1.什么是RabbitMQ?
RabbitMQ是一款使用Erlang语言开发的,基于AMQP协议的消息中间件,作为一款优秀的消息系统,RabbitMQ有高并发、可扩展等优势,并适用于大型系统中各个模块之间的通信。
RabbitMQ的特点为:
持久化、传输确认、发布确认等功能保证消息可靠
支持多种消息分发模式,处理更加灵活
提供可视化管理界面,使用方便
支持集群部署,保证服务高可用
2.RabbitMQ环境搭建
version: '3'services:rabbitmq:image: registry.cn-hangzhou.aliyuncs.com/zhengqing/rabbitmq:3.7.8-management # 原镜像`rabbitmq:3.7.8-management` 【 注:该版本包含了web控制页面 】container_name: rabbitmq # 容器名为'rabbitmq'hostname: my-rabbitrestart: unless-stopped # 指定容器退出后的重启策略为始终重启,但是不考虑在Docker守护进程启动时就已经停止了的容器environment: # 设置环境变量,相当于docker run命令中的-eTZ: Asia/ShanghaiLANG: en_US.UTF-8RABBITMQ_DEFAULT_VHOST: my_vhost # 主机名RABBITMQ_DEFAULT_USER: admin # 登录账号RABBITMQ_DEFAULT_PASS: admin # 登录密码volumes: # 数据卷挂载路径设置,将本机目录映射到容器目录- "./rabbitmq/data:/var/lib/rabbitmq"ports: # 映射端口- "5672:5672"- "15672:15672"
运行
docker-compose -f docker-compose-rabbitmq.yml -p rabbitmq up -d
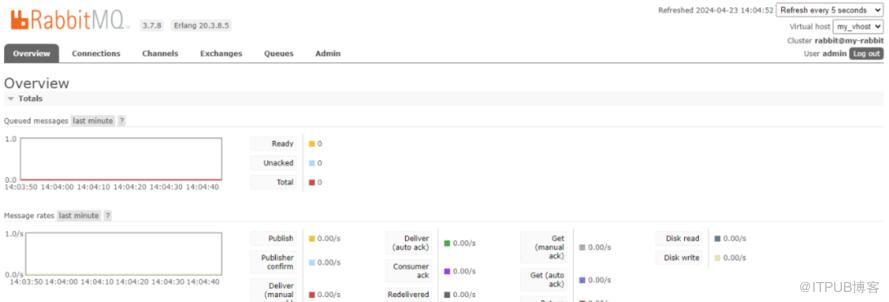
web管理端:http://127.0.0.1:15672 登录账号密码:admin/admin
3.代码工程
实验目的:实现通过rabbitmq发送和接收消息
pom.xml
<project xmlns="http://maven.apache.org/POM/4.0.0"xmlns:xsi="http://www.w3.org/2001/XMLSchema-instance"xsi:schemaLocation="http://maven.apache.org/POM/4.0.0 http://maven.apache.org/xsd/maven-4.0.0.xsd"><parent><artifactId>springboot-demo</artifactId><groupId>com.et</groupId><version>1.0-SNAPSHOT</version></parent><modelVersion>4.0.0</modelVersion><artifactId>rabbitmq</artifactId><properties><maven.compiler.source>8</maven.compiler.source><maven.compiler.target>8</maven.compiler.target></properties><dependencies><dependency><groupId>org.springframework.boot</groupId><artifactId>spring-boot-starter-web</artifactId></dependency><dependency><groupId>org.springframework.boot</groupId><artifactId>spring-boot-autoconfigure</artifactId></dependency><dependency><groupId>org.springframework.boot</groupId><artifactId>spring-boot-starter-test</artifactId><scope>test</scope></dependency><dependency><groupId>org.springframework.boot</groupId><artifactId>spring-boot-starter-amqp</artifactId></dependency><dependency><groupId>org.springframework.boot</groupId><artifactId>spring-boot-starter-amqp</artifactId></dependency><dependency><groupId>org.projectlombok</groupId><artifactId>lombok</artifactId></dependency></dependencies></project>
application.properties
server.port=8088spring.rabbitmq.host=localhostspring.rabbitmq.port=5672spring.rabbitmq.username=adminspring.rabbitmq.password=adminspring.rabbitmq.virtual-host=my_vahost
config
简单使用
package com.et.rabbitmq.config;import org.springframework.amqp.core.Queue;import org.springframework.context.annotation.Bean;import org.springframework.context.annotation.Configuration;@Configurationpublic class RabbitConfig {@Beanpublic Queue Queue() {return new Queue("hello");}}
topic 是RabbitMQ中最灵活的一种方式,可以根据routing_key自由的绑定不同的队列 首先对topic规则配置,这里使用两个队列来测试
package com.et.rabbitmq.config;import org.springframework.amqp.core.Binding;import org.springframework.amqp.core.BindingBuilder;import org.springframework.amqp.core.Queue;import org.springframework.amqp.core.TopicExchange;import org.springframework.context.annotation.Bean;import org.springframework.context.annotation.Configuration;public class TopicRabbitConfig {public final static String TOPIC_ONE = "topic.one";public final static String TOPIC_TWO = "topic.two";public final static String TOPIC_EXCHANGE = "topicExchange";public Queue queue_one(){return new Queue(TOPIC_ONE);}public Queue queue_two(){return new Queue(TOPIC_TWO);}TopicExchange exchange(){return new TopicExchange(TOPIC_EXCHANGE);}Binding bindingExchangeOne(Queue queue_one, TopicExchange exchange){return BindingBuilder.bind(queue_one).to(exchange).with("topic.one");}Binding bindingExchangeTwo(Queue queue_two, TopicExchange exchange){//# 表示零个或多个词//* 表示一个词return BindingBuilder.bind(queue_two).to(exchange).with("topic.#");}}
Fanout 就是我们熟悉的广播模式或者订阅模式,给Fanout交换机发送消息,绑定了这个交换机的所有队列都收到这个消息。
package com.et.rabbitmq.config;import org.springframework.amqp.core.Binding;import org.springframework.amqp.core.BindingBuilder;import org.springframework.amqp.core.FanoutExchange;import org.springframework.amqp.core.Queue;import org.springframework.context.annotation.Bean;import org.springframework.context.annotation.Configuration;@Configurationpublic class FanoutRabbitConfig {@Beanpublic Queue AMessage() {return new Queue("fanout.A");}@Beanpublic Queue BMessage() {return new Queue("fanout.B");}@Beanpublic Queue CMessage() {return new Queue("fanout.C");}@BeanFanoutExchange fanoutExchange() {return new FanoutExchange("fanoutExchange");}@BeanBinding bindingExchangeA(Queue AMessage, FanoutExchange fanoutExchange) {return BindingBuilder.bind(AMessage).to(fanoutExchange);}@BeanBinding bindingExchangeB(Queue BMessage, FanoutExchange fanoutExchange) {return BindingBuilder.bind(BMessage).to(fanoutExchange);}@BeanBinding bindingExchangeC(Queue CMessage, FanoutExchange fanoutExchange) {return BindingBuilder.bind(CMessage).to(fanoutExchange);}}
receiver
package com.et.rabbitmq.receiver;import lombok.extern.slf4j.Slf4j;import org.springframework.amqp.rabbit.annotation.RabbitHandler;import org.springframework.amqp.rabbit.annotation.RabbitListener;import org.springframework.messaging.handler.annotation.Payload;import org.springframework.stereotype.Component;import org.springframework.stereotype.Service;@Service@Slf4jpublic class HelloReceiver {@RabbitListener(queues = "hello")public void process(String hello) {System.out.println("Receiver : " + hello);}@RabbitListener(queues = {"topic.one"})public void receiveTopic1(@Payload String fileBody) {log.info("topic1:" + fileBody);}@RabbitListener(queues = {"topic.two"})public void receiveTopic2(@Payload String fileBody) {log.info("topic2:" + fileBody);}@RabbitListener(queues = {"fanout.A"})public void fanoutA(@Payload String fileBody) {log.info("fanoutA:" + fileBody);}@RabbitListener(queues = {"fanout.B"})public void fanoutB(@Payload String fileBody) {log.info("fanoutB:" + fileBody);}@RabbitListener(queues = {"fanout.C"})public void fanoutC(@Payload String fileBody) {log.info("fanoutC:" + fileBody);}}
sender
package com.et.rabbitmq.sender;import org.springframework.amqp.core.AmqpTemplate;import org.springframework.beans.factory.annotation.Autowired;import org.springframework.stereotype.Component;import java.util.Date;public class HelloSender {private AmqpTemplate rabbitTemplate;public void send() {String context = "hello " + new Date();System.out.println("Sender : " + context);this.rabbitTemplate.convertAndSend("hello", context);}}
package com.et.rabbitmq.sender;import com.et.rabbitmq.config.TopicRabbitConfig;import org.springframework.amqp.core.AmqpTemplate;import org.springframework.beans.factory.annotation.Autowired;import org.springframework.stereotype.Component;public class TopicSender {private AmqpTemplate rabbitTemplate;//两个消息接受者都可以收到public void send_one() {String context = "Hi, I am message one";System.out.println("Sender : " + context);this.rabbitTemplate.convertAndSend(TopicRabbitConfig.TOPIC_EXCHANGE,"topic.one",context);}//只有TopicReceiverTwo都可以收到public void send_two() {String context = "Hi, I am message two";System.out.println("Sender : " + context);this.rabbitTemplate.convertAndSend(TopicRabbitConfig.TOPIC_EXCHANGE,"topic.two",context);}}
DemoApplication.java
package com.et.quartz;import org.springframework.boot.SpringApplication;import org.springframework.boot.autoconfigure.SpringBootApplication;public class DemoApplication {public static void main(String[] args) {SpringApplication.run(DemoApplication.class, args);}}
以上只是一些关键代码,所有代码请参见下面代码仓库
代码仓库
https://github.com/Harries/springboot-demo
4.测试
简单使用
public void hello() throws Exception {helloSender.send();Thread.sleep(50000);}
Topic Exchange
public void topicOne() throws Exception {topicSender.send_one();Thread.sleep(50000);}public void topicTwo() throws Exception {topicSender.send_two();Thread.sleep(50000);}
Fanout Exchange
public void sendFanout() throws InterruptedException {String context = "hi, fanout msg ";System.out.println("Sender : " + context);this.rabbitTemplate.convertAndSend("fanoutExchange","", context);Thread.sleep(50000);}
5.参考连接
https://www.rabbitmq.com/
https://spring.io/projects/spring-amqp
原文作者:HBLOG;如有侵权,请联系管理员删除。

请登录后发表评论
登录
全部评论
