1.背景
上次发了这篇文章《Spring Boot集成Shiro快速入门Demo》后,有网友“just.blue”后台反馈集成redis有点问题,今天特地把集成过程发出来
2.为什么要使用cache
用来减轻数据库的访问压力,从而提升查询效率。
3.Shiro使用Redis做缓存
redis环境准备
参照代码工程li面redis模块里面docker,按照要求启动即可
引入pom,xml
<!-- https://mvnrepository.com/artifact/org.springframework.boot/spring-boot-starter-data-redis --><dependency><groupId>org.springframework.boot</groupId><artifactId>spring-boot-starter-data-redis</artifactId></dependency>
redis配置
spring:redis:database: 0port: 6379host: 127.0.0.1password: 123456timeout=3000:jedis:pool:: 8: 8: -1: 0
cache接口实现
创建RedisCacheManager实现CacheManager接口
package com.et.shiro.cache;import org.apache.shiro.cache.Cache;import org.apache.shiro.cache.CacheException;import org.apache.shiro.cache.CacheManager;public class RedisCacheManager implements CacheManager {public <K, V> Cache<K, V> getCache(String cacheKey) throws CacheException {return new RedisCache<>(cacheKey);}}
创建RedisCache实现Cache接口
package com.et.shiro.cache;import org.apache.shiro.cache.Cache;import org.apache.shiro.cache.CacheException;import org.springframework.data.redis.core.RedisTemplate;import org.springframework.data.redis.serializer.StringRedisSerializer;import java.util.Collection;import java.util.Set;public class RedisCache<K, V> implements Cache<K, V> {private String cacheName;public RedisCache() {}public RedisCache(String cacheName) {this.cacheName = cacheName;}private RedisTemplate getRedisTemplate() {RedisTemplate redisTemplate = (RedisTemplate) ApplicationContextUtil.getBean("redisTemplate");redisTemplate.setKeySerializer(new StringRedisSerializer());redisTemplate.setHashKeySerializer(new StringRedisSerializer());return redisTemplate;}public V get(K k) throws CacheException {return (V) getRedisTemplate().opsForHash().get(this.cacheName,k.toString());}public V put(K k, V v) throws CacheException {getRedisTemplate().opsForHash().put(this.cacheName,k.toString(), v);return null;}public V remove(K k) throws CacheException {return (V) getRedisTemplate().opsForHash().delete(this.cacheName,k.toString());}public void clear() throws CacheException {getRedisTemplate().opsForHash().delete(this.cacheName);}public int size() {return getRedisTemplate().opsForHash().size(this.cacheName).intValue();}public Set<K> keys() {return getRedisTemplate().opsForHash().keys(this.cacheName);}public Collection<V> values() {return getRedisTemplate().opsForHash().values(this.cacheName);}}
获取bean工具类
package com.et.shiro.cache;import org.springframework.beans.BeansException;import org.springframework.context.ApplicationContext;import org.springframework.context.ApplicationContextAware;import org.springframework.stereotype.Component;public class ApplicationContextUtil implements ApplicationContextAware {private static ApplicationContext applicationContext;public void setApplicationContext(ApplicationContext applicationContext) throws BeansException {this.applicationContext = applicationContext;}public static <T> T getBean(String beanName) {return (T)applicationContext.getBean(beanName);}public static <T> T getBean(Class<T> className) {return applicationContext.getBean(className);}}
由于自定义realm中认证所需要的盐值内部并没有实现序列化接口,所以我们需要自己定一个MyByteSource继承SimpleByteSource并实现Serializable接口
package com.et.shiro.config;import org.apache.shiro.util.SimpleByteSource;import java.io.Serializable;public class MyByteSource extends SimpleByteSource implements Serializable {public MyByteSource(String string) {super(string);}}
在自定义的Realm中需要在认证的方法中,改写salt的处理。
@Overrideprotected AuthenticationInfo doGetAuthenticationInfo(AuthenticationToken token)throws AuthenticationException {System.out.println("MyShiroRealm.doGetAuthenticationInfo()");String username = (String)token.getPrincipal();System.out.println(token.getCredentials());//query user by username//in here ,you can cache some data for efficientUserInfo userInfo = userInfoService.findByUsername(username);System.out.println("----->>userInfo="+userInfo);if(userInfo == null){return null;}SimpleAuthenticationInfo authenticationInfo = new SimpleAuthenticationInfo(userInfo, //usernameuserInfo.getPassword(), //passwordnew MyByteSource(userInfo.getCredentialsSalt()),//ByteSource.Util.bytes(userInfo.getCredentialsSalt()),//salt=username+saltgetName() //realm name);return authenticationInfo;}
注意实体类(角色类,用户类,权限类)要记得实现Serializable接口 最后在Shiro配置类中开启缓存,使用我们自己定义的RedisManager
public MyShiroRealm myShiroRealm(){MyShiroRealm myShiroRealm = new MyShiroRealm();myShiroRealm.setCredentialsMatcher(hashedCredentialsMatcher());// 设置解密规则// 开启全局缓存myShiroRealm.setCachingEnabled(true);// 开启认证缓存myShiroRealm.setAuthenticationCachingEnabled(true);// 设置认证缓存管理的名字myShiroRealm.setAuthenticationCacheName("authenticationCache");// 开启授权缓存管理myShiroRealm.setAuthorizationCachingEnabled(true);// 设置授权缓存管理的名字myShiroRealm.setAuthorizationCacheName("authorizationCache");// 开启Redis缓存myShiroRealm.setCacheManager(new RedisCacheManager());return myShiroRealm;}
以上只是一些关键代码,所有代码请参见下面代码仓库
代码仓库
https://github.com/Harries/springboot-demo
4.测试
启动项目,访问http://127.0.0.1:8088/userInfo/userAdd,会跳转到登录页,输入admin 123456,查看redis是否缓存了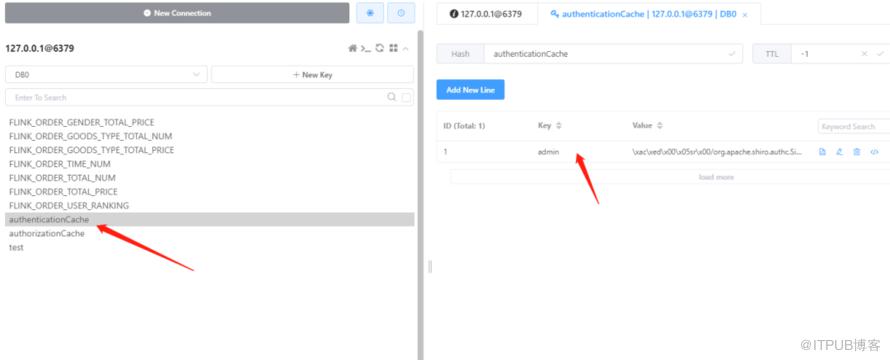 登录用户,第一次会从数据库中查询,并通过RedisTemplate的put方法将用户信息装入缓存,下次再刷新首页就会从redis中查询权限,授权等信息。退出时会调用RedisTemplate中的remove方法清除向对应的用户缓存。
5.引用
http://www.liuhaihua.cn/archives/710596.html
https://www.cnblogs.com/dataoblogs/p/14121884.html
原文作者:HBLOG;如有侵权,请联系管理员删除。

