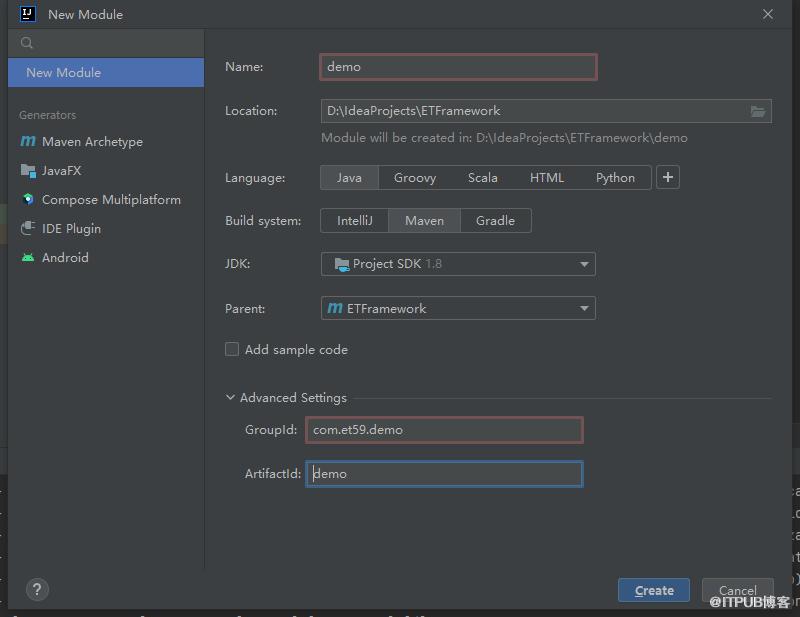
一.创建springboot模块
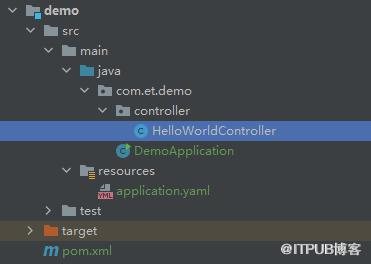
二.工程搭建
1.pom文件 引入最小依赖
<project xmlns="http://maven.apache.org/POM/4.0.0"xmlns:xsi="http://www.w3.org/2001/XMLSchema-instance"xsi:schemaLocation="http://maven.apache.org/POM/4.0.0 http://maven.apache.org/xsd/maven-4.0.0.xsd"><parent><artifactId>springboot-demo</artifactId><groupId>com.et</groupId><version>1.0-SNAPSHOT</version></parent><modelVersion>4.0.0</modelVersion><groupId>com.et59.demo</groupId><artifactId>demo</artifactId><properties><maven.compiler.source>8</maven.compiler.source><maven.compiler.target>8</maven.compiler.target></properties><dependencies><dependency><groupId>org.springframework.boot</groupId><artifactId>spring-boot-starter-web</artifactId></dependency><dependency><groupId>org.springframework.boot</groupId><artifactId>spring-boot-autoconfigure</artifactId></dependency></dependencies></project>
2.编写返回HelloWorld的Controller
package com.et.demo.controller;import java.util.HashMap;import java.util.Map;import org.springframework.stereotype.Controller;import org.springframework.web.bind.annotation.RequestMapping;import org.springframework.web.bind.annotation.ResponseBody;@Controllerpublic class HelloWorldController {@RequestMapping("/hello")@ResponseBodypublic Map<String, Object> showHelloWorld(){Map<String, Object> map = new HashMap<>();map.put("msg", "HelloWorld");return map;}}
3.配置文件
application.yaml
server:port: 8088
4.应用启动类
package com.et.demo;import org.springframework.boot.SpringApplication;import org.springframework.boot.autoconfigure.SpringBootApplication;public class DemoApplication {public static void main(String[] args) {SpringApplication.run(DemoApplication.class, args);}}
三.验证服务是否正常
3.1启动服务

3.2打开浏览器验证
输入url http://127.0.0.1:8088/hello response:
{"msg":"HelloWorld"}
总结
这就是SpringBoot的helloworld的入门程序,是不是特别简单,相比以前的开发少了很多的配置,只需要在pom.xml中添加一个web的启动器即可完成所有配置
原文作者:HBLOG;如有侵权,请联系管理员删除。

请登录后发表评论
登录
全部评论
