1.为何要使用 Google 账号登录
借助“使用 Google 账号登录”功能,您可通过安全性备受信赖的 Google 账号,轻松快捷地在网上登录和注册网站与应用。该功能可消除您对密码的依赖,从而降低使用密码带来的困扰和安全风险。
2.环境准备
登录 Google 开发者中心:Google 开发者中心
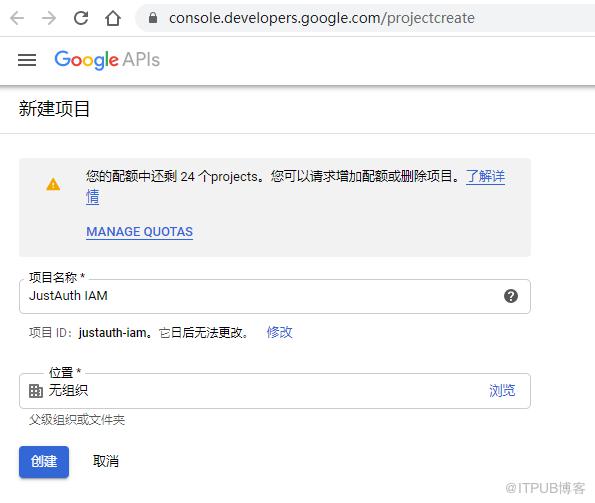
点击新建项目:新建项目
确保在第二步新建的项目下,选择“API 和服务”-“凭据”
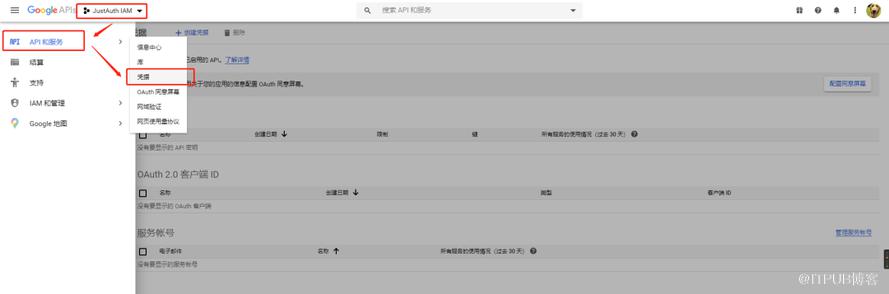
-
创建凭据

注:如果仅作测试使用,则可以直接忽略这个验证操作,直接进入下一步,否则的话,建议按照提示进行验证。
这个时候我们直接再次访问 “凭据” - “创建凭据” - “OAuth 客户端 ID”,选择“Web 应用”,然后按照提示填入内容
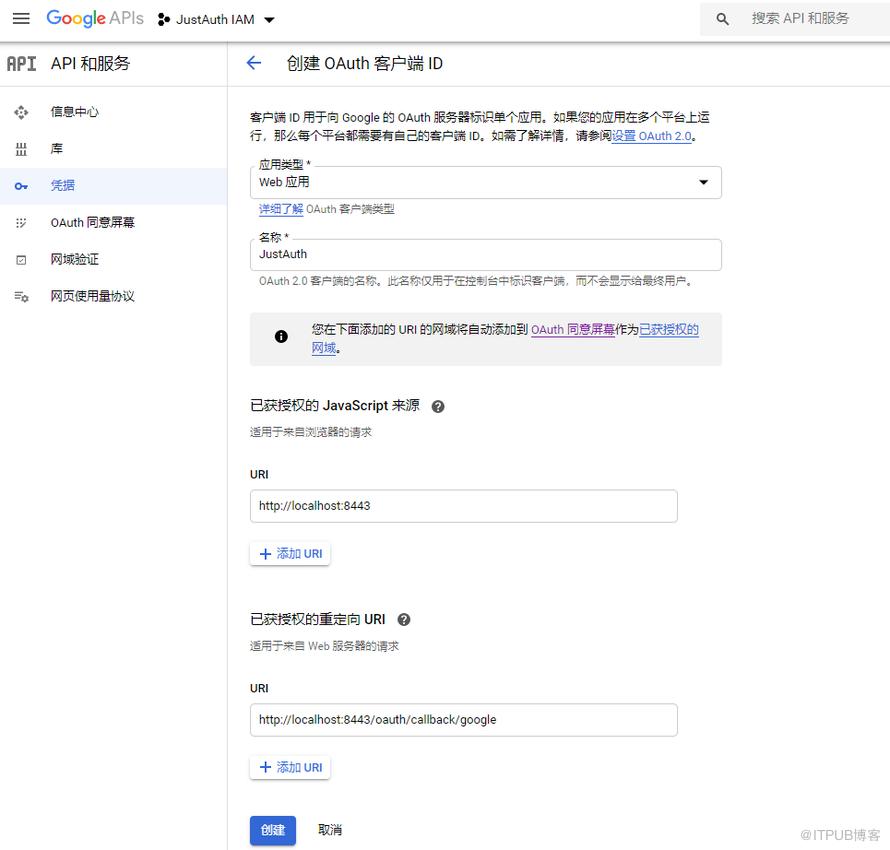 保存信息后,会弹出密钥和ID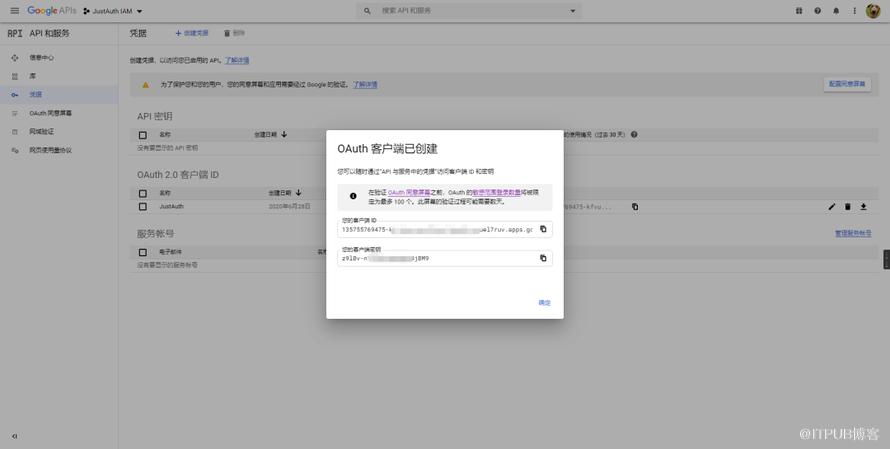
创建凭据时,选择 “OAuth 客户端 ID”
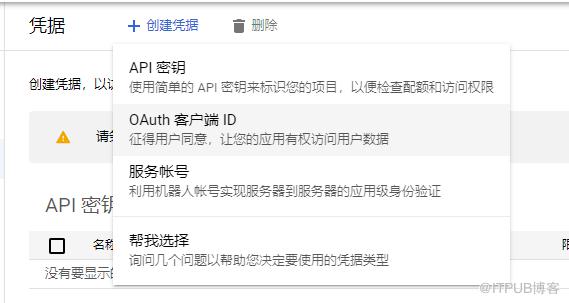
首次创建凭据时系统会提示“如需创建 OAuth 客户端 ID,您必须先在同意屏幕上设置产品名称”,根据提示进行操作

选择 “User Type”
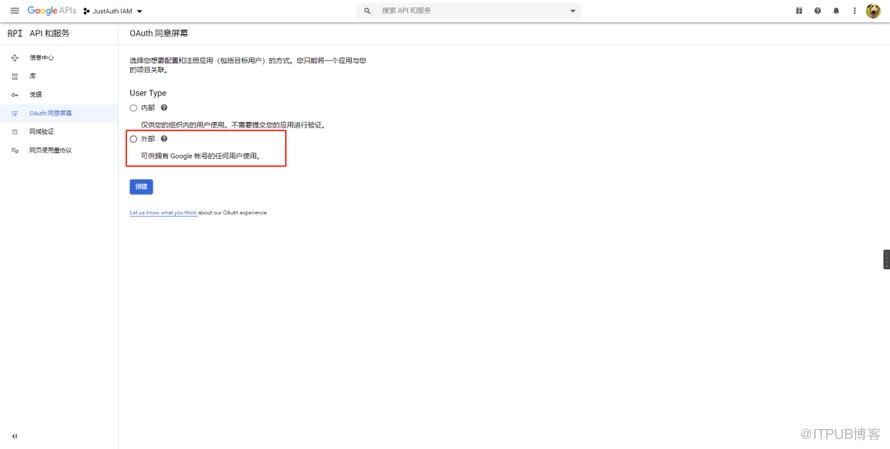 这一步根据项目具体的用途进行选择,一般选择“外部”即可
以上内容操作完成后,接下来就需要配置“OAuth 同意屏幕”的详情

第四步保存后,会提示需要验证应用,如下

记录以下三个信息:Client ID、Client Secret和回调地址,后面我们会用到。
重要提示
“应用密钥”可保护你应用程序的安全,因此请确保其不会泄露!也不要与任何人共享你的“应用密钥”!!!
3.代码工程
实验目的
实现Google登陆
pom.xml
<project xmlns="http://maven.apache.org/POM/4.0.0"xmlns:xsi="http://www.w3.org/2001/XMLSchema-instance"xsi:schemaLocation="http://maven.apache.org/POM/4.0.0 http://maven.apache.org/xsd/maven-4.0.0.xsd"><parent><artifactId>socia-login</artifactId><groupId>com.et</groupId><version>1.0-SNAPSHOT</version></parent><modelVersion>4.0.0</modelVersion><artifactId>googlelogin</artifactId><properties><maven.compiler.source>8</maven.compiler.source><maven.compiler.target>8</maven.compiler.target></properties><dependencies><dependency><groupId>org.springframework.boot</groupId><artifactId>spring-boot-starter-web</artifactId></dependency><dependency><groupId>org.springframework.boot</groupId><artifactId>spring-boot-autoconfigure</artifactId></dependency><dependency><groupId>org.springframework.boot</groupId><artifactId>spring-boot-starter-test</artifactId><scope>test</scope></dependency><dependency><groupId>me.zhyd.oauth</groupId><artifactId>JustAuth</artifactId><version>1.16.4</version></dependency><dependency><groupId>cn.hutool</groupId><artifactId>hutool-http</artifactId><version>5.1.0</version></dependency><dependency><groupId>cn.hutool</groupId><artifactId>hutool-crypto</artifactId><version>5.1.0</version><scope>provided</scope></dependency></dependencies></project>
controller
package com.et.google.controller;import com.xkcoding.http.config.HttpConfig;import me.zhyd.oauth.config.AuthConfig;import me.zhyd.oauth.request.AuthGoogleRequest;import me.zhyd.oauth.model.AuthCallback;import me.zhyd.oauth.request.AuthRequest;import me.zhyd.oauth.utils.AuthStateUtils;import org.springframework.beans.factory.annotation.Value;import org.springframework.web.bind.annotation.PathVariable;import org.springframework.web.bind.annotation.RequestMapping;import org.springframework.web.bind.annotation.RestController;import javax.servlet.http.HttpServletResponse;import java.io.IOException;import java.net.InetSocketAddress;import java.net.Proxy;public class RestAuthController {private String clientid;private String clientsecret;private String redirecturi;public void renderAuth(HttpServletResponse response) throws IOException {AuthRequest authRequest = getAuthRequest();response.sendRedirect(authRequest.authorize(AuthStateUtils.createState()));}public Object login(AuthCallback callback) {AuthRequest authRequest = getAuthRequest();return authRequest.login(callback);}private AuthRequest getAuthRequest() {return new AuthGoogleRequest(AuthConfig.builder().clientId(clientid).clientSecret(clientsecret).redirectUri(redirecturi).httpConfig(HttpConfig.builder().timeout(15000)//proxy host and port.proxy(new Proxy(Proxy.Type.HTTP, new InetSocketAddress("127.0.0.1", 1087))).build()).build());}}
application.yaml
server:port: 8088google:: xxxxx: xxxx: http://127.0.0.1:8088/oauth/callback
以上只是一些关键代码,所有代码请参见下面代码仓库
代码仓库
https://github.com/Harries/springboot-demo(social-login/google)
4.测试
启动spring Boot 应用
访问http://127.0.0.1:8088/oauth/render,跳转到Google授权页面
授权完之后会回掉http://127.0.0.1:8088/oauth/callback
5.引用
https://www.justauth.cn/guide/oauth/google/#_1-1-%E5%88%9B%E5%BB%BA%E7%AC%AC%E4%B8%89%E6%96%B9%E6%8E%88%E6%9D%83%E5%BA%94%E7%94%A8

如果觉得文章对您有帮助的话,请帮忙关注/留言/转发!另外最近写的一个《Spring Boot快速入门》专栏,大家可以去看看,对新手友好,极简入门。没有冗余的理论知识,直接上干货代码。方便在实际项目中快速应用!
原文作者:HBLOG;如有侵权,请联系管理员删除。

