lstio
Istio 版本的支持状态
由于我们部署的 Kubernetes 为1.22版本,通过上面的表可以知道,istio 支持的版本为 1.11。
没有已知漏洞披露(CVEs)的版本
下载istio-1.11
下载指定版本通过ISTIO_VERSION和OS_ARCH指定,不指定默认下载最新版本,当前最新版本为1.11.1
ISTIO_VERSION=1.11.1
OS_ARCH=amd64
[root@master1 kube-prometheus-0.10.0]# wget https://github.com/istio/istio/releases/download/${ISTIO_VERSION}/istio-${ISTIO_VERSION}-linux-${OS_ARCH}.tar.gz
--2022-07-11 16:37:36--  https://github.com/istio/istio/releases/download/1.11.1/istio-1.11.1-linux-amd64.tar.gz
...
HTTP request sent, awaiting response... 200 OK
Length: 24028669 (23M) [application/octet-stream]
Saving to: ‘istio-1.11.1-linux-amd64.tar.gz’

100%[=====================================================================================>] 24,028,669  27.0KB/s   in 8m 22s

2022-07-11 16:46:01 (46.7 KB/s) - ‘istio-1.11.1-linux-amd64.tar.gz’ saved [24028669/24028669]

[root@master1 kube-prometheus-0.10.0]# tar xf istio-${ISTIO_VERSION}-linux-${OS_ARCH}.tar.gz -C /usr/local
[root@master1 kube-prometheus-0.10.0]# tar xf istio-${ISTIO_VERSION}-linux-${OS_ARCH}.tar.gz --strip-components 2  -C /usr/local/bin istio-${ISTIO_VERSION}/bin/istioctl
[root@master1 kube-prometheus-0.10.0]#
根据官方的介绍有3种安装方式:istioct安装,helm安装,operator安装,使用operator安装依赖istioctl
另外测试发现operator安装的默认的镜像在grc.io仓库,版本为1.4-dev
使用operator安装istio
部署Istio Operator
istio-operator默认安装在istio-operator名称空间下
[root@master1 kube-prometheus-0.10.0]# istioctl operator init
Installing operator controller in namespace: istio-operator using image: docker.io/istio/operator:1.11.1
Operator controller will watch namespaces: istio-system
- Processing resources for Istio operator. Waiting for Deployment/istio-operator/istio-operator
✔ Istio operator installed
✔ Installation complete
[root@master1 kube-prometheus-0.10.0]#
安装istio
kubectl create ns istio-system
kubectl apply -f - <<EOF
apiVersion: install.istio.io/v1alpha1
kind: IstioOperator
metadata:
  namespace: istio-system
  name: example-istiocontrolplane
spec:
  profile: demo
EOF
istiooperator.install.istio.io/example-istiocontrolplane created
Istio Operator控制器在创建IstioOperator资源的90秒内启动Istio的安装。Istio安装过程将在120秒内完成。
检查pods
[root@master1 kube-prometheus-0.10.0]# kubectl get po -n istio-system
NAME                                   READY   STATUS    RESTARTS   AGE
istio-egressgateway-54899cb8f9-dq4dr   1/1     Running   0          3m10s
istio-ingressgateway-776c8cfc-phrrz    1/1     Running   0          3m10s
istiod-dcf548bfd-n2l2r                 1/1     Running   0          4m54s
[root@master1 kube-prometheus-0.10.0]#
检查services
[root@master1 kube-prometheus-0.10.0]# kubectl get svc -n istio-system
NAME                   TYPE           CLUSTER-IP       EXTERNAL-IP   PORT(S)                   AGE
istio-egressgateway    ClusterIP      10.102.166.62    <none>        80/TCP,443/TCP                   3m27s
istio-ingressgateway   LoadBalancer   10.111.230.145   10.10.1.151   15021:31353/TCP,80:31336/TCP,443:32479/TCP,31400:30264/TCP,15443:31860/TCP   3m26s
istiod                 ClusterIP      10.111.196.130   <none>        15010/TCP,15012/TCP,443/TCP,15014/TCP                   5m10s
[root@master1 kube-prometheus-0.10.0]#
使用istioctl安装
不同profile的功能列表:安装配置文件
查看预设的profile
istioctl profile list
Istio configuration profiles:
    default
    demo
    empty
    external
    minimal
    openshift
    preview
    remote
通过预设的profile进行安装
istioctl install --set profile=demo
查看profile的配置
istioctl profile dump default
istioctl自定义安装
istioctl install --set profile=demo \
  --set values.global.imagePullPolicy=IfNotPresent \
  --set meshConfig.outboundTrafficPolicy.mode=ALLOW_ANY

This will install the Istio 1.11.1 demo profile with ["Istio core" "Istiod" "Ingress gateways" "Egress gateways"] components into the cluster. Proceed? (y/N) y
✔ Istio core installed
✔ Istiod installed
✔ Egress gateways installed
✔ Ingress gateways installed
✔ Installation complete
Thank you for installing Istio 1.11.  Please take a few minutes to tell us about your install/upgrade experience!  https://forms.gle/kWULBRjUv7hHci7T6
卸载istio
istioctl x uninstall --purge
新手建议直接使用default,如果想要体验完整功能则建议使用demo。
istioctl manifest apply --set profile=demo

This will install the Istio 1.11.1 demo profile with ["Istio core" "Istiod" "Ingress gateways" "Egress gateways"] components into the cluster. Proceed? (y/N) y
✔ Istio core installed
✔ Istiod installed
✔ Egress gateways installed
✔ Ingress gateways installed
✔ Installation complete
Thank you for installing Istio 1.11.  Please take a few minutes to tell us about your install/upgrade experience!  https://forms.gle/kWULBRjUv7hHci7T6
检查运行状态
kubectl get po -n istio-system
输出如下
NAME                                    READY   STATUS    RESTARTS   AGE
istio-egressgateway-6f9d4548b-przfm     1/1     Running   0          70s
istio-ingressgateway-5dc645f586-c8z6s   1/1     Running   0          70s
istiod-79b65d448f-wflf5                 1/1     Running   0          100s
查看svc
kubectl get svc -n istio-system
NAME                   TYPE           CLUSTER-IP       EXTERNAL-IP   PORT(S)                                                                      AGE
istio-egressgateway    ClusterIP      10.100.153.42    <none>        80/TCP,443/TCP                                                               80s
istio-ingressgateway   LoadBalancer   10.110.200.116   <pending>     15021:30161/TCP,80:31197/TCP,443:30715/TCP,31400:30986/TCP,15443:30867/TCP   80s
istiod                 ClusterIP      10.106.31.251    <none>        15010/TCP,15012/TCP,443/TCP,15014/TCP                                        111s
修改为NodePort
kubectl patch -n istio-system svc istio-ingressgateway  -p '{"spec": {"type": "NodePort"}}'
service/istio-ingressgateway patched
再次查看
[root@master1 kube-prometheus-0.10.0]# kubectl get svc -n istio-system
NAME                   TYPE        CLUSTER-IP       EXTERNAL-IP   PORT(S)                AGE
istio-egressgateway    ClusterIP   10.102.166.62    <none>        80/TCP,443/TCP                4m42s
istio-ingressgateway   NodePort    10.111.230.145   <none>        15021:31353/TCP,80:31336/TCP,443:32479/TCP,31400:30264/TCP,15443:31860/TCP   4m41s
istiod                 ClusterIP   10.111.196.130   <none>        15010/TCP,15012/TCP,443/TCP,15014/TCP                6m25s
[root@master1 kube-prometheus-0.10.0]#
部署官方示例-bookinfo
https://istio.io/latest/zh/docs/examples/bookinfo/#determine-the-ingress-ip-and-port
Bookinfo 应用分为四个单独的微服务:
productpage: 这个微服务会调用details和reviews两个微服务,用来生成页面。details: 这个微服务中包含了书籍的信息。reviews: 这个微服务中包含了书籍相关的评论。它还会调用ratings微服务。ratings: 这个微服务中包含了由书籍评价组成的评级信息。
reviews 微服务有 3 个版本:
v1 版本不会调用
ratings服务。v2 版本会调用
ratings服务,并使用 1 到 5 个黑色星形图标来显示评分信息。v3 版本会调用
ratings服务,并使用 1 到 5 个红色星形图标来显示评分信息。
开启自动注入功能
[root@master1 kube-prometheus-0.10.0]# kubectl label namespace default istio-injection=enabled
namespace/default labeled
[root@master1 kube-prometheus-0.10.0]#
部署bookinfo
[root@master1 kube-prometheus-0.10.0]# cd /usr/local/istio-${ISTIO_VERSION}
[root@master1 istio-1.11.1]# kubectl apply -f samples/bookinfo/platform/kube/bookinfo.yaml
service/details created
serviceaccount/bookinfo-details created
deployment.apps/details-v1 created
service/ratings created
serviceaccount/bookinfo-ratings created
deployment.apps/ratings-v1 created
service/reviews created
serviceaccount/bookinfo-reviews created
deployment.apps/reviews-v1 created
deployment.apps/reviews-v2 created
deployment.apps/reviews-v3 created
service/productpage created
serviceaccount/bookinfo-productpage created
deployment.apps/productpage-v1 created
[root@master1 istio-1.11.1]#
检查部署状态
kubectl get po -l security.istio.io/tlsMode=istio
NAME                              READY   STATUS    RESTARTS   AGE
details-v1-79f774bdb9-twftn       2/2     Running   0          2m22s
productpage-v1-6b746f74dc-2qx6f   2/2     Running   0          2m21s
ratings-v1-b6994bb9-nsx7s         2/2     Running   0          2m22s
reviews-v1-545db77b95-kzqh2       2/2     Running   0          2m22s
reviews-v2-7bf8c9648f-fwqg9       2/2     Running   0          2m22s
reviews-v3-84779c7bbc-jh78x       2/2     Running   0          2m22s

[root@master1 istio-1.11.1]# kubectl get svc
NAME          TYPE        CLUSTER-IP       EXTERNAL-IP   PORT(S)        AGE
details       ClusterIP   10.108.125.226   <none>        9080/TCP       39h
kubernetes    ClusterIP   10.96.0.1        <none>        443/TCP        5d18h
myapp         ClusterIP   10.107.46.54     10.10.1.150   80/TCP         4d18h
nginx         NodePort    10.96.135.205    <none>        80:32622/TCP   5d17h
productpage   ClusterIP   10.109.2.60      <none>        9080/TCP       39h
ratings       ClusterIP   10.98.99.204     <none>        9080/TCP       39h
reviews       ClusterIP   10.110.233.104   <none>        9080/TCP       39h
[root@master1 istio-1.11.1]#
pod测试
[root@master1 istio-1.11.1]# kubectl exec -it $(kubectl get pod -l app=ratings -o jsonpath='{.items[0].metadata.name}') -c ratings -- curl productpage:9080/productpage | grep -o "<title>.*</title>"
<title>Simple Bookstore App</title>
[root@master1 istio-1.11.1]#
部署gateway
如果需要对外提供服务,就需要创建gateway
[root@master1 istio-1.11.1]# STIO_VERSION=1.11.1
[root@master1 istio-1.11.1]# OS_ARCH=amd64
[root@master1 istio-1.11.1]# cd /usr/local/istio-${ISTIO_VERSION}
[root@master1 istio-1.11.1]# kubectl apply -f samples/bookinfo/networking/bookinfo-gateway.yaml
gateway.networking.istio.io/bookinfo-gateway created
virtualservice.networking.istio.io/bookinfo created
[root@master1 istio-1.11.1]#
[root@master1 istio-1.11.1]# kubectl get virtualservice
NAME       GATEWAYS               HOSTS   AGE
bookinfo   ["bookinfo-gateway"]   ["*"]   5m24s
[root@master1 istio-1.11.1]#
获取访问地址
因为使用的是NodePort,host是集群中的任意一台
[root@master1 istio-1.11.1]# export INGRESS_HOST=10.10.1.7
[root@master1 istio-1.11.1]# export INGRESS_PORT=$(kubectl -n istio-system get service istio-ingressgateway -o jsonpath='{.spec.ports[?(@.name=="http2")].nodePort}')
[root@master1 istio-1.11.1]# export SECURE_INGRESS_PORT=$(kubectl -n istio-system get service istio-ingressgateway -o jsonpath='{.spec.ports[?(@.name=="https")].nodePort}')
[root@master1 istio-1.11.1]# echo $ESS_HOST
10.10.1.7
[root@master1 istio-1.11.1]# echo $INGRESS_PORT
31336
[root@master1 istio-1.11.1]# echo $SECURE_INGRESS_PORT
32479
[root@master1 istio-1.11.1]#


# 设置GATEWAY_URL
export GATEWAY_URL=$INGRESS_HOST:$INGRESS_PORT

[root@master1 istio-1.11.1]# echo ${GATEWAY_URL}
10.10.1.7:31336
[root@master1 istio-1.11.1]#

# 确认可以从集群外部访问
curl -s http://${GATEWAY_URL}/productpage | grep -o "<title>.*</title>"
<title>Simple Bookstore App</title>
查看仪表盘
Istio 和几个遥测应用做了集成。 遥测能帮你了解服务网格的结构、展示网络的拓扑结构、分析网格的健康状态。
使用下面说明部署Kiali仪表板、 以及Prometheus、Grafana、还有Jaeger。
安装kiali等插件
该命令会安装一系列的crd资源,并且安装grafana、prometheus、jaeger、kiali组件
[root@master1 istio-1.11.1]# kubectl rollout status deployment/kiali -n istio-system
Waiting for deployment "kiali" rollout to finish: 0 of 1 updated replicas are available...
Waiting for deployment "kiali" rollout to finish: 0 of 1 updated replicas are available...
deployment "kiali" successfully rolled out
[root@master1 istio-1.11.1]#
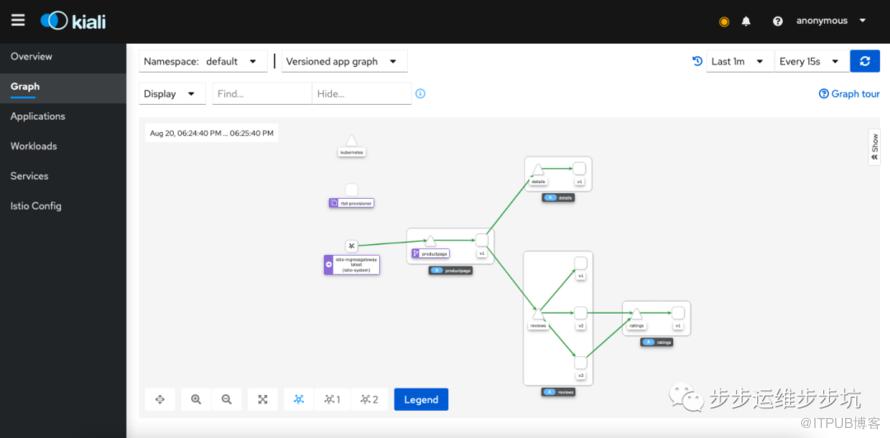
访问仪表盘
使用下面的命令在本地代理kiali进行访问
istioctl dashboard kiali
也可以将kiali的svc修改为NodePort的形式进行访问(可选)
[root@master1 ~]# kubectl patch svc -n istio-system kiali -p '{"spec":{"type": "NodePort"}}'
service/kiali patched
[root@master1 ~]# kubectl get svc -n istio-system kiali
NAME    TYPE       CLUSTER-IP       EXTERNAL-IP   PORT(S)                          AGE
kiali   NodePort   10.105.101.186   <none>        20001:30741/TCP,9090:32543/TCP   52m
[root@master1 ~]#
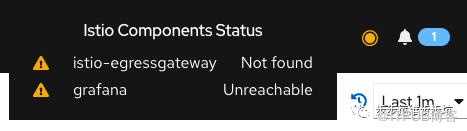
通过仪表盘,我们可以看到组件的状态,egressgateway找不到,因为default没有部署 grafana需要修改kiali配置文件
vim samples/addons/kiali.yaml
    external_services:
      grafana:
        url: "http://grafana.istio-system.svc:3000"
        in_cluster_url: "http://grafana.istio-system:3000"

kubectl apply -f samples/addons/kiali.yaml

# 修改完configmap需要重启pod
kubectl delete po -n istio-system -l app=kiali
想要体验istio完整功能,建议部署时将profile设置为demo。
卸载
Istio卸载程序按照层次结构逐级的从istio-system命令空间中删除RBAC权限和所有资源。对于不存在的资源报错,可以安全的忽略掉,毕竟他们已经被分层的删除了。
kubectl delete -f samples/addons
istioctl manifest generate --set profile=default | kubectl delete --ignore-not-found=true -f -
命名空间istio-system默认情况下并不会被删除。不需要的时候,使用下面命令删掉它
kubectl delete namespace istio-system
指示Istio自动注入Envoy边车代理的标签默认也不删除。不需要的时候,使用下面命令删掉它。
kubectl label namespace default istio-injection-
流量管理
配置请求路由
Istio Bookinfo示例包含四个独立的微服务,每个微服务都有多个版本。其中一个微服务reviews的三个不同版本已经部署并同时运行。 为了说明这导致的问题,在浏览器中访问Bookinfo应用程序的 /productpage 并刷新几次。 您会注意到,有时书评的输出包含星级评分,有时则不包含。这是因为没有明确的默认服务版本路由,Istio将以循环方式请求路由到所有可用版本。
此任务的最初目标是应用将所有流量路由到微服务的v1(版本 1)的规则。稍后,您将应用规则根据HTTP请求header的值路由流量。
应用virtual service
要仅路由到一个版本,请应用为微服务设置默认版本的 virtual service。在这种情况下,virtual service 将所有流量路由到每个微服务的 v1 版本。
default 和 demo 的配置文件默认情况下启用了自动双向TLS。
[root@master1 istio-1.11.1]# cd /usr/local/istio-${ISTIO_VERSION}
[root@master1 istio-1.11.1]# kubectl apply -f samples/bookinfo/networking/destination-rule-all-mtls.yaml
destinationrule.networking.istio.io/productpage created
destinationrule.networking.istio.io/reviews created
destinationrule.networking.istio.io/ratings created
destinationrule.networking.istio.io/details created
[root@master1 istio-1.11.1]# kubectl apply -f samples/bookinfo/networking/virtual-service-all-v1.yaml
virtualservice.networking.istio.io/productpage created
virtualservice.networking.istio.io/reviews created
virtualservice.networking.istio.io/ratings created
virtualservice.networking.istio.io/details created
[root@master1 istio-1.11.1]#
检查已经应用到v1
kubectl get virtualservices -o yaml
kubectl get destinationrules -o yaml
测试新的路由配置
打开浏览器,输入:http://10.10.1.7:31336/productpage,此时,无论您刷新多少次,页面的评论部分都不会显示评级星标。这是因为您将 Istio 配置为 将评论服务的所有流量路由到版本 reviews:v1,而此版本的服务不访问星级评分服务。
基于用户身份的路由
jason的用户的所有流量将被路由到服务reviews:v2,productpage 服务在所有到reviews服务的HTTP请求中都增加了一个自定义的 end-user请求头,从而达到了本例子的效果。
kubectl apply -f samples/bookinfo/networking/virtual-service-reviews-test-v2.yaml
virtualservice.networking.istio.io/reviews configured
打开浏览器,分别验证登录和不登录jason的页面显示效果。


原理
在此任务中,您首先使用Istio将100%的请求流量都路由到了Bookinfo服务的v1版本。然后设置了一条路由规则,它根据productpage服务发起的请求中的end-user自定义请求头内容,选择性地将特定的流量路由到了reviews服务的v2版本。
请注意,Kubernetes中的服务,如本任务中使用的Bookinfo服务,必须遵守某些特定限制,才能利用到Istio的L7路由特性优势。参考Pod和Service需求了解详情。
在流量转移任务中,您将按照在此处学习到的相同的基本模式来配置路由规则,以逐步将流量从服务的一个版本迁移到另一个版本。
故障注入
前置条件
安装好
Istio部署
bookinfo示例,并应用默认目标规则初始化应用程序路由
kubectl apply -f samples/bookinfo/networking/virtual-service-all-v1.yaml
kubectl apply -f samples/bookinfo/networking/virtual-service-reviews-test-v2.yaml
注入HTTP延迟故障
为了测试微服务应用程序Bookinfo的弹性,我们将为用户jason在reviews:v2和ratings服务之间注入一个7秒的延迟。这个测试将会发现一个故意引入Bookinfo应用程序中的bug。
注意reviews:v2服务对ratings服务的调用具有10秒的硬编码连接超时。因此,尽管引入了7秒的延迟,我们仍然期望端到端的流程是没有任何错误的。
创建故障注入规则以延迟测试用户jason的流量
kubectl apply -f samples/bookinfo/networking/virtual-service-ratings-test-delay.yaml
virtualservice.networking.istio.io/ratings configured
确认规则已经创建
kubectl get virtualservice ratings -o yaml
测试延迟配置
打开浏览器,访问bookinfo应用:http://${GATEWAY_URL}/productpage,并使用jason登录

Sorry, product reviews are currently unavailable for this book.
原理
你发现了一个bug。微服务中有硬编码超时,导致reviews服务失败。
按照预期,我们引入的7秒延迟不会影响到reviews服务,因为reviews和ratings服务间的超时被硬编码为10秒。但是,在productpage和reviews服务之间也有一个3秒的硬编码的超时,再加1次重试,一共6秒。结果,productpage对reviews的调用在6秒后提前超时并抛出错误了。
这种类型的错误可能发生在典型的由不同的团队独立开发不同的微服务的企业应用程序中。Istio的故障注入规则可以帮助您识别此类异常,而不会影响最终用户。
请注意,此次故障注入限制为仅影响用户 jason。如果您以任何其他用户身份登录,则不会遇到任何延迟。
错误修复
这种问题通常会这么解决:
增加
productpage与reviews服务之间的超时或降低reviews与ratings的超时终止并重启修复后的微服务
确认
/productpage页面正常响应且没有任何错误
但是,reviews服务的v3版本已经修复了这个问题。reviews:v3服务已将reviews与ratings的超时时间从10秒降低为 2.5 秒,因此它可以兼容(小于)下游的productpage的请求。
注入HTTP abort故障
给ratings微服务为测试用户jason引入一个 HTTP abort。我们希望页面能够立即加载,同时显示Ratings service is currently unavailable这样的消息。
为用户jason创建一个发送HTTP abort的故障注入规则
kubectl apply -f samples/bookinfo/networking/virtual-service-ratings-test-abort.yaml
virtualservice.networking.istio.io/ratings configured
确认规则已经创建
kubectl get virtualservice ratings -o yaml
测试HTTP abort
用浏览器,打开bookinfo应用,使用jason登录

Ratings service is currently unavailable注销后页面正常
流量转移
生产环境中经常需要将旧版本的流量转移到新版本,在本任务中,您将会把50%的流量发送到reviews:v1,另外50%的流量发送到reviews:v3。然后,再把100%的流量发送到reviews:v3来完成迁移。
前置条件
安装好
Istio部署
bookinfo示例应用默认目标规则
kubectl apply -f samples/bookinfo/networking/destination-rule-all-mtls.yaml
应用基于权重的路由
将所有流量路由到v1版本
kubectl apply -f samples/bookinfo/networking/virtual-service-all-v1.yaml
浏览器测试
打开浏览器访问http://${GATEWAY_URL}/productpage,这时不管刷新多少戏,页面都不会显示评价星级内容。因为istio被配置为将所有流量都路由到reviews:v1版本。
把50%的流量从reviews:v1转移到reviews:v3
kubectl apply -f samples/bookinfo/networking/virtual-service-reviews-50-v3.yaml
virtualservice.networking.istio.io/reviews configured
应用完需要等待几秒中,等待新的规则下发到envoy代理中。
确认规则已经生效
kubectl get virtualservice reviews -o yaml
测试效果
打开浏览器,打开bookinfo应用,反复刷新页面,大约有 50% 的几率会看到页面中出带 红色 星级的评价内容(v3)
流量100%迁移到v3
经过测试v3版本已经没有问题,这是把流量全部转到v3上来
kubectl apply -f samples/bookinfo/networking/virtual-service-reviews-v3.yaml
virtualservice.networking.istio.io/reviews configured
再次刷新bookinfo页,您将始终看到带有 红色 星级评分的书评。
原理
在这项任务中,我们使用Istio的权重路由功能将reviews服务的流量迁移到新版本。请注意,这和使用容器编排平台的部署功能来进行版本迁移完全不同,后者使用了实例扩容来对流量进行管理。
使用Istio,两个版本的reviews服务可以独立地进行扩容和缩容,而不会影响这两个服务版本之间的流量分发。
清理
删除应用程序路由规则
kubectl delete -f samples/bookinfo/networking/virtual-service-all-v1.yaml
TCP流量转移
本任务展示了如何将TCP流量从微服务的一个版本逐步迁移到另一个版本。例如,将TCP流量从旧版本迁移到新版本。
一个常见的用例是将TCP流量从微服务的一个版本迁移到另一个版本。在Istio中,您可以通过配置一系列规则来实现此目标,这些规则将一定比例的TCP流量路由到不同的服务。在此任务中,将会把100%的TCP流量分配到tcp-echo:v1,接着,再通过配置Istio路由权重把20%的TCP流量分配到tcp-echo:v2。
前置条件
安装好
Istio
设置测试环境
1.创建istio-io-tcp-traffic-shifting名称空间用于测试TCP流量转移,并将其标记为自动注入sidecar方式
创建istio-io-tcp-traffic-shifting名称空间
kubectl create namespace istio-io-tcp-traffic-shifting
namespace/istio-io-tcp-traffic-shifting created
设置为自动注入sidecar
kubectl label namespace istio-io-tcp-traffic-shifting istio-injection=enabled
namespace/istio-io-tcp-traffic-shifting labeled
部署sleep应用程序,用于发送请求的测试源
kubectl apply -f samples/sleep/sleep.yaml -n istio-io-tcp-traffic-shifting
serviceaccount/sleep created
service/sleep created
deployment.apps/sleep created
部署tcp-echo微服务的v1和v2版本
kubectl apply -f samples/tcp-echo/tcp-echo-services.yaml -n istio-io-tcp-traffic-shifting
service/tcp-echo created
deployment.apps/tcp-echo-v1 created
deployment.apps/tcp-echo-v2 created
确定Ingress端口
export INGRESS_HOST=10.10.1.7
export TCP_INGRESS_PORT=$(kubectl -n istio-system get service istio-ingressgateway -o jsonpath='{.spec.ports[?(@.name=="tcp")].nodePort}')
istio部署时
profile=default时istio-ingressgateway没有名称为tcp的端口,部署时请注意。
应用基于权重的TCP路由
1.将所有流量路由到微服务tcp-echo的v1版本
kubectl apply -f samples/tcp-echo/tcp-echo-all-v1.yaml -n istio-io-tcp-traffic-shifting
gateway.networking.istio.io/tcp-echo-gateway created
destinationrule.networking.istio.io/tcp-echo-destination created
virtualservice.networking.istio.io/tcp-echo created
2.通过从sleep客户端发送一些TCP流量,确认tcp-echoServer已经启动并运行
for i in {1..20}; do
  kubectl exec "$(kubectl get pod -l app=sleep -n istio-io-tcp-traffic-shifting -o jsonpath={.items..metadata.name})" \
-c sleep -n istio-io-tcp-traffic-shifting -- sh -c "(date; sleep 1) | nc $INGRESS_HOST$TCP_INGRESS_PORT"; \
done
one Sat Aug 21 07:31:36 UTC 2021
one Sat Aug 21 07:31:38 UTC 2021
one Sat Aug 21 07:31:39 UTC 2021
one Sat Aug 21 07:31:41 UTC 2021
one Sat Aug 21 07:31:42 UTC 2021
one Sat Aug 21 07:31:43 UTC 2021
one Sat Aug 21 07:31:45 UTC 2021
.
我们看到,所有的流量都被路由到了v1上
3.将20%的流量从tcp-echo:v1转移到tcp-echo:v2
kubectl apply -f samples/tcp-echo/tcp-echo-20-v2.yaml -n istio-io-tcp-traffic-shifting
virtualservice.networking.istio.io/tcp-echo configured
4.确认规则已经替换
kubectl get virtualservice tcp-echo -o yaml -n istio-io-tcp-traffic-shifting
5.发送更多TCP流量进行测试
for i in {1..20}; do
  kubectl exec "$(kubectl get pod -l app=sleep -n istio-io-tcp-traffic-shifting -o jsonpath={.items..metadata.name})" \
-c sleep -n istio-io-tcp-traffic-shifting -- sh -c "(date; sleep 1) | nc $INGRESS_HOST$TCP_INGRESS_PORT"
done
one Sat Aug 21 07:37:04 UTC 2021
one Sat Aug 21 07:37:06 UTC 2021
one Sat Aug 21 07:37:07 UTC 2021
one Sat Aug 21 07:37:09 UTC 2021
one Sat Aug 21 07:37:10 UTC 2021
two Sat Aug 21 07:37:11 UTC 2021
one Sat Aug 21 07:37:13 UTC 2021
one Sat Aug 21 07:37:14 UTC 2021
one Sat Aug 21 07:37:15 UTC 2021
one Sat Aug 21 07:37:17 UTC 2021
one Sat Aug 21 07:37:18 UTC 2021
two Sat Aug 21 07:37:19 UTC 2021
one Sat Aug 21 07:37:21 UTC 2021
...
多测试几次,可以看到大约20%的流量到two上了
原理
这个任务中,使用Istio路由权重特性将tcp-echo服务的TCP流量从旧版本迁移到了新版本。请注意,这与使用容器编排平台的部署功能进行版本迁移完全不同,后者(容器编排平台)使用了实例扩容来管理流量。
在Istio中,可以对tcp-echo服务的两个版本进行独立扩容和缩容,这个过程不会影响两个服务版本之间的流量分配。
清理tcp-echo
kubectl delete -f samples/tcp-echo/tcp-echo-all-v1.yaml -n istio-io-tcp-traffic-shifting
kubectl delete -f samples/tcp-echo/tcp-echo-services.yaml -n istio-io-tcp-traffic-shifting
kubectl delete -f samples/sleep/sleep.yaml -n istio-io-tcp-traffic-shifting
kubectl delete namespace istio-io-tcp-traffic-shifting
设置请求超时
前置条件
安装好istio
-
部署
bookinfo示例并应用默认目标规则kubectl apply -f samples/bookinfo/networking/destination-rule-all-mtls.yaml
-
初始化应用到版本路由到v1
kubectl apply -f samples/bookinfo/networking/virtual-service-all-v1.yaml
请求超时
HTTP请求的超时可以用路由规则的timeout字段来指定。默认情况下,超时是禁用的,本任务中,会把reviews服务的超时设置为1秒。 为了观察效果,还需要在对ratings服务的调用上人为引入2秒的延迟。
1.将请求路由到reviews服务的v2版本
kubectl apply -f - <<EOF
apiVersion: networking.istio.io/v1alpha3
kind: VirtualService
metadata:
  name: reviews
spec:
  hosts:
    - reviews
  http:
  - route:
    - destination:
        host: reviews
        subset: v2
EOF
virtualservice.networking.istio.io/reviews configured
2.给对ratings服务的调用添加2秒的延迟
kubectl apply -f - <<EOF
apiVersion: networking.istio.io/v1alpha3
kind: VirtualService
metadata:
  name: ratings
spec:
  hosts:
  - ratings
  http:
  - fault:
      delay:
        percent: 100
        fixedDelay: 2s
    route:
    - destination:
        host: ratings
        subset: v1
EOF
virtualservice.networking.istio.io/ratings configured
3.打开bookinfo页面http://${GATEWAY_URL}/productpage
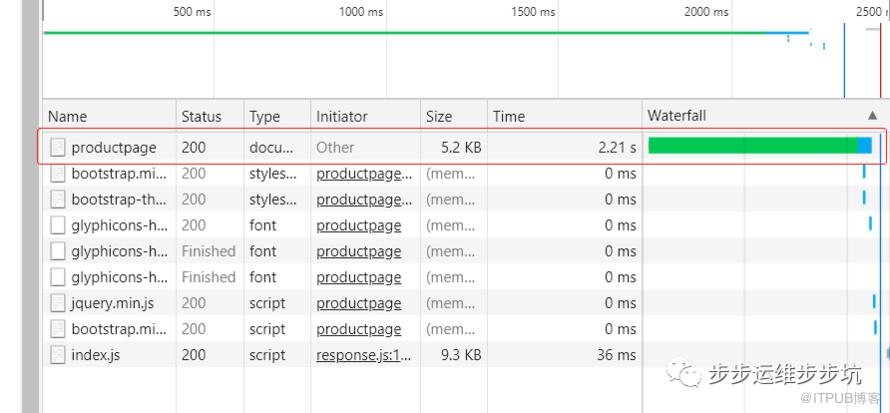
这时可以看到Bookinfo应用运行正常(显示了评级的星型符号),但是每次刷新页面,都会有2秒的延迟。
4.对reviews服务的调用增加一个半秒的请求超时
kubectl apply -f - <<EOF
apiVersion: networking.istio.io/v1alpha3
kind: VirtualService
metadata:
  name: reviews
spec:
  hosts:
  - reviews
  http:
  - route:
    - destination:
        host: reviews
        subset: v2
    timeout: 0.5s
EOF
virtualservice.networking.istio.io/reviews configured
5.刷新Bookinfo页面。
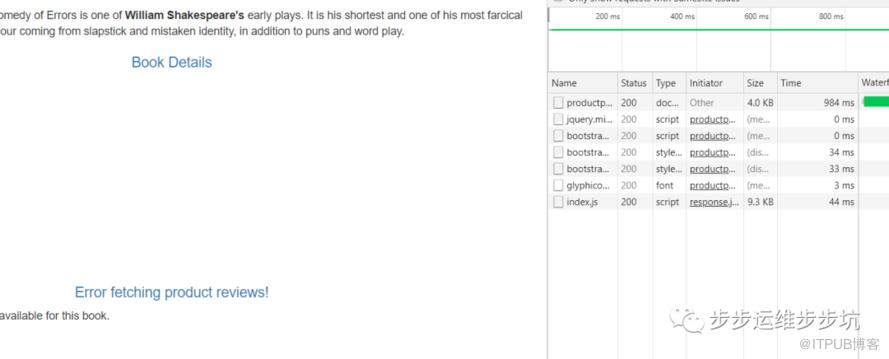
这时候应该看到1秒钟就会返回,而不是之前的2秒钟,但reviews是不可用的。
熔断
熔断,是创建弹性微服务应用程序的重要模式。熔断能够使您的应用程序具备应对来自故障、潜在峰值和其他未知网络因素影响的能力。
这个任务中,你将配置熔断规则,然后通过有意的使熔断器“跳闸”来测试配置。httpbin 作为此任务的后端服务。
前置条件
安装istio
-
启动httpbin服务
kubectl apply -f samples/httpbin/httpbin.yaml
serviceaccount/httpbin created
service/httpbin created
deployment.apps/httpbin created
配置熔断器
如果您的Istio启用了双向TLS身份验证,则必须在应用目标规则之前将TLS流量策略mode:ISTIO_MUTUAL添加到DestinationRule 。否则请求将产生503错误
创建一个 DestinationRule,在调用 httpbin 服务时应用熔断设置
kubectl apply -f - <<EOF
apiVersion: networking.istio.io/v1alpha3
kind: DestinationRule
metadata:
  name: httpbin
spec:
  host: httpbin
  trafficPolicy:
    connectionPool:
      tcp:
        maxConnections: 1
      http:
        http1MaxPendingRequests: 1
        maxRequestsPerConnection: 1
    outlierDetection:
      consecutive5xxErrors: 1
      interval: 1s
      baseEjectionTime: 3m
      maxEjectionPercent: 100
EOF
destinationrule.networking.istio.io/httpbin created
2.验证目标规则是否已经正确创建
kubectl get destinationrule httpbin -o yaml
添加一个客户端
创建客户端程序以发送流量到httpbin服务。这是一个名为Fortio的负载测试客户的,其可以控制连接数、并发数及发送HTTP请求的延迟。通过Fortio能够有效的触发前面在DestinationRule中设置的熔断策略。
1.向客户端注入 Istio Sidecar 代理,以便 Istio 对其网络交互进行管理
kubectl apply -f samples/httpbin/sample-client/fortio-deploy.yaml
service/fortio created
deployment.apps/fortio-deploy created

kubectl get po
NAME                             READY   STATUS    RESTARTS   AGE
fortio-deploy-5b4656987b-b58bn   2/2     Running   0          24s
httpbin-779c54bf49-fq7gg         2/2     Running   0          5m23s
2.登入客户端 Pod 并使用 Fortio 工具调用 httpbin 服务
FORTIO_POD=$(kubectl get pod | grep fortio | awk '{ print $1 }')
kubectl exec -it $FORTIO_POD  -c fortio -- /usr/bin/fortio load -curl  http://httpbin:8000/get
HTTP/1.1 200 OK
server: envoy
date: Sat, 21 Aug 2021 08:12:34 GMT
content-type: application/json
content-length: 594
access-control-allow-origin: *
access-control-allow-credentials: true
x-envoy-upstream-service-time: 97

{
  "args": {},
  "headers": {
    "Host": "httpbin:8000",
    "User-Agent": "fortio.org/fortio-1.11.3",
    "X-B3-Parentspanid": "9b943656befa52a8",
    "X-B3-Sampled": "1",
    "X-B3-Spanid": "fdd35d9a9896ae10",
    "X-B3-Traceid": "f6d81ba2c71f637e9b943656befa52a8",
    "X-Envoy-Attempt-Count": "1",
    "X-Forwarded-Client-Cert": "By=spiffe://cluster.local/ns/default/sa/httpbin;Hash=9004f620fef03d4b69798ee69f7270fb9380771d145b45df6e9dc1e0903772af;Subject=\"\";URI=spiffe://cluster.local/ns/default/sa/default"
  },
  "origin": "127.0.0.6",
  "url": "http://httpbin:8000/get"
}
看到调用后端服务的请求已经成功!接下来,可以测试熔断。
触发熔断器
在DestinationRule配置中,您定义了maxConnections: 1和http1MaxPendingRequests: 1。这些规则意味着,如果并发的连接和请求数超过一个,在istio-proxy进行进一步的请求和连接时,后续请求或连接将被阻止。
1.发送并发数为2的连接(-c 2),请求20次(-n 20)
kubectl exec -it $FORTIO_POD -c fortio -- /usr/bin/fortio load -c 2 -qps 0 -n 20 -loglevel Warning http://httpbin:8000/get
输出如下
08:15:07 I logger.go:127> Log level is now 3 Warning (was 2 Info)
Fortio 1.11.3 running at 0 queries per second, 4->4 procs, for 20 calls: http://httpbin:8000/get
Starting at max qps with 2 thread(s) [gomax 4] for exactly 20 calls (10 per thread + 0)
08:15:07 W http_client.go:693> Parsed non ok code 503 (HTTP/1.1 503)
08:15:07 W http_client.go:693> Parsed non ok code 503 (HTTP/1.1 503)
08:15:07 W http_client.go:693> Parsed non ok code 503 (HTTP/1.1 503)
08:15:07 W http_client.go:693> Parsed non ok code 503 (HTTP/1.1 503)
08:15:07 W http_client.go:693> Parsed non ok code 503 (HTTP/1.1 503)
08:15:07 W http_client.go:693> Parsed non ok code 503 (HTTP/1.1 503)
Ended after 144.883411ms : 20 calls. qps=138.04
Aggregated Function Time : count 20 avg 0.013612914 +/- 0.01866 min 0.000777306 max 0.07671694 sum 0.27225829
# range, mid point, percentile, count
>= 0.000777306 <= 0.001 , 0.000888653 , 15.00, 3
> 0.001 <= 0.002 , 0.0015 , 20.00, 1
> 0.005 <= 0.006 , 0.0055 , 30.00, 2
> 0.006 <= 0.007 , 0.0065 , 55.00, 5
> 0.007 <= 0.008 , 0.0075 , 65.00, 2
> 0.009 <= 0.01 , 0.0095 , 70.00, 1
> 0.01 <= 0.011 , 0.0105 , 75.00, 1
> 0.012 <= 0.014 , 0.013 , 80.00, 1
> 0.014 <= 0.016 , 0.015 , 85.00, 1
> 0.03 <= 0.035 , 0.0325 , 90.00, 1
> 0.05 <= 0.06 , 0.055 , 95.00, 1
> 0.07 <= 0.0767169 , 0.0733585 , 100.00, 1
# target 50% 0.0068
# target 75% 0.011
# target 90% 0.035
# target 99% 0.0753736
# target 99.9% 0.0765826
Sockets used: 8 (for perfect keepalive, would be 2)
Jitter: false
Code 200 : 14 (70.0 %)
Code 503 : 6 (30.0 %)
Response Header Sizes : count 20 avg 161.15 +/- 105.5 min 0 max 231 sum 3223
Response Body/Total Sizes : count 20 avg 649.25 +/- 267.3 min 241 max 825 sum 12985
All done 20 calls (plus 0 warmup) 13.613 ms avg, 138.0 qps
2.将并发连接数提高到3个
kubectl exec -it $FORTIO_POD -c fortio -- /usr/bin/fortio load -c 3 -qps 0 -n 30 -loglevel Warning http://httpbin:8000/get
输出如下
08:16:44 I logger.go:127> Log level is now 3 Warning (was 2 Info)
Fortio 1.11.3 running at 0 queries per second, 4->4 procs, for 30 calls: http://httpbin:8000/get
Starting at max qps with 3 thread(s) [gomax 4] for exactly 30 calls (10 per thread + 0)
08:16:44 W http_client.go:693> Parsed non ok code 503 (HTTP/1.1 503)
08:16:44 W http_client.go:693> Parsed non ok code 503 (HTTP/1.1 503)
08:16:44 W http_client.go:693> Parsed non ok code 503 (HTTP/1.1 503)
08:16:44 W http_client.go:693> Parsed non ok code 503 (HTTP/1.1 503)
08:16:44 W http_client.go:693> Parsed non ok code 503 (HTTP/1.1 503)
08:16:44 W http_client.go:693> Parsed non ok code 503 (HTTP/1.1 503)
08:16:44 W http_client.go:693> Parsed non ok code 503 (HTTP/1.1 503)
08:16:44 W http_client.go:693> Parsed non ok code 503 (HTTP/1.1 503)
08:16:44 W http_client.go:693> Parsed non ok code 503 (HTTP/1.1 503)
08:16:44 W http_client.go:693> Parsed non ok code 503 (HTTP/1.1 503)
08:16:44 W http_client.go:693> Parsed non ok code 503 (HTTP/1.1 503)
08:16:44 W http_client.go:693> Parsed non ok code 503 (HTTP/1.1 503)
08:16:44 W http_client.go:693> Parsed non ok code 503 (HTTP/1.1 503)
08:16:44 W http_client.go:693> Parsed non ok code 503 (HTTP/1.1 503)
08:16:44 W http_client.go:693> Parsed non ok code 503 (HTTP/1.1 503)
08:16:44 W http_client.go:693> Parsed non ok code 503 (HTTP/1.1 503)
08:16:44 W http_client.go:693> Parsed non ok code 503 (HTTP/1.1 503)
08:16:44 W http_client.go:693> Parsed non ok code 503 (HTTP/1.1 503)
08:16:44 W http_client.go:693> Parsed non ok code 503 (HTTP/1.1 503)
08:16:44 W http_client.go:693> Parsed non ok code 503 (HTTP/1.1 503)
08:16:44 W http_client.go:693> Parsed non ok code 503 (HTTP/1.1 503)
Ended after 54.153348ms : 30 calls. qps=553.98
Aggregated Function Time : count 30 avg 0.0041682143 +/- 0.005383 min 0.000507205 max 0.018732702 sum 0.12504643
# range, mid point, percentile, count
>= 0.000507205 <= 0.001 , 0.000753603 , 40.00, 12
> 0.001 <= 0.002 , 0.0015 , 63.33, 7
> 0.002 <= 0.003 , 0.0025 , 70.00, 2
> 0.005 <= 0.006 , 0.0055 , 73.33, 1
> 0.006 <= 0.007 , 0.0065 , 76.67, 1
> 0.007 <= 0.008 , 0.0075 , 80.00, 1
> 0.008 <= 0.009 , 0.0085 , 83.33, 1
> 0.009 <= 0.01 , 0.0095 , 86.67, 1
> 0.01 <= 0.011 , 0.0105 , 90.00, 1
> 0.016 <= 0.018 , 0.017 , 93.33, 1
> 0.018 <= 0.0187327 , 0.0183664 , 100.00, 2
# target 50% 0.00142857
# target 75% 0.0065
# target 90% 0.011
# target 99% 0.0186228
# target 99.9% 0.0187217
Sockets used: 23 (for perfect keepalive, would be 3)
Jitter: false
Code 200 : 9 (30.0 %)
Code 503 : 21 (70.0 %)
Response Header Sizes : count 30 avg 69.1 +/- 105.6 min 0 max 231 sum 2073
Response Body/Total Sizes : count 30 avg 416 +/- 267.3 min 241 max 825 sum 12480
All done 30 calls (plus 0 warmup) 4.168 ms avg, 554.0 qps
现在,您将开始看到预期的熔断行为,只有30%的请求成功,其余的均被熔断器拦截
Code 200 : 9 (30.0 %) Code 503 : 21 (70.0 %)
3.查询istio-proxy状态以了解更多熔断详情
kubectl exec $FORTIO_POD -c istio-proxy -- pilot-agent request GET stats | grep httpbin | grep pending
cluster.outbound|8000||httpbin.default.svc.cluster.local.circuit_breakers.default.remaining_pending: 1
cluster.outbound|8000||httpbin.default.svc.cluster.local.circuit_breakers.default.rq_pending_open: 0
cluster.outbound|8000||httpbin.default.svc.cluster.local.circuit_breakers.high.rq_pending_open: 0
cluster.outbound|8000||httpbin.default.svc.cluster.local.upstream_rq_pending_active: 0
cluster.outbound|8000||httpbin.default.svc.cluster.local.upstream_rq_pending_failure_eject: 0
cluster.outbound|8000||httpbin.default.svc.cluster.local.upstream_rq_pending_overflow: 27
cluster.outbound|8000||httpbin.default.svc.cluster.local.upstream_rq_pending_total: 24
看到upstream_rq_pending_overflow的值为27,代表27个已经标识为熔断
清理
1.清理规则
kubectl delete destinationrule httpbin
2.下线httpbin服务和客户端
kubectl delete deploy httpbin fortio-deploy
kubectl delete svc httpbin
流量镜像
流量镜像,也称为影子流量,是一个以尽可能低的风险为生产带来变化的强大的功能。服务新版本上线时,对服务的性能和bug并没有太大把握,流量镜像会将实时流量的副本发送到镜像服务。镜像流量发生在主服务的关键请求路径之外。
任务:把流量全部路由到v1版本的测试服务。然后,执行规则将一部分流量镜像到v2版本。
前置条件
1.安装好Istio 2.部署两个版本的httpbin服务,并开启访问日志功能
httpbin-v1
cat <<EOF | istioctl kube-inject -f - | kubectl create -f -
apiVersion: apps/v1
kind: Deployment
metadata:
  name: httpbin-v1
spec:
  replicas: 1
  selector:
    matchLabels:
      app: httpbin
      version: v1
  template:
    metadata:
      labels:
        app: httpbin
        version: v1
    spec:
      containers:
      - image: docker.io/kennethreitz/httpbin
        imagePullPolicy: IfNotPresent
        name: httpbin
        command: ["gunicorn", "--access-logfile", "-", "-b", "0.0.0.0:80", "httpbin:app"]
        ports:
        - containerPort: 80
EOF
deployment.apps/httpbin-v1 created

httpbin-v2
cat <<EOF | istioctl kube-inject -f - | kubectl create -f -
apiVersion: apps/v1
kind: Deployment
metadata:
  name: httpbin-v2
spec:
  replicas: 1
  selector:
    matchLabels:
      app: httpbin
      version: v2
  template:
    metadata:
      labels:
        app: httpbin
        version: v2
    spec:
      containers:
      - image: docker.io/kennethreitz/httpbin
        imagePullPolicy: IfNotPresent
        name: httpbin
        command: ["gunicorn", "--access-logfile", "-", "-b", "0.0.0.0:80", "httpbin:app"]
        ports:
        - containerPort: 80
EOF
deployment.apps/httpbin-v2 created

httpbin service
kubectl create -f - <<EOF
apiVersion: v1
kind: Service
metadata:
  name: httpbin
  labels:
    app: httpbin
spec:
  ports:
  - name: http
    port: 8000
    targetPort: 80
  selector:
    app: httpbin
EOF
service/httpbin created
3.启动sleep服务,这样就可以使用curl来提供负载
sleep service
cat <<EOF | istioctl kube-inject -f - | kubectl create -f -
apiVersion: apps/v1
kind: Deployment
metadata:
  name: sleep
spec:
  replicas: 1
  selector:
    matchLabels:
      app: sleep
  template:
    metadata:
      labels:
        app: sleep
    spec:
      containers:
      - name: sleep
        image: curlimages/curl
        command: ["/bin/sleep","3650d"]
        imagePullPolicy: IfNotPresent
EOF
deployment.apps/sleep created
创建一个默认路由策略
默认情况下,Kubernetes在httpbin服务的两个版本之间进行负载均衡。在此步骤中会更改该行为,把所有流量都路由到v1版本。
1.创建一个默认路由规则,将所有流量路由到服务的v1
kubectl apply -f - <<EOF
apiVersion: networking.istio.io/v1alpha3
kind: VirtualService
metadata:
  name: httpbin
spec:
  hosts:
    - httpbin
  http:
  - route:
    - destination:
        host: httpbin
        subset: v1
      weight: 100
---
apiVersion: networking.istio.io/v1alpha3
kind: DestinationRule
metadata:
  name: httpbin
spec:
  host: httpbin
  subsets:
  - name: v1
    labels:
      version: v1
  - name: v2
    labels:
      version: v2
EOF
virtualservice.networking.istio.io/httpbin created
destinationrule.networking.istio.io/httpbin created
现在所有流量都转到httpbin:v1服务。
2.向服务发送一部分流量
export SLEEP_POD=$(kubectl get pod -l app=sleep -o jsonpath={.items..metadata.name})
kubectl exec -it "$SLEEP_POD" -c sleep -- curl -sS http://httpbin:8000/headers
{
  "headers": {
    "Accept": "*/*",
    "Host": "httpbin:8000",
    "User-Agent": "curl/7.35.0",
    "X-B3-Parentspanid": "91ffa12314782a09",
    "X-B3-Sampled": "1",
    "X-B3-Spanid": "012952154e90d7cb",
    "X-B3-Traceid": "70956ad857e4bfd191ffa12314782a09",
    "X-Envoy-Attempt-Count": "1",
    "X-Forwarded-Client-Cert": "By=spiffe://cluster.local/ns/default/sa/default;Hash=bc31ed168cab2d9b5e0bd47ddf3f0b3cbbc995c9323357dca0de153b4293dfe3;Subject=\"\";URI=spiffe://cluster.local/ns/default/sa/default"
  }
}
3.分别查看httpbin pod的v1和v2两个版本的日志,可以看到只有v1版本的访问日志条目。
export V1_POD=$(kubectl get pod -l app=httpbin,version=v1 -o jsonpath={.items..metadata.name})
kubectl logs "$V1_POD" -c httpbin

export V2_POD=$(kubectl get pod -l app=httpbin,version=v2 -o jsonpath={.items..metadata.name})
kubectl logs "$V2_POD" -c httpbin
流量镜像到v2
1.改变流量规则将流量镜像到v2
kubectl apply -f - <<EOF
apiVersion: networking.istio.io/v1alpha3
kind: VirtualService
metadata:
  name: httpbin
spec:
  hosts:
    - httpbin
  http:
  - route:
    - destination:
        host: httpbin
        subset: v1
      weight: 100
    mirror:
      host: httpbin
      subset: v2
    mirrorPercentage:
      value: 100.0
EOF
virtualservice.networking.istio.io/httpbin configured
这个路由规则发送100%流量到v1版本。最后一节表示您将100%的相同流量镜像(即发送)到httpbin:v2服务。当流量被镜像时,请求将发送到镜像服务中,并在headers中的Host/Authority属性值上追加-shadow。例如cluster-1变为cluster-1-shadow。
此外,重点注意这些被镜像的流量是『 即发即弃』的,就是说镜像请求的响应会被丢弃。
您可以使用mirrorPercentage下的value属性来设置镜像流量的百分比,而不是镜像全部请求。为了兼容老版本,如果这个属性不存在,将镜像所有流量。
2.发送流量测试
kubectl exec -it "${SLEEP_POD}" -c sleep -- curl -sS http://httpbin:8000/headers
{
  "headers": {
    "Accept": "*/*",
    "Host": "httpbin:8000",
    "User-Agent": "curl/7.35.0",
    "X-B3-Parentspanid": "a60a327f14ed15f3",
    "X-B3-Sampled": "1",
    "X-B3-Spanid": "ee6beda1c7ba4061",
    "X-B3-Traceid": "1212719a8fbb98e1a60a327f14ed15f3",
    "X-Envoy-Attempt-Count": "1",
    "X-Forwarded-Client-Cert": "By=spiffe://cluster.local/ns/default/sa/default;Hash=bc31ed168cab2d9b5e0bd47ddf3f0b3cbbc995c9323357dca0de153b4293dfe3;Subject=\"\";URI=spiffe://cluster.local/ns/default/sa/default"
  }
}
现在就可以看到v1和v2版本中都有了访问日志。v2版本中的访问日志就是由镜像流量产生的,这些请求的实际目标是v1版本。
kubectl logs "$V1_POD" -c httpbin

kubectl logs "$V2_POD" -c httpbin
清理
1.清楚规则
kubectl delete virtualservice httpbin
kubectl delete destinationrule httpbin
2.关闭Httpbin服务和客户端
kubectl delete deploy httpbin-v1 httpbin-v2 sleep
kubectl delete svc httpbin
地域负载均衡
一个地域定义了workload instance在你的网格中的地理位置。这三个元素定义了一个地域:
地区: 代表较大的地理区域,例如
us-east. 一个地区通常包含许多可用 zones。在Kubernetes中,标签topology.kubernetes.io/region确定节点的区域。区域: 区域内的一组计算资源。通过在区域内的多个区域中运行服务,可以在区域内的区域之间进行故障转移,同时保持最终用户的数据地域性。在
Kubernetes中,标签topology.kubernetes.io/zone确定节点的区域。分区: 允许管理员进一步细分区域,以实现更细粒度的控制,例如“相同机架”。
Kubernetes中不存在分区的概念。结果,Istio引入了自定义节点标签topology.istio.io/subzone来定义分区。
如果您使用托管的
Kubernetes服务,则云提供商应为您配置区域和区域标签。如果您正在运行自己的Kubernetes集群,则需要将这些标签添加到您的节点上。
地域是分层的,按匹配顺序排列:
地区
区域
分区
这意味着,在foo地区的bar区域中运行Pod是不被认为是在baz地区的bar区域中运行的Pod。
Istio使用地域信息来控制负载平衡行为。按照本系列的任务一,为您的网格配置地域负载均衡。
前置条件
在开始区域负载均衡任务之前,必须首先在多个集群上安装Istio。群集必须跨越三个地区,其中包含四个可用区域。所需集群的数量可能会因您的云提供商所提供的功能而异。
为简单起见,我们假设只有一个
primary cluster在网格中。由于更改仅需要应用于一个集群,因此这简化了配置控制平面的过程。
我们将部署 helloWorld 应用程序的多个实例,如下所示:


环境变量
本指南假定将通过 Kubernetes 配置文件 中的上下文切换访问集群。以下环境变量将用于各种上下文:
创建 sample 命名空间
首先,启用自动注入 Sidecar 并为 sample 命名空间生成 yaml
cat <<EOF > sample.yaml
apiVersion: v1
kind: Namespace
metadata:
  name: sample
  labels:
    istio-injection: enabled
EOF
为每个集群添加 sample 命名空间:
for CTX in "$CTX_PRIMARY" "$CTX_R1_Z1" "$CTX_R1_Z2" "$CTX_R2_Z3" "$CTX_R3_Z4"; \
do \
  kubectl --context="$CTX" apply -f sample.yaml; \
done
部署helloWorld
使用地域作为版本号,为每个地域生成 helloWorld 的 yaml:
for LOC in "region1.zone1" "region1.zone2" "region2.zone3" "region3.zone4"; \
do \
  ./@samples/helloworld/gen-helloworld.sh@ \
    --version "$LOC" > "helloworld-${LOC}.yaml"; \
done
应用HelloWorldYAML到每个地域的合适集群:
kubectl apply --context="${CTX_R1_Z1}" -n sample \
  -f helloworld-region1.zone1.yaml

kubectl apply --context="${CTX_R1_Z2}" -n sample \
  -f helloworld-region1.zone2.yaml

kubectl apply --context="${CTX_R2_Z3}" -n sample \
  -f helloworld-region2.zone3.yaml

kubectl apply --context="${CTX_R3_Z4}" -n sample \
  -f helloworld-region3.zone4.yaml
部署 sleep
部署 Sleep 应用到 region1 zone1:
kubectl apply --context="${CTX_R1_Z1}" \
  -f @samples/sleep/sleep.yaml@ -n sample
等待 helloWorld Pods
等到 HelloWorld 在每个区域的 Pod 都为 Running:
kubectl get pod --context="${CTX_R1_Z1}" -n sample -l app="helloworld" \
  -l version="region1.zone1"
NAME                                       READY   STATUS    RESTARTS   AGE
helloworld-region1.zone1-86f77cd7b-cpxhv   2/2     Running   0          30s

kubectl get pod --context="${CTX_R1_Z2}" -n sample -l app="helloworld" \
  -l version="region1.zone2"
NAME                                       READY   STATUS    RESTARTS   AGE
helloworld-region1.zone2-86f77cd7b-cpxhv   2/2     Running   0          30s

kubectl get pod --context="${CTX_R2_Z3}" -n sample -l app="helloworld" \
  -l version="region2.zone3"
NAME                                       READY   STATUS    RESTARTS   AGE
helloworld-region2.zone3-86f77cd7b-cpxhv   2/2     Running   0          30s

kubectl get pod --context="${CTX_R3_Z4}" -n sample -l app="helloworld" \
  -l version="region3.zone4"
NAME                                       READY   STATUS    RESTARTS   AGE
helloworld-region3.zone4-86f77cd7b-cpxhv   2/2     Running   0          30s
恭喜您! 您已成功完成系统配置,现在可以开始进行地域负载均衡任务了
下一步
现在,您可以配置以下负载均衡选项之一:
地域故障转移
地域权重分布
应当仅配置负载均衡选项之一,因为它们是互斥的。尝试同时配置两者可能会导致意外行为。
地域故障转移
在此任务中,您将使用 sleep pod 在 region1.zone1 作为请求源发送到 helloWorld 服务。然后,您将触发故障,这些故障将按照以下顺序导致不同地域之间的故障转移:

在内部,Envoy优先级用于控制故障转移。这些优先级将按照以下方式分配来自sleepPod(在 region1 zone1)的流量:
配置地域故障转移
应用一个 DestinationRule 配置如下:
异常检测: 用于
helloWorld服务。这是故障转移正常运行所必须的。特别是,它可以配置Sidecar代理以知道服务的Endpoint何时不正常,最终触发故障转移到下一个地域。故障转移: 地区之间的策略,这确保了超出地区边界的故障转移将具有可预测的行为。
连接池: 强制每个HTTP请求使用一个新连接的策略。该任务利用
Envoy的逐出 功能强制将故障转移到下一个位置。一旦逐出,Envoy 将拒绝所有新的请求。由于每个请求都使用一个新连接,这将导致在耗尽后立即进行故障转移。此配置仅用于演示目的。
kubectl --context="${CTX_PRIMARY}" apply -n sample -f - <<EOF
apiVersion: networking.istio.io/v1beta1
kind: DestinationRule
metadata:
  name: helloworld
spec:
  host: helloworld.sample.svc.cluster.local
  trafficPolicy:
    connectionPool:
      http:
        maxRequestsPerConnection: 1
    loadBalancer:
      simple: ROUND_ROBIN
      localityLbSetting:
        enabled: true
        failover:
          - from: region1
            to: region2
    outlierDetection:
      consecutive5xxErrors: 1
      interval: 1s
      baseEjectionTime: 1m
EOF
验证流量保持在region1.zone1
从sleepPod调用helloWorld服务
kubectl exec --context="${CTX_R1_Z1}" -n sample -c sleep \
  "$(kubectl get pod --context="${CTX_R1_Z1}" -n sample -l \
  app=sleep -o jsonpath='{.items[0].metadata.name}')" \
  -- curl -sSL helloworld.sample:5000/hello
Hello version: region1.zone1, instance: helloworld-region1.zone1-86f77cd7b-cpxhv
验证响应中的version是region1.zone。
重复几次,验证响应总是相同的。
故障转移到 region1.zone2
接下来, 触发故障转移到region1.zone2。为此,您在region1.zone1中helloWorld逐出 Envoy Sidecar 代理 :
kubectl --context="${CTX_R1_Z1}" exec \
  "$(kubectl get pod --context="${CTX_R1_Z1}" -n sample -l app=helloworld \
  -l version=region1.zone1 -o jsonpath='{.items[0].metadata.name}')" \
  -n sample -c istio-proxy -- curl -sSL -X POST 127.0.0.1:15000/drain_listeners
从 sleep Pod 调用 helloWorld 服务:
kubectl exec --context="${CTX_R1_Z1}" -n sample -c sleep \
  "$(kubectl get pod --context="${CTX_R1_Z1}" -n sample -l \
  app=sleep -o jsonpath='{.items[0].metadata.name}')" \
  -- curl -sSL helloworld.sample:5000/hello
Hello version: region1.zone2, instance: helloworld-region1.zone2-86f77cd7b-cpxhv
第一个调用将失败,这将触发故障转移。多次重复该命令,并验证响应中的 version 始终为 region1.zone2。
故障转移到 region2.zone3
现在触发故障转移到 region2.zone3。正如您之前所做的,配置 helloWorld 在 region1.zone2 中调用失败。
kubectl --context="${CTX_R1_Z2}" exec \
  "$(kubectl get pod --context="${CTX_R1_Z2}" -n sample -l app=helloworld \
  -l version=region1.zone2 -o jsonpath='{.items[0].metadata.name}')" \
  -n sample -c istio-proxy -- curl -sSL -X POST 127.0.0.1:15000/drain_listeners
从sleepPod 调用helloWorld服务:
kubectl exec --context="${CTX_R1_Z1}" -n sample -c sleep \
  "$(kubectl get pod --context="${CTX_R1_Z1}" -n sample -l \
  app=sleep -o jsonpath='{.items[0].metadata.name}')" \
  -- curl -sSL helloworld.sample:5000/hello
Hello version: region2.zone3, instance: helloworld-region2.zone3-86f77cd7b-cpxhv
第一个调用将失败,这将触发故障转移。多次重复该命令,并验证响应中的version始终为region2.zone3。
故障转移到 region3.zone4
现在触发故障转移到 region3.zone4。正如您之前所做的, 配置 helloWorld 在 region2.zone3 中调用失败。
kubectl --context="${CTX_R2_Z3}" exec \
  "$(kubectl get pod --context="${CTX_R2_Z3}" -n sample -l app=helloworld \
  -l version=region2.zone3 -o jsonpath='{.items[0].metadata.name}')" \
  -n sample -c istio-proxy -- curl -sSL -X POST 127.0.0.1:15000/drain_listeners
从sleepPod调用helloWorld服务:
kubectl exec --context="${CTX_R1_Z1}" -n sample -c sleep \
  "$(kubectl get pod --context="${CTX_R1_Z1}" -n sample -l \
  app=sleep -o jsonpath='{.items[0].metadata.name}')" \
  -- curl -sSL helloworld.sample:5000/hello
Hello version: region3.zone4, instance: helloworld-region3.zone4-86f77cd7b-cpxhv
第一次调用将失败,这将触发故障转移。多次重复该命令,并验证响应中的 version 始终为 region3.zone4。
恭喜! 您成功配置了地域故障转移!
地域权重分布
在这个任务中,您将使用 region1 zone1 中的 sleep Pod 作为 helloWorld 服务的请求源。您将使用以下分布在不同的地域配置Istio:
配置权重分布
应用 DestinationRule 配置如下:
故障检测 用于
helloWorld服务。这是 Distribution 正常运行所必需的。特别是,它配置 Sidecar 代理以知道服务的 Endpoint 何时不健康。权重分布 如上表中所述的
helloWorld服务。
kubectl --context="${CTX_PRIMARY}" apply -n sample -f - <<EOF
apiVersion: networking.istio.io/v1beta1
kind: DestinationRule
metadata:
  name: helloworld
spec:
  host: helloworld.sample.svc.cluster.local
  trafficPolicy:
    loadBalancer:
      localityLbSetting:
        enabled: true
        distribute:
        - from: region1/zone1/*
          to:
            "region1/zone1/*": 70
            "region1/zone2/*": 20
            "region3/zone4/*": 10
    outlierDetection:
      consecutive5xxErrors: 100
      interval: 1s
      baseEjectionTime: 1m
EOF
验证分布
从 sleep Pod 调用 helloWorld 服务:
kubectl exec --context="${CTX_R1_Z1}" -n sample -c sleep \
  "$(kubectl get pod --context="${CTX_R1_Z1}" -n sample -l \
  app=sleep -o jsonpath='{.items[0].metadata.name}')" \
  -- curl -sSL helloworld.sample:5000/hello
重复多次,并验证每个 Pod 的回复数与本指南顶部表格中的预期百分比匹配。
恭喜! 你成功配置了地域权重分布!
清理删除生成的文件
rm -f sample.yaml helloworld-region*.zone*.yaml
删除 sample 命名空间
for CTX in "$CTX_PRIMARY" "$CTX_R1_Z1" "$CTX_R1_Z2" "$CTX_R2_Z3" "$CTX_R3_Z4";
do
  kubectl --context="$CTX" delete ns sample --ignore-not-found=true;
done
管理集群入口流量
Ingress Gateway
部署httpbin示例
kubectl apply -f <(istioctl kube-inject -f samples/httpbin/httpbin.yaml)
1.使用istio gateway配置ingress
创建 Istio Gateway
kubectl apply -f - <<EOF
apiVersion: networking.istio.io/v1alpha3
kind: Gateway
metadata:
  name: httpbin-gateway
spec:
  selector:
    istio: ingressgateway # use Istio default gateway implementation
  servers:
  - port:
      number: 80
      name: http
      protocol: HTTP
    hosts:
    - "httpbin.example.com"
EOF
gateway.networking.istio.io/httpbin-gateway created
为通过 Gateway 的入口流量配置路由
kubectl apply -f - <<EOF
apiVersion: networking.istio.io/v1alpha3
kind: VirtualService
metadata:
  name: httpbin
spec:
  hosts:
  - "httpbin.example.com"
  gateways:
  - httpbin-gateway
  http:
  - match:
    - uri:
        prefix: /status
    - uri:
        prefix: /delay
    route:
    - destination:
        port:
          number: 8000
        host: httpbin
EOF
virtualservice.networking.istio.io/httpbin created
curl测试
curl -I -HHost:httpbin.example.com http://$INGRESS_HOST:$INGRESS_PORT/status/200
HTTP/1.1 200 OK
server: istio-envoy
date: Thu, 13 Feb 2020 09:22:40 GMT
content-type: text/html; charset=utf-8
access-control-allow-origin: *
access-control-allow-credentials: true
content-length: 0
x-envoy-upstream-service-time: 5
已为 httpbin 服务创建了VirtualService 配置,包含两个路由规则,允许流量流向路径 /status 和 /delay。
gateways 列表规约了哪些请求允许通过 httpbin-gateway 网关。 所有其他外部请求均被拒绝并返回 404 响应。
2.通过浏览器访问
配置好hosts文件192.168.100.102 httpbin.example.com,访问:https://httpbin.example.com/status/200
3.清理
kubectl delete gateway httpbin-gateway
kubectl delete virtualservice httpbin
kubectl delete --ignore-not-found=true -f samples/httpbin/httpbin.yaml
Copy
4.3.8.2 安全网关
本任务则展示了如何使用简单或双向 TLS 暴露安全 HTTPS 服务。
TLS 所必需的私钥、服务器证书和根证书使用基于文件挂载的方式进行配置。
1.部署istio和httpbin实例
kubectl apply -f <(istioctl kube-inject -f samples/httpbin/httpbin.yaml)
serviceaccount/httpbin created
service/httpbin created
deployment.apps/httpbin created
2.生成服务器证书和私钥
创建一个根证书和私钥以为您的服务所用的证书签名
openssl req -x509 -sha256 -nodes -days 365 -newkey rsa:2048 -subj '/O=example Inc./CN=example.com' -keyout example.com.key -out example.com.crt
Generating a 2048 bit RSA private key
...........+++
....+++
writing new private key to 'example.com.key'
-----
Copy
为 httpbin.example.com 创建一个证书和私钥
openssl req -out httpbin.example.com.csr -newkey rsa:2048 -nodes -keyout httpbin.example.com.key -subj "/CN=httpbin.example.com/O=httpbin organization"
Generating a 2048 bit RSA private key
..................................................+++
.................................................+++
writing new private key to 'httpbin.example.com.key'
-----

openssl x509 -req -days 365 -CA example.com.crt -CAkey example.com.key -set_serial 0 -in httpbin.example.com.csr -out httpbin.example.com.crt
Signature ok
subject=/CN=httpbin.example.com/O=httpbin organization
Getting CA Private Key
3.基于文件挂载的方式配置挂载tls ingress网关
首先使用证书和私钥创建一个 secret。该 secret 将被挂载为 /etc/istio/ingressgateway-certs 路径下的一个文件。 然后您可以创建一个网关定义,它将配置一个运行于端口 443 的服务。
使用 kubectl 在命名空间 istio-system 下创建 secret istio-ingressgateway-certs。Istio 网关将会自动加载该 secret
kubectl create -n istio-system secret tls istio-ingressgateway-certs --key httpbin.example.com.key --cert httpbin.example.com.crt
secret/istio-ingressgateway-certs created
验证 tls.crt 和 tls.key 是否都已经挂载到 ingress 网关 pod 中
INGRESSGATEWAY_POD=$(kubectl -n istio-system get pods -l istio=ingressgateway -ojsonpath='{.items[0].metadata.name}')
kubectl -n istio-system exec $INGRESSGATEWAY_POD -- ls -l /etc/istio/ingressgateway-certs
total 0
lrwxrwxrwx. 1 root root 14 Feb 17 12:53 tls.crt -> ..data/tls.crt
lrwxrwxrwx. 1 root root 14 Feb 17 12:53 tls.key -> ..data/tls.key
为 443 端口定义 Gateway 并设置 server
证书和私钥必须位于 /etc/istio/ingressgateway-certs,否则网关将无法加载它们。
kubectl apply -f - <<EOF
apiVersion: networking.istio.io/v1alpha3
kind: Gateway
metadata:
  name: httpbin-gateway
spec:
  selector:
    istio: ingressgateway # use istio default ingress gateway
  servers:
  - port:
      number: 443
      name: https
      protocol: HTTPS
    tls:
      mode: SIMPLE
      serverCertificate: /etc/istio/ingressgateway-certs/tls.crt
      privateKey: /etc/istio/ingressgateway-certs/tls.key
    hosts:
    - "httpbin.example.com"
EOF
gateway.networking.istio.io/httpbin-gateway created
配置路由以让流量从 Gateway 进入
kubectl apply -f - <<EOF
apiVersion: networking.istio.io/v1alpha3
kind: VirtualService
metadata:
  name: httpbin
spec:
  hosts:
  - "httpbin.example.com"
  gateways:
  - httpbin-gateway
  http:
  - match:
    - uri:
        prefix: /status
    - uri:
        prefix: /delay
    route:
    - destination:
        port:
          number: 8000
        host: httpbin
EOF
virtualservice.networking.istio.io/httpbin created
Copy
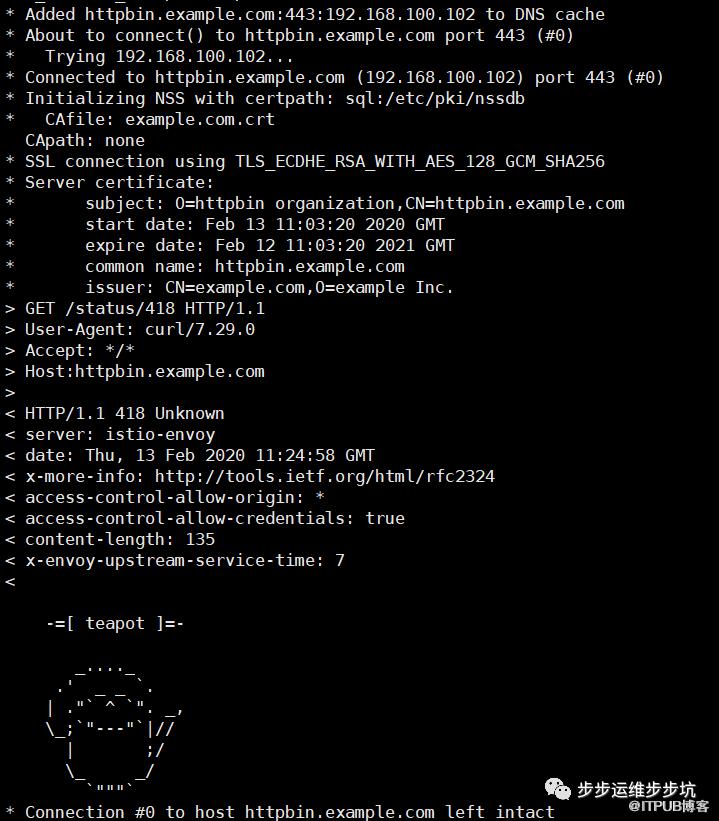
使用 curl 发送一个 https 请求到 SECURE_INGRESS_PORT 以通过 HTTPS 访问 httpbin 服务
curl -v -HHost:httpbin.example.com --resolve httpbin.example.com:$SECURE_INGRESS_PORT:$INGRESS_HOST --cacert example.com.crt https://httpbin.example.com:$SECURE_INGRESS_PORT/status/418
输出中的 SSL certificate verify ok 这一行表示服务端的证书验证成功。
4.配置双向 TLS ingress 网关
在命名空间 istio-system 中创建 secret istio-ingressgateway-ca-certs,Istio 网关将会自动加载该 secret。
kubectl create -n istio-system secret generic istio-ingressgateway-ca-certs --from-file=example.com.crt
secret/istio-ingressgateway-ca-certs created
重新定义之前的 Gateway,修改 TLS 模式为 MUTUAL,并指定 caCertificates
kubectl apply -f - <<EOF
apiVersion: networking.istio.io/v1alpha3
kind: Gateway
metadata:
  name: httpbin-gateway
spec:
  selector:
    istio: ingressgateway # use istio default ingress gateway
  servers:
  - port:
      number: 443
      name: https
      protocol: HTTPS
    tls:
      mode: MUTUAL
      serverCertificate: /etc/istio/ingressgateway-certs/tls.crt
      privateKey: /etc/istio/ingressgateway-certs/tls.key
      caCertificates: /etc/istio/ingressgateway-ca-certs/example.com.crt
    hosts:
    - "httpbin.example.com"
EOF
gateway.networking.istio.io/httpbin-gateway configured
Copy
通过curl访问httpbin的HTTPS服务
curl -HHost:httpbin.example.com --resolve httpbin.example.com:$SECURE_INGRESS_PORT:$INGRESS_HOST --cacert example.com.crt https://httpbin.example.com:$SECURE_INGRESS_PORT/status/418
为 httpbin.example.com 服务创建客户端证书
openssl req -out httpbin-client.example.com.csr -newkey rsa:2048 -nodes -keyout httpbin-client.example.com.key -subj "/CN=httpbin-client.example.com/O=httpbin's client organization"
openssl x509 -req -days 365 -CA example.com.crt -CAkey example.com.key -set_serial 0 -in httpbin-client.example.com.csr -out httpbin-client.example.com.crt
重新用 curl 发送之前的请求,这次通过参数传递客户端证书(添加 --cert 选项)和您的私钥(--key 选项)
curl -HHost:httpbin.example.com --resolve httpbin.example.com:$SECURE_INGRESS_PORT:$INGRESS_HOST --cacert example.com.crt --cert httpbin-client.example.com.crt --key httpbin-client.example.com.key https://httpbin.example.com:$SECURE_INGRESS_PORT/status/418
curl: (35) You are attempting to import a cert with the same issuer/serial as an existing cert, but that is not the same cert.
ps:这里测试和实验的不一样,原因未知
5.为多主机配置 TLS ingress 网关
为 bookinfo.com 创建服务器证书和私钥
openssl req -out bookinfo.com.csr -newkey rsa:2048 -nodes -keyout bookinfo.com.key -subj "/CN=bookinfo.com/O=bookinfo organization"
Generating a 2048 bit RSA private key
.....................................+++
...+++
writing new private key to 'bookinfo.com.key'
-----

openssl x509 -req -days 365 -CA example.com.crt -CAkey example.com.key -set_serial 0 -in bookinfo.com.csr -out bookinfo.com.crt
Signature ok
subject=/CN=bookinfo.com/O=bookinfo organization
Getting CA Private Key
创建一个新的 secret 以保存 bookinfo.com 的证书
kubectl create -n istio-system secret tls istio-ingressgateway-bookinfo-certs --key bookinfo.com.key --cert bookinfo.com.crt
secret/istio-ingressgateway-bookinfo-certs created
更新 istio-ingressgateway deployment 以挂载新创建的 secret
cat > gateway-patch.json <<EOF
[{
  "op": "add",
  "path": "/spec/template/spec/containers/0/volumeMounts/0",
  "value": {
    "mountPath": "/etc/istio/ingressgateway-bookinfo-certs",
    "name": "ingressgateway-bookinfo-certs",
    "readOnly": true
  }
},
{
  "op": "add",
  "path": "/spec/template/spec/volumes/0",
  "value": {
  "name": "ingressgateway-bookinfo-certs",
    "secret": {
      "secretName": "istio-ingressgateway-bookinfo-certs",
      "optional": true
    }
  }
}]
EOF

kubectl -n istio-system patch --type=json deploy istio-ingressgateway -p "$(cat gateway-patch.json)"
deployment.apps/istio-ingressgateway patched
验证 istio-ingressgateway pod 已成功加载私钥和证书
kubectl exec -it -n istio-system $(kubectl -n istio-system get pods -l istio=ingressgateway -o jsonpath='{.items[0].metadata.name}') -- ls -al /etc/istio/ingressgateway-bookinfo-certs
total 0
drwxrwxrwt. 3 root root 120 Feb 17 13:08 .
drwxr-xr-x. 1 root root 115 Feb 17 13:08 ..
drwxr-xr-x. 2 root root  80 Feb 17 13:08 ..2020_02_17_13_08_05.978854437
lrwxrwxrwx. 1 root root  31 Feb 17 13:08 ..data -> ..2020_02_17_13_08_05.978854437
lrwxrwxrwx. 1 root root  14 Feb 17 13:08 tls.crt -> ..data/tls.crt
lrwxrwxrwx. 1 root root  14 Feb 17 13:08 tls.key -> ..data/tls.key
Co
6.配置 bookinfo.com 主机的流量
部署Bookinfo 示例应用
kubectl apply -f samples/bookinfo/platform/kube/bookinfo.yaml
service/details created
serviceaccount/bookinfo-details created
deployment.apps/details-v1 created
service/ratings created
serviceaccount/bookinfo-ratings created
deployment.apps/ratings-v1 created
service/reviews created
serviceaccount/bookinfo-reviews created
deployment.apps/reviews-v1 created
deployment.apps/reviews-v2 created
deployment.apps/reviews-v3 created
service/productpage created
serviceaccount/bookinfo-productpage created
deployment.apps/productpage-v1 created
为 bookinfo.com 定义网关
kubectl apply -f - <<EOF
apiVersion: networking.istio.io/v1alpha3
kind: Gateway
metadata:
  name: bookinfo-gateway
spec:
  selector:
    istio: ingressgateway # use istio default ingress gateway
  servers:
  - port:
      number: 443
      name: https-bookinfo
      protocol: HTTPS
    tls:
      mode: SIMPLE
      serverCertificate: /etc/istio/ingressgateway-bookinfo-certs/tls.crt
      privateKey: /etc/istio/ingressgateway-bookinfo-certs/tls.key
    hosts:
    - "bookinfo.com"
EOF
gateway.networking.istio.io/bookinfo-gateway created
配置 bookinfo.com 的路由
kubectl apply -f - <<EOF
apiVersion: networking.istio.io/v1alpha3
kind: VirtualService
metadata:
  name: bookinfo
spec:
  hosts:
  - "bookinfo.com"
  gateways:
  - bookinfo-gateway
  http:
  - match:
    - uri:
        exact: /productpage
    - uri:
        exact: /login
    - uri:
        exact: /logout
    - uri:
        prefix: /api/v1/products
    route:
    - destination:
        host: productpage
        port:
          number: 9080
EOF
virtualservice.networking.istio.io/bookinfo created
发送到 Bookinfo productpage 的请求
curl -o /dev/null -s -v -w "%{http_code}\n" -HHost:bookinfo.com --resolve bookinfo.com:$SECURE_INGRESS_PORT:$INGRESS_HOST --cacert example.com.crt -HHost:bookinfo.com https://bookinfo.com:$SECURE_INGRESS_PORT/productpage
测试结果是404
验证 httbin.example.com
curl -HHost:httpbin.example.com --resolve httpbin.example.com:$SECURE_INGRESS_PORT:$INGRESS_HOST --cacert example.com.crt --cert httpbin-client.example.com.crt --key httpbin-client.example.com.key https://httpbin.example.com:$SECURE_INGRESS_PORT/status/418
curl: (35) You are attempting to import a cert with the same issuer/serial as an existing cert, but that is not the same cert.
跟预设的结果不一样
清理
kubectl delete gateway --ignore-not-found=true httpbin-gateway bookinfo-gateway
kubectl delete virtualservice httpbin
kubectl delete --ignore-not-found=true -n istio-system secret istio-ingressgateway-certs istio-ingressgateway-ca-certs
kubectl delete --ignore-not-found=true virtualservice bookinfo

rm -rf example.com.crt example.com.key httpbin.example.com.crt httpbin.example.com.key httpbin.example.com.csr httpbin-client.example.com.crt httpbin-client.example.com.key httpbin-client.example.com.csr bookinfo.com.crt bookinfo.com.key bookinfo.com.csr

rm -f gateway-patch.json

kubectl delete --ignore-not-found=true -f samples/httpbin/httpbin.yaml
kubectl delete -f samples/bookinfo/platform/kube/bookinfo.yaml
安全网关(SDS)
1.为服务器和客户端生成证书
克隆示例代码库
git clone https://github.com/nicholasjackson/mtls-go-example
cd mtls-go-example
为 httpbin.example.com 生成证书,password换成具体的密码,一直按Y
./generate.sh httpbin.example.com <password>
把证书移动到 httpbin.example.com 目录中
 mkdir ../httpbin.example.com && mv 1_root 2_intermediate 3_application 4_client ../httpbin.example.com
 cd ..
2.使用SDS 配置 TLS Ingress Gateway
在 Ingress Gateway 上启用 SDS,并部署 Ingress Gateway 代理。
这个功能缺省是禁用的,因此需要在 Helm 中打开 istio-ingressgateway.sds.enabled 开关,然后生成 istio-ingressgateway.yaml 文件
istioctl manifest generate \
--set values.gateways.istio-egressgateway.enabled=false \
--set values.gateways.istio-ingressgateway.sds.enabled=true > \
$HOME/istio-ingressgateway.yaml

kubectl apply -f $HOME/istio-ingressgateway.yaml
设置环境变量
export SECURE_INGRESS_PORT=$(kubectl -n istio-system \
get service istio-ingressgateway -o jsonpath='{.spec.ports[?(@.name=="https")].port}')
export INGRESS_HOST=$(kubectl -n istio-system \
get service istio-ingressgateway -o jsonpath='{.status.loadBalancer.ingress[0].ip}')
Copy
3.为单一主机配置 TLS Ingress Gateway
启动 httpbin 样例
cat <<EOF | kubectl apply -f -
apiVersion: v1
kind: Service
metadata:
  name: httpbin
  labels:
    app: httpbin
spec:
  ports:
  - name: http
    port: 8000
  selector:
    app: httpbin
---
apiVersion: apps/v1
kind: Deployment
metadata:
  name: httpbin
spec:
  replicas: 1
  selector:
    matchLabels:
      app: httpbin
      version: v1
  template:
    metadata:
      labels:
        app: httpbin
        version: v1
    spec:
      containers:
      - image: docker.io/citizenstig/httpbin
        imagePullPolicy: IfNotPresent
        name: httpbin
        ports:
        - containerPort: 8000
EOF
service/httpbin created
deployment.apps/httpbin created
为 Ingress Gateway 创建 Secret
kubectl create -n istio-system secret generic httpbin-credential \
--from-file=key=httpbin.example.com/3_application/private/httpbin.example.com.key.pem \
--from-file=cert=httpbin.example.com/3_application/certs/httpbin.example.com.cert.pem
secret/httpbin-credential created
创建一个 Gateway ,其 servers: 字段的端口为 443,设置 credentialName 的值为 httpbin-credential。这个值就是 Secret 的名字。TLS 模式设置为 SIMPLE。
cat <<EOF | kubectl apply -f -
apiVersion: networking.istio.io/v1alpha3
kind: Gateway
metadata:
  name: mygateway
spec:
  selector:
    istio: ingressgateway # use istio default ingress gateway
  servers:
  - port:
      number: 443
      name: https
      protocol: HTTPS
    tls:
      mode: SIMPLE
      credentialName: "httpbin-credential" # must be the same as secret
    hosts:
    - "httpbin.example.com"
EOF
gateway.networking.istio.io/mygateway created
配置 Gateway 的 Ingress 流量路由,并配置对应的 VirtualService
cat <<EOF | kubectl apply -f -
apiVersion: networking.istio.io/v1alpha3
kind: VirtualService
metadata:
  name: httpbin
spec:
  hosts:
  - "httpbin.example.com"
  gateways:
  - mygateway
  http:
  - match:
    - uri:
        prefix: /status
    - uri:
        prefix: /delay
    route:
    - destination:
        port:
          number: 8000
        host: httpbin
EOF
virtualservice.networking.istio.io/httpbin created
用 HTTPS 协议访问 httpbin 服务
curl -v -HHost:httpbin.example.com \
--resolve httpbin.example.com:$SECURE_INGRESS_PORT:$INGRESS_HOST \
--cacert httpbin.example.com/2_intermediate/certs/ca-chain.cert.pem \
https://httpbin.example.com:$SECURE_INGRESS_PORT/status/418
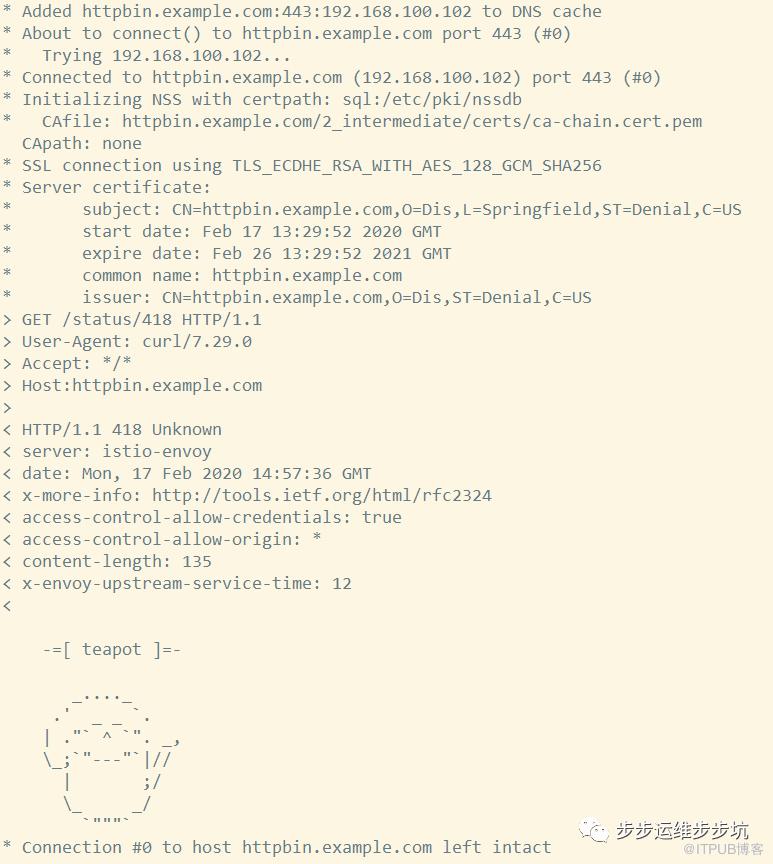
http返回一个茶壶
删除 Gateway 的 Secret,并新建另外一个,然后修改 Ingress Gateway 的凭据
kubectl -n istio-system delete secret httpbin-credential
secret "httpbin-credential" deleted

cd mtls-go-example
./generate.sh httpbin.example.com <password>
mkdir ../httpbin.new.example.com && mv 1_root 2_intermediate 3_application 4_client ../httpbin.new.example.com
cd ..

kubectl create -n istio-system secret generic httpbin-credential \
--from-file=key=httpbin.new.example.com/3_application/private/httpbin.example.com.key.pem \
--from-file=cert=httpbin.new.example.com/3_application/certs/httpbin.example.com.cert.pem
secret/httpbin-credential created
使用 curl 访问 httpbin 服务
curl -v -HHost:httpbin.example.com \
--resolve httpbin.example.com:$SECURE_INGRESS_PORT:$INGRESS_HOST \
--cacert httpbin.new.example.com/2_intermediate/certs/ca-chain.cert.pem \
https://httpbin.example.com:$SECURE_INGRESS_PORT/status/418
再次使用之前的证书访问httpbin,提示curl: (60) Peer's Certificate issuer is not recognized.
4.为TLS Ingress Gateway 配置多个主机名
要恢复 “httpbin” 的凭据,请删除对应的 secret 并重新创建
kubectl -n istio-system delete secret httpbin-credential
kubectl create -n istio-system secret generic httpbin-credential \
--from-file=key=httpbin.example.com/3_application/private/httpbin.example.com.key.pem \
--from-file=cert=httpbin.example.com/3_application/certs/httpbin.example.com.cert.pem
启动 hellowworld-v1 示例
cat <<EOF | kubectl apply -f -
apiVersion: v1
kind: Service
metadata:
  name: helloworld-v1
  labels:
    app: helloworld-v1
spec:
  ports:
  - name: http
    port: 5000
  selector:
    app: helloworld-v1
---
apiVersion: apps/v1
kind: Deployment
metadata:
  name: helloworld-v1
spec:
  replicas: 1
  selector:
    matchLabels:
      app: helloworld-v1
      version: v1
  template:
    metadata:
      labels:
        app: helloworld-v1
        version: v1
    spec:
      containers:
      - name: helloworld
        image: istio/examples-helloworld-v1
        resources:
          requests:
            cpu: "100m"
        imagePullPolicy: IfNotPresent #Always
        ports:
        - containerPort: 5000
EOF
service/helloworld-v1 created
deployment.apps/helloworld-v1 created
为 Ingress Gateway 创建一个 Secret。如果已经创建了 httpbin-credential,就可以创建 helloworld-credential Secret
cd mtls-go-example
./generate.sh helloworld-v1.example.com <password>
mkdir ../helloworld-v1.example.com && mv 1_root 2_intermediate 3_application 4_client ../helloworld-v1.example.com
cd -

kubectl create -n istio-system secret generic helloworld-credential \
--from-file=key=helloworld-v1.example.com/3_application/private/helloworld-v1.example.com.key.pem \
--from-file=cert=helloworld-v1.example.com/3_application/certs/helloworld-v1.example.com.cert.pem
secret/helloworld-credential created
Copy
定义一个 Gateway ,其中包含了两个 server,都开放了 443 端口。两个 credentialName 字段分别赋值为 httpbin-credential 和 helloworld-credential。设置 TLS 的 mode 为 SIMPLE
cat <<EOF | kubectl apply -f -
apiVersion: networking.istio.io/v1alpha3
kind: Gateway
metadata:
  name: mygateway
spec:
  selector:
    istio: ingressgateway # use istio default ingress gateway
  servers:
  - port:
      number: 443
      name: https-httpbin
      protocol: HTTPS
    tls:
      mode: SIMPLE
      credentialName: "httpbin-credential"
    hosts:
    - "httpbin.example.com"
  - port:
      number: 443
      name: https-helloworld
      protocol: HTTPS
    tls:
      mode: SIMPLE
      credentialName: "helloworld-credential"
    hosts:
    - "helloworld-v1.example.com"
EOF
gateway.networking.istio.io/mygateway configured
配置 Gateway 的流量路由,配置 VirtualService
cat <<EOF | kubectl apply -f -
apiVersion: networking.istio.io/v1alpha3
kind: VirtualService
metadata:
  name: helloworld-v1
spec:
  hosts:
  - "helloworld-v1.example.com"
  gateways:
  - mygateway
  http:
  - match:
    - uri:
        exact: /hello
    route:
    - destination:
        host: helloworld-v1
        port:
          number: 5000
EOF
virtualservice.networking.istio.io/helloworld-v1 created
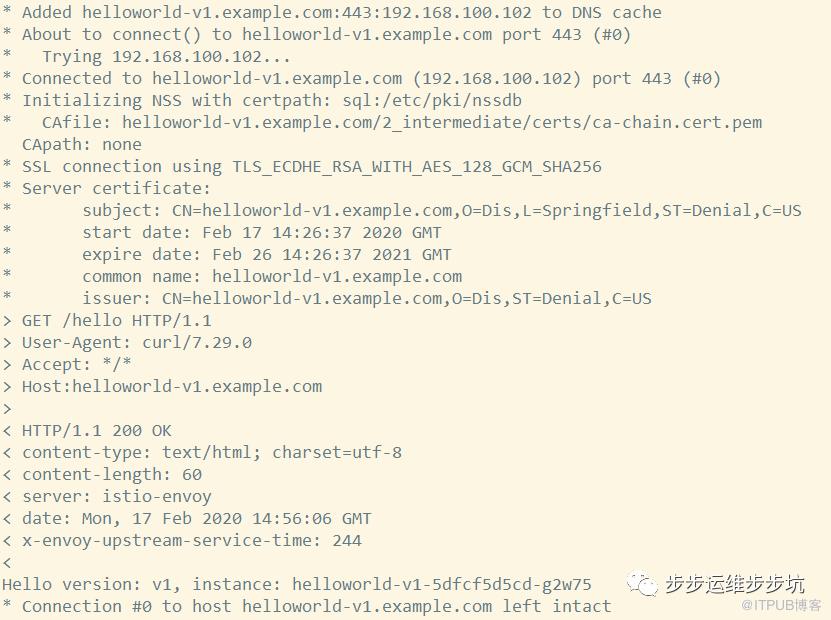
向 helloworld-v1.example.com 发送 HTTPS 请求
curl -v -HHost:helloworld-v1.example.com \
--resolve helloworld-v1.example.com:$SECURE_INGRESS_PORT:$INGRESS_HOST \
--cacert helloworld-v1.example.com/2_intermediate/certs/ca-chain.cert.pem \
https://helloworld-v1.example.com:$SECURE_INGRESS_PORT/hello
发送 HTTPS 请求到 httpbin.example.com
curl -v -HHost:httpbin.example.com \
--resolve httpbin.example.com:$SECURE_INGRESS_PORT:$INGRESS_HOST \
--cacert httpbin.example.com/2_intermediate/certs/ca-chain.cert.pem \
https://httpbin.example.com:$SECURE_INGRESS_PORT/status/418
5.配置双向TLS Ingress Gateway
修改 Ingress Gateway 的凭据,就要删除并重建对应的 Secret
kubectl -n istio-system delete secret httpbin-credential
kubectl create -n istio-system secret generic httpbin-credential  \
--from-file=key=httpbin.example.com/3_application/private/httpbin.example.com.key.pem \
--from-file=cert=httpbin.example.com/3_application/certs/httpbin.example.com.cert.pem \
--from-file=cacert=httpbin.example.com/2_intermediate/certs/ca-chain.cert.pem
修改 Gateway 定义,设置 TLS 的模式为 MUTUAL
cat <<EOF | kubectl apply -f -
apiVersion: networking.istio.io/v1alpha3
kind: Gateway
metadata:
 name: mygateway
spec:
 selector:
   istio: ingressgateway # use istio default ingress gateway
 servers:
 - port:
     number: 443
     name: https
     protocol: HTTPS
   tls:
     mode: MUTUAL
     credentialName: "httpbin-credential" # must be the same as secret
   hosts:
   - "httpbin.example.com"
EOF
gateway.networking.istio.io/mygateway configured
使用前面的方式尝试发出 HTTPS 请求
curl -v -HHost:httpbin.example.com \
--resolve httpbin.example.com:$SECURE_INGRESS_PORT:$INGRESS_HOST \
--cacert httpbin.example.com/2_intermediate/certs/ca-chain.cert.pem \
https://httpbin.example.com:$SECURE_INGRESS_PORT/status/418
会提示:curl: (35) NSS: client certificate not found (nickname not specified)
在 curl 命令中加入客户端证书和私钥的参数,重新发送请求。(客户端证书参数为 --cert,私钥参数为 --key)
curl -v -HHost:httpbin.example.com \
--resolve httpbin.example.com:$SECURE_INGRESS_PORT:$INGRESS_HOST \
--cacert httpbin.example.com/2_intermediate/certs/ca-chain.cert.pem \
--cert httpbin.example.com/4_client/certs/httpbin.example.com.cert.pem \
--key httpbin.example.com/4_client/private/httpbin.example.com.key.pem \
https://httpbin.example.com:$SECURE_INGRESS_PORT/status/418
可以再次看到茶壶图像
如果不想用 httpbin-credential secret 来存储所有的凭据, 可以创建两个单独的 secret :
httpbin-credential用来存储服务器的秘钥和证书httpbin-credential-cacert用来存储客户端的 CA 证书且一定要有-cacert后缀
kubectl -n istio-system delete secret httpbin-credential
kubectl create -n istio-system secret generic httpbin-credential  \
--from-file=key=httpbin.example.com/3_application/private/httpbin.example.com.key.pem \
--from-file=cert=httpbin.example.com/3_application/certs/httpbin.example.com.cert.pem
kubectl create -n istio-system secret generic httpbin-credential-cacert  \
--from-file=cacert=httpbin.example.com/2_intermediate/certs/ca-chain.cert.pem
6.清理
删除 Gateway 配置、VirtualService 以及 Secret
kubectl delete gateway mygateway
kubectl delete virtualservice httpbin
kubectl delete --ignore-not-found=true -n istio-system secret \
httpbin-credential helloworld-credential
kubectl delete --ignore-not-found=true virtualservice helloworld-v1
Copy
删除证书目录以及用于生成证书的代码库
rm -rf httpbin.example.com helloworld-v1.example.com mtls-go-example
删除用于重新部署 Ingress Gateway 的文件
rm -f $HOME/istio-ingressgateway.yaml
关闭 httpbin 和 helloworld-v1 服务
kubectl delete service --ignore-not-found=true helloworld-v1
kubectl delete service --ignore-not-found=true httpbin
删除deployment
kubectl delete deploy httpbin helloworld-v1
部署istio dashboard
Naftis 是一个基于 web 的 Istio dashboard,通过任务模板的方式来帮助用户更方便地执行 Istio 任务。 用户可以在 Naftis 中定义自己的任务模板,并填充变量来构造单个或多个构造任务实例,从而完成各种服务治理功能。
Naftis的功能:
内部集成了一些常用 dashboard
可定制的任务模板支持
支持回滚指定任务
支持指定根服务节点的服务拓扑图
提供查看 Istio 的 Services 和 Pod 的支持
开箱即用,通过 Kubectl 相关指令即可快速部署
支持 Istio 1.0
github仓库地址:https://github.com/xiaomi/naftis
目前最新版本为0.1.4-rc6
部署naftis 下载最新 release 文件和部署清单
wget -O - https://raw.githubusercontent.com/XiaoMi/naftis/master/tool/getlatest.sh | bash
Copy
创建 Naftis 命名空间
kubectl create namespace naftis
Copy
确认 Naftis 命名空间已创建
kubectl get namespace naftis
NAME     STATUS   AGE
naftis   Active   7s
Copy
修改mysql.yaml文件
cp mysql.yaml{,.ori}
diff mysql.yaml.ori mysql.yaml
10c10
<   storageClassName: manual
---
>   storageClassName: managed-nfs-storage
206c206
<   storageClassName: "manual"
---
>   storageClassName: "managed-nfs-storage"
275c275
< apiVersion: extensions/v1beta1
---
> apiVersion: apps/v1
284a285,287
>   selector:
>     matchLabels:
>       app: naftis-mysql
Copy
部署 Naftis MySQL 服务
kubectl apply -n naftis -f mysql.yaml
persistentvolume/naftis-pv created
secret/naftis-mysql created
configmap/naftis-mysql-initialization created
configmap/naftis-mysql-test created
persistentvolumeclaim/naftis-mysql created
service/naftis-mysql created
pod/naftis-mysql-test created
deployment.apps/naftis-mysql created
Copy
确认 MySQL 已部署
kubectl get po -n naftis
NAME                           READY   STATUS    RESTARTS   AGE
naftis-mysql-54444ffc5-7mp86   1/1     Running   0          33s
naftis-mysql-test              0/1     Running   0          33s
Copy
修改naftis.yaml文件
cp naftis.yaml{,.ori}
diff naftis.yaml.ori naftis.yaml
84c84
< apiVersion: extensions/v1beta1
---
> apiVersion: apps/v1
94a95,98
>   selector:
>     matchLabels:
>       app: naftis-ui
>       release: naftis
111c115
< apiVersion: extensions/v1beta1
---
> apiVersion: apps/v1
121a126,129
>   selector:
>     matchLabels:
>       app: naftis-api
>       release: naftis
Copy
部署 Naftis API 和 UI 服务
kubectl apply -n naftis -f naftis.yaml
namespace/naftis created
configmap/naftis-config created
clusterrolebinding.rbac.authorization.k8s.io/naftis-rbac created
service/naftis-api created
service/naftis-ui created
deployment.apps/naftis-ui created
deployment.apps/naftis-api created
Copy
确认 Naftis 所有的服务已经正确定义并正常运行中
kubectl get svc -n naftis
NAME           TYPE           CLUSTER-IP       EXTERNAL-IP   PORT(S)        AGE
naftis-api     ClusterIP      10.104.140.162   <none>        50000/TCP      27s
naftis-mysql   ClusterIP      10.105.179.76    <none>        3306/TCP       79s
naftis-ui      LoadBalancer   10.97.7.57       <pending>     80:30377/TCP   27s

kubectl get pod -n naftis
NAME                           READY   STATUS    RESTARTS   AGE
naftis-api-7cbdb88f97-qrg2f    0/1     Running   0          6s
naftis-mysql-54444ffc5-8vnsq   1/1     Running   0          58s
naftis-mysql-test              0/1     Running   0          58s
naftis-ui-5f769cdbbd-85cwz     1/1     Running   0          6s
Copy
端口转发访问 Naftis
kubectl -n naftis port-forward $(kubectl -n naftis get pod -l app=naftis-ui -o jsonpath='{.items[0].metadata.name}') --address 0.0.0.0 8080:80 &
Copy
打开浏览器,访问 http://localhost:8080 即可。默认用户名和密码分别为 admin、admin。
或者修改naftis-ui服务类型为NodePort
kubectl patch -n naftis svc naftis-ui -p '{"spec": {"type": "NodePort"}}'
service/naftis-ui patched

kubectl get svc -n naftis naftis-ui
NAME        TYPE       CLUSTER-IP   EXTERNAL-IP   PORT(S)        AGE
naftis-ui   NodePort   10.97.7.57   <none>        80:30377/TCP   6m39s
Copy
然后通过http://192.168.100.10:30377进行访问。
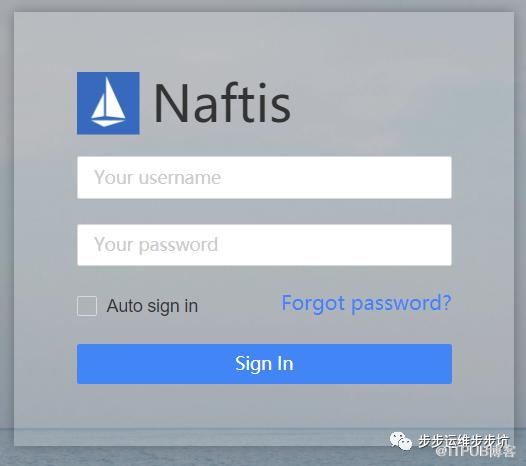
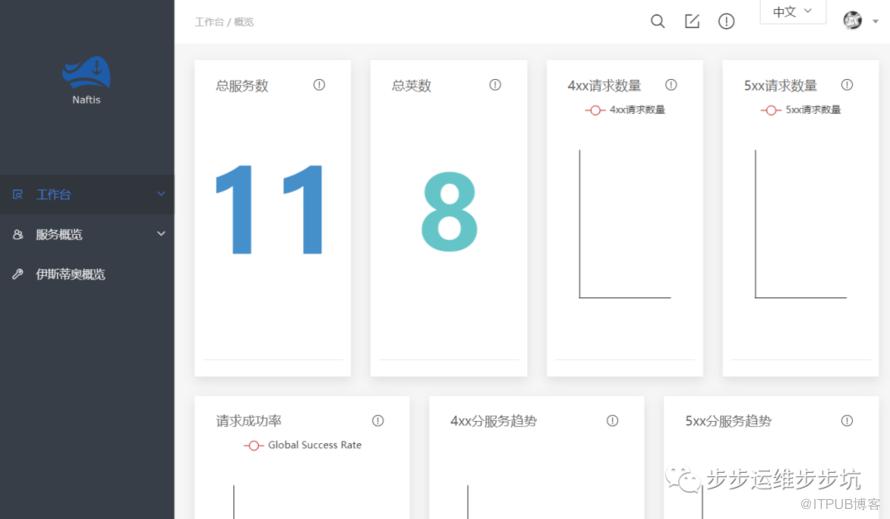
页面支持中文和英文两种,具体的操作略。
错误汇总
kubeadm init 报错 ”unknown service runtime.v1alpha2.RuntimeService”
[root@k8s-master opt]# rm /etc/containerd/config.toml
[root@k8s-master opt]# systemctl restart containerd
Failed to get system container stats for “/system.slice/kubelet.service”
[root@master-all ~]# vim /usr/lib/systemd/system/kubelet.service
[Service]
CPUAccounting=true
MemoryAccounting=true
[root@master-all ~]# vim /etc/systemd/system/kubelet.service.d/10-kubeadm.conf
# Note: This dropin only works with kubeadm and kubelet v1.11+
[Service]
Environment="KUBELET_KUBECONFIG_ARGS=--bootstrap-kubeconfig=/etc/kubernetes/bootstrap-kubelet.conf --kubeconfig=/etc/kubernetes/kubelet.conf"
Environment="KUBELET_CONFIG_ARGS=--config=/var/lib/kubelet/config.yaml"
Environment="KUBELET_CGROUP_ARGS=--cgroup-driver=systemd --runtime-cgroups=/systemd/system.slice --kubelet-cgroups=/systemd/system.slice"
# This is a file that "kubeadm init" and "kubeadm join" generates at runtime, populating the KUBELET_KUBEADM_ARGS variable dynamically
EnvironmentFile=-/var/lib/kubelet/kubeadm-flags.env
# This is a file that the user can use for overrides of the kubelet args as a last resort. Preferably, the user should use
# the .NodeRegistration.KubeletExtraArgs object in the configuration files instead. KUBELET_EXTRA_ARGS should be sourced from this file.
EnvironmentFile=-/etc/sysconfig/kubelet
ExecStart=
ExecStart=/usr/bin/kubelet $KUBELET_KUBECONFIG_ARGS $KUBELET_CONFIG_ARGS $KUBELET_KUBEADM_ARGS $KUBELET_EXTRA_ARGS
[root@master-all ~]# systemctl daemon-reload
[root@master-all ~]# reboot
Failed to get system container stats for "/user.slice/user-0.slice/session-1.scope": failed to get cgroup stats for "/user.slice/user-0.slice/session-1.scope": failed to get container info for "/user.slice/user-0.slice/session-1.scope": unknown container "/user.slice/user-0.slice/session-1.scope"
[root@master-all ~]# vim /etc/systemd/system/kubelet.service.d/10-kubeadm.conf
# Note: This dropin only works with kubeadm and kubelet v1.11+
[Service]
Environment="KUBELET_KUBECONFIG_ARGS=--bootstrap-kubeconfig=/etc/kubernetes/bootstrap-kubelet.conf --kubeconfig=/etc/kubernetes/kubelet.conf"
Environment="KUBELET_CONFIG_ARGS=--config=/var/lib/kubelet/config.yaml"
Environment="KUBELET_CGROUP_ARGS=--cgroup-driver=systemd --runtime-cgroups=/systemd/system.slice --kubelet-cgroups=/systemd/system.slice"
# This is a file that "kubeadm init" and "kubeadm join" generates at runtime, populating the KUBELET_KUBEADM_ARGS variable dynamically
EnvironmentFile=-/var/lib/kubelet/kubeadm-flags.env
# This is a file that the user can use for overrides of the kubelet args as a last resort. Preferably, the user should use
# the .NodeRegistration.KubeletExtraArgs object in the configuration files instead. KUBELET_EXTRA_ARGS should be sourced from this file.
EnvironmentFile=-/etc/sysconfig/kubelet
ExecStart=
ExecStart=/usr/bin/kubelet $KUBELET_KUBECONFIG_ARGS $KUBELET_CONFIG_ARGS $KUBELET_KUBEADM_ARGS $KUBELET_EXTRA_ARGS
[root@master-all ~]# systemctl daemon-reload
访问api 401/403
RBAC
通过api访问报错
# kubectl get secret -n kube-system |grep anonymous
# kubectl describe secret anonymous-token-c8xmh
# kubectl describe secret anonymous-token-c8xmh -nkube-system

# curl -sSk  -H "Authorization:Bearer eyJhbGciOiJSUzI1NiIsImtpZCI6IkhJdG93QkZKVXVJb2lreUZnSXZDbWYtZDVjWVM5UmZrZkxyWkItYkI0WTAifQ.eyJpc3MiOiJrdWJlcm5ldGVzL3NlcnZpY2VhY2NvdW50Iiwia3ViZXJuZXRlcy5pby9zZXJ2aWNlYWNjb3VudC9uYW1lc3BhY2UiOiJrdWJlLXN5c3RlbSIsImt1YmVybmV0ZXMuaW8vc2VydmljZWFjY291bnQvc2VjcmV0Lm5hbWUiOiJhbm9ueW1vdXMtdG9rZW4tYzh4bWgiLCJrdWJlcm5ldGVzLmlvL3NlcnZpY2VhY2NvdW50L3NlcnZpY2UtYWNjb3VudC5uYW1lIjoiYW5vbnltb3VzIiwia3ViZXJuZXRlcy5pby9zZXJ2aWNlYWNjb3VudC9zZXJ2aWNlLWFjY291bnQudWlkIjoiOGE2MjMzMjQtMmRmMi00NjQzLTg5MmItODNkNmMxZGU3NjRiIiwic3ViIjoic3lzdGVtOnNlcnZpY2VhY2NvdW50Omt1YmUtc3lzdGVtOmFub255bW91cyJ9.Mqtofro3Okb7HUsjQfj8_QgVmINWQyZa6dSyVH9758-z8L0ucxC4jpwlujgCnAzbXI7sxfLF8i65sd2Y3i_UJK1SsWjJc2uLz_5WpQODdYYhian_uWL3WdV2EJ96wOqj6vrGDu-c-An1j71_PjOP-HjZ1c7WLIFTpjmt5ajHFafjRKFwvplkFXwg1nsv-QG97EPdianZCWM4KtL0-6AlHnoxnRwJODwq2knnvWz2zHT8d0_AGbyLjbqLs5wLEGHHFVWg2VPivWfxUF9HxWhE0xfiyHAQB9JKfloerJfpsDQDZD19QK9mWeLwMdSFDswCIurwLYwMQh5w7hWmT368Jg" https://10.10.1.9:8443/api/v1/namespaces/kube-system/services/monitoring-grafana/proxy
{
  "kind": "Status",
  "apiVersion": "v1",
  "metadata": {

  },
  "status": "Failure",
  "message": "services \"monitoring-grafana\" is forbidden: User \"system:serviceaccount:kube-system:anonymous\" cannot get resource \"services/proxy\" in API group \"\" in the namespace \"kube-system\"",
  "reason": "Forbidden",
  "details": {
    "name": "monitoring-grafana",
    "kind": "services"
  },
  "code": 403
}
解决
创建rbac
[root@master1 influxdb]# cat annomo-rbac.yaml
---
apiVersion: rbac.authorization.k8s.io/v1
kind: ClusterRole
metadata:
  name: anonymous-role
rules:
- apiGroups: [""]
  resources: ["services/proxy","services","endpoints"]
  verbs: ["*"]
---
apiVersion: rbac.authorization.k8s.io/v1
kind: ClusterRoleBinding
metadata:
  name: anonymous-binding
roleRef:
  apiGroup: rbac.authorization.k8s.io
  kind: ClusterRole
  name: anonymous-role
subjects:
- apiGroup: rbac.authorization.k8s.io
  kind: User
  name: system:anonymous
期待你的
分享
点赞
在看

添加博主
微信号|yfq940-
原文作者:步步运维步步坑;如有侵权,请联系管理员删除。

