3.2、搭建 Istio 环境
3.2.1、下载 Istio
下载 Istio,下载内容将包含:安装文件、示例和 istioctl 命令行工具
可以通过github官方代码仓库下载合适的release版本:
Istio release (https://github.com/istio/istio/releases/tag/1.22.2)再Linux 系统中,也可以通过以下命令下载最新版本的 Istio:
[root@m1 istio]# curl -L https://istio.io/downloadIstio | sh -% Total % Received % Xferd Average Speed Time Time Time CurrentDload Upload Total Spent Left Speed100 102 100 102 0 0 275 0 --:--:-- --:--:-- --:--:-- 275100 4899 100 4899 0 0 1947 0 0:00:02 0:00:02 --:--:-- 4331Downloading istio-1.22.2 from https://github.com/istio/istio/releases/download/1.22.2/istio-1.22.2-linux-amd64.tar.gz ...Istio 1.22.2 Download Complete!Istio has been successfully downloaded into the istio-1.22.2 folder on your system.Next Steps:See https://istio.io/latest/docs/setup/install/ to add Istio to your Kubernetes cluster.To configure the istioctl client tool for your workstation,add the /data/istio/istio-1.22.2/bin directory to your environment path variable with:export PATH="$PATH:/data/istio/istio-1.22.2/bin"Begin the Istio pre-installation check by running:istioctl x precheckNeed more information? Visit https://istio.io/latest/docs/setup/install/
可用指定版本:
$ curl -L https://istio.io/downloadIstio | ISTIO_VERSION=1.22.2 sh -切换到 Istio 包所在目录下。例如:Istio 包名为 istio-1.22.2,则:
[root@m1 istio]# cd istio-1.22.2/[root@m1 istio-1.22.2]# lltotal 40drwxr-x---. 2 root root 4096 Jun 27 04:02 bin-rw-r--r--. 1 root root 11357 Jun 27 04:02 LICENSEdrwxr-xr-x. 4 root root 4096 Jun 27 04:02 manifests-rw-r-----. 1 root root 956 Jun 27 04:02 manifest.yaml-rw-r--r--. 1 root root 6759 Jun 27 04:02 README.mddrwxr-xr-x. 26 root root 4096 Jun 27 04:02 samplesdrwxr-xr-x. 3 root root 4096 Jun 27 04:02 tools[root@m1 istio-1.22.2]#
安装目录包含如下内容:
samples/ 目录下,有示例应用程序
bin/ 目录下,包含 istioctl 的客户端文件。istioctl 工具用于手动注入 Envoy sidecar 代理。
将 istioctl 客户端路径增加到 path 环境变量中
[root istio-1.22.2]# export PATH=$PWD/bin:$PATH[root istio-1.22.2]# echo $PATH/data/istio/istio-1.22.2/bin:/usr/lib/jvm/java-11-openjdk-11.0.23.0.9-2.el7_9.x86_64/bin:/usr/lib/jvm/java-11-openjdk-11.0.23.0.9-2.el7_9.x86_64/bin:/usr/local/sbin:/usr/local/bin:/usr/sbin:/usr/bin:/usr/lib/jvm/java-11-openjdk-11.0.23.0.9-2.el7_9.x86_6/bin:/data/apache-maven-3.6.1/bin:/root/bin[root istio-1.22.2]#
安装 bash 自动补全文件
[][]
如果 istioctl 补全文件已经正确安装,在你输入 istioctl 命令时通过按 Tab 键,它会返回一组推荐命令供你选择:
[]proxy-config (Retrieve information about proxy configuration from Envoy [kube only])proxy-status (Retrieves the synchronization status of each Envoy in the mesh)

3.2.2、安装 Istio
请按照以下步骤在你所选的平台上使用 demo 配置文件安装 Istio。
安装 demo 配置
[root@m1 data]# istioctl manifest apply --set profile=demoThe default revision has been updated to point to this installation.This will install the Istio 1.22.2 "demo" profile (with components: Istio core, Istiod, Ingress gateways, and Egress gateways) into the cluster. Proceed? (y/N) y✔ Istio core installed✔ Istiod installed✔ Egress gateways installed✔ Ingress gateways installed✔ Installation completeMade this installation the default for injection and validation.[root@m1 data]#
选择要安装的组件在 istio-1.22.2/manifests/profiles 中!
为了验证是否安装成功,需要先确保以下 Kubernetes 服务正确部署,是否有正确的clusterIP

如果集群运行在一个不支持外部负载均衡器的环境中(例如:minikube),istio-ingressgateway 的 EXTERNAL-IP 将显示为 <pending> 状态。请使用服务的 NodePort 或 端口转发来访问网关。确保关联的 Kubernetes pod 已经部署,并且 STATUS 为 Running:


3.2.3、卸载 Istio
istioctl manifest generate --set profile=demo | kubectl delete -f -
3.3、Bookinfo 示例
3.3.1、应用说明
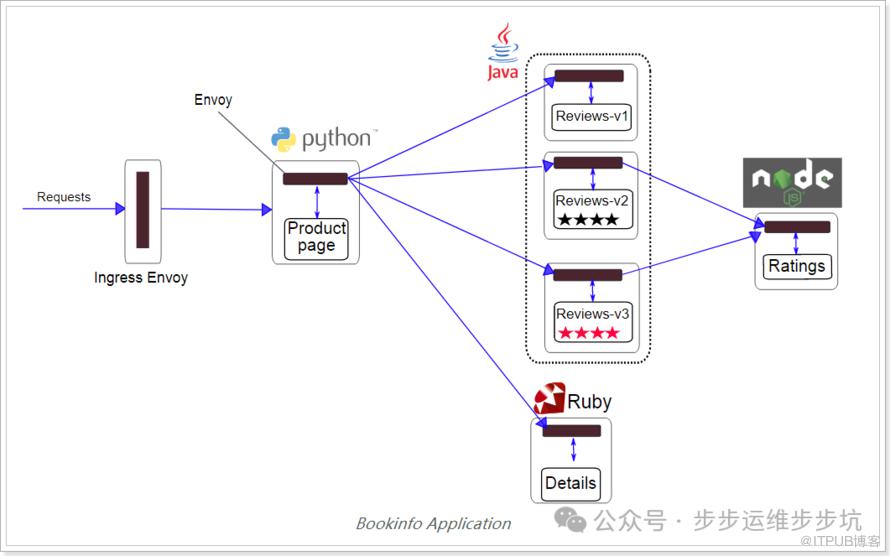
这个示例部署了一个用于演示多种 Istio 特性的应用,该应用由四个单独的微服务构成。 这个应用模仿在线书店的一个分类,显示一本书的信息。 页面上会显示一本书的描述,书籍的细节(ISBN、页数等),以及关于这本书的一些评论。
Bookinfo 应用分为四个单独的微服务:
productpage. 这个微服务会调用 details 和 reviews 两个微服务,用来生成页面。
details. 这个微服务中包含了书籍的信息。
reviews. 这个微服务中包含了书籍相关的评论。它还会调用 ratings 微服务。
ratings. 这个微服务中包含了由书籍评价组成的评级信息。
reviews 微服务有 3 个版本:
v1 版本不会调用 ratings 服务。
v2 版本会调用 ratings 服务,并使用 1 到 5 个黑色星形图标来显示评分信息。
v3 版本会调用 ratings 服务,并使用 1 到 5 个红色星形图标来显示评分信息。
下图展示了这个应用的端到端架构。

Bookinfo 应用中的几个微服务是由不同的语言编写的。 这些服务对 Istio 并无依赖,但是构成了一个有代表性的服务网格的例子:它由多个服务、多个语言构成,并且 reviews 服务具有多个版本。

3.3.2、部署应用
要在 Istio 中运行这一应用,无需对应用自身做出任何改变。你只要简单的在 Istio 环境中对服务进行配置和运行,具体一点说就是把 Envoy sidecar 注入到每个服务之中。最终的部署结果将如下图所示:
所有的微服务都和 Envoy sidecar 集成在一起,被集成服务所有的出入流量都被 sidecar 所劫持,这样就为外部控制准备了所需的 Hook,然后就可以利用 Istio 控制平面为应用提供服务路由、遥测数据收集以及策略实施等功能。

3.3.3、启动应用服务
进入 Istio 安装目录。
Istio 默认自动注入 Sidecar. 请为 default 命名空间打上标签 istio-injection=enabled:
[root istio-1.22.2]# kubectl label namespace default istio-injection=enablednamespace/default not labeled[root istio-1.22.2]# kubectl describe ns defaultName: defaultLabels: istio-injection=enabledkubernetes.io/metadata.name=defaultAnnotations: <none>Status: ActiveNo resource quota.No LimitRange resource.[root istio-1.22.2]#
使用 kubectl 部署应用:
[root@m1 istio-1.22.2]# lltotal 40drwxr-x---. 2 root root 4096 Jun 27 04:02 bin-rw-r--r--. 1 root root 11357 Jun 27 04:02 LICENSEdrwxr-xr-x. 4 root root 4096 Jun 27 04:02 manifests-rw-r-----. 1 root root 956 Jun 27 04:02 manifest.yaml-rw-r--r--. 1 root root 6759 Jun 27 04:02 README.mddrwxr-xr-x. 26 root root 4096 Jun 27 04:02 samplesdrwxr-xr-x. 3 root root 4096 Jun 27 04:02 tools[root@m1 istio-1.22.2]# kubectl apply -f samples/bookinfo/platform/kube/bookinfo.yamlservice/details createdserviceaccount/bookinfo-details createddeployment.apps/details-v1 createdservice/ratings createdserviceaccount/bookinfo-ratings createddeployment.apps/ratings-v1 createdservice/reviews createdserviceaccount/bookinfo-reviews createddeployment.apps/reviews-v1 createddeployment.apps/reviews-v2 createddeployment.apps/reviews-v3 createdservice/productpage createdserviceaccount/bookinfo-productpage createddeployment.apps/productpage-v1 created[root@m1 istio-1.22.2]#

注意:如果你在安装过程中禁用了 Sidecar(未设置istio-injection=true) 自动注入功能而选择手动注入 Sidecar,请在部署应用之前使用 istioctl kube-inject 命令修改 bookinfo.yaml 文件。
kubectl apply -f <(istioctl kube-inject -f samples/bookinfo/platform/kube/bookinfo.yaml)上面的命令会启动全部的四个服务,其中也包括了 reviews 服务的三个版本(v1、v2 以及 v3)。
在实际部署中,微服务版本的启动过程需要持续一段时间,并不是同时完成的。
确认所有的服务和 Pod 都已经正确的定义和启动


要确认 Bookinfo 应用是否正在运行,请在某个 Pod 中用 curl 命令对应用发送请求,例如 ratings
[root@m1 data]# kubectl exec -it $(kubectl get pod -l app=ratings -o jsonpath='{.items[0].metadata.name}') -c ratings -- curl productpage:9080/productpage | grep -o "<title>.*</title>"<title>Simple Bookstore App</title>[root@m1 data]#

3.3.4、确定 Ingress 的 IP
现在 Bookinfo 服务启动并运行中,现在需要使应用程序可以从外部访问 Kubernetes 集群,例如使用浏览器。可以用 Istio Gateway 来实现这个目标。
为应用程序定义 Ingress 网关:
[]gateway.networking.istio.io/bookinfo-gateway createdvirtualservice.networking.istio.io/bookinfo created[]
确认网关创建完成:
[]NAME AGEbookinfo-gateway 2m56s[]
设置访问网关的 INGRESS_HOST 和 INGRESS_PORT 变量。确认并设置。
[root istio-1.22.2]# export INGRESS_PORT=$(kubectl -n istio-system get service istio-ingressgateway -o jsonpath='{.spec.ports[?(@.name=="http2")].nodePort}')[root istio-1.22.2]# export SECURE_INGRESS_PORT=$(kubectl -n istio-system get service istio-ingressgateway -o jsonpath='{.spec.ports[?(@.name=="https")].nodePort}')[root istio-1.22.2]# export INGRESS_HOST=$(kubectl get po -l istio=ingressgateway -n istio-system -o jsonpath='{.items[0].status.hostIP}')[root istio-1.22.2]# echo $INGRESS_PORT $SECURE_INGRESS_PORT $INGRESS_HOST32020 32156 172.16.20.121[root istio-1.22.2]#
设置 GATEWAY_URL:
[]172.16.20.121:32020[]
可以用浏览器打开网址 http://$GATEWAY_URL/productpage,来浏览应用的 Web 页面。如果刷新几次应用的页面,就会看到 productpage 页面中会随机展示 reviews 服务的不同版本的效果(红色、黑色的星形或者没有显示)。r出现这种情况的远呀是因为我们还没有使用 Istio 来控制版本的路由


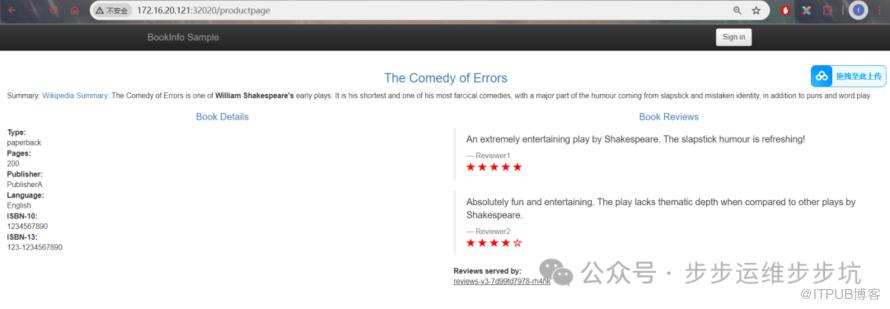

3.3.5、应用默认目标规则
给各个服务创建 DestinationRule
在使用 Istio 控制 Bookinfo 版本路由之前,你需要在目标规则中定义好可用的版本,命名为 subsets 。
#设置istio-1.22.2]# kubectl apply -f samples/bookinfo/networking/destination-rule-all.yamlcreatedcreatedcreatedcreatedistio-1.22.2]##查询istio-1.22.2]# kubectl get destinationrules -o yamlapiVersion: v1items:apiVersion: networking.istio.io/v1kind: DestinationRulemetadata:...spec:host: detailssubsets:labels:version: v1name: v1labels:version: v2name: v2apiVersion: networking.istio.io/v1kind: DestinationRulemetadata:...spec:host: productpagesubsets:labels:version: v1name: v1apiVersion: networking.istio.io/v1kind: DestinationRulemetadata:...spec:host: ratingssubsets:labels:version: v1name: v1labels:version: v2name: v2labels:version: v2-mysqlname: v2-mysqllabels:version: v2-mysql-vmname: v2-mysql-vmapiVersion: networking.istio.io/v1kind: DestinationRulemetadata:...spec:host: reviewssubsets:labels:version: v1name: v1labels:version: v2name: v2labels:version: v3name: v3kind: Listmetadata:resourceVersion: ""istio-1.22.2]#

3.3.6、详细说明
DestinationRule 的详细说明:detailsHost: detailsSubsets:v1 (版本: v1)v2 (版本: v2)details 的服务,并将其流量分配到 v1 和 v2 两个版本。productpageHost: productpageSubsets:v1 (版本: v1)productpage 的服务,并将其流量分配到 v1 版本。ratingsHost: ratingsSubsets:v1 (版本: v1)v2 (版本: v2)(版本: v2-mysql)(版本: v2-mysql-vm)ratings 的服务,并将其流量分配到 v1, v2, v2-mysql 和 v2-mysql-vm 四个版本。reviewsHost: reviewsSubsets:v1 (版本: v1)v2 (版本: v2)v3 (版本: v3)reviews 的服务,并将其流量分配到 v1, v2 和 v3 三个版本。
至此,Istio 完成了全部的接管,第一个示例部署完成

3.4、体验 Istio
3.4.1、请求路由
按照版本路由,目前的 reviews 有三个版本,但是我们在浏览器中访问 Bookinfo 应用程序的 /productpage 并刷新几次。我们发现有时书评的输出包含星级评分,有时则不包含。这是因为没有明确的默认服务版本路由。所以现在我们要做就是让 istio 接管路由,比如将所有流量都路由到每个微服务的 v1 版本,Istio 实现起来是非常简单的,只需要添加虚拟服务(VirtualService)即可。
示例:将所有流量都路由到各个微服务的 v1 版本
[]virtualservice.networking.istio.io/productpage createdvirtualservice.networking.istio.io/reviews createdvirtualservice.networking.istio.io/ratings createdvirtualservice.networking.istio.io/details created
其内容如下:
istio-1.22.2]# cat samples/bookinfo/networking/virtual-service-all-v1.yamlapiVersion: networking.istio.io/v1alpha3kind: VirtualServicemetadata:name: productpagespec:hosts:productpagehttp:route:destination:host: productpagesubset: v1---apiVersion: networking.istio.io/v1alpha3kind: VirtualServicemetadata:name: reviewsspec:hosts:reviewshttp:route:destination:host: reviewssubset: v1---apiVersion: networking.istio.io/v1alpha3kind: VirtualServicemetadata:name: ratingsspec:hosts:ratingshttp:route:destination:host: ratingssubset: v1---apiVersion: networking.istio.io/v1alpha3kind: VirtualServicemetadata:name: detailsspec:hosts:detailshttp:route:destination:host: detailssubset: v1---
详细解释
每个 VirtualService 的详细说明:productpageHosts: productpageHTTP:Route:Destination:Host: productpageSubset: v1这个规则定义了名为 productpage 的服务,并将所有流量路由到 v1 版本的 productpage 服务实例。reviewsHosts: reviewsHTTP:Route:Destination:Host: reviewsSubset: v1这个规则定义了名为 reviews 的服务,并将所有流量路由到 v1 版本的 reviews 服务实例。ratingsHosts: ratingsHTTP:Route:Destination:Host: ratingsSubset: v1这个规则定义了名为 ratings 的服务,并将所有流量路由到 v1 版本的 ratings 服务实例。detailsHosts: detailsHTTP:Route:Destination:Host: detailsSubset: v1这个规则定义了名为 details 的服务,并将所有流量路由到 v1 版本的 details 服务实例。
经过测试,发现 reviews 不再切换样式。
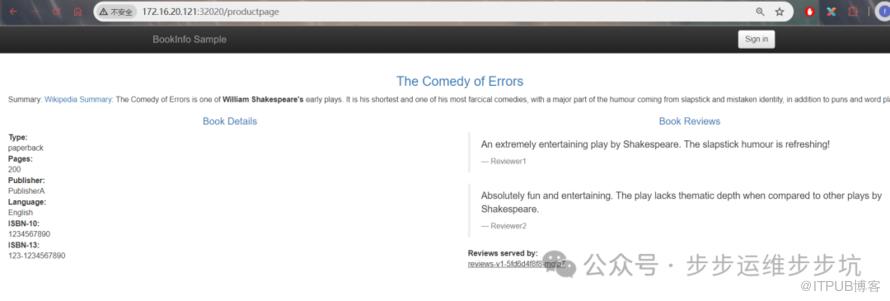
[]virtualservice.networking.istio.io/reviews configured[]
istio-1.22.2]# kubectl get virtualservice reviews -o yamlapiVersion: networking.istio.io/v1kind: VirtualServicemetadata:...spec:hosts:reviewshttp:match:headers::exact: jasonroute:destination:host: reviewssubset: v2route:destination:host: reviewssubset: v1istio-1.22.2]#
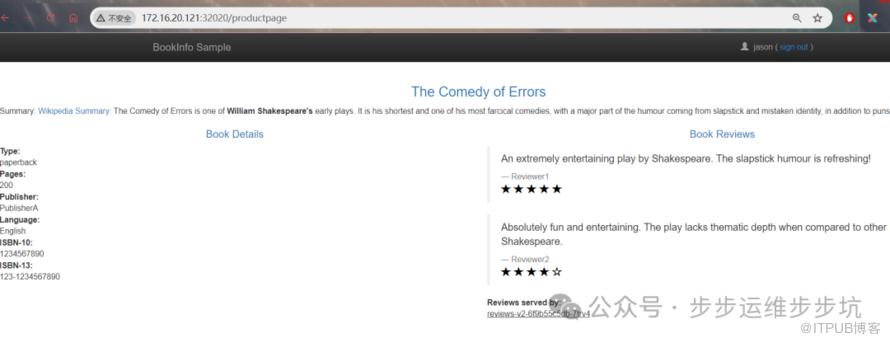
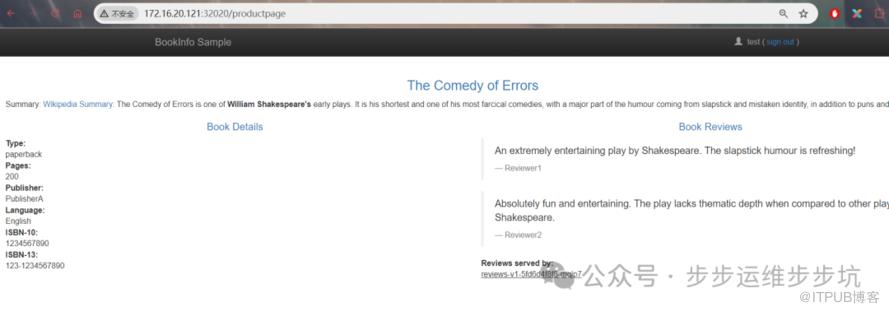
已成功配置 Istio 以根据用户身份路由流量。

3.4.2、流量转移
还可以将 reviews 的部分流量转移到 v3 版本,基于此可以实现灰度发布、A/B 测试等:
#将所有流量都路由到每个服务的v1版本istio-1.22.2]# kubectl apply -f samples/bookinfo/networking/virtual-service-all-v1.yamlunchangedconfiguredunchangedunchangedistio-1.22.2]#istio-1.22.2]# kubectl get virtualservice reviews -o yamlapiVersion: networking.istio.io/v1kind: VirtualServicemetadata:...spec:hosts:reviewshttp:route:destination:host: reviewssubset: v1istio-1.22.2]##将reviews服务 50%的流量转移到v3istio-1.22.2]# kubectl apply -f samples/bookinfo/networking/virtual-service-reviews-50-v3.yamlconfiguredistio-1.22.2]# kubectl get virtualservice reviews -o yamlapiVersion: networking.istio.io/v1kind: VirtualServicemetadata:...spec:hosts:reviewshttp:route:destination: # 指定流量的目的地服务和子集。host: reviewssubset: v1 # 服务的子集(需要在 DestinationRule 中定义weight: 50 # 权重destination:host: reviewssubset: v3weight: 50istio-1.22.2]# .
刷新浏览器中的 /productpage 页面,大约有 50% 的几率会看到页面中出带 红色 星级的评价内容。这是因为 v3 版本的 reviews 访问了带星级评级的 ratings 服务,但 v1 版本却没有。
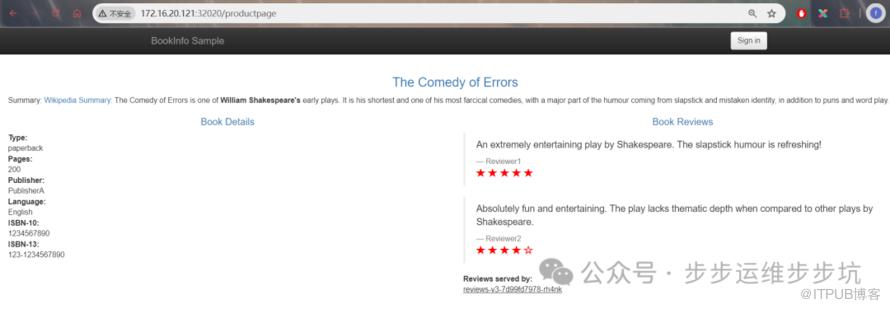
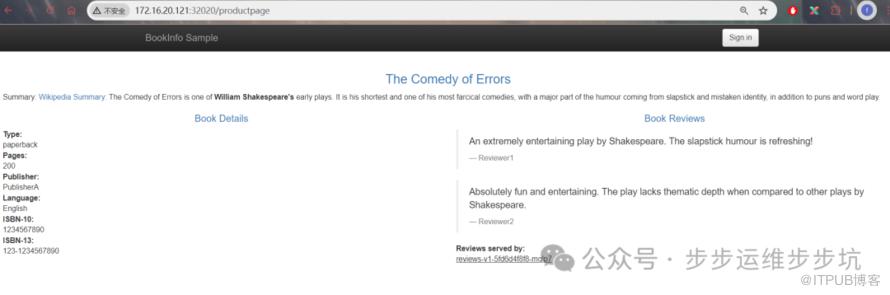
如果认为 reviews:v3 微服务已经稳定,可以通过应用此 virtual service 规则将 100% 的流量路由到 reviews:v3:
#将reviews服务的全部流量都切换到v3版本istio-1.22.2]# kubectl apply -f samples/bookinfo/networking/virtual-service-reviews-v3.yamlconfiguredistio-1.22.2]# kubectl get virtualservice reviews -o yamlapiVersion: networking.istio.io/v1kind: VirtualServicemetadata:...spec:hosts:reviewshttp:route:destination:host: reviewssubset: v3istio-1.22.2]#
这样,所有的请求都转向到了 v3 了。
如果需要删除所有服务的虚拟网络,可以执行:
kubectl delete -f samples/bookinfo/networking/virtual-service-all-v1.yamlvirtual-service-all-v1.yaml 配置文件中配置了所有服务的路由信息,如果删除了则所有的路由信息都删了

3.4.3、超时与重试
http 请求的超时可以用路由规则的 timeout 字段来指定。默认情况下,超时是禁用的
这里我们来实验 reviews 服务的请求超时,将请求路由到 reviews 服务的 v2 版本,它会去调用 ratings 服务,我们首先在 ratings 服务上人为的引入 2s 的延迟(故障注入),再对 reviews 服务配置超时 timeout
在 istio-1.22.2/samples/bookinfo/networking 目录下创建配置文件
#创建配置文件# vim virtual-service-reviews-v2-timeout.yamlapiVersion: networking.istio.io/v1alpha3kind: VirtualServicemetadata:name: ratingsspec:hosts:ratingshttp: # 定义HTTP流量的路由规则。fault:delay:percent: 100 # 故障注入的百分比。这里设为100%,意味着所有请求都会受到影响fixedDelay: 2s # 固定的延迟时间。所有请求都会被延迟2秒。route:destination:host: ratingssubset: v1---apiVersion: networking.istio.io/v1alpha3kind: VirtualServicemetadata:name: reviewsspec:hosts:reviewshttp:route:destination:host: reviewssubset: v2#timeout: 0.5s
[]virtualservice.networking.istio.io/ratings configuredvirtualservice.networking.istio.io/reviews configured[]
istio-1.22.2]# kubectl get virtualservice -o yamlapiVersion: v1items:apiVersion: networking.istio.io/v1kind: VirtualServicemetadata:...spec:gateways:bookinfo-gatewayhosts:'*'http:match:uri:exact: /productpageuri:prefix: /staticuri:exact: /loginuri:exact: /logouturi:prefix: /api/v1/productsroute:destination:host: productpageport:number: 9080apiVersion: networking.istio.io/v1kind: VirtualService...spec:hosts:detailshttp:route:destination:host: detailssubset: v1apiVersion: networking.istio.io/v1kind: VirtualService...spec:hosts:productpagehttp:route:destination:host: productpagesubset: v1apiVersion: networking.istio.io/v1kind: VirtualService....spec:hosts:ratingshttp:fault:delay:fixedDelay: 2spercent: 100route:destination:host: ratingssubset: v1apiVersion: networking.istio.io/v1kind: VirtualService...spec:hosts:reviewshttp:route:destination:host: reviewssubset: v2timeout: 0.5skind: Listmetadata:resourceVersion: ""

3.4.4、熔断
熔断器是 Istio 为创建具有弹性的微服务应用提供的有用的机制。在熔断器中,设置一个对服务中的单个主机调用的限制,例如并发连接的数量或对该主机调用失败的次数。一旦限制被触发,熔断器就会 “跳闸” 并停止连接到该主机。
使用熔断模式可以快速失败而不必让客户端尝试连接到过载或有故障的主机。
部署 httpbin
httpbin 是一个开源项目,使用 Python+Flask 编写,利用它可以测试各种 HTTP 请求和响应。官网:http://httpbin.org/
[root@m1 istio-1.22.2]# kubectl apply -f samples/httpbin/httpbin.yamlserviceaccount/httpbin createdservice/httpbin createddeployment.apps/httpbin created[root@m1 istio-1.22.2]#
该配置文件的内容为:
################################################################################################### httpbin service##################################################################################################apiVersion: v1kind: ServiceAccount # SCC授权metadata:name: httpbin---apiVersion: v1 # svc服务kind: Servicemetadata:name: httpbinlabels:app: httpbinspec:ports:- name: httpport: 8000targetPort: 80selector:app: httpbin---apiVersion: apps/v1kind: Deployment # 应用metadata:name: httpbinspec:replicas: 1selector:matchLabels:app: httpbinversion: v1template:metadata:labels:app: httpbinversion: v1spec:serviceAccountName: httpbincontainers:- image: docker.io/kennethreitz/httpbinimagePullPolicy: IfNotPresentname: httpbinports:- containerPort: 80
kubectl apply -f - <<EOFapiVersion: networking.istio.io/v1alpha3kind: DestinationRulemetadata:name: httpbinspec:host: httpbintrafficPolicy:connectionPool:tcp:maxConnections: 1 #最大连接数http:http1MaxPendingRequests: 1 #http请求pending状态的最大请求数maxRequestsPerConnection: 1 #在一定时间内限制对后端服务发起的最大请求数outlierDetection: #熔断设置consecutiveErrors: 1 #从连接池开始拒绝连接,已经连接失败的次数,当通过HTTP访问时,返回代码是502、503或504则视为错误。interval: 1s #拒绝访问扫描的时间间隔,即在interval(1s)内连续发生1个consecutiveErrors错误,则触发服务熔断,格式是1h/1m/1s/1ms,但必须大于等于1ms。即分析是否需要剔除的频率,多久分析一次,默认10秒。baseEjectionTime: 3m #最短拒绝访问时长。这个时间主机将保持拒绝访问,且如果决绝访问达到一定的次数。格式:1h/1m/1s/1ms,但必须大于等于1ms。实例被剔除后,至少多久不得返回负载均衡池,默认是30秒。maxEjectionPercent: 100 #服务在负载均衡池中被拒绝访问(被移除)的最大百分比,负载均衡池中最多有多大比例被剔除,默认是10%。EOF
验证目标规则是否已正确创建
[root@m1 data]# kubectl get destinationrule httpbin -o yamlapiVersion: networking.istio.io/v1kind: DestinationRulemetadata:...spec:host: httpbintrafficPolicy:connectionPool:http:http1MaxPendingRequests: 1maxRequestsPerConnection: 1tcp:maxConnections: 1outlierDetection:baseEjectionTime: 3mconsecutiveErrors: 1interval: 1smaxEjectionPercent: 100[root@m1 data]#
[root@m1 istio-1.22.2]# kubectl apply -f <(istioctl kube-inject -f samples/httpbin/sample-client/fortio-deploy.yaml)service/fortio createddeployment.apps/fortio-deploy created[root@m1 istio-1.22.2]#
中间稍等一会,让客户端部署
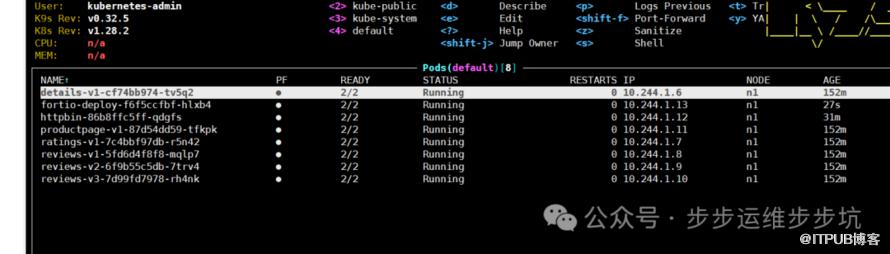
登入客户端 Pod 并使用 Fortio 工具调用 httpbin 服务。-curl 参数表明发送一次调用
$ FORTIO_POD=$(kubectl get pod | grep fortio | awk '{ print $1 }')$ kubectl exec -it $FORTIO_POD -c fortio -- /usr/bin/fortio load -curl http://httpbin:8000/get[root@m1 istio-1.22.2]# FORTIO_POD=$(kubectl get pod | grep fortio | awk '{ print $1 }')[root@m1 istio-1.22.2]# kubectl exec -it $FORTIO_POD -c fortio -- /usr/bin/fortio load -curl http://httpbin:8000/get09:33:07.101 r1 [INF] scli.go:123> Starting, command="Φορτίο", version="1.60.3 h1:adR0uf/69M5xxKaMLAautVf9FIVkEpMwuEWyMaaSnI0= go1.20.10 amd64 linux"HTTP/1.1 200 OKserver: envoydate: Mon, 15 Jul 2024 09:33:07 GMTcontent-type: application/jsoncontent-length: 425access-control-allow-origin: *access-control-allow-credentials: truex-envoy-upstream-service-time: 13{"args": {},"headers": {"Host": "httpbin:8000","User-Agent": "fortio.org/fortio-1.60.3","X-Envoy-Attempt-Count": "1","X-Forwarded-Client-Cert": "By=spiffe://cluster.local/ns/default/sa/httpbin;Hash=92b9a6c7c4ac913de4723527e99738d1adbfad46f37056fcadeec719ba6f5216;Subject=\"\";URI=spiffe://cluster.local/ns/default/sa/default"},"origin": "127.0.0.6","url": "http://httpbin:8000/get"}[root@m1 istio-1.22.2]# HTTP/1.1 200 OKserver: envoydate: Tue, 16 Jan 2018 23:47:00 GMTcontent-type: application/jsonaccess-control-allow-origin: *access-control-allow-credentials: truecontent-length: 445x-envoy-upstream-service-time: 36{"args": {},"headers": {"Content-Length": "0","Host": "httpbin:8000","User-Agent": "istio/fortio-0.6.2","X-B3-Sampled": "1","X-B3-Spanid": "824fbd828d809bf4","X-B3-Traceid": "824fbd828d809bf4","X-Ot-Span-Context": "824fbd828d809bf4;824fbd828d809bf4;0000000000000000","X-Request-Id": "1ad2de20-806e-9622-949a-bd1d9735a3f4"},"origin": "127.0.0.1","url": "http://httpbin:8000/get"}
可以看到调用后端服务的请求已经成功!接下来测试熔断
[root@m1 istio-1.22.2]# kubectl exec -it $FORTIO_POD -c fortio -- /usr/bin/fortio load -c 2 -qps 0 -n 20 -loglevel Warning http://httpbin:8000/get09:33:49.694 r1 [INF] logger.go:254> Log level is now 3 Warning (was 2 Info)Fortio 1.60.3 running at 0 queries per second, 16->16 procs, for 20 calls: http://httpbin:8000/getStarting at max qps with 2 thread(s) [gomax 16] for exactly 20 calls (10 per thread + 0)09:33:49.705 r35 [WRN] http_client.go:1104> Non ok http code, code=503, status="HTTP/1.1 503", thread=0, run=009:33:49.715 r36 [WRN] http_client.go:1104> Non ok http code, code=503, status="HTTP/1.1 503", thread=1, run=009:33:49.720 r35 [WRN] http_client.go:1104> Non ok http code, code=503, status="HTTP/1.1 503", thread=0, run=009:33:49.727 r36 [WRN] http_client.go:1104> Non ok http code, code=503, status="HTTP/1.1 503", thread=1, run=009:33:49.730 r35 [WRN] http_client.go:1104> Non ok http code, code=503, status="HTTP/1.1 503", thread=0, run=009:33:49.741 r35 [WRN] http_client.go:1104> Non ok http code, code=503, status="HTTP/1.1 503", thread=0, run=009:33:49.744 r36 [WRN] http_client.go:1104> Non ok http code, code=503, status="HTTP/1.1 503", thread=1, run=0Ended after 59.342745ms : 20 calls. qps=337.03Aggregated Function Time : count 20 avg 0.0058604489 +/- 0.004583 min 0.000356057 max 0.017002726 sum 0.117208979# range, mid point, percentile, count>= 0.000356057 <= 0.001 , 0.000678028 , 20.00, 4> 0.001 <= 0.002 , 0.0015 , 25.00, 1> 0.003 <= 0.004 , 0.0035 , 50.00, 5> 0.006 <= 0.007 , 0.0065 , 60.00, 2> 0.007 <= 0.008 , 0.0075 , 75.00, 3> 0.009 <= 0.01 , 0.0095 , 80.00, 1> 0.01 <= 0.011 , 0.0105 , 90.00, 2> 0.014 <= 0.016 , 0.015 , 95.00, 1> 0.016 <= 0.0170027 , 0.0165014 , 100.00, 1# target 50% 0.004# target 75% 0.008# target 90% 0.011# target 99% 0.0168022# target 99.9% 0.0169827Error cases : count 7 avg 0.0020124073 +/- 0.00244 min 0.000356057 max 0.007465399 sum 0.014086851# range, mid point, percentile, count>= 0.000356057 <= 0.001 , 0.000678028 , 57.14, 4> 0.001 <= 0.002 , 0.0015 , 71.43, 1> 0.003 <= 0.004 , 0.0035 , 85.71, 1> 0.007 <= 0.0074654 , 0.0072327 , 100.00, 1# target 50% 0.000892676# target 75% 0.00325# target 90% 0.00713962# target 99% 0.00743282# target 99.9% 0.00746214# Socket and IP used for each connection:[0] 5 socket used, resolved to 10.111.166.239:8000, connection timing : count 5 avg 0.0001413654 +/- 2.207e-05 min 0.000124169 max 0.000183986 sum 0.000706827[1] 4 socket used, resolved to 10.111.166.239:8000, connection timing : count 4 avg 0.00017490925 +/- 5.561e-05 min 9.554e-05 max 0.000238633 sum 0.000699637Connection time (s) : count 9 avg 0.00015627378 +/- 4.385e-05 min 9.554e-05 max 0.000238633 sum 0.001406464Sockets used: 9 (for perfect keepalive, would be 2)Uniform: false, Jitter: false, Catchup allowed: trueIP addresses distribution:10.111.166.239:8000: 9Code 200 : 13 (65.0 %)Code 503 : 7 (35.0 %)Response Header Sizes : count 20 avg 149.6 +/- 109.8 min 0 max 231 sum 2992Response Body/Total Sizes : count 20 avg 510.2 +/- 197.5 min 241 max 656 sum 10204All done 20 calls (plus 0 warmup) 5.860 ms avg, 337.0 qps[root@m1 istio-1.22.2]#
Code 200 : 13 (65.0 %)Code 503 : 7 (35.0 %)
[root@m1 istio-1.22.2]# kubectl exec -it $FORTIO_POD -c fortio -- /usr/bin/fortio load -c 3 -qps 0 -n 30 -loglevel Warning http://httpbin:8000/get09:35:10.778 r1 [INF] logger.go:254> Log level is now 3 Warning (was 2 Info)...10.111.166.239:8000: 21Code 200 : 10 (33.3 %)Code 503 : 20 (66.7 %)Response Header Sizes : count 30 avg 76.666667 +/- 108.4 min 0 max 230 sum 2300Response Body/Total Sizes : count 30 avg 379 +/- 195.2 min 241 max 655 sum 11370All done 30 calls (plus 0 warmup) 2.529 ms avg, 941.8 qps[root@m1 istio-1.22.2]#
Code 200 : 10 (33.3 %)Code 503 : 20 (66.7 %)
[root@m1 istio-1.22.2]# kubectl exec $FORTIO_POD -c istio-proxy -- pilot-agent request GET stats | grep httpbin | grep pending

清理规则$ kubectl delete destinationrule httpbin夏县httpbin应用$ kubectl delete deploy httpbin fortio-deploy$ kubectl delete svc httpbin

3.4.5、可观测性
istio 的可观测性体现在:指标度量,日志,分布式追踪,网格可视化等方面
网格可视化我们可以将 istio 网格以可视化的方式呈现,基于 Web 的图形用户界面来查看网格和 Istio 配置对象的服务图,使我们的操作更方便
在 Istio 中可以使用 Kiali 进行可视化的管理服务网格。Kiali 官网:https://www.kiali.io/
[]serviceaccount/kiali createdconfigmap/kiali createdclusterrole.rbac.authorization.k8s.io/kiali createdclusterrolebinding.rbac.authorization.k8s.io/kiali createdrole.rbac.authorization.k8s.io/kiali-controlplane createdrolebinding.rbac.authorization.k8s.io/kiali-controlplane createdservice/kiali createddeployment.apps/kiali created[]serviceaccount/prometheus createdconfigmap/prometheus createdclusterrole.rbac.authorization.k8s.io/prometheus createdclusterrolebinding.rbac.authorization.k8s.io/prometheus createdservice/prometheus createddeployment.apps/prometheus created[][]serviceaccount/loki createdconfigmap/loki createdconfigmap/loki-runtime createdservice/loki-memberlist createdservice/loki-headless createdservice/loki createdstatefulset.apps/loki created[]serviceaccount/grafana createdconfigmap/grafana createdservice/grafana createddeployment.apps/grafana createdconfigmap/istio-grafana-dashboards createdconfigmap/istio-services-grafana-dashboards created[]deployment.apps/jaeger createdservice/tracing createdservice/zipkin createdservice/jaeger-collector created[]


打开 Kiali UI
[root@m1 istio-1.22.2]# istioctl dashboard kiali --address 172.16.20.122http://172.16.20.122:20001/kialiFailed to open browser; open http://172.16.20.122:20001/kiali in your browser.

$ watch -n 0.1 curl -o /dev/null -s -w %{http_code} $GATEWAY_URL/productpage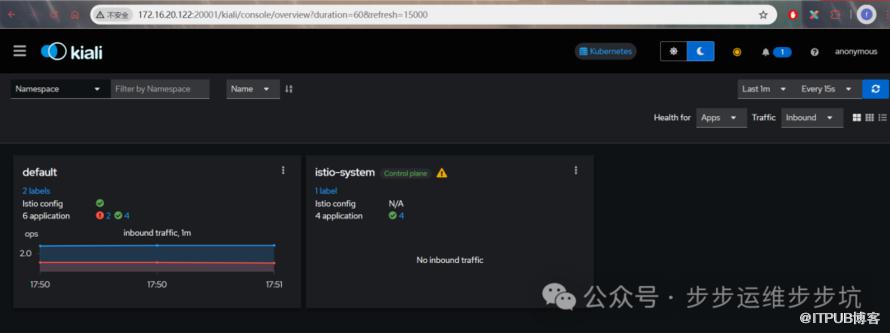

图表
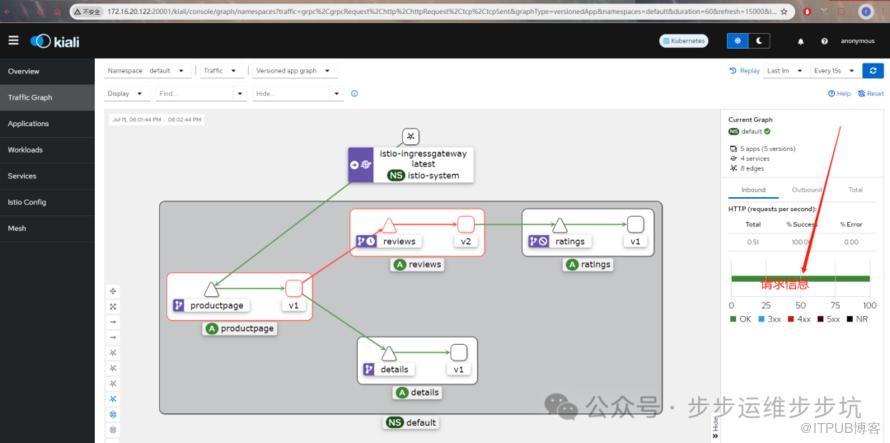
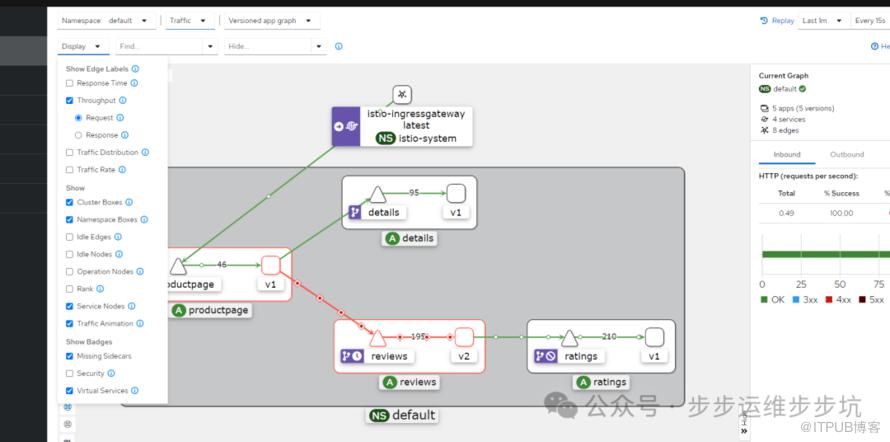
查看流量分配数量
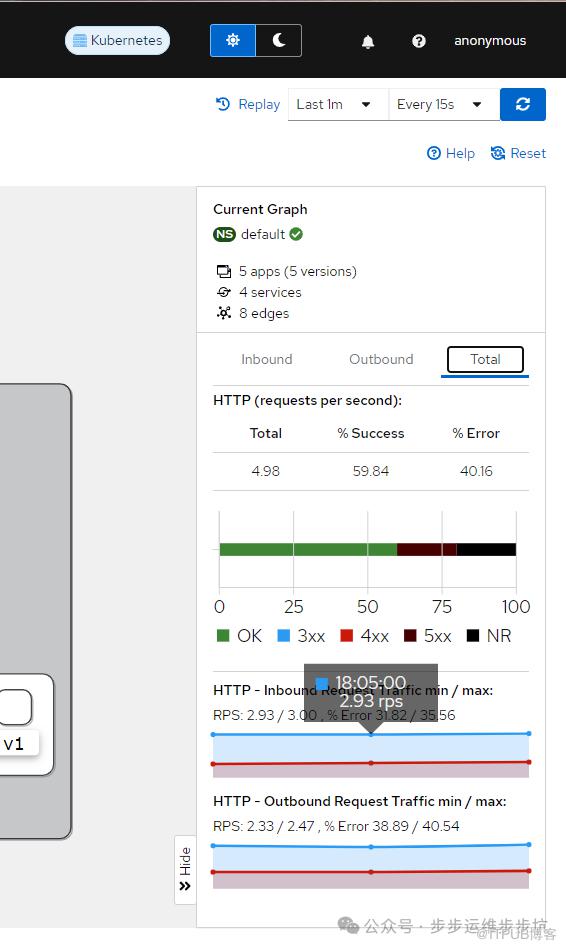
请求统计数据,RPS 数据(最小 / 最大的比值)
四种类型:
-
APP:图形类型将一个应用程序的所有版本聚合到一个图形节点
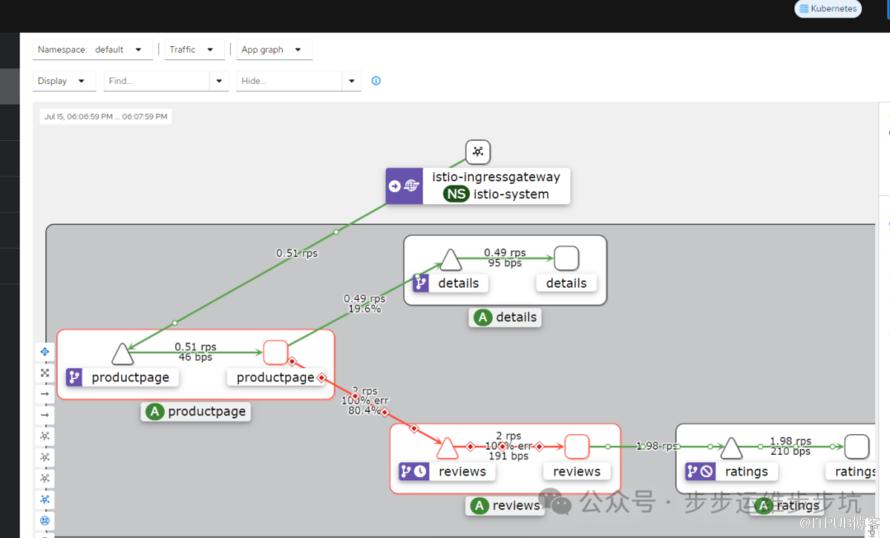
-
Versioned App:图类型显示每个应用程序版本的节点,但是特定应用程序的所有版本都组合在一起。
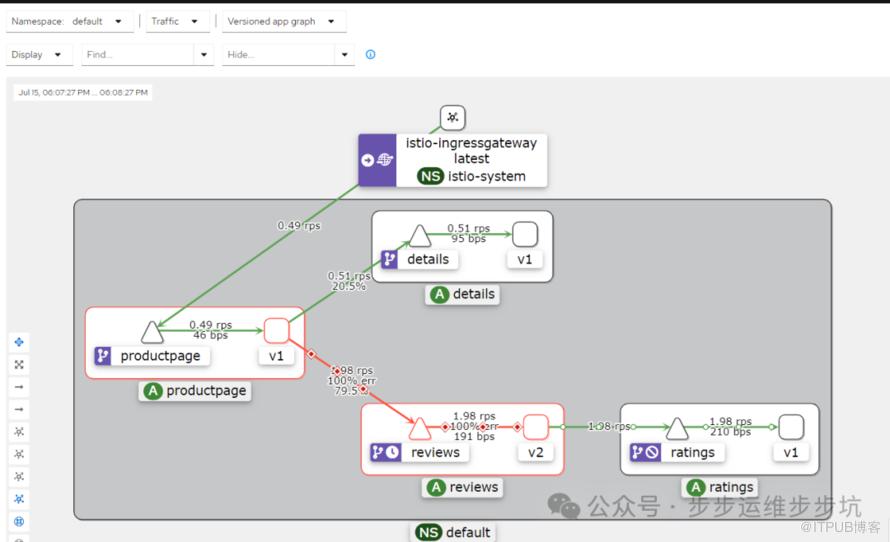
-
Workload:图类型显示了服务网格中每个工作负载的节点
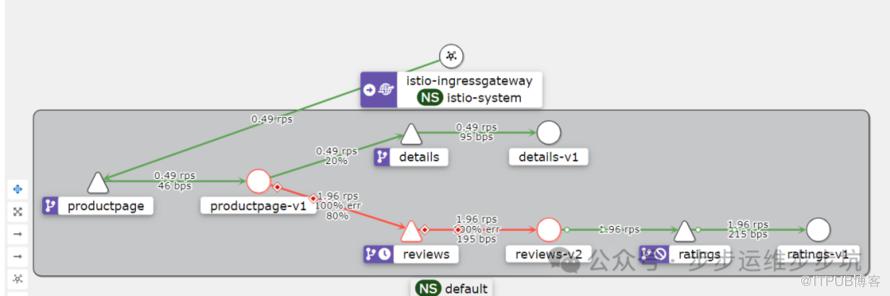
-
Service:图类型显示网格中每个服务的节点
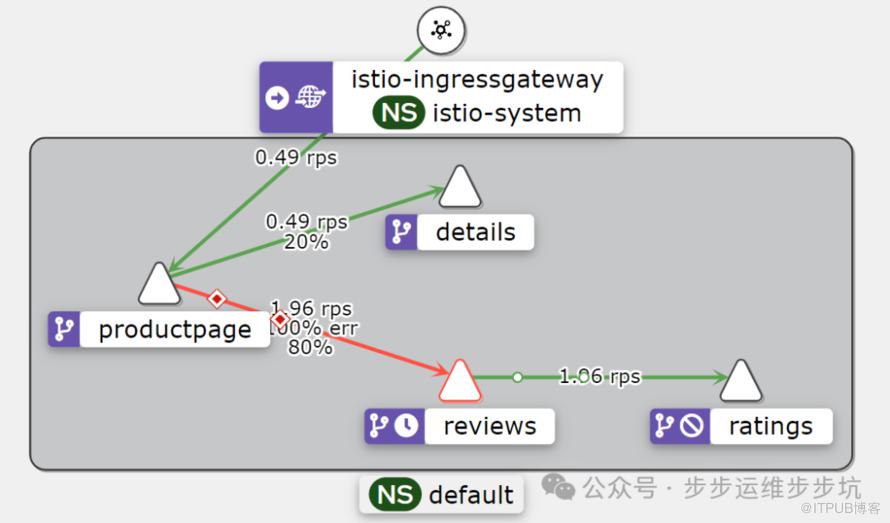

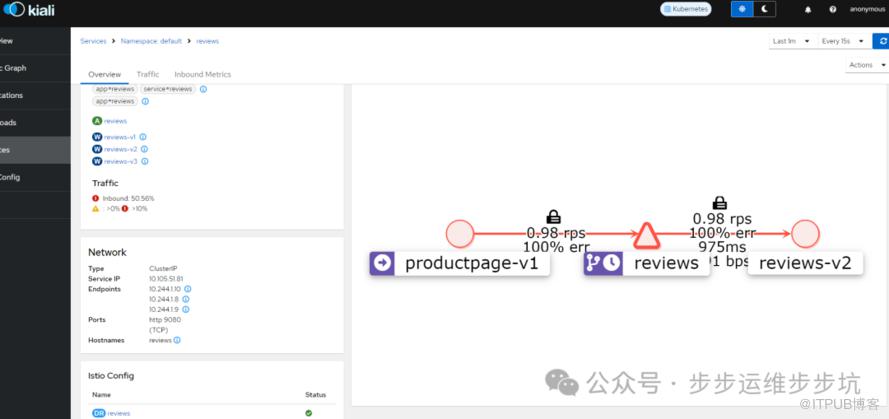
第三步,删除原有路由规则:
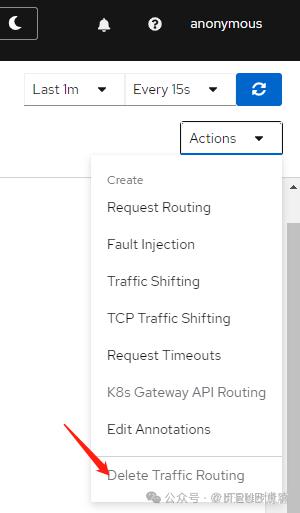
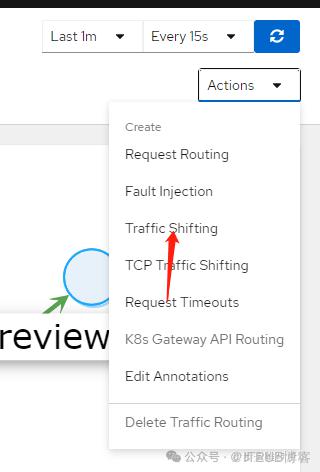
第四步,创建权重的规则:
默认情况:
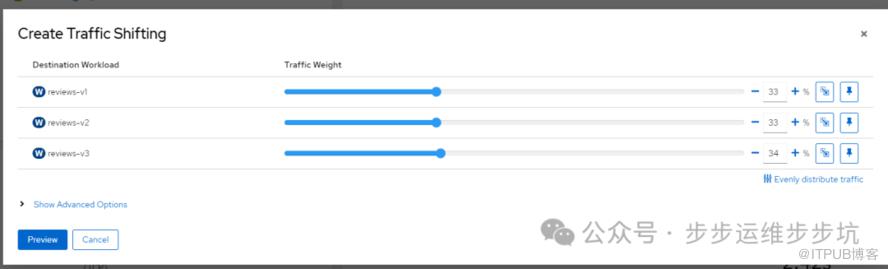
进行调整:
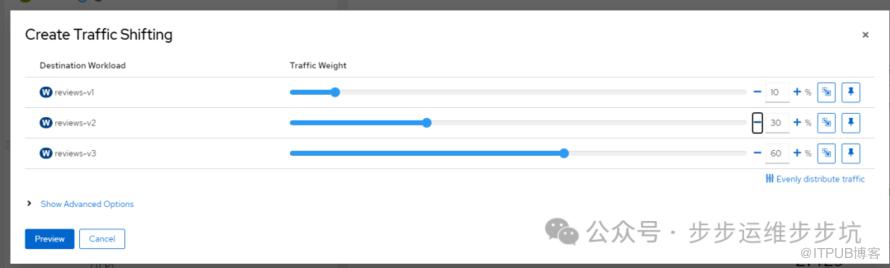
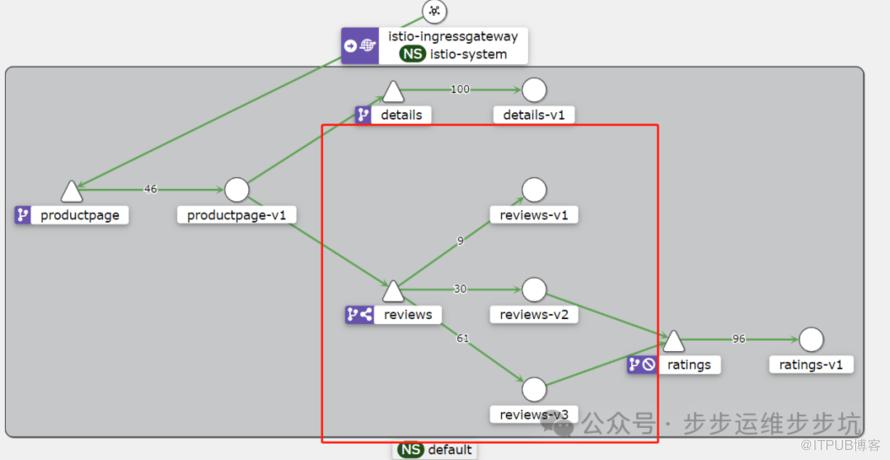
可以看到,分配到 reviews 的 v1、v2、v3 的百分比发生了变化
查看工作负载
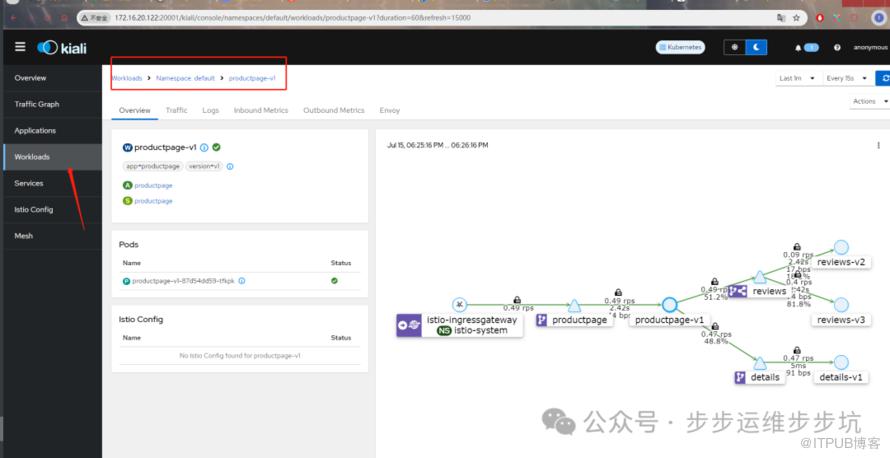
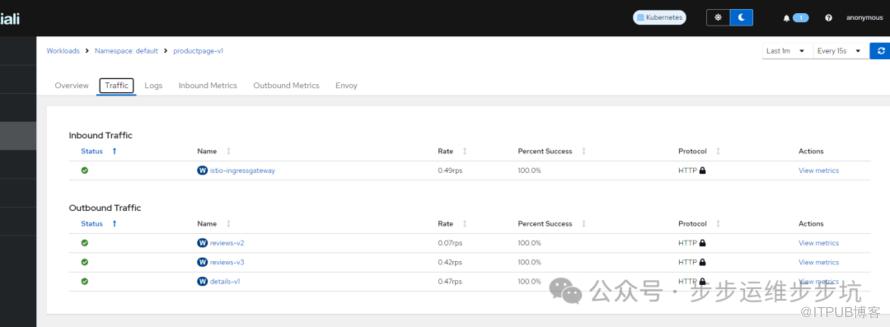
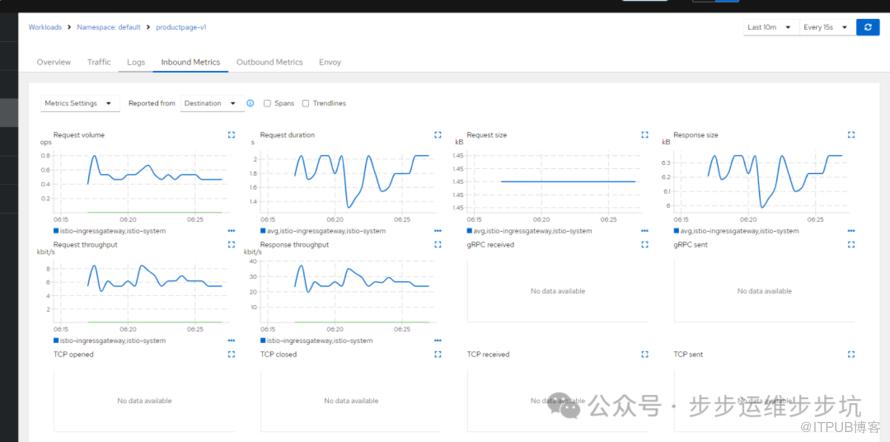
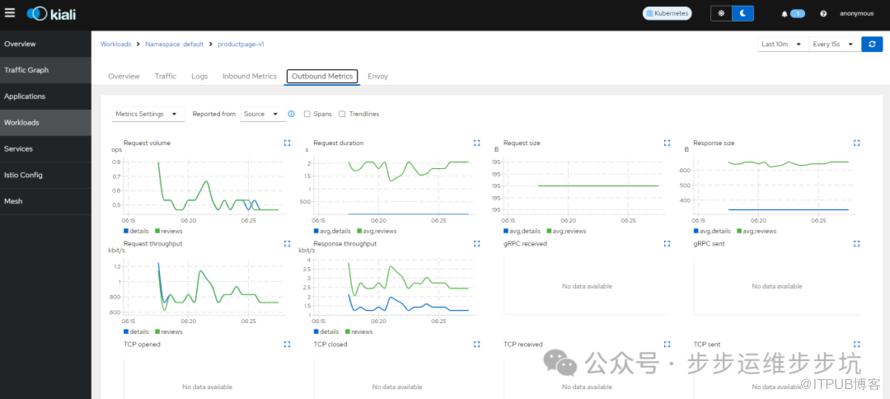
入站、出站信息
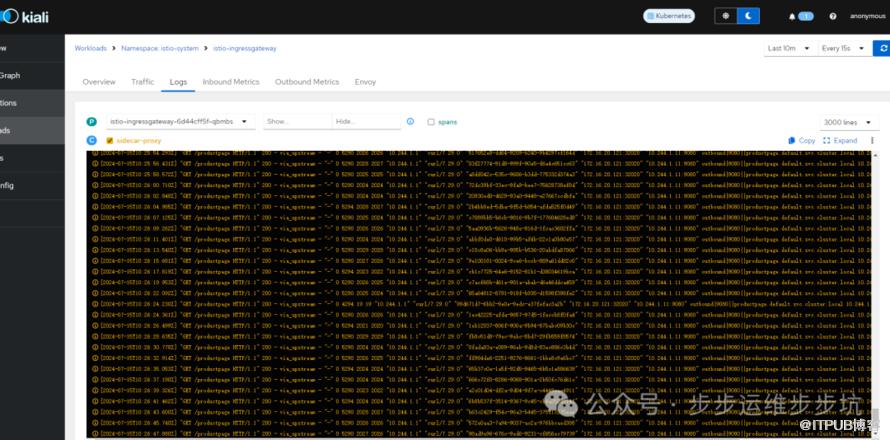
日志信息
入站指标
出站指标
Enovy代理

查看工作负载
期待你的
分享
点赞
在看

添加博主
微信号|yfq940-
原文作者:步步运维步步坑;如有侵权,请联系管理员删除。

