Oracle RAC搭建(二)
1)在配置SSH之前,先在两个节点上生成RSA和DSA密码
在节点rac1上:
[root@rac1 ~]# su - oracle
[oracle@rac1 ~]$ mkdir .ssh
[oracle@rac1 ~]$ chmod 700 ~/.ssh
创建一个RSA类型的公钥和私钥,如下:
[oracle@rac1 ~]$ /usr/bin/ssh-keygen -t rsa
Generating public/private rsa key pair.
Enter file in which to save the key (/home/oracle/.ssh/id_rsa):
Enter passphrase (empty for no passphrase):
Enter same passphrase again:
Your identification has been saved in /home/oracle/.ssh/id_rsa.
Your public key has been saved in /home/oracle/.ssh/id_rsa.pub.
The key fingerprint is:
dc:19:3c:60:ad:a7:32:12:70:74:b9:c0:5e:1d:a0:90 oracle@rac1
通过如上命令将会创建公钥文件/home/oracle/.ssh/id_dsa.pub和私钥文件/home/oracle/.ssh/id_dsa,如下:
[oracle@rac1 .ssh]$ ll
total 8
-rw------- 1 oracle oinstall 1675 May 12 14:35 id_rsa
-rw-r--r-- 1 oracle oinstall 393 May 12 14:35 id_rsa.pub
创建一个DSA类型的公钥和私钥,如下:
[oracle@rac1 .ssh]$ /usr/bin/ssh-keygen -t dsa
Generating public/private dsa key pair.
Enter file in which to save the key (/home/oracle/.ssh/id_dsa):
Enter passphrase (empty for no passphrase):
Enter same passphrase again:
Your identification has been saved in /home/oracle/.ssh/id_dsa.
Your public key has been saved in /home/oracle/.ssh/id_dsa.pub.
The key fingerprint is:
4d:69:16:a4:23:6a:3d:bf:07:3c:e3:d0:15:ad:3f:8d oracle@rac1
通过如上命令将会创建公钥文件/home/oracle/.ssh/id_rsa.pub和私钥文件/home/oracle/.ssh/id_rsa,如下:
[oracle@rac1 .ssh]$ ll
total 16
-rw------- 1 oracle oinstall 668 May 12 14:45 id_dsa
-rw-r--r-- 1 oracle oinstall 601 May 12 14:45 id_dsa.pub
-rw------- 1 oracle oinstall 1675 May 12 14:35 id_rsa
-rw-r--r-- 1 oracle oinstall 393 May 12 14:35 id_rsa.pub
2)授权密钥文件中添加密钥
节点rac1上操作:
[oracle@rac1 .ssh]$ cat id_rsa.pub >>authorized_keys
[oracle@rac1 .ssh]$ cat id_dsa.pub >>authorized_keys
[oracle@rac1 .ssh]$ ls
authorized_keys id_dsa id_dsa.pub id_rsa id_rsa.pub
节点rac2上操作:
创建公钥和私钥,如下:
[oracle@rac2 .ssh]$ ll
total 16
-rw------- 1 oracle oinstall 668 May 12 14:50 id_dsa
-rw-r--r-- 1 oracle oinstall 601 May 12 14:50 id_dsa.pub
-rw------- 1 oracle oinstall 1675 May 12 14:49 id_rsa
-rw-r--r-- 1 oracle oinstall 393 May 12 14:49 id_rsa.pub
[oracle@rac2 .ssh]$ ls
authorized_keys id_dsa id_dsa.pub id_rsa id_rsa.pub
传输公钥和私钥至另一节点的authorized_keys中,如下:
[oracle@rac1 .ssh]$ ssh rac2 cat ~/.ssh/id_rsa.pub >> ~/.ssh/authorized_keys
The authenticity of host 'rac2 (192.168.10.2)' can't be established.
RSA key fingerprint is 24:25:0c:03:51:1c:4b:60:24:dd:7d:04:85:94:b9:66.
Are you sure you want to continue connecting (yes/no)? yes
Warning: Permanently added 'rac2,192.168.10.2' (RSA) to the list of known hosts.
oracle@rac2's password:
[oracle@rac1 .ssh]$ ssh rac2 cat ~/.ssh/id_dsa.pub >> ~/.ssh/authorized_keys
oracle@rac2's password:
[oracle@rac1 .ssh]$ scp ~/.ssh/authorized_keys rac2:~/.ssh/authorized_keys
oracle@rac2's password:
authorized_keys 100% 1988 1.9KB/s 00:00
3)验证双机互信 #确保有日期返回,并且不需要输入密码
[oracle@rac1 .ssh]$ ssh rac1 date
Wed May 14 07:45:12 CST 2014
[oracle@rac1 .ssh]$ ssh rac2 date
Wed May 14 07:45:17 CST 2014
[oracle@rac1 .ssh]$ ssh rac1-priv date
Wed May 14 07:44:31 CST 2014
[oracle@rac1 .ssh]$ ssh rac2-priv date
Wed May 14 07:44:33 CST 2014
[oracle@rac2 .ssh]$ ssh rac1 date
Wed May 14 07:45:40 CST 2014
[oracle@rac2 .ssh]$ ssh rac2 date
Wed May 14 07:45:41 CST 2014
[oracle@rac2 .ssh]$ ssh rac1-priv date
Wed May 14 07:46:14 CST 2014
[oracle@rac2 .ssh]$ ssh rac2-priv date
Wed May 14 07:46:15 CST 2014
[oracle@rac1 .ssh]$ exec /usr/bin/ssh-agent $SHELL
[oracle@rac1 .ssh]$ exec /usr/bin/ssh-add //查看是否有信息弹出
Identity added: /home/oracle/.ssh/id_rsa (/home/oracle/.ssh/id_rsa)
Identity added: /home/oracle/.ssh/id_dsa (/home/oracle/.ssh/id_dsa)
2.查看两节点的网络配置是否能够相互ping通,如下:
[root@rac1 ~]# ifconfig
eth0 Link encap:Ethernet HWaddr 00:0C:29:40:6C:B8
inet addr:192.168.10.1 Bcast:192.168.10.255 Mask:255.255.255.0
inet6 addr: fe80::20c:29ff:fe40:6cb8/64 Scope:Link
UP BROADCAST RUNNING MULTICAST MTU:1500 Metric:1
RX packets:667 errors:0 dropped:0 overruns:0 frame:0
TX packets:882 errors:0 dropped:0 overruns:0 carrier:0
collisions:0 txqueuelen:1000
RX bytes:92478 (90.3 KiB) TX bytes:123456 (120.5 KiB)
Interrupt:75 Base address:0x2424
eth1 Link encap:Ethernet HWaddr 00:0C:29:40:6C:C2
inet addr:10.0.0.1 Bcast:10.0.0.255 Mask:255.255.255.0
inet6 addr: fe80::20c:29ff:fe40:6cc2/64 Scope:Link
UP BROADCAST RUNNING MULTICAST MTU:1500 Metric:1
RX packets:401 errors:0 dropped:0 overruns:0 frame:0
TX packets:63 errors:0 dropped:0 overruns:0 carrier:0
collisions:0 txqueuelen:1000
RX bytes:44958 (43.9 KiB) TX bytes:8950 (8.7 KiB)
Interrupt:67 Base address:0x24a4
lo Link encap:Local Loopback
inet addr:127.0.0.1 Mask:255.0.0.0
inet6 addr: ::1/128 Scope:Host
UP LOOPBACK RUNNING MTU:16436 Metric:1
RX packets:1389 errors:0 dropped:0 overruns:0 frame:0
TX packets:1389 errors:0 dropped:0 overruns:0 carrier:0
collisions:0 txqueuelen:0
RX bytes:2969540 (2.8 MiB) TX bytes:2969540 (2.8 MiB)
[root@rac2 ~]# ifconfig
eth0 Link encap:Ethernet HWaddr 00:0C:29:D8:29:91
inet addr:192.168.10.2 Bcast:192.168.10.255 Mask:255.255.255.0
inet6 addr: fe80::20c:29ff:fed8:2991/64 Scope:Link
UP BROADCAST RUNNING MULTICAST MTU:1500 Metric:1
RX packets:538 errors:0 dropped:0 overruns:0 frame:0
TX packets:757 errors:0 dropped:0 overruns:0 carrier:0
collisions:0 txqueuelen:1000
RX bytes:90042 (87.9 KiB) TX bytes:108986 (106.4 KiB)
Interrupt:75 Base address:0x2424
eth1 Link encap:Ethernet HWaddr 00:0C:29:D8:29:9B
inet addr:10.0.0.2 Bcast:10.0.0.255 Mask:255.255.255.0
inet6 addr: fe80::20c:29ff:fed8:299b/64 Scope:Link
UP BROADCAST RUNNING MULTICAST MTU:1500 Metric:1
RX packets:688 errors:0 dropped:0 overruns:0 frame:0
TX packets:70 errors:0 dropped:0 overruns:0 carrier:0
collisions:0 txqueuelen:1000
RX bytes:78348 (76.5 KiB) TX bytes:9618 (9.3 KiB)
Interrupt:67 Base address:0x24a4
lo Link encap:Local Loopback
inet addr:127.0.0.1 Mask:255.0.0.0
inet6 addr: ::1/128 Scope:Host
UP LOOPBACK RUNNING MTU:16436 Metric:1
RX packets:1527 errors:0 dropped:0 overruns:0 frame:0
TX packets:1527 errors:0 dropped:0 overruns:0 carrier:0
collisions:0 txqueuelen:0
RX bytes:3073680 (2.9 MiB) TX bytes:3073680 (2.9 MiB)
验证连通性,如下:
[root@rac1 ~]# ping -c 3 192.168.10.2
PING 192.168.10.2 (192.168.10.2) 56(84) bytes of data.
64 bytes from 192.168.10.2: icmp_seq=1 ttl=64 time=16.3 ms
64 bytes from 192.168.10.2: icmp_seq=2 ttl=64 time=0.231 ms
64 bytes from 192.168.10.2: icmp_seq=3 ttl=64 time=0.140 ms
--- 192.168.10.2 ping statistics ---
3 packets transmitted, 3 received, 0% packet loss, time 2011ms
rtt min/avg/max/mdev = 0.140/5.563/16.319/7.605 ms
[root@rac1 ~]# ping -c 3 10.0.0.2
PING 10.0.0.2 (10.0.0.2) 56(84) bytes of data.
64 bytes from 10.0.0.2: icmp_seq=1 ttl=64 time=0.738 ms
64 bytes from 10.0.0.2: icmp_seq=2 ttl=64 time=0.122 ms
64 bytes from 10.0.0.2: icmp_seq=3 ttl=64 time=0.135 ms
--- 10.0.0.2 ping statistics ---
3 packets transmitted, 3 received, 0% packet loss, time 2024ms
rtt min/avg/max/mdev = 0.122/0.331/0.738/0.288 ms
[root@rac2 ~]# ping -c 3 192.168.10.1
PING 192.168.10.1 (192.168.10.1) 56(84) bytes of data.
64 bytes from 192.168.10.1: icmp_seq=1 ttl=64 time=0.197 ms
64 bytes from 192.168.10.1: icmp_seq=2 ttl=64 time=0.134 ms
64 bytes from 192.168.10.1: icmp_seq=3 ttl=64 time=0.229 ms
--- 192.168.10.1 ping statistics ---
3 packets transmitted, 3 received, 0% packet loss, time 2028ms
rtt min/avg/max/mdev = 0.134/0.186/0.229/0.042 ms
[root@rac2 ~]# ping -c 3 10.0.0.1
PING 10.0.0.1 (10.0.0.1) 56(84) bytes of data.
64 bytes from 10.0.0.1: icmp_seq=1 ttl=64 time=0.209 ms
64 bytes from 10.0.0.1: icmp_seq=2 ttl=64 time=0.222 ms
64 bytes from 10.0.0.1: icmp_seq=3 ttl=64 time=0.231 ms
--- 10.0.0.1 ping statistics ---
3 packets transmitted, 3 received, 0% packet loss, time 2025ms
rtt min/avg/max/mdev = 0.209/0.220/0.231/0.019 ms
批注:共有IP能够相互ping通说明数据库能够通过两节点对外提供服务,私有IP能够ping通,说明两节点能够相互通信。
3.配置时间同步
在rac1配置时间同步服务器:
[root@rac1 ~]# vi /etc/ntp.conf
添加或修改内容如下:
server 127.127.1.0
fudge 127.127.1.0 stratum 11
broadcastdelay 0.008
driftfile /var/lib/ntp/drift
启动ntp服务:
[root@rac1 ~]# /etc/init.d/ntpd start
Starting ntpd: [ OK ]
设置ntp随系统启动而启动,如下:
[root@rac1 ~]# chkconfig --level 345 ntpd on
[root@rac1 ~]# chkconfig --list|grep ntp
ntpd 0:off 1:off 2:off 3:on 4:on 5:on 6:off
在节点rac2上的配置:
查看rac2节点上ntp服务状态:
[root@rac2 ~]# chkconfig --list |grep ntp
ntpd 0:off 1:off 2:off 3:off 4:off 5:off 6:off
设置执行计划,每30秒进行一次时间同步,如下:
[root@rac2 ~]# vi /etc/crontab #已其中一个节点为时间服务器,这样两节点时间就一致了
#添加执行计划如下:
*/2 * * * * root /usr/sbin/ntpdate 192.168.10.1
在两节点上进行时间同步测试,如下:
[root@rac1 ~]# ntpdate rac2
14 May 07:50:59 ntpdate[4153]: the NTP socket is in use, exiting
[root@rac2 ~]# ntpdate rac1
14 May 07:51:07 ntpdate[4128]: no server suitable for synchronization found
4.安装和配置Oracle Clusterware
下载链接:http://www.oracle.com/technetwork/cn/database/10201linuxsoft-092327-zhs.html
1)准备安装文件
[root@rac1 mnt]# ll
total 2
dr-xr-xr-x 1 root root 2048 Oct 17 2010 clusterware
[root@rac1 mnt]# cp -R clusterware/ /u01/app/
[root@rac1 app]# chown -R oracle:oinstall clusterware/
[root@rac1 app]# ll
total 8
dr-xr-xr-x 9 oracle oinstall 4096 May 12 15:40 clusterware
drwxr-xr-x 3 oracle oinstall 4096 May 12 09:37 oracle
2)图形界面安装clusterware
[root@rac1 ~]# xhost +
access control disabled, clients can connect from any host
[root@rac1 ~]# su - oracle
[oracle@rac1 ~]$ export LANG=en_US
[oracle@rac1 ~]$ cd /u01/app/clusterware/
[oracle@rac1 clusterware]$ ls
cluvfy doc install response rpm runInstaller stage upgrade welcome.html
[oracle@rac1 clusterware]$ ./runInstaller
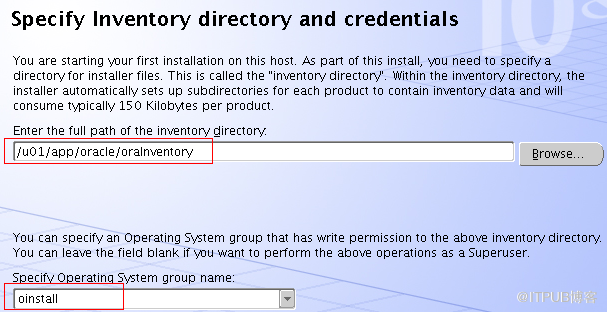
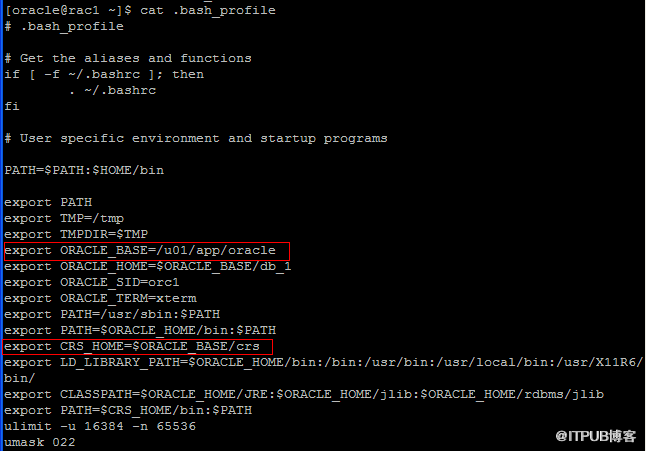
[oracle@rac1 oracle]$ mkdir crs
[oracle@rac1 oracle]$ ll
total 12
drwxr-xr-x 2 oracle oinstall 4096 May 12 16:02 crs
drwxr-xr-x 2 oracle oinstall 4096 May 12 09:37 db_1
drwxrwxr-x 5 oracle oinstall 4096 May 12 16:05 oraInventory
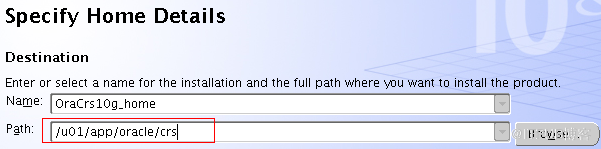
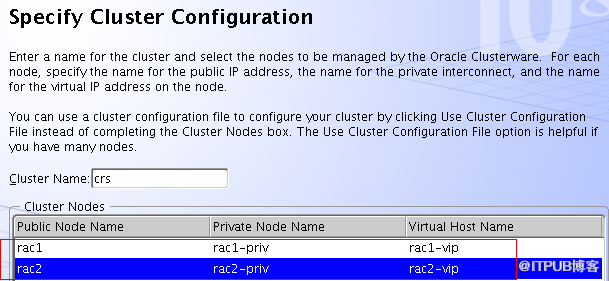
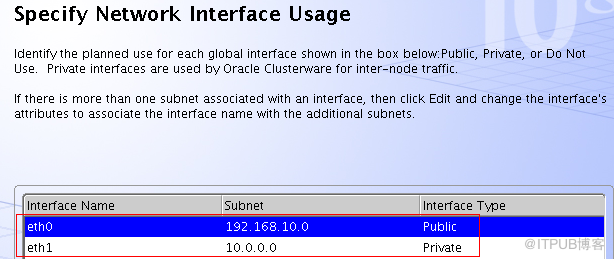
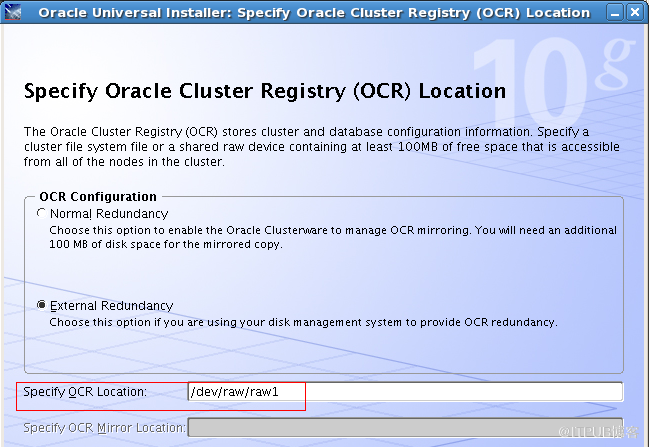
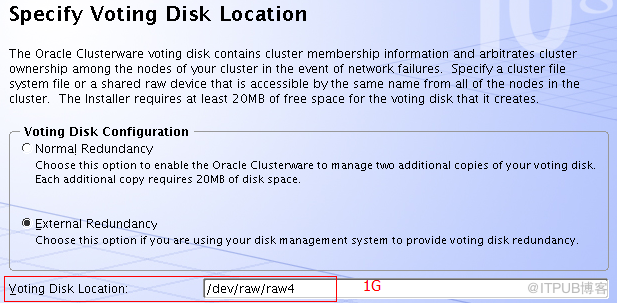
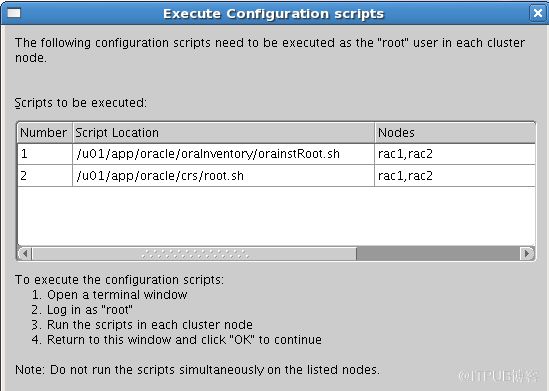
[root@rac1 oracle]$/u01/app/oracle/oralnventory/orainstRoot.ssh
[root@rac2 oracle]$/u01/app/oracle/oralnventory/orainstRoot.ssh
[root@rac1 oracle]$/u01/app/oracle/crs/root.sh
[root@rac2 oracle]$/u01/app/oracle/crs/root.sh
在节点rac2上执行/u01/app/oracle/crs/root.sh出现如下错误:
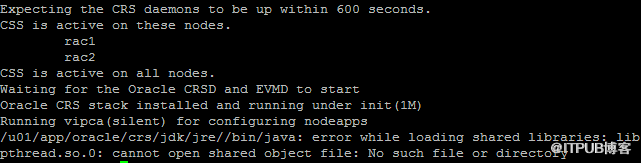
解决办法:
用oracle用户编辑$CRS_HOME/bin下的vipca,找到如下字段:
117 #Remove this workaround when the bug 3937317 is fixed
118 arch=`uname -m`
119 if [ "$arch" = "i686" -o "$arch" = "ia64" ]
120 then
121 LD_ASSUME_KERNEL=2.4.19
122 export LD_ASSUME_KERNEL
123 fi
在fi 后添加一行:unset LD_ASSUME_KERNEL
同样用oracle用户编辑$CRS_HOME/bin下的srvctl,找到如下字段:
165 #Remove this workaround when the bug 3937317 is fixed
166 LD_ASSUME_KERNEL=2.4.19
167 export LD_ASSUME_KERNEL
在其后添加一行:unset LD_ASSUME_KERNEL
两个文件修改后用scp拷贝到第二个节点:
[oracle@rac02 ~]$ scp $CRS_HOME/bin/srvctl rac01:/u01/app/oracle/crs/bin/
srvctl 100% 5501 5.4KB/s 00:00
[oracle@rac02 ~]$ scp /u01/app/oracle/crs/bin/vipca rac01:/u01/app/oracle/crs/bin/
vipca 100% 5003 4.9KB/s 00:00
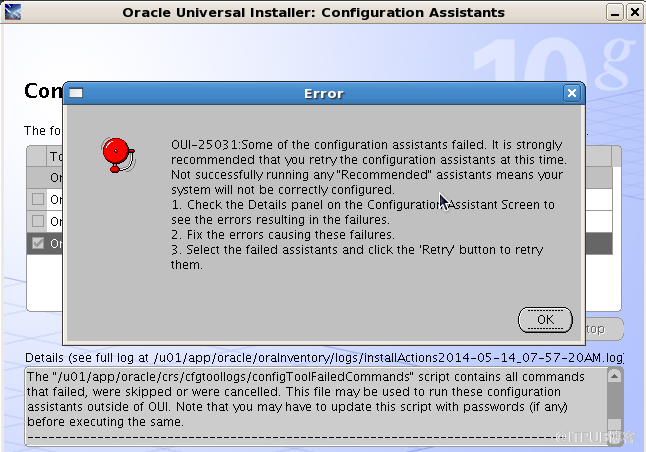
OUI-25031错误处理:手动配置VIPCA
手动修改vipca设置(两节点都要执行)
[root@rac1 ~]# cd /u01/app/oracle/crs/bin/
[root@rac1 bin]# ./oifcfg setif -global eth0/192.168.10.0:public
PRIF-50: duplicate interface is given in the input
[root@rac1 bin]# ./oifcfg setif -global eth1/10.0.0.0:cluster_interconnect
PRIF-50: duplicate interface is given in the input
[root@rac1 bin]# ./oifcfg getif
eth0 192.168.10.0 global public
eth1 10.0.0.0 global cluster_interconnect
[root@rac1 bin]# vi vipca
117 #Remove this workaround when the bug 3937317 is fixed
118 arch=`uname -m`
119 if [ "$arch" = "i686" -o "$arch" = "ia64" ]
120 then
121 LD_ASSUME_KERNEL=2.4.19
122 export LD_ASSUME_KERNEL
123 unset LD_ASSUME_KERNEL=2.4.19
124 fi
125 unset LD_ASSUME_KERNEL
126 #End workaround
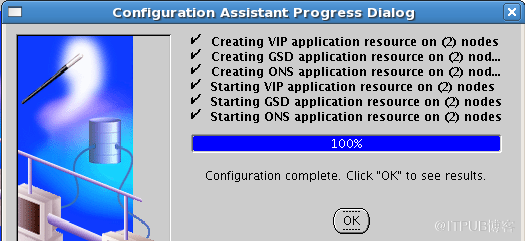
新开一个终端,进入CRS_HOME/bin,再次执行./vipca
开始配置VIP,如下: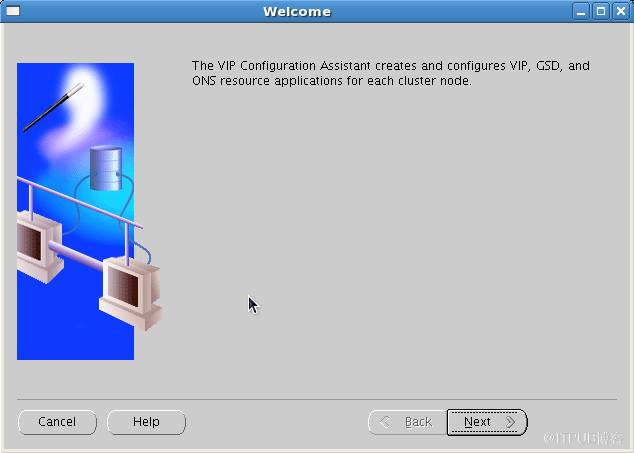
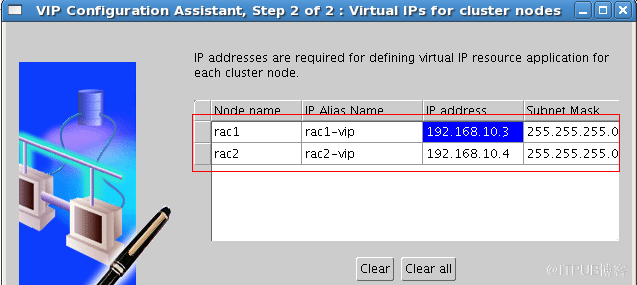
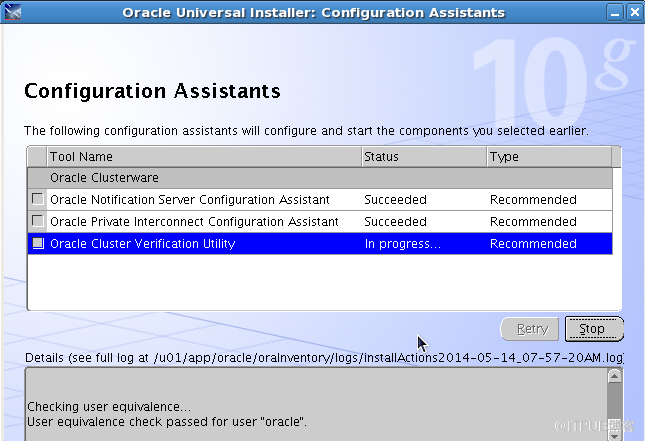
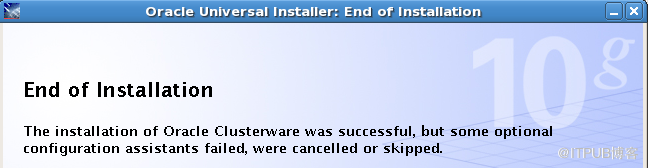
VIP配置完成之后,再次执行检查,点击Retry
在oracle用户下执行crs_stat -t
[oracle@rac2 ~]$ crs_stat -t
Name Type Target State Host
------------------------------------------------------------
ora.rac1.gsd application ONLINE ONLINE rac1
ora.rac1.ons application ONLINE ONLINE rac1
ora.rac1.vip application ONLINE ONLINE rac1
ora.rac2.gsd application ONLINE ONLINE rac2
ora.rac2.ons application ONLINE ONLINE rac2
ora.rac2.vip application ONLINE ONLINE rac2
来自 “ ITPUB博客 ” ,链接:https://blog.itpub.net/14288937/viewspace-1264008/ ,如需转载,请注明出处,否则将追究法律责任。

最新文章
- 缺少log_archive_config导致归档路径被禁用
- [WK-T]ORACLE RAC +ASM Backup and Recovery(四)
- [WK-T]ORACLE RAC +ASM Backup and Recovery(三)
- [WK-T]ORACLE RAC +ASM Backup and Recovery(二)
- [WK-T]ORACLE RAC +ASM Backup and Recovery(一)
- [WK-T]ORACLE 10G RAC+ASM增加controlfile
- How to copy a datafile from ASM to a file system not using RMAN
- Oracle Flashback(二)
- Oracle Flashback(一)
- ORACLE10g Stream表级复制配置
