介绍
嵌入式系统开发中,烧录是一个至关重要的环节。然而,长期以来,我们发现国产芯片现有的烧录工具在跨平台方面存在着一些不便之处。对于Synwit单片机而言, 暂时没发现在Mac平台上有合适的烧录工具。因此,我们决定着手在Mac下开发一个全新的上位机工具,简化烧录过程,提高开发效率,并为Synwit单片机的使用者提供更多的选择。为了实现这一目标,我们选择了Rust作为主要开发语言,并借助Slint语言设计界面。
在这个项目中,我们将结合Rust的内存安全和高性能优势,Slint优雅的声明式语言设计UI,来快速打造一个简单、易于使用的烧录工具,为嵌入式开发者带来便利。接下来,我将分享部分Rust代码和Slint界面代码,探讨这个项目的开发过程和功能特点。
Rust后台部分代码如下:
let lister = Lister::new();
let ui_weak = ui.as_weak();

ui.on_flash(move |probe, chip, file| {
    let ui = ui_weak.unwrap();
    let p = PROBES.lock().unwrap();
    let pb = p.get(probe as usize).unwrap().clone();
    let probe = pb.open(&lister);

    let probe = if let Ok(probe) = probe {
        probe
    } else {
        log::info!("open fail");
        return;
    };

    let mut session = probe
        .attach(String::from(chip).as_str(), Permissions::default())
        .unwrap();
    let flash_process = flashing::FlashProgress::new(move |e| match e {
        flashing::ProgressEvent::Initialized { flash_layout: _ } => {
            ui.invoke_print_log("Initialized".into());
        }
        flashing::ProgressEvent::FinishedProgramming => {
            let cnt = ui.get_success_cnt() + 1;
            ui.set_success_cnt(cnt);
        }
        flashing::ProgressEvent::FailedErasing
            | flashing::ProgressEvent::FailedProgramming => {
                let cnt = ui.get_fail_cnt() + 1;
                ui.set_fail_cnt(cnt);
            }
        _a => ui.invoke_print_log(format!("{:?}", _a).into()),
    });
    let mut download_options = flashing::DownloadOptions::default();
    download_options.verify = true;
    download_options.progress = Some(flash_process);
    let _ = flashing::download_file_with_options(
        &mut session,
        String::from(file).as_str(),
        flashing::Format::Elf,
        download_options,
    )
        .inspect_err(|e| {
            log::error!("error: {}", e);
        });
});
界面Slint代码如下
import { Button, VerticalBox , HorizontalBox, CheckBox, GroupBox} from "std-widgets.slint";
import { FileTextEdit } from "component/FileTextEdit.slint";
import { TitleComBox } from "component/TitleComBox.slint";
import { TextEdit } from "component/TextEdit.slint";

export struct Vender {
    name: string,
    chip: [string],
}

export component AppWindow inherits Window {
    title: @tr("MCU Flash@Hysonglet");
    in-out property <[Vender]> chip_set : [];
    in-out property<int> success_cnt;
    in property <int> fail_cnt;
    in-out property <string> firmware;
    in property <string> firmware_detail;
    in property <[string]> probe_list: [
        @tr("first"),
        @tr("second")
    ];
    in property <[string]> vender_list: [
    ];
    in property <[string]> chip_list: [];
    callback flash(int, string, string);
    pure callback firmware_ready() -> bool;
    pure callback process() -> int;

    public function clear_log() {
        log.clear()
    }
    public function print_log(txt: string) {
        log.print(txt);
    }

    height: 480px;
    width: 720px;
    HorizontalBox {
        alignment: LayoutAlignment.space-between;

        left := VerticalBox {
            alignment: LayoutAlignment.space-around;
            spacing: 0px;
            file_text_edit := FileTextEdit {
                width: 210px;
                height: 180px;
                process: root.process()*1.0/100.0;
                firmware <=> root.firmware;
                file_detail: firmware_detail;
            }
            probe := TitleComBox {
                title: @tr("Probe");
                model: root.probe_list;
            }
            vender:= TitleComBox {
                title: @tr("Vender");
                model: root.vender-list;
            }
            chip:= TitleComBox {
                title: @tr("Chip");
                model: root.chip_set[vender.current_index].chip;
            }

            Button {
                text: @tr("Flash");

                clicked => {
                    flash(probe.current_index, chip.current_value, root.firmware);
                }
                enabled: firmware_ready();
            }
        }

        VerticalBox {
            width: 450px;
            log := TextEdit {
                height: parent.height/1.2;
            }

            HorizontalBox {
                height: 45px;
                alignment: space-between;
                Button {
                    text: @tr("Success:") + root.success_cnt;
                }
                Button {
                    text: @tr("Fail: ") + root.fail_cnt;
                }
                Button {
                    text: @tr("Clear");
                    clicked => {
                        log.clear()
                    }
                }
            }
        }
    }
}
Rust后台控制Jlink或CMISI-DAP工具,采用SWD协议,只需连接SWM341的SWC、SWIO、GND、VCC即可下载。
通过这个项目的开发,我深刻体会到了Rust语言的强大之处,其内存安全和高性能,为本项目提供了坚实的基础。同时,使用slint设计界面,快速实现界面的定制,非常便捷优雅。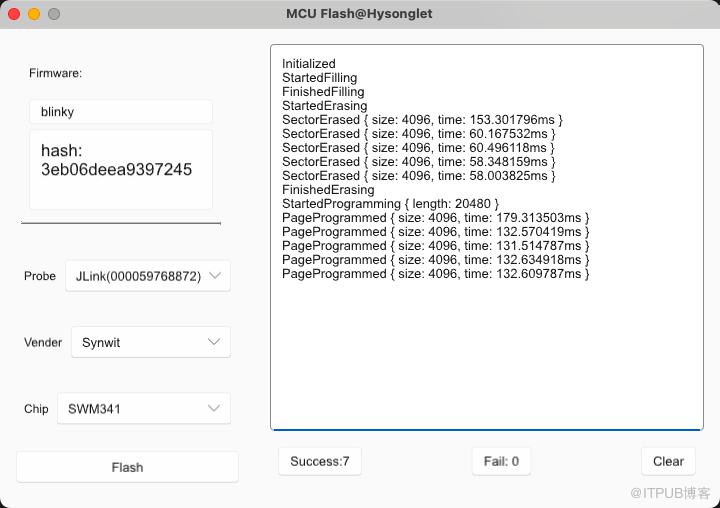 工具界面
工具界面

原文作者:Rust嵌入式;如有侵权,请联系管理员删除。
上一篇:
毕业三年后,我终于出了国
下一篇:
国产芯片 Rust 快速点灯

请登录后发表评论
登录
全部评论
