高级定时器
PY32F030 的内部有一个高级定时器TIM1,是一个16位可编程的定时器,可用于多种场合,如基础定时功能,输入脉冲测量,输出PWM。TIM1的主要特性如下:
16bit 可配置的向下、向上、上下重载模式 16位的分频器,支持1~65535的分频 4 个独立的通道,可用于 输入脉冲捕获 输出比较 PWM 单脉冲输出 支持互补输出的死区配置 外部信号控制定时器或定时器级联控制 DMA 操作 中断事件 更新事件 触发事件 输入捕获事件 输出比较 刹车输入 -
支持正交编码与霍尔传感器电路 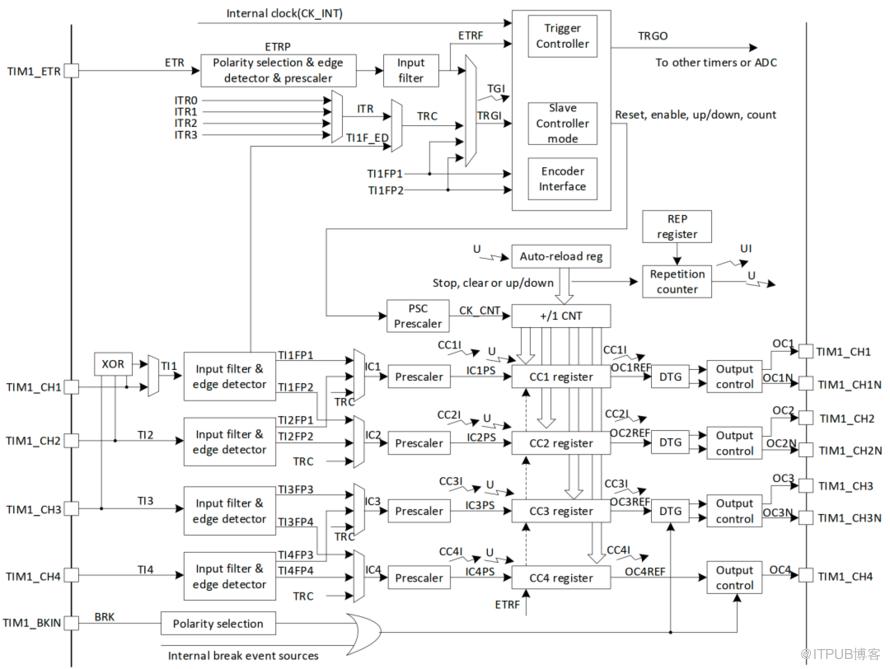
在驱动包 py32f030-hal 中,目前已实现常用的定时、PWM输出、中断等功能,扩展其他功能也非常简单。以下将提供裸机环境操作定时器和多任务系统中配置定时器输出PWM的例程。
示例1: 定时:examples/advanced_timer_block.rs
#![no_std]
#![no_main]

use embedded_hal::digital::v2::ToggleableOutputPin;
use hal::gpio::{Output, PinIoType, PinSpeed};
use hal::mode::Blocking;
use hal::timer::advanced_timer::AnyTimer;
use py32f030_hal as hal;

use {defmt_rtt as _, panic_probe as _};

#[cortex_m_rt::entry]
fn main() -> ! {
    defmt::info!("timer counter examples start...");
    let p = hal::init(Default::default());

    let gpioa = p.GPIOA.split();

    let timer = AnyTimer::<_, Blocking>::new(p.TIM1).unwrap();
    letmut counter = timer.as_counter();

    letmut led = Output::new(gpioa.PA0, PinIoType::PullUp, PinSpeed::Low);

    letmut cnt = 0;

    loop {
        let _ = led.toggle();
        // 延时 1s
        counter.delay_us_blocking(1_000_000);
        defmt::info!("{}", cnt);
        cnt += 1;
    }
}
运行:cargo r --example advanced_timer_block
示例2: examples/advanced_timer_block_2.rs
#![no_std]
#![no_main]

use embedded_hal::timer::CountDown;
use fugit::ExtU32;
use hal::mode::Blocking;
use hal::timer::advanced_timer::AnyTimer;
use py32f030_hal as hal;

use {defmt_rtt as _, panic_probe as _};

#[cortex_m_rt::entry]
fn main() -> ! {
    defmt::info!("timer counter examples start...");
    let p = hal::init(Default::default());

    let timer = AnyTimer::<_, Blocking>::new(p.TIM1).unwrap();
    letmut counter = timer.as_counter();

    letmut cnt = 0;
    loop {
        // 延时 5s
        defmt::info!("repeat...{} ", cnt);
        counter.start(5u32.secs());
        let _ = counter.wait();
        cnt += 1;
    }
}
运行:cargo r --example advanced_timer_block_2
示例3:PWM输出:examples/embassy_pwm.rs
配置输出 PWM 波形
#![no_std]
#![no_main]

use hal::timer::advanced_timer::{AnyTimer, ChannelConfig, ChannelOutputConfig};
use py32f030_hal::gpio::gpioa::PA0;
use py32f030_hal::{selfas hal, mode::Blocking, timer::advanced_timer::Channel};

use embassy_executor::Spawner;
use embassy_time::Timer;
use embedded_hal::Pwm;

use {defmt_rtt as _, panic_probe as _};

#[embassy_executor::task]
asyncfn run() {
    loop {
        Timer::after_secs(2).await;
        defmt::info!("task run");
    }
}

#[embassy_executor::main]
asyncfn main(_spawner: Spawner) {
    defmt::info!("time1 start...");
    let p = hal::init(Default::default());
    let gpioa = p.GPIOA.split();

    _spawner.spawn(run()).unwrap();

    let timer: AnyTimer<_, Blocking> = AnyTimer::new(p.TIM1).unwrap();
    letmut pwm = timer.as_pwm();

    let channel_1_pin = gpioa.PA3;
    pwm.set_channel_1_pin::<_, PA0>(Some(channel_1_pin), None);

    // 配置定时器
    pwm.config(
        /* 配置通道1 */
       Some(ChannelConfig::default().ch(ChannelOutputConfig::default())),
        None,
        None,
        None,
    );

    // 计数频率为1M
    pwm.set_frequency(1_000_000);
    // 设置计数周期为1000,则波形的频率为 1000_000/1000 = 1K
    pwm.set_period(1000u16 - 1);
    let max_duty = pwm.get_max_duty();
    // 33%的占空比
    pwm.set_duty(Channel::CH1, max_duty / 3);
    // 使能通道
    pwm.enable(Channel::CH1);
    // 开始计数器
    pwm.start();

    loop {
        Timer::after_secs(1).await;
    }
}
运行: cargo r --example embassy_pwm
原文作者:Rust嵌入式;如有侵权,请联系管理员删除。
上一篇:
嵌入式 Rust 使用 DMA
下一篇:
在单片机中使用Rust闭包优雅应对中断

请登录后发表评论
登录
全部评论
