安装kubernetes1.17.3多master节点的高可用集群
上一篇我们介绍了kubernetes1.17.3单master节点的集群安装,但是对于生产环境来说,需要对master节点做高可用,这样才可以保证集群能够处于稳定的运行状态,那么我们接下来就开始带领大家去安装k8s1.17.3的高可用集群,如果你是初学小白,只要跟着做,也能保证100%完成安装,下面开始我们的安装之旅吧,内容较多,都是干货,无任何套路~~
如果你觉得累,请看看下面这段话:我们想要去的地方,永远没有捷径,只有脚踏实地,一步一个脚印的才能走向诗和远方!
友情提示:
1.k8s1.16.4,k8s1.17.3,k8s1.18高可用集群的安装视频在百度网盘,可按文章最后的方式加我免费获取
2.下文需要的yaml文件所在的github地址:
https://github.com/luckylucky421/kubernetes1.17.3/tree/master大家可以把我的github仓库fork到你们自己的仓库里,觉得不错的不要忘记在我的github上点star哈~~
3.下文需要的镜像获取方式:镜像在百度网盘,镜像较大,拉取速度可能较慢,如果想要快速获取镜像,按文末方式获取
链接:https://pan.baidu.com/s/1UCldCLnIrDpE5NIoMqvXIg提取码:xk3y
一、准备实验环境
1.准备四台centos7虚拟机,用来安装k8s集群,下面是四台虚拟机的配置情况
master1(192.168.124.16)配置:
操作系统:centos7.4、centos7.5、centos7.6以及更高版本都可以配置:4核cpu,6G内存,两块60G硬盘网络:桥接网络
master2(192.168.124.26)配置:
操作系统:centos7.4、centos7.5、centos7.6以及更高版本都可以配置:4核cpu,6G内存,两块60G硬盘网络:桥接网络
master3(192.168.124.36)配置:
操作系统:centos7.4、centos7.5、centos7.6以及更高版本都可以配置:4核cpu,6G内存,两块60G硬盘网络:桥接网络
node1(192.168.124.56)配置:
操作系统:centos7.6配置:4核cpu,4G内存,两块60G硬盘网络:桥接网络
二、初始化实验环境
1.配置静态ip
把虚拟机或者物理机配置成静态ip地址,这样机器重新启动后ip地址也不会发生改变。
1.1 在master1节点配置网络
修改/etc/sysconfig/network-scripts/ifcfg-ens33文件,变成如下:
TYPE=EthernetPROXY_METHOD=noneBROWSER_ONLY=noBOOTPROTO=staticIPADDR=192.168.124.16NETMASK=255.255.255.0GATEWAY=192.168.124.1DNS1=192.168.124.1DEFROUTE=yesIPV4_FAILURE_FATAL=noIPV6INIT=yesIPV6_AUTOCONF=yesIPV6_DEFROUTE=yesIPV6_FAILURE_FATAL=noIPV6_ADDR_GEN_MODE=stable-privacyNAME=ens33DEVICE=ens33ONBOOT=yes
修改配置文件之后需要重启网络服务才能使配置生效,重启网络服务命令如下:
service network restart
1.2 在master2节点配置网络
修改/etc/sysconfig/network-scripts/ifcfg-ens33文件,变成如下:
TYPE=EthernetPROXY_METHOD=noneBROWSER_ONLY=noBOOTPROTO=staticIPADDR=192.168.124.26NETMASK=255.255.255.0GATEWAY=192.168.124.1DNS1=192.168.124.1DEFROUTE=yesIPV4_FAILURE_FATAL=noIPV6INIT=yesIPV6_AUTOCONF=yesIPV6_DEFROUTE=yesIPV6_FAILURE_FATAL=noIPV6_ADDR_GEN_MODE=stable-privacyNAME=ens33DEVICE=ens33ONBOOT=yes
修改配置文件之后需要重启网络服务才能使配置生效,重启网络服务命令如下:
service network restart1.3 在master3节点配置网络
修改/etc/sysconfig/network-scripts/ifcfg-ens33文件,变成如下:
TYPE=EthernetPROXY_METHOD=noneBROWSER_ONLY=noBOOTPROTO=staticIPADDR=192.168.124.36NETMASK=255.255.255.0GATEWAY=192.168.124.1DNS1=192.168.124.1DEFROUTE=yesIPV4_FAILURE_FATAL=noIPV6INIT=yesIPV6_AUTOCONF=yesIPV6_DEFROUTE=yesIPV6_FAILURE_FATAL=noIPV6_ADDR_GEN_MODE=stable-privacyNAME=ens33DEVICE=ens33ONBOOT=yes
修改配置文件之后需要重启网络服务才能使配置生效,重启网络服务命令如下:
service network restart注:ifcfg-ens33文件配置解释:
IPADDR=192.168.124.16 #ip地址,需要跟自己电脑所在网段一致NETMASK=255.255.255.0 #子网掩码,需要跟自己电脑所在网段一致GATEWAY=192.168.124.1 #网关,在自己电脑打开cmd,输入ipconfig /all可看到DNS1=192.168.124.1 #DNS,在自己电脑打开cmd,输入ipconfig /all可看到
1.4 在node1节点配置网络
修改/etc/sysconfig/network-scripts/ifcfg-ens33文件,变成如下:
TYPE=EthernetPROXY_METHOD=noneBROWSER_ONLY=noBOOTPROTO=staticIPADDR=192.168.124.56NETMASK=255.255.255.0GATEWAY=192.168.124.1DNS1=192.168.124.1DEFROUTE=yesIPV4_FAILURE_FATAL=noIPV6INIT=yesIPV6_AUTOCONF=yesIPV6_DEFROUTE=yesIPV6_FAILURE_FATAL=noIPV6_ADDR_GEN_MODE=stable-privacyNAME=ens33DEVICE=ens33ONBOOT=yes
修改配置文件之后需要重启网络服务才能使配置生效,重启网络服务命令如下:
service network restart2.安装基础软件包,各个节点操作
yum -y install wget net-tools nfs-utilslrzsz gcc gcc-c++ make cmake libxml2-devel openssl-devel curl curl-devel unzipsudo ntp libaio-devel wget vim ncurses-devel autoconf automake zlib-devel python-devel epel-release openssh-server socat ipvsadm conntrack ntpdate3.关闭firewalld防火墙,各个节点操作,centos7系统默认使用的是firewalld防火墙,停止firewalld防火墙,并禁用这个服务
systemctl stop firewalld &&systemctl disable firewalld4.安装iptables,各个节点操作,如果你用firewalld不是很习惯,可以安装iptables,这个步骤可以不做,根据大家实际需求
4.1 安装iptables
yum install iptables-services -y
4.2 禁用iptables
service iptables stop && systemctl disable iptables5.时间同步,各个节点操作
5.1 时间同步
ntpdate cn.pool.ntp.org
5.2 编辑计划任务,每小时做一次同步
crontab -e* */1 * * * /usr/sbin/ntpdate cn.pool.ntp.org
6. 关闭selinux,各个节点操作
关闭selinux,设置永久关闭,这样重启机器selinux也处于关闭状态
修改/etc/sysconfig/selinux文件
sed -i 's/SELINUX=enforcing/SELINUX=disabled/'/etc/sysconfig/selinuxsed -i"s/SELINUX=enforcing/SELINUX=disabled/g" /etc/selinux/config
上面文件修改之后,需要重启虚拟机,可以强制重启:
reboot -f7.关闭交换分区,各个节点操作
swapoff -a# 永久禁用,打开/etc/fstab注释掉swap那一行。sed -i 's/.*swap.*/#&/' /etc/fstab
8.修改内核参数,各个节点操作
cat <<EOF > /etc/sysctl.d/k8s.conf= 1= 1EOFsysctl --system
9.修改主机名
在192.168.124.16上:
hostnamectl set-hostname master1 在192.168.124.26上:
hostnamectl set-hostname master2在192.168.124.36上:
hostnamectl set-hostname master3在192.168.124.56上:
hostnamectl set-hostname node110.配置hosts文件,各个节点操作
在/etc/hosts文件增加如下几行:
192.168.124.16 master1192.168.124.26 master2192.168.124.36 master3192.168.124.56 node1
11.配置master1到node无密码登陆,配置master1到master2、master3无密码登陆
在master1上操作
ssh-keygen -t rsa#一直回车就可以
ssh-copy-id -i .ssh/id_rsa.pubroot@192.168.124.26#上面需要输入密码,输入master2物理机密码即可
ssh-copy-id -i .ssh/id_rsa.pubroot@192.168.124.36#上面需要输入密码,输入master3物理机密码即可
ssh-copy-id -i .ssh/id_rsa.pubroot@192.168.124.56#上面需要输入密码,输入node1物理机密码即可
三、安装kubernetes1.17.3高可用集群
1.修改yum源,各个节点操作
(1)备份原来的yum源
mv /etc/yum.repos.d/CentOS-Base.repo/etc/yum.repos.d/CentOS-Base.repo.backup(2)下载阿里的yum源
wget -O /etc/yum.repos.d/CentOS-Base.repohttp://mirrors.aliyun.com/repo/Centos-7.repo(3)生成新的yum缓存
yum makecache fast(4)配置安装k8s需要的yum源
cat <<EOF > /etc/yum.repos.d/kubernetes.repo[kubernetes]name=Kubernetesbaseurl=https://mirrors.aliyun.com/kubernetes/yum/repos/kubernetes-el7-x86_64enabled=1gpgcheck=0EOF
(5)清理yum缓存
yum clean all(6)生成新的yum缓存
yum makecache fast(7)更新yum源
yum -y update(8)安装软件包
yum -y install yum-utilsdevice-mapper-persistent-data lvm2(9)添加新的软件源
yum-config-manager--add-repo http://mirrors.aliyun.com/docker-ce/linux/centos/docker-ce.repo
2.安装docker19.03,各个节点操作
2.1 查看支持的docker版本
yum list docker-ce --showduplicates |sort-r2.2 下载19.03.7版本
yum install -y docker-ce-19*systemctl enable docker &&systemctl start docker
#查看docker状态,如果状态是active(running),说明docker是正常运行状态
systemctl status docker2.3 修改docker配置文件,配置镜像加速器
cat > /etc/docker/daemon.json <<EOF{"exec-opts": ["native.cgroupdriver=systemd"],"log-driver": "json-file","log-opts": {"max-size": "100m"},"storage-driver": "overlay2","storage-opts": ["overlay2.override_kernel_check=true"]}EOF
2.4 重启docker使配置生效
systemctl daemon-reload && systemctlrestart docker2.5 设置网桥包经IPTables,core文件生成路径,配置永久生效
echo 1 > /proc/sys/net/bridge/bridge-nf-call-iptablesecho 1 >/proc/sys/net/bridge/bridge-nf-call-ip6tablesecho """vm.swappiness = 0net.bridge.bridge-nf-call-iptables = 1net.ipv4.ip_forward = 1net.bridge.bridge-nf-call-ip6tables = 1""" > /etc/sysctl.confsysctl -p
2.6 开启ipvs,不开启ipvs将会使用iptables,但是效率低,所以官网推荐需要开通ipvs内核
cat >/etc/sysconfig/modules/ipvs.modules <<EOFipvs_modules="ip_vs ip_vs_lc ip_vs_wlcip_vs_rr ip_vs_wrr ip_vs_lblc ip_vs_lblcr ip_vs_dh ip_vs_sh ip_vs_fo ip_vs_nqip_vs_sed ip_vs_ftp nf_conntrack"for kernel_module in \${ipvs_modules}; do/sbin/modinfo -F filename \${kernel_module}> /dev/null 2>&1if [$? -eq 0 ]; then/sbin/modprobe \${kernel_module}fidoneEOFchmod755 /etc/sysconfig/modules/ipvs.modules && bash/etc/sysconfig/modules/ipvs.modules && modprobe ip_vs && lsmod| grep ip_vs
3.安装kubernetes1.17.3
3.1 在master1、master2、master3和node1上安装kubeadm和kubelet
yum install kubeadm-1.17.3 kubelet-1.17.3 -ysystemctl enable kubelet
3.2上传镜像到master1、master2、master3和node1节点之后,手动解压镜像,镜像在百度网盘,我的是从官方下载的镜像,大家可以放心使用
docker load -i kube-apiserver.tar.gzdocker load -i kube-scheduler.tar.gzdocker load -i kube-controller-manager.tar.gzdocker load -i pause.tar.gzdocker load -i cordns.tar.gzdocker load -i etcd.tar.gzdocker load -i kube-proxy.tar.gzdocker load -i cni.tar.gzdocker load -i calico-node.tar.gzdocker load -i kubernetes-dashboard_1_10.tar.gzdocker load -i metrics-server-amd64_0_3_1.tar.gzdocker load -i addon.tar.gz
说明:
pause版本是3.1,用到的镜像是k8s.gcr.io/pause:3.1
etcd版本是3.4.3,用到的镜像是k8s.gcr.io/etcd:3.4.3-0
cordns版本是1.6.5,用到的镜像是k8s.gcr.io/coredns:1.6.5
cni版本是3.5.3,用到的镜像是quay.io/calico/cni:v3.5.3
calico版本是3.5.3,用到的镜像是quay.io/calico/node:v3.5.3
apiserver、scheduler、controller-manager、kube-proxy版本是1.17.3,用到的镜像分别是
k8s.gcr.io/kube-apiserver:v1.17.3
k8s.gcr.io/kube-controller-manager:v1.17.3
k8s.gcr.io/kube-scheduler:v1.17.3
k8s.gcr.io/kube-proxy:v1.17.3
kubernetes dashboard版本1.10.1,用到的镜像是k8s.gcr.io/kubernetes-dashboard-amd64:v1.10.1
metrics-server版本0.3.1,用到的镜像是k8s.gcr.io/metrics-server-amd64:v0.3.1
addon-resizer版本是1.8.4,用到的镜像是k8s.gcr.io/addon-resizer:1.8.4
3.3 部署keepalive+lvs实现master节点高可用-对apiserver做高可用
(1)部署keepalived+lvs,在各master节点操作
yum install -y socat keepalived ipvsadm conntrack(2)修改master1的keepalived.conf文件,按如下修改
修改/etc/keepalived/keepalived.conf
master1节点修改之后的keepalived.conf如下所示:
global_defs {router_id LVS_DEVEL}vrrp_instance VI_1 {state BACKUPnopreemptinterface ens33virtual_router_id 80priority 100advert_int 1authentication {auth_type PASSauth_pass just0kk}virtual_ipaddress {192.168.124.199}}virtual_server 192.168.124.199 6443 {delay_loop 6lb_algo loadbalancelb_kind DRnet_mask 255.255.255.0persistence_timeout 0protocol TCPreal_server 192.168.124.16 6443 {weight 1SSL_GET {url {path /healthzstatus_code 200}connect_timeout 3nb_get_retry 3delay_before_retry 3}}real_server 192.168.124.26 6443 {weight 1SSL_GET {url {path /healthzstatus_code 200}connect_timeout 3nb_get_retry 3delay_before_retry 3}}real_server 192.168.124.36 6443 {weight 1SSL_GET {url {path /healthzstatus_code 200}connect_timeout 3nb_get_retry 3delay_before_retry 3}}}
(3)修改master2的keepalived.conf文件,按如下修改
修改/etc/keepalived/keepalived.conf
master2节点修改之后的keepalived.conf如下所示:
global_defs {router_id LVS_DEVEL}vrrp_instance VI_1 {state BACKUPnopreemptinterface ens33virtual_router_id 80priority 50advert_int 1authentication {auth_type PASSauth_pass just0kk}virtual_ipaddress {192.168.124.199}}virtual_server 192.168.124.199 6443 {delay_loop 6lb_algo loadbalancelb_kind DR net_mask 255.255.255.0persistence_timeout 0protocol TCPreal_server 192.168.124.16 6443 {weight 1SSL_GET {url {path /healthzstatus_code 200}connect_timeout 3nb_get_retry 3delay_before_retry 3}}real_server 192.168.124.26 6443 {weight 1SSL_GET {url {path /healthzstatus_code 200}connect_timeout 3nb_get_retry 3delay_before_retry 3}}real_server 192.168.124.36 6443 {weight 1SSL_GET {url {path /healthzstatus_code 200}connect_timeout 3nb_get_retry 3delay_before_retry 3}}}
(4)修改master3的keepalived.conf文件,按如下修改
修改/etc/keepalived/keepalived.conf
master3节点修改之后的keepalived.conf如下所示:
global_defs {router_id LVS_DEVEL}vrrp_instance VI_1 {state BACKUPnopreemptinterface ens33virtual_router_id 80priority 30advert_int 1authentication {auth_type PASSauth_pass just0kk}virtual_ipaddress {192.168.124.199}}virtual_server 192.168.124.199 6443 {delay_loop 6lb_algo loadbalancelb_kind DRnet_mask 255.255.255.0persistence_timeout 0protocol TCPreal_server 192.168.124.16 6443 {weight 1SSL_GET {url {path /healthzstatus_code 200}connect_timeout 3nb_get_retry 3delay_before_retry 3}}real_server 192.168.124.26 6443 {weight 1SSL_GET {url {path /healthzstatus_code 200}connect_timeout 3nb_get_retry 3delay_before_retry 3}}real_server 192.168.124.36 6443 {weight 1SSL_GET {url {path /healthzstatus_code 200}connect_timeout 3nb_get_retry 3delay_before_retry 3}}}
重要知识点,必看,否则生产会遇到巨大的坑
keepalive需要配置BACKUP,而且是非抢占模式nopreempt,假设master1宕机,启动之后vip不会自动漂移到master1,这样可以保证k8s集群始终处于正常状态,因为假设master1启动,apiserver等组件不会立刻运行,如果vip漂移到master1,那么整个集群就会挂掉,这就是为什么我们需要配置成非抢占模式了
启动顺序master1->master2->master3,在master1、master2、master3依次执行如下命令
systemctl enable keepalived && systemctl start keepalived && systemctl status keepalivedkeepalived启动成功之后,在master1上通过ip addr可以看到vip已经绑定到ens33这个网卡上了
2: ens33:<BROADCAST,MULTICAST,UP,LOWER_UP> mtu 1500 qdisc pfifo_fast state UPgroup default qlen 100000:0c:29:9d:7b:09 brd ff:ff:ff:ff:ff:ffinet 192.168.124.16/24 brd 192.168.124.255 scope global noprefixrouteens33valid_lft forever preferred_lft foreverinet 192.168.124.199/32 scopeglobal ens33valid_lft forever preferred_lft foreverinet6 fe80::e2f9:94cd:c994:34d9/64 scope link tentative noprefixroutedadfailedvalid_lft forever preferred_lft foreverinet6 fe80::ed0d:a5fc:e36a:a563/64 scope link noprefixroutevalid_lft forever preferred_lft forever
3.4 在master1节点初始化k8s集群,在master1上操作如下
echo """apiVersion: kubeadm.k8s.io/v1beta2kind: ClusterConfigurationkubernetesVersion: v1.17.3controlPlaneEndpoint:"192.168.124.199:6443"apiServer:certSANs:-192.168.124.16-192.168.124.26-192.168.124.36-192.168.124.56192.168.124.199networking:podSubnet: 10.244.0.0/16---apiVersion:kubeproxy.config.k8s.io/v1alpha1kind: KubeProxyConfigurationmode: ipvs> kubeadm-config.yaml
kubeadm init --config kubeadm-config.yaml
显示如下,说明初始化成功了
To start using your cluster, you need torun the following as a regular user:mkdir -p $HOME/.kubesudo cp -i /etc/kubernetes/admin.conf $HOME/.kube/configsudo chown $(id -u):$(id -g) $HOME/.kube/configYou should now deploy a pod network to thecluster.Run "kubectl apply -f [podnetwork].yaml"with one of the options listed at:https://kubernetes.io/docs/concepts/cluster-administration/addons/Then you can join any number of workernodes by running the following on each as root:kubeadm join 192.168.124.199:6443 --tokeny6ryw4.69atvhqbxins51vs \--discovery-token-ca-cert-hashsha256:797acd093254f02e48e6528862de131cea18801d5b4f28a651592d2ad854c2b6
注:kubeadm join ... 这条命令需要记住,下面我们把k8s的master2、master3,node1节点加入到集群需要在这些节点节点输入这条命令,每次执行这个结果都是不一样的,大家记住自己执行的结果,在下面会用到
3.5 在master1节点执行如下,这样才能有权限操作k8s资源
mkdir -p $HOME/.kubesudo cp -i /etc/kubernetes/admin.conf$HOME/.kube/configsudo chown $(id -u):$(id -g)$HOME/.kube/config
在master1节点执行kubectl get nodes
显示如下
NAME STATUS ROLES AGE VERSIONmaster1 NotReady master 2m13s v1.17.3
kubectl get pods -n kube-system
可看到cordns也是处于pending状态
coredns-6955765f44-cj8cv 0/1 Pending 0 3m16scoredns-6955765f44-lxt6f 0/1 Pending 0 3m16s
上面可以看到STATUS状态是NotReady,cordns是pending,是因为没有安装网络插件,需要安装calico或者flannel,接下来我们安装calico,在master1节点安装calico网络插件:
在master1节点执行如下:
kubectl apply -f calico.yaml
cat calico.yaml
# Calico Version v3.5.3#https://docs.projectcalico.org/v3.5/releases#v3.5.3# This manifest includes the followingcomponent versions:# calico/node:v3.5.3# calico/cni:v3.5.3# This ConfigMap is used to configure aself-hosted Calico installation.kind: ConfigMapapiVersion: v1metadata:name: calico-confignamespace: kube-systemdata:#Typha is disabled.typha_service_name: "none"#Configure the Calico backend to use.calico_backend: "bird"#Configure the MTU to useveth_mtu: "1440"#The CNI network configuration to install on each node. The special#values in this config will be automatically populated.cni_network_config: |-{: "k8s-pod-network",: "0.3.0",: [{: "calico",: "info",: "kubernetes",: "__KUBERNETES_NODE_NAME__",: __CNI_MTU__,: {: "host-local",: "usePodCidr"},: {: "k8s"},: {:"__KUBECONFIG_FILEPATH__"}},{: "portmap",: true,: {"portMappings": true}}]}---# This manifest installs the calico/nodecontainer, as well# as the Calico CNI plugins and networkconfig on# each master and worker node in aKubernetes cluster.kind: DaemonSetapiVersion: apps/v1metadata:name: calico-nodenamespace: kube-systemlabels:: calico-nodespec:selector:matchLabels:: calico-nodeupdateStrategy:type: RollingUpdaterollingUpdate:maxUnavailable: 1template:metadata:labels:: calico-nodeannotations:# This, along with the CriticalAddonsOnly toleration below,# marks the pod as a critical add-on, ensuring it gets# priority scheduling and that its resources are reserved# if it ever gets evicted.: ''spec:nodeSelector:: linuxhostNetwork: truetolerations:# Make sure calico-node gets scheduled on all nodes.effect: NoScheduleoperator: Exists# Mark the pod as a critical add-on for rescheduling.key: CriticalAddonsOnlyoperator: Existseffect: NoExecuteoperator: ExistsserviceAccountName: calico-node# Minimize downtime during a rolling upgrade or deletion; tellKubernetes to do a "force# deletion":https://kubernetes.io/docs/concepts/workloads/pods/pod/#termination-of-pods.terminationGracePeriodSeconds: 0initContainers:# This container installs the Calico CNI binaries# and CNI network config file on each node.name: install-cniimage: quay.io/calico/cni:v3.5.3command: ["/install-cni.sh"]env:# Name of the CNI config file to create.name: CNI_CONF_NAMEvalue:"10-calico.conflist"# The CNI network config to install on each node.name: CNI_NETWORK_CONFIGvalueFrom:configMapKeyRef:name: calico-configkey: cni_network_config# Set the hostname based on the k8s node name.name: KUBERNETES_NODE_NAMEvalueFrom:fieldRef:fieldPath: spec.nodeName# CNI MTU Config variablename: CNI_MTUvalueFrom:configMapKeyRef:name: calico-configkey: veth_mtu# Prevents the container from sleeping forever.name: SLEEPvalue: "false"volumeMounts:mountPath: /host/opt/cni/binname: cni-bin-dirmountPath: /host/etc/cni/net.dname: cni-net-dircontainers:# Runs calico/node container on each Kubernetes node. This# container programs network policy and routes on each# host.name: calico-nodeimage: quay.io/calico/node:v3.5.3env:# Use Kubernetes API as the backing datastore.name: DATASTORE_TYPEvalue: "kubernetes"# Wait for the datastore.name: WAIT_FOR_DATASTOREvalue: "true"# Set based on the k8s node name.name: NODENAMEvalueFrom:fieldRef:fieldPath: spec.nodeName# Choose the backend to use.name: CALICO_NETWORKING_BACKENDvalueFrom:configMapKeyRef:name: calico-configkey: calico_backend# Cluster type to identify the deployment typename: CLUSTER_TYPEvalue: "k8s,bgp"# Auto-detect the BGP IP address.name: IPvalue: "autodetect"name: IP_AUTODETECTION_METHODvalue:"can-reach=192.168.124.56"# Enable IPIPname: CALICO_IPV4POOL_IPIPvalue: "Always"# Set MTU for tunnel device used if ipip is enabledname: FELIX_IPINIPMTUvalueFrom:configMapKeyRef:name: calico-configkey: veth_mtu# The default IPv4 pool to create on startup if none exists. Pod IPswill be# chosen from this range. Changing this value after installation willhave# no effect. This should fall within `--cluster-cidr`.name: CALICO_IPV4POOL_CIDRvalue: "10.244.0.0/16"# Disable file logging so `kubectl logs` works.name: CALICO_DISABLE_FILE_LOGGINGvalue: "true"# Set Felix endpoint to host default action to ACCEPT.name: FELIX_DEFAULTENDPOINTTOHOSTACTIONvalue: "ACCEPT"# Disable IPv6 on Kubernetes.name: FELIX_IPV6SUPPORTvalue: "false"# Set Felix logging to"info"name: FELIX_LOGSEVERITYSCREENvalue: "info"name: FELIX_HEALTHENABLEDvalue: "true"securityContext:privileged: trueresources:requests:cpu: 250mlivenessProbe:httpGet:path: /livenessport: 9099host: localhostperiodSeconds: 10initialDelaySeconds: 10failureThreshold: 6readinessProbe:exec:command:/bin/calico-node-bird-ready-felix-readyperiodSeconds: 10volumeMounts:mountPath: /lib/modulesname: lib-modulesreadOnly: truemountPath: /run/xtables.lockname: xtables-lockreadOnly: falsemountPath: /var/run/caliconame: var-run-calicoreadOnly: falsemountPath: /var/lib/caliconame: var-lib-calicoreadOnly: falsevolumes:# Used by calico/node.name: lib-moduleshostPath:path: /lib/modulesname: var-run-calicohostPath:path: /var/run/caliconame: var-lib-calicohostPath:path: /var/lib/caliconame: xtables-lockhostPath:path: /run/xtables.locktype: FileOrCreate# Used to install CNI.name: cni-bin-dirhostPath:path: /opt/cni/binname: cni-net-dirhostPath:path: /etc/cni/net.d---apiVersion: v1kind: ServiceAccountmetadata:name: calico-nodenamespace: kube-system---# Create all the CustomResourceDefinitionsneeded for# Calico policy and networking mode.apiVersion: apiextensions.k8s.io/v1beta1kind: CustomResourceDefinitionmetadata:name: felixconfigurations.crd.projectcalico.orgspec:scope: Clustergroup: crd.projectcalico.orgversion: v1names:kind: FelixConfigurationplural: felixconfigurationssingular: felixconfiguration---apiVersion: apiextensions.k8s.io/v1beta1kind: CustomResourceDefinitionmetadata:name: bgppeers.crd.projectcalico.orgspec:scope: Clustergroup: crd.projectcalico.orgversion: v1names:kind: BGPPeerplural: bgppeerssingular: bgppeer---apiVersion: apiextensions.k8s.io/v1beta1kind: CustomResourceDefinitionmetadata:name: bgpconfigurations.crd.projectcalico.orgspec:scope: Clustergroup: crd.projectcalico.orgversion: v1names:kind: BGPConfigurationplural: bgpconfigurationssingular: bgpconfiguration---apiVersion: apiextensions.k8s.io/v1beta1kind: CustomResourceDefinitionmetadata:name: ippools.crd.projectcalico.orgspec:scope: Clustergroup: crd.projectcalico.orgversion: v1names:kind: IPPoolplural: ippoolssingular: ippool---apiVersion: apiextensions.k8s.io/v1beta1kind: CustomResourceDefinitionmetadata:name: hostendpoints.crd.projectcalico.orgspec:scope: Clustergroup: crd.projectcalico.orgversion: v1names:kind: HostEndpointplural: hostendpointssingular: hostendpoint---apiVersion: apiextensions.k8s.io/v1beta1kind: CustomResourceDefinitionmetadata:name: clusterinformations.crd.projectcalico.orgspec:scope: Clustergroup: crd.projectcalico.orgversion: v1names:kind: ClusterInformationplural: clusterinformationssingular: clusterinformation---apiVersion: apiextensions.k8s.io/v1beta1kind: CustomResourceDefinitionmetadata:name: globalnetworkpolicies.crd.projectcalico.orgspec:scope: Clustergroup: crd.projectcalico.orgversion: v1names:kind: GlobalNetworkPolicyplural: globalnetworkpoliciessingular: globalnetworkpolicy---apiVersion: apiextensions.k8s.io/v1beta1kind: CustomResourceDefinitionmetadata:name: globalnetworksets.crd.projectcalico.orgspec:scope: Clustergroup: crd.projectcalico.orgversion: v1names:kind: GlobalNetworkSetplural: globalnetworksetssingular: globalnetworkset---apiVersion: apiextensions.k8s.io/v1beta1kind: CustomResourceDefinitionmetadata:name: networkpolicies.crd.projectcalico.orgspec:scope: Namespacedgroup: crd.projectcalico.orgversion: v1names:kind: NetworkPolicyplural: networkpoliciessingular: networkpolicy---# Include a clusterrole for the calico-nodeDaemonSet,# and bind it to the calico-nodeserviceaccount.kind: ClusterRoleapiVersion:rbac.authorization.k8s.io/v1beta1metadata:name: calico-noderules:#The CNI plugin needs to get pods, nodes, and namespaces.: [""]resources:podsnodesnamespacesverbs:get: [""]resources:endpointsservicesverbs:# Used to discover service IPs for advertisement.watchlist# Used to discover Typhas.get: [""]resources:nodes/statusverbs:# Needed for clearing NodeNetworkUnavailable flag.patch# Calico stores some configuration information in node annotations.update#Watch for changes to Kubernetes NetworkPolicies.: ["networking.k8s.io"]resources:networkpoliciesverbs:watchlist#Used by Calico for policy information.: [""]resources:podsnamespacesserviceaccountsverbs:listwatch#The CNI plugin patches pods/status.: [""]resources:pods/statusverbs:patch#Calico monitors various CRDs for config.: ["crd.projectcalico.org"]resources:globalfelixconfigsfelixconfigurationsbgppeersglobalbgpconfigsbgpconfigurationsippoolsglobalnetworkpoliciesglobalnetworksetsnetworkpoliciesclusterinformationshostendpointsverbs:getlistwatch#Calico must create and update some CRDs on startup.: ["crd.projectcalico.org"]resources:ippoolsfelixconfigurationsclusterinformationsverbs:createupdate#Calico stores some configuration information on the node.: [""]resources:nodesverbs:getlistwatch#These permissions are only requried for upgrade from v2.6, and can#be removed after upgrade or on fresh installations.: ["crd.projectcalico.org"]resources:bgpconfigurationsbgppeersverbs:createupdate---apiVersion:rbac.authorization.k8s.io/v1beta1kind: ClusterRoleBindingmetadata:name: calico-noderoleRef:apiGroup: rbac.authorization.k8s.iokind: ClusterRolename: calico-nodesubjects:kind: ServiceAccountname: calico-nodenamespace: kube-system---
安装calico之后,在master1节点执行kubectl get nodes
显示如下,看到STATUS是Ready,kubectl get pods -n kube-system可以看到cordns也是running状态,说明master1节点的calico安装完成
NAME STATUS ROLES AGE VERSIONmaster1 Ready master 2m13s v1.17.3
3.6 把master1节点的证书拷贝到master2和master3上
(1)在master2和master3上创建证书存放目录
cd /root && mkdir -p /etc/kubernetes/pki/etcd &&mkdir -p ~/.kube/
在master1节点把证书拷贝到master2和master3上,在master1上操作
scp /etc/kubernetes/pki/ca.crtmaster2:/etc/kubernetes/pki/scp /etc/kubernetes/pki/ca.keymaster2:/etc/kubernetes/pki/scp /etc/kubernetes/pki/sa.keymaster2:/etc/kubernetes/pki/scp /etc/kubernetes/pki/sa.pubmaster2:/etc/kubernetes/pki/scp /etc/kubernetes/pki/front-proxy-ca.crtmaster2:/etc/kubernetes/pki/scp /etc/kubernetes/pki/front-proxy-ca.keymaster2:/etc/kubernetes/pki/scp /etc/kubernetes/pki/etcd/ca.crtmaster2:/etc/kubernetes/pki/etcd/scp /etc/kubernetes/pki/etcd/ca.keymaster2:/etc/kubernetes/pki/etcd/scp /etc/kubernetes/pki/ca.crtmaster3:/etc/kubernetes/pki/scp /etc/kubernetes/pki/ca.keymaster3:/etc/kubernetes/pki/scp /etc/kubernetes/pki/sa.keymaster3:/etc/kubernetes/pki/scp /etc/kubernetes/pki/sa.pubmaster3:/etc/kubernetes/pki/scp /etc/kubernetes/pki/front-proxy-ca.crtmaster3:/etc/kubernetes/pki/scp /etc/kubernetes/pki/front-proxy-ca.keymaster3:/etc/kubernetes/pki/scp /etc/kubernetes/pki/etcd/ca.crtmaster3:/etc/kubernetes/pki/etcd/scp /etc/kubernetes/pki/etcd/ca.keymaster3:/etc/kubernetes/pki/etcd/
证书拷贝之后在master2和master3上执行如下,形成集群
kubeadm join 192.168.124.199:6443 --tokeny6ryw4.69atvhqbxins51vs \--discovery-token-ca-cert-hashsha256:797acd093254f02e48e6528862de131cea18801d5b4f28a651592d2ad854c2b6 --control-plane
--control-plane:这个参数表示加入到k8s集群的是master节点
在master2和master3上操作:
mkdir -p $HOME/.kubesudo cp -i /etc/kubernetes/admin.conf$HOME/.kube/configsudo chown $(id -u):$(id -g)$HOME/.kube/config
kubectl get nodes 显示如下:
NAME STATUS ROLES AGE VERSIONmaster1 Ready master 39m v1.17.3master2 Ready master 5m9s v1.17.3master3 Ready master 2m33s v1.17.3
3.7 把node1节点加入到k8s集群,在node节点操作
kubeadm join 192.168.124.199:6443 --tokeny6ryw4.69atvhqbxins51vs \--discovery-token-ca-cert-hashsha256:797acd093254f02e48e6528862de131cea18801d5b4f28a651592d2ad854c2b6
注:上面的这个加入到k8s节点的一串命令就是在3.3初始化的时候生成的
3.6 在master1节点查看集群节点状态
kubectl get nodes 显示如下
NAME STATUS ROLES AGE VERSIONmaster1 Ready master 3m48s v1.17.3master2 Ready master 3m48s v1.17.3master3 Ready master 3m48s v1.17.3node1 Ready <none> 3m48s v1.17.3
说明node1节点也加入到k8s集群了,通过以上就完成了k8s多master高可用集群的搭建
4.安装kubernetesdashboard(kubernetes的web ui界面)
在k8s-master节点操作
kubectl apply -f kubernetes-dashboard.yaml
cat kubernetes-dashboard.yaml
# Copyright 2017 The Kubernetes Authors.## Licensed under the Apache License,Version 2.0 (the "License");# you may not use this file except incompliance with the License.# You may obtain a copy of the License at## http://www.apache.org/licenses/LICENSE-2.0## Unless required by applicable law oragreed to in writing, software# distributed under the License isdistributed on an "AS IS" BASIS,# WITHOUT WARRANTIES OR CONDITIONS OF ANYKIND, either express or implied.# See the License for the specific languagegoverning permissions and# limitations under the License.# Configuration to deploy release versionof the Dashboard UI compatible with# Kubernetes 1.8.## Example usage: kubectl create -f<this_file>---apiVersion: v1kind: Secretmetadata:labels:: kubernetes-dashboard#Allows editing resource and makes sure it is created first.: EnsureExistsname: kubernetes-dashboard-certsnamespace: kube-systemtype: Opaque---apiVersion: v1kind: Secretmetadata:labels:: kubernetes-dashboard#Allows editing resource and makes sure it is created first.: EnsureExistsname: kubernetes-dashboard-key-holdernamespace: kube-systemtype: Opaque---# ------------------- Dashboard ServiceAccount ------------------- #apiVersion: v1kind: ServiceAccountmetadata:labels:: kubernetes-dashboardname: kubernetes-dashboard-adminnamespace: kube-system---# ------------------- Dashboard Role &Role Binding ------------------- #apiVersion: rbac.authorization.k8s.io/v1kind: ClusterRoleBindingmetadata:name: kubernetes-dashboard-adminnamespace: kube-systemroleRef:apiGroup: rbac.authorization.k8s.iokind: ClusterRolename: cluster-adminsubjects:kind: ServiceAccountname: kubernetes-dashboard-adminnamespace: kube-system---apiVersion: rbac.authorization.k8s.io/v1kind: ClusterRolemetadata:name: cluster-watcherrules:apiGroups:-'*'resources:-'*'verbs:-'get'-'list'nonResourceURLs:-'*'verbs:-'get'-'list'apiGroups: [""]resources: ["secrets"]resourceNames: ["kubernetes-dashboard-key-holder","kubernetes-dashboard-certs"]verbs: ["get", "update", "delete"]#Allow Dashboard to get and update 'kubernetes-dashboard-settings' config map.apiGroups: [""]resources: ["configmaps"]resourceNames: ["kubernetes-dashboard-settings"]verbs: ["get", "update"]#Allow Dashboard to get metrics from heapster.apiGroups: [""]resources: ["services"]resourceNames: ["heapster"]verbs: ["proxy"]---# ------------------- Dashboard Deployment------------------- #apiVersion: apps/v1kind: Deploymentmetadata:name: kubernetes-dashboardnamespace: kube-systemlabels:: kubernetes-dashboard: "true": Reconcilespec:selector:matchLabels:: kubernetes-dashboardtemplate:metadata:labels:: kubernetes-dashboardannotations:: '': 'docker/default'spec:priorityClassName: system-cluster-criticalcontainers:name: kubernetes-dashboardimage: k8s.gcr.io/kubernetes-dashboard-amd64:v1.10.1resources:limits:cpu: 100mmemory: 300Mirequests:cpu: 50mmemory: 100Miports:containerPort: 8443protocol: TCPargs:--auto-generate-certificatesvolumeMounts:name: kubernetes-dashboard-certsmountPath: /certsname: tmp-volumemountPath: /tmplivenessProbe:httpGet:scheme: HTTPSpath: /port: 8443initialDelaySeconds: 30timeoutSeconds: 30volumes:name: kubernetes-dashboard-certssecret:secretName: kubernetes-dashboard-certsname: tmp-volumeemptyDir: {}serviceAccountName: kubernetes-dashboard-admintolerations:key: node-role.kubernetes.io/mastereffect: NoSchedule---# ------------------- Dashboard Service------------------- #kind: ServiceapiVersion: v1metadata:labels:: kubernetes-dashboardname: kubernetes-dashboardnamespace: kube-systemspec:ports:: 443targetPort: 8443selector:: kubernetes-dashboardtype: NodePort---kind: IngressapiVersion: extensions/v1beta1metadata:name: dashboardnamespace: kube-systemannotations:: traefikspec:rules:host: dashboard.multi.iohttp:paths:backend:serviceName:kubernetes-dashboardservicePort: 443path: /
查看dashboard是否安装成功:
kubectl get pods -n kube-system
显示如下,说明dashboard安装成功了
kubernetes-dashboard-7898456f45-7h2q6 1/1 Running 0 61s
查看dashboard前端的service
kubectl get svc -n kube-system显示如下:
kubernetes-dashboard NodePort 10.106.68.182 <none> 443:30982/TCP 12m
上面可看到service类型是NodePort,访问k8s-master节点ip:30982端口即可访问kubernetes dashboard,我的环境需要输入如下地址
https://192.168.124.16:30982/
可看到出现了dashboard界面

5.安装metrics监控插件
在k8s-master节点操作
kubectl apply -f metrics.yamlcat metrics.yaml
apiVersion: rbac.authorization.k8s.io/v1kind: ClusterRoleBindingmetadata:name: metrics-server:system:auth-delegatorlabels:: "true": ReconcileroleRef:apiGroup: rbac.authorization.k8s.iokind: ClusterRolename: system:auth-delegatorsubjects:kind: ServiceAccountname: metrics-servernamespace: kube-system---apiVersion: rbac.authorization.k8s.io/v1kind: RoleBindingmetadata:name: metrics-server-auth-readernamespace: kube-systemlabels:: "true": ReconcileroleRef:apiGroup: rbac.authorization.k8s.iokind: Rolename: extension-apiserver-authentication-readersubjects:kind: ServiceAccountname: metrics-servernamespace: kube-system---apiVersion: v1kind: ServiceAccountmetadata:name: metrics-servernamespace: kube-systemlabels:: "true": Reconcile---apiVersion: rbac.authorization.k8s.io/v1kind: ClusterRolemetadata:name: system:metrics-serverlabels:: "true": Reconcilerules:apiGroups:-""resources:-pods-nodes-nodes/stats-namespacesverbs:-get-listwatchapiGroups:-"extensions"resources:-deploymentsverbs:-get-list-update-watch---apiVersion: rbac.authorization.k8s.io/v1kind: ClusterRoleBindingmetadata:name: system:metrics-serverlabels:: "true": ReconcileroleRef:apiGroup: rbac.authorization.k8s.iokind: ClusterRolename: system:metrics-serversubjects:kind: ServiceAccountname: metrics-servernamespace: kube-system---apiVersion: v1kind: ConfigMapmetadata:name: metrics-server-confignamespace: kube-systemlabels:: "true": EnsureExistsdata:NannyConfiguration: |-apiVersion: nannyconfig/v1alpha1kind: NannyConfiguration---apiVersion: apps/v1kind: Deploymentmetadata:name: metrics-servernamespace: kube-systemlabels:: metrics-server: "true": Reconcileversion: v0.3.1spec:selector:matchLabels:: metrics-serverversion: v0.3.1template:metadata:name: metrics-serverlabels:: metrics-serverversion: v0.3.1annotations:: '': 'docker/default'spec:priorityClassName: system-cluster-criticalserviceAccountName: metrics-servercontainers:name: metrics-serverimage: k8s.gcr.io/metrics-server-amd64:v0.3.1command:/metrics-server--metric-resolution=30s--kubelet-preferred-address-types=InternalIP--kubelet-insecure-tlsports:containerPort: 443name: httpsprotocol: TCPname: metrics-server-nannyimage: k8s.gcr.io/addon-resizer:1.8.4resources:limits:cpu: 100mmemory: 300Mirequests:cpu: 5mmemory: 50Mienv:name: MY_POD_NAMEvalueFrom:fieldRef:fieldPath: metadata.namename: MY_POD_NAMESPACEvalueFrom:fieldRef:fieldPath: metadata.namespacevolumeMounts:name: metrics-server-config-volumemountPath: /etc/configcommand:/pod_nanny--config-dir=/etc/config--cpu=300m--extra-cpu=20m--memory=200Mi--extra-memory=10Mi--threshold=5--deployment=metrics-server--container=metrics-server--poll-period=300000--estimator=exponential--minClusterSize=2volumes:name: metrics-server-config-volumeconfigMap:name: metrics-server-configtolerations:key: "CriticalAddonsOnly"operator: "Exists"key: node-role.kubernetes.io/mastereffect: NoSchedule---apiVersion: v1kind: Servicemetadata:name: metrics-servernamespace: kube-systemlabels:: Reconcile: "true": "Metrics-server"spec:selector:: metrics-serverports:: 443protocol: TCPtargetPort: https---apiVersion: apiregistration.k8s.io/v1beta1kind: APIServicemetadata:name: v1beta1.metrics.k8s.iolabels:: "true": Reconcilespec:service:name: metrics-servernamespace: kube-systemgroup: metrics.k8s.ioversion: v1beta1insecureSkipTLSVerify: truegroupPriorityMinimum: 100versionPriority: 100
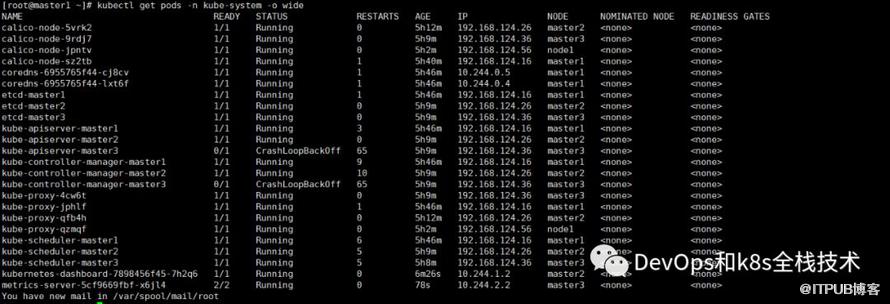
上面组件都安装之后,kubectl get pods -n kube-system -o wide,查看组件安装是否正常,STATUS状态是Running,说明组件正常,如下所示
为了大家更快速的学习知识,掌握技术,随时沟通问题,特组建了技术交流群,大家在群里可以分享自己的技术栈,抛出日常问题,群里会有很多大佬及时解答,这样我们就会结识很多志同道合的人,长按下图可加我微信,备注运维或者k8s或者devops即可进群,让我们共同努力,向着美好的未来出发吧~~~,想要免费获取各个版本的k8s高可用集群的安装视频或者其他的免费视频,也可进群获取哈~~
微信:luckylucky421302
或者扫描下面二维码

写给大家的一句话:
如果每天能进步一点点,那么每个月,每年就会进步一大截,继续冲吧~~
原文作者:DevOps和k8s全栈技术;如有侵权,请联系管理员删除。

最新文章
- 韩先超对兴业数金进行云原生k8s培训总结|干货分享|前沿技术必看
- Java 应用上 Kubernetes 的 20 条生产级必备条件
- Kubernetes 存活探测(Liveness Probe)详解:原理、配置与最佳实践
- 深耕为舟,远志为帆->韩先超2025年终总结
- 生产故障排查记录:Redis 中间件疑难错误排查与修复
- docker镜像加速器又又被封了:新整理一批可以用的|无需代理,国内可访问
- 运维秘籍:20个常识,关键时刻能救命!
- 提升运维效率:Linux和Kubernetes常见故障的20种解决方案
- K8s Scheduler Pod 启动失败:Error: failed to reserve container name
- K8S集群证书过期,一键修复指南 | 干货分享
