DolphinScheduler 3.1.9 + Minio 开发环境【IDEA】搭建访问及相关问题处理
目录

- DolphinScheduler 3.1.9 开发环境【IDEA】搭建访问
这里按照官方提供的文档进行操作:
前提
官方提供的开发手册位置

1、软件要求
在搭建 DolphinScheduler 开发环境之前请确保你已经安装以下软件:
- Git
- JDK: v1.8.x (当前暂不支持 jdk 11)
- Maven: v3.5+
- Node: v16.13+ (dolphinScheduler 版本低于 3.0, 请安装 node v12.20+)
- Pnpm: v6.x
2、克隆代码库
通过你 git 管理工具下载 git 代码,下面以 git-core 为例
mkdir dolphinscheduler
cd dolphinscheduler
git clone git@github.com:apache/dolphinscheduler.git
3、编译源码
支持的系统:
* MacOS
* Linux
【这个我没有运行试试】
运行 `mvn clean install -Prelease -Dmaven.test.skip=true`
DolphinScheduler 普通开发模式
上面是官方提供的,我觉得有用就复制下来,
这里开始我就按照自己的操作顺序记录
1、编译问题:
1、git相关
1-1:开启 Windows Git 长路径支持,
管理员 PowerShell 执行,解决 DolphinScheduler 路径太深导致 git add 失败
git config --system core.longpaths true
1-2:先初始化git仓库,只在本地,不涉及账号、不推远程,Spotless 需要 HEAD
git init
git add .
git commit -m "initial commit"
2、Maven 编译 / 格式化(IDEA 里的 Terminal)
2-1:依赖 Git HEAD,自动修复格式问题
mvn spotless:apply
2-2:编译整个项目(跳过测试),确保所有模块已 install
mvn clean install -DskipTests
3、前端相关:
查看 Node.js 是否已安装
node -v
查看 npm 版本
npm -v
安装 pnpm
npm install -g pnpm
pnpm -v
编译都没有问题

2、启动zookeeper
官方内容
下载 ZooKeeper,解压

存储配置

启动脚本
搞个txt编辑完后,后缀该bat即可
@echo off
echo 正在启动 ZooKeeper...
cd /d E:\\install\\ZooKeeper\\zookeeper-3.8.3\\bin
zkServer.cmd
pause
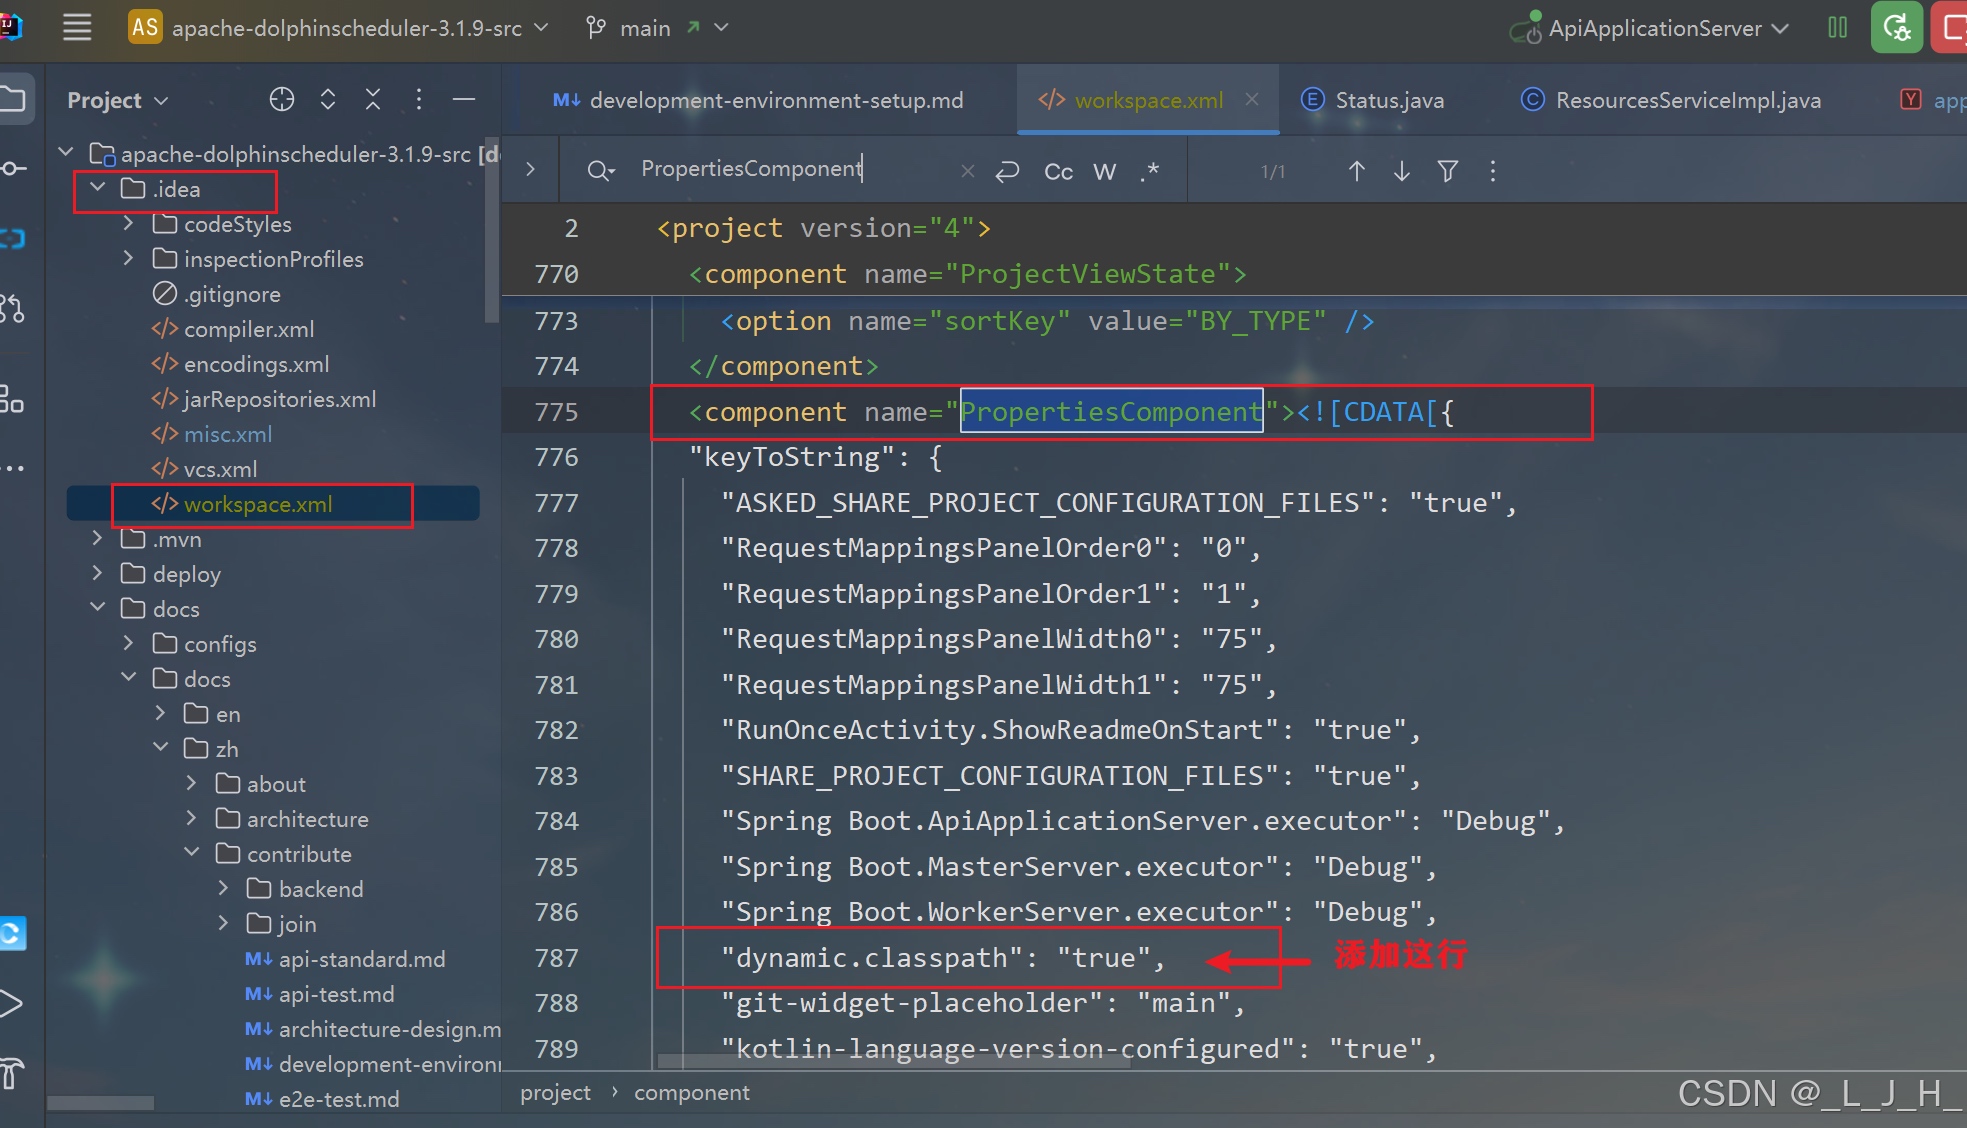
3、workspace.xml 修改
【可以不用,我也是看其他文章有添加的,不过我没添加也能正常运行,这里只做记录】
在其他文章看到说在这里添加这行,说是让 IDEA 在运行时动态使用模块的 classpath,而不是用启动时生成的静态 classpath。
注意点:
这个作用只会影响本地 IDEA 启动,线上环境如果有问题这个是解决不了的。
"dynamic.classpath": "true",
4、数据库
我这里用的是mysql,所以需要修改
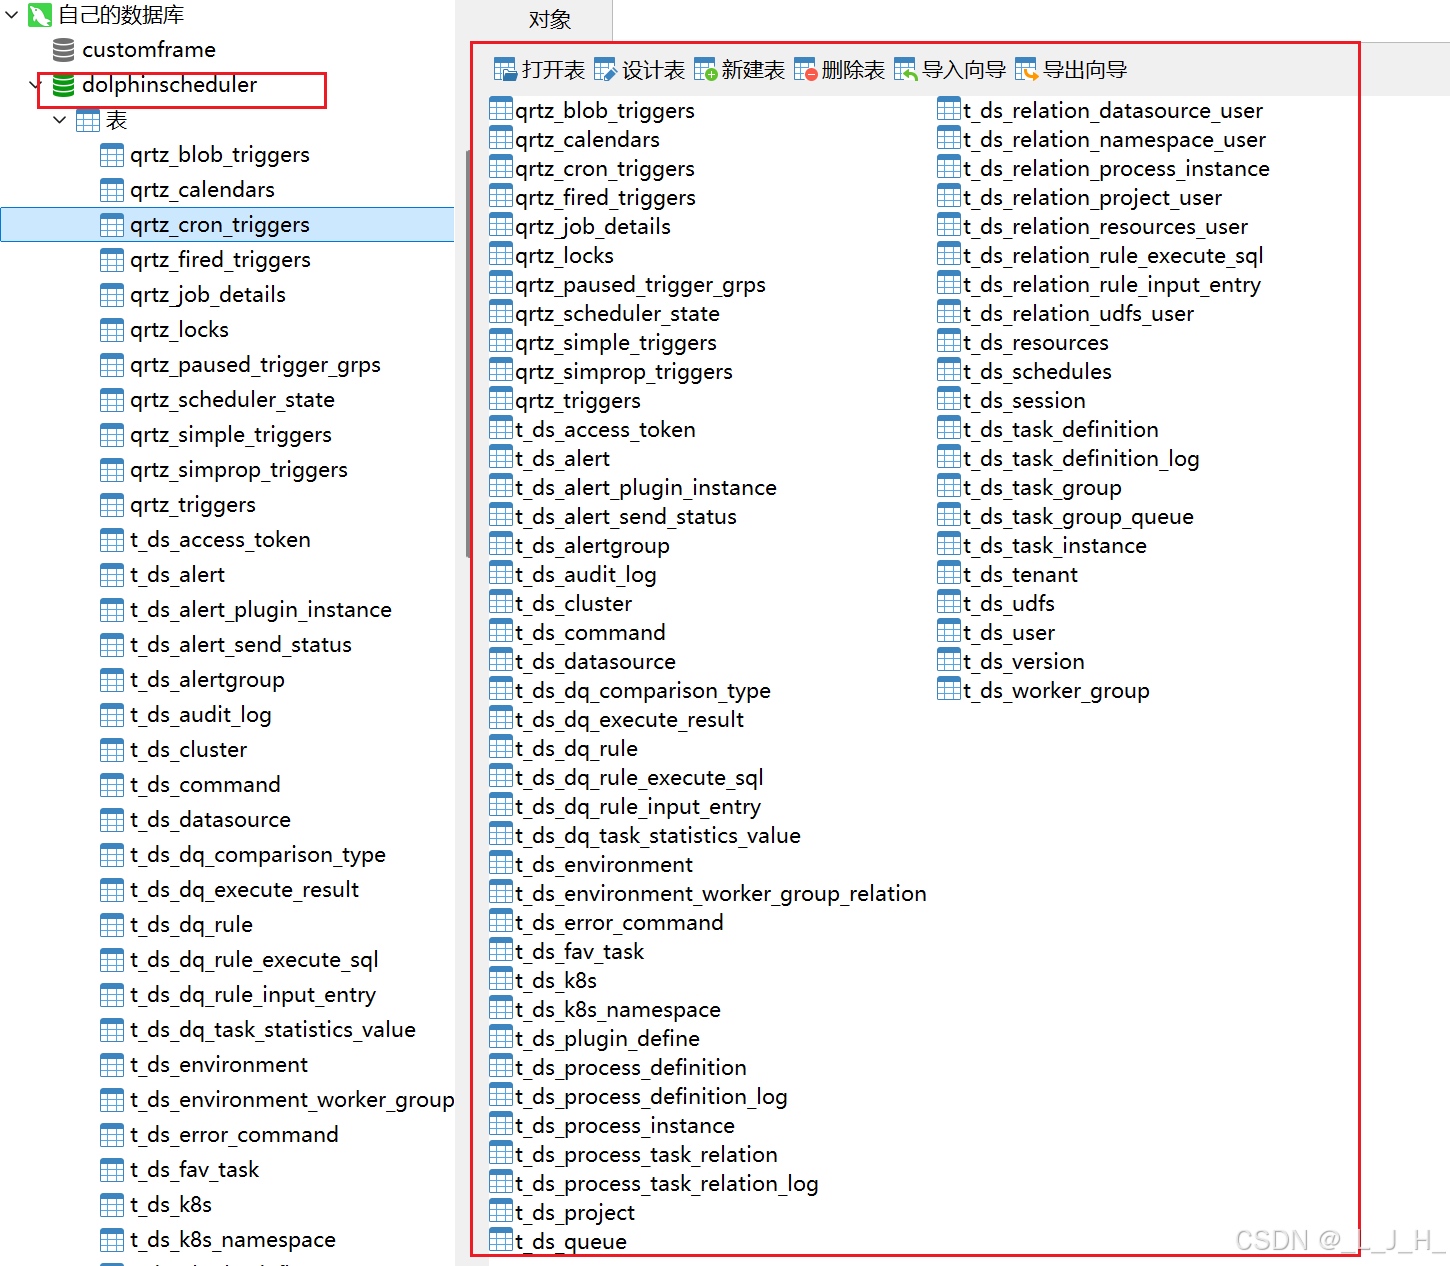
4-1:数据初始化
创建名为【dolphinscheduler】的新数据库后,
把这个位置的sql直接拷贝复制执行即可。
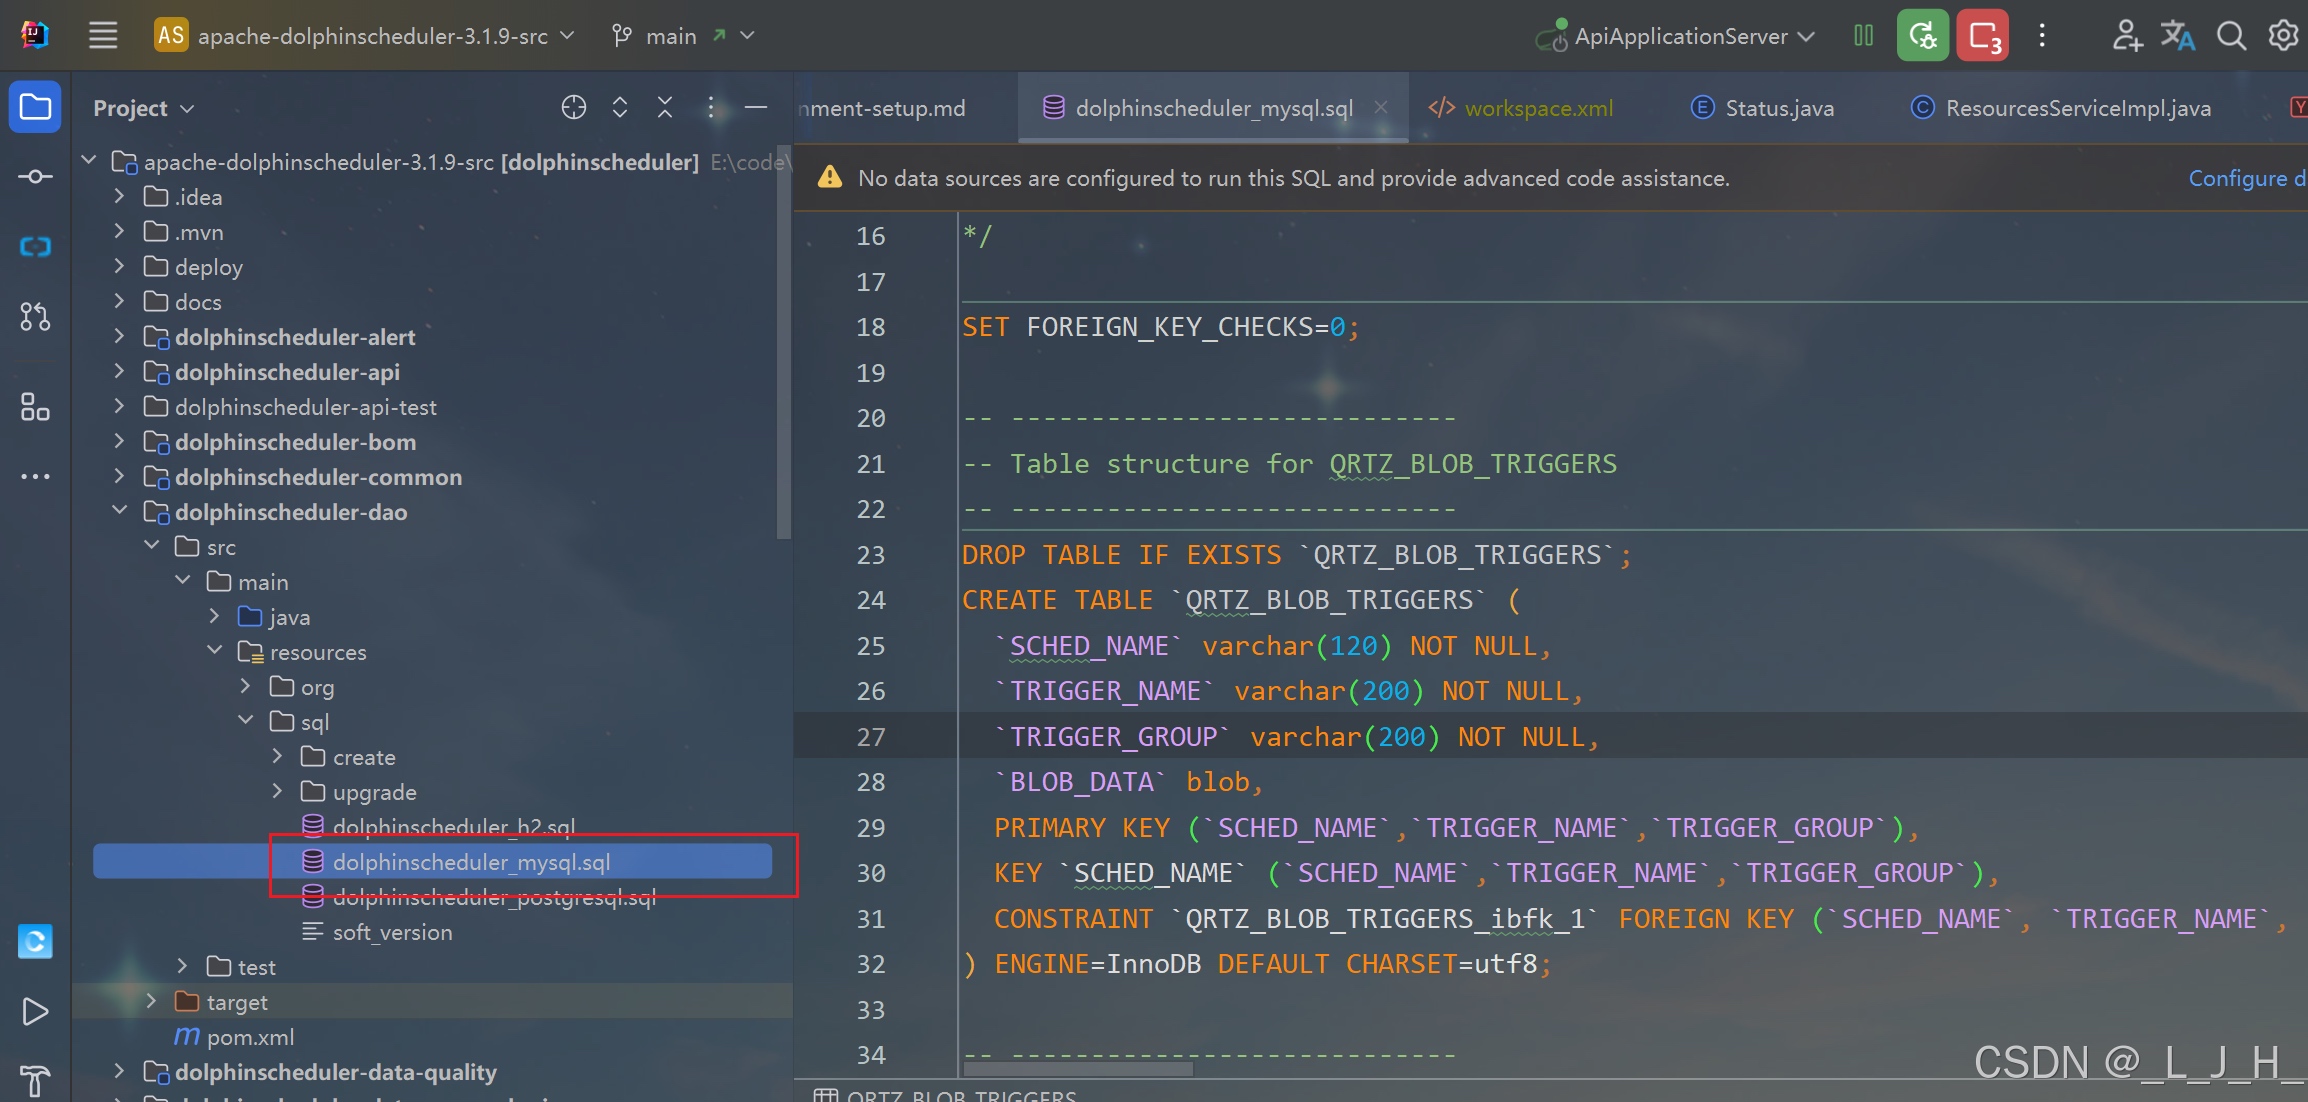
如图:
4-2:依赖相关修改
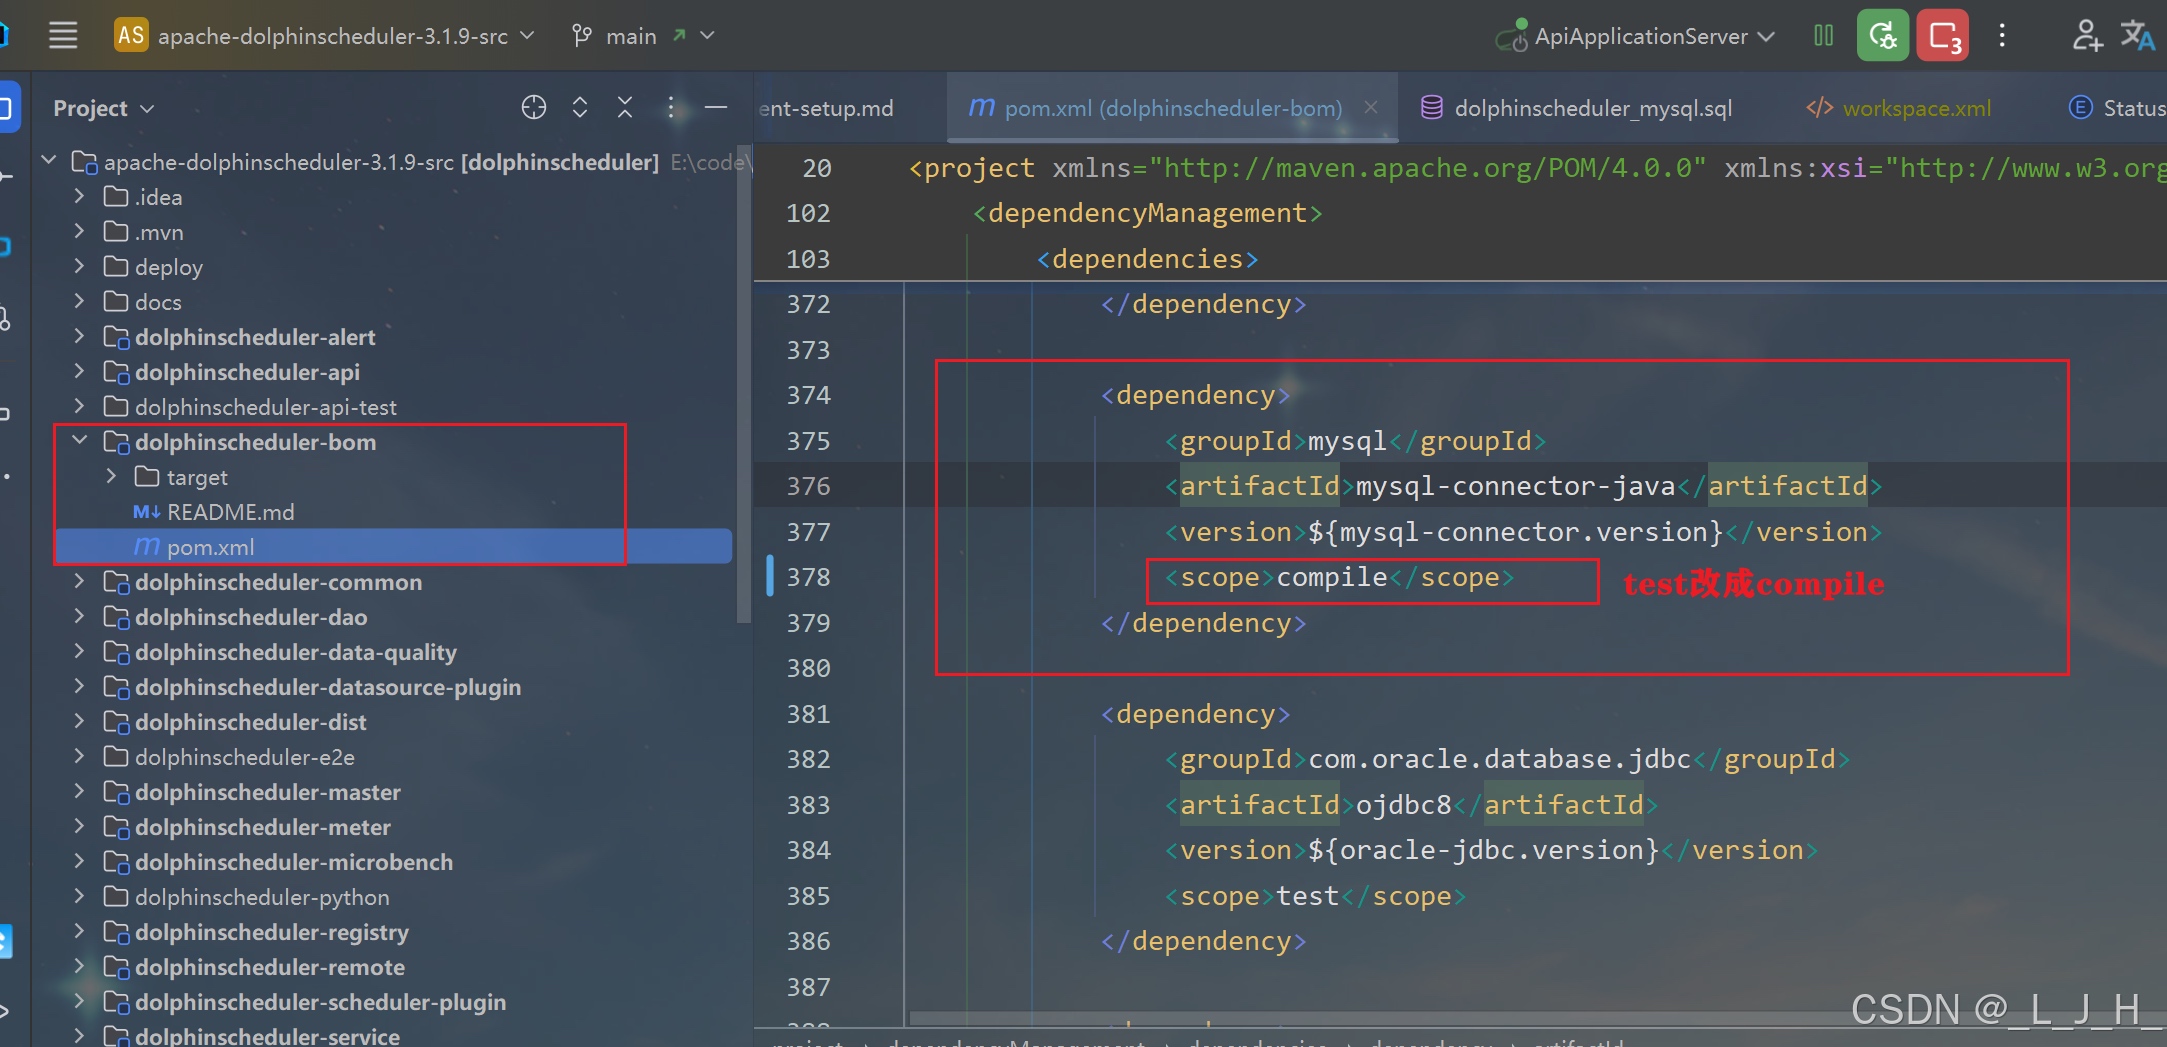
如果使用 MySQL 作为元数据库,需要先修改 `dolphinscheduler/pom.xml`,
将 `mysql-connector-java` 依赖的 `scope` 改为 `compile`,
使用 PostgreSQL 则不需要
test 改成 compile
5、application.yaml 修改数据库配置

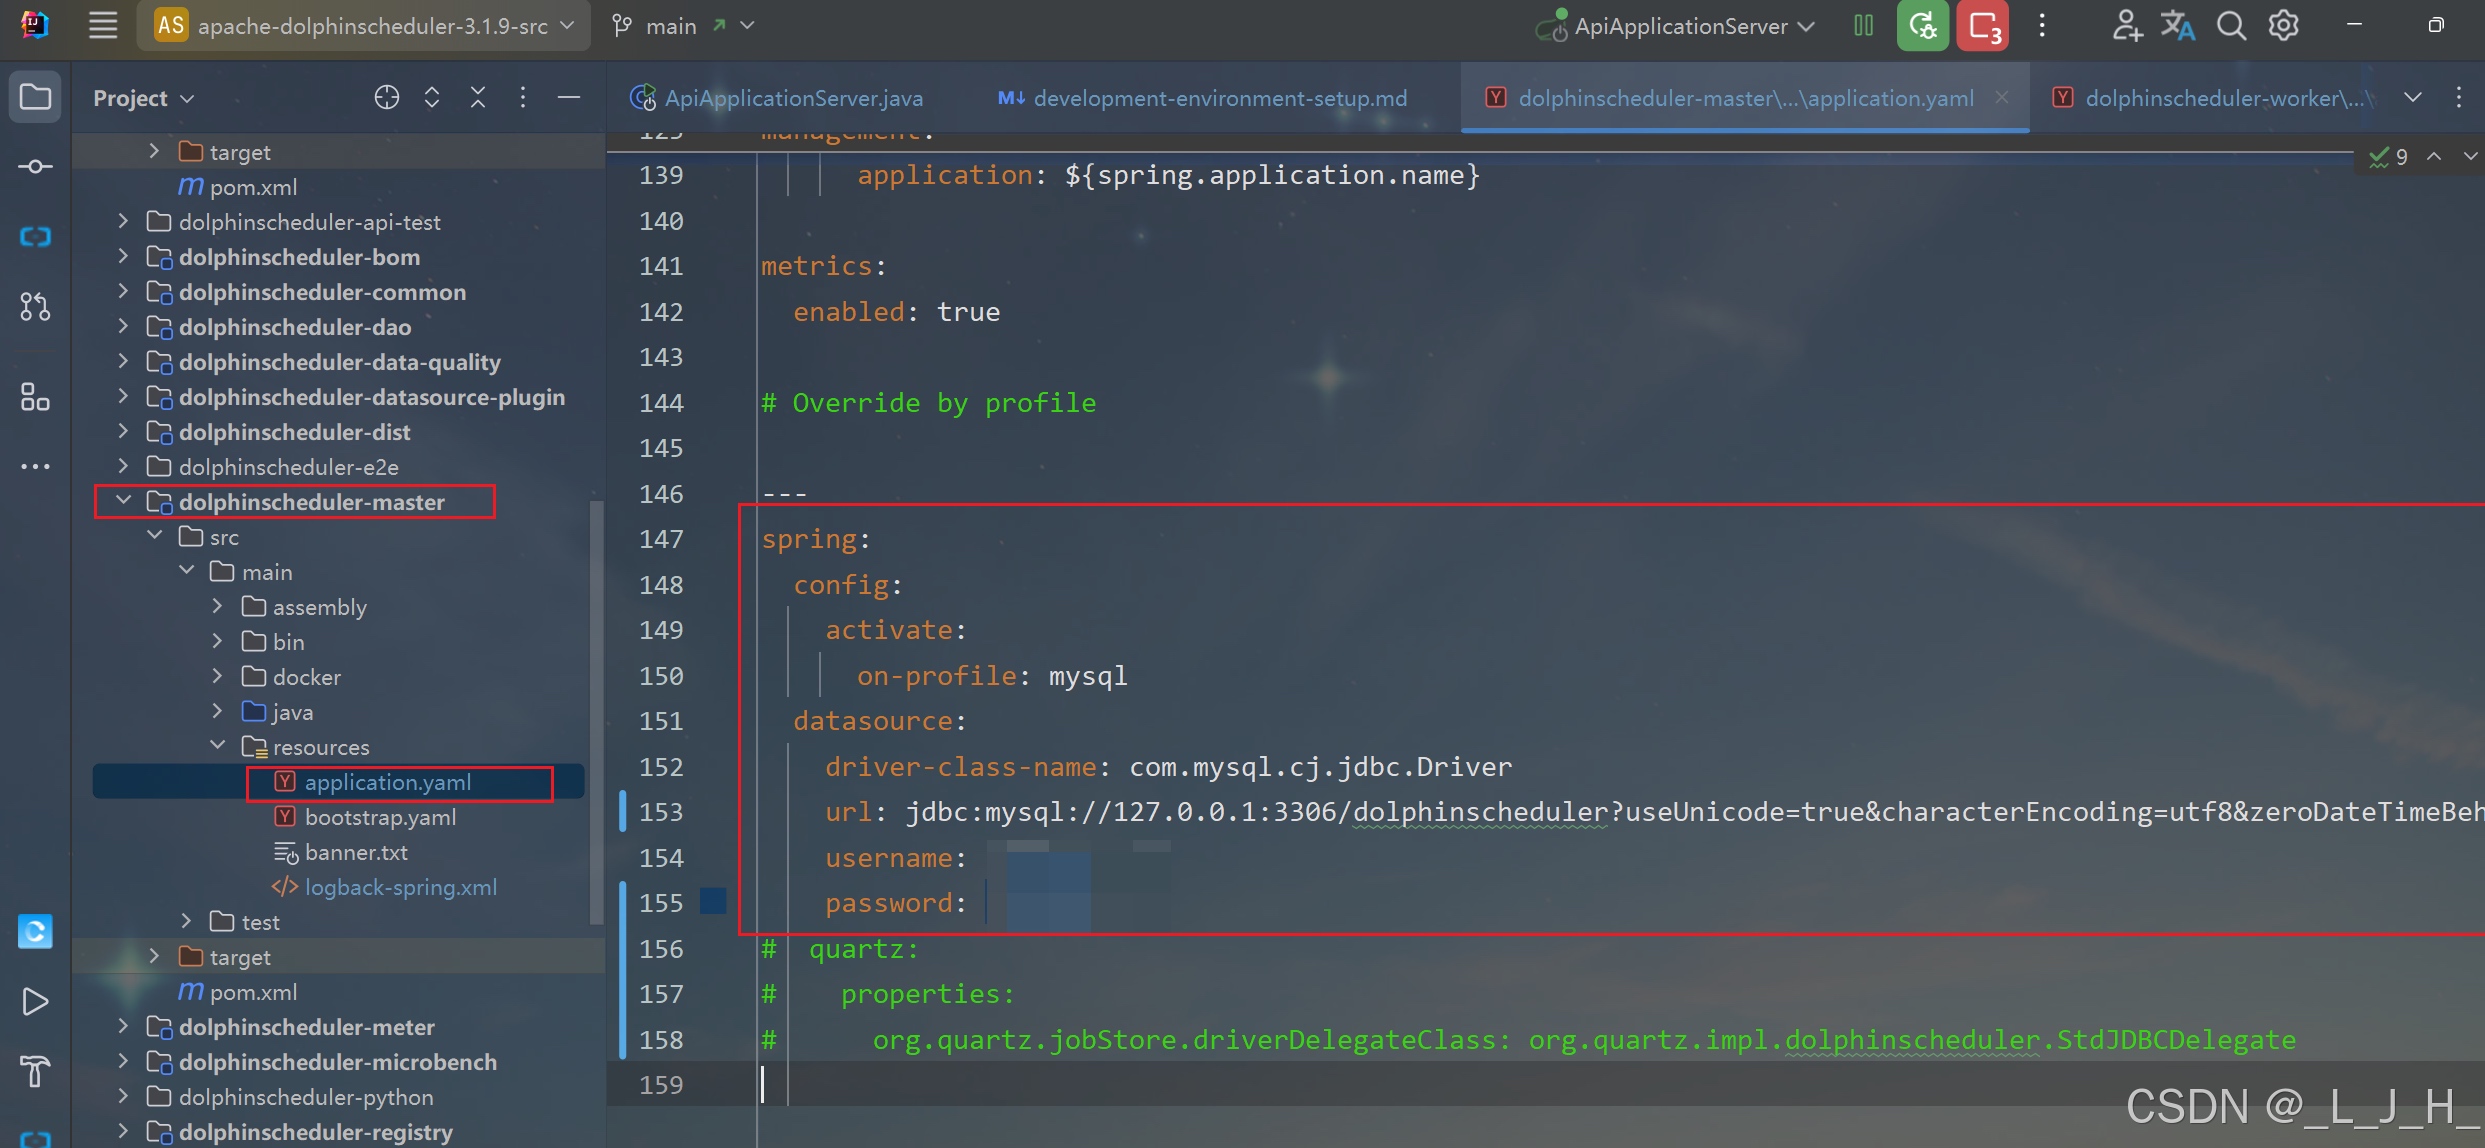
5-1:dolphinscheduler-master
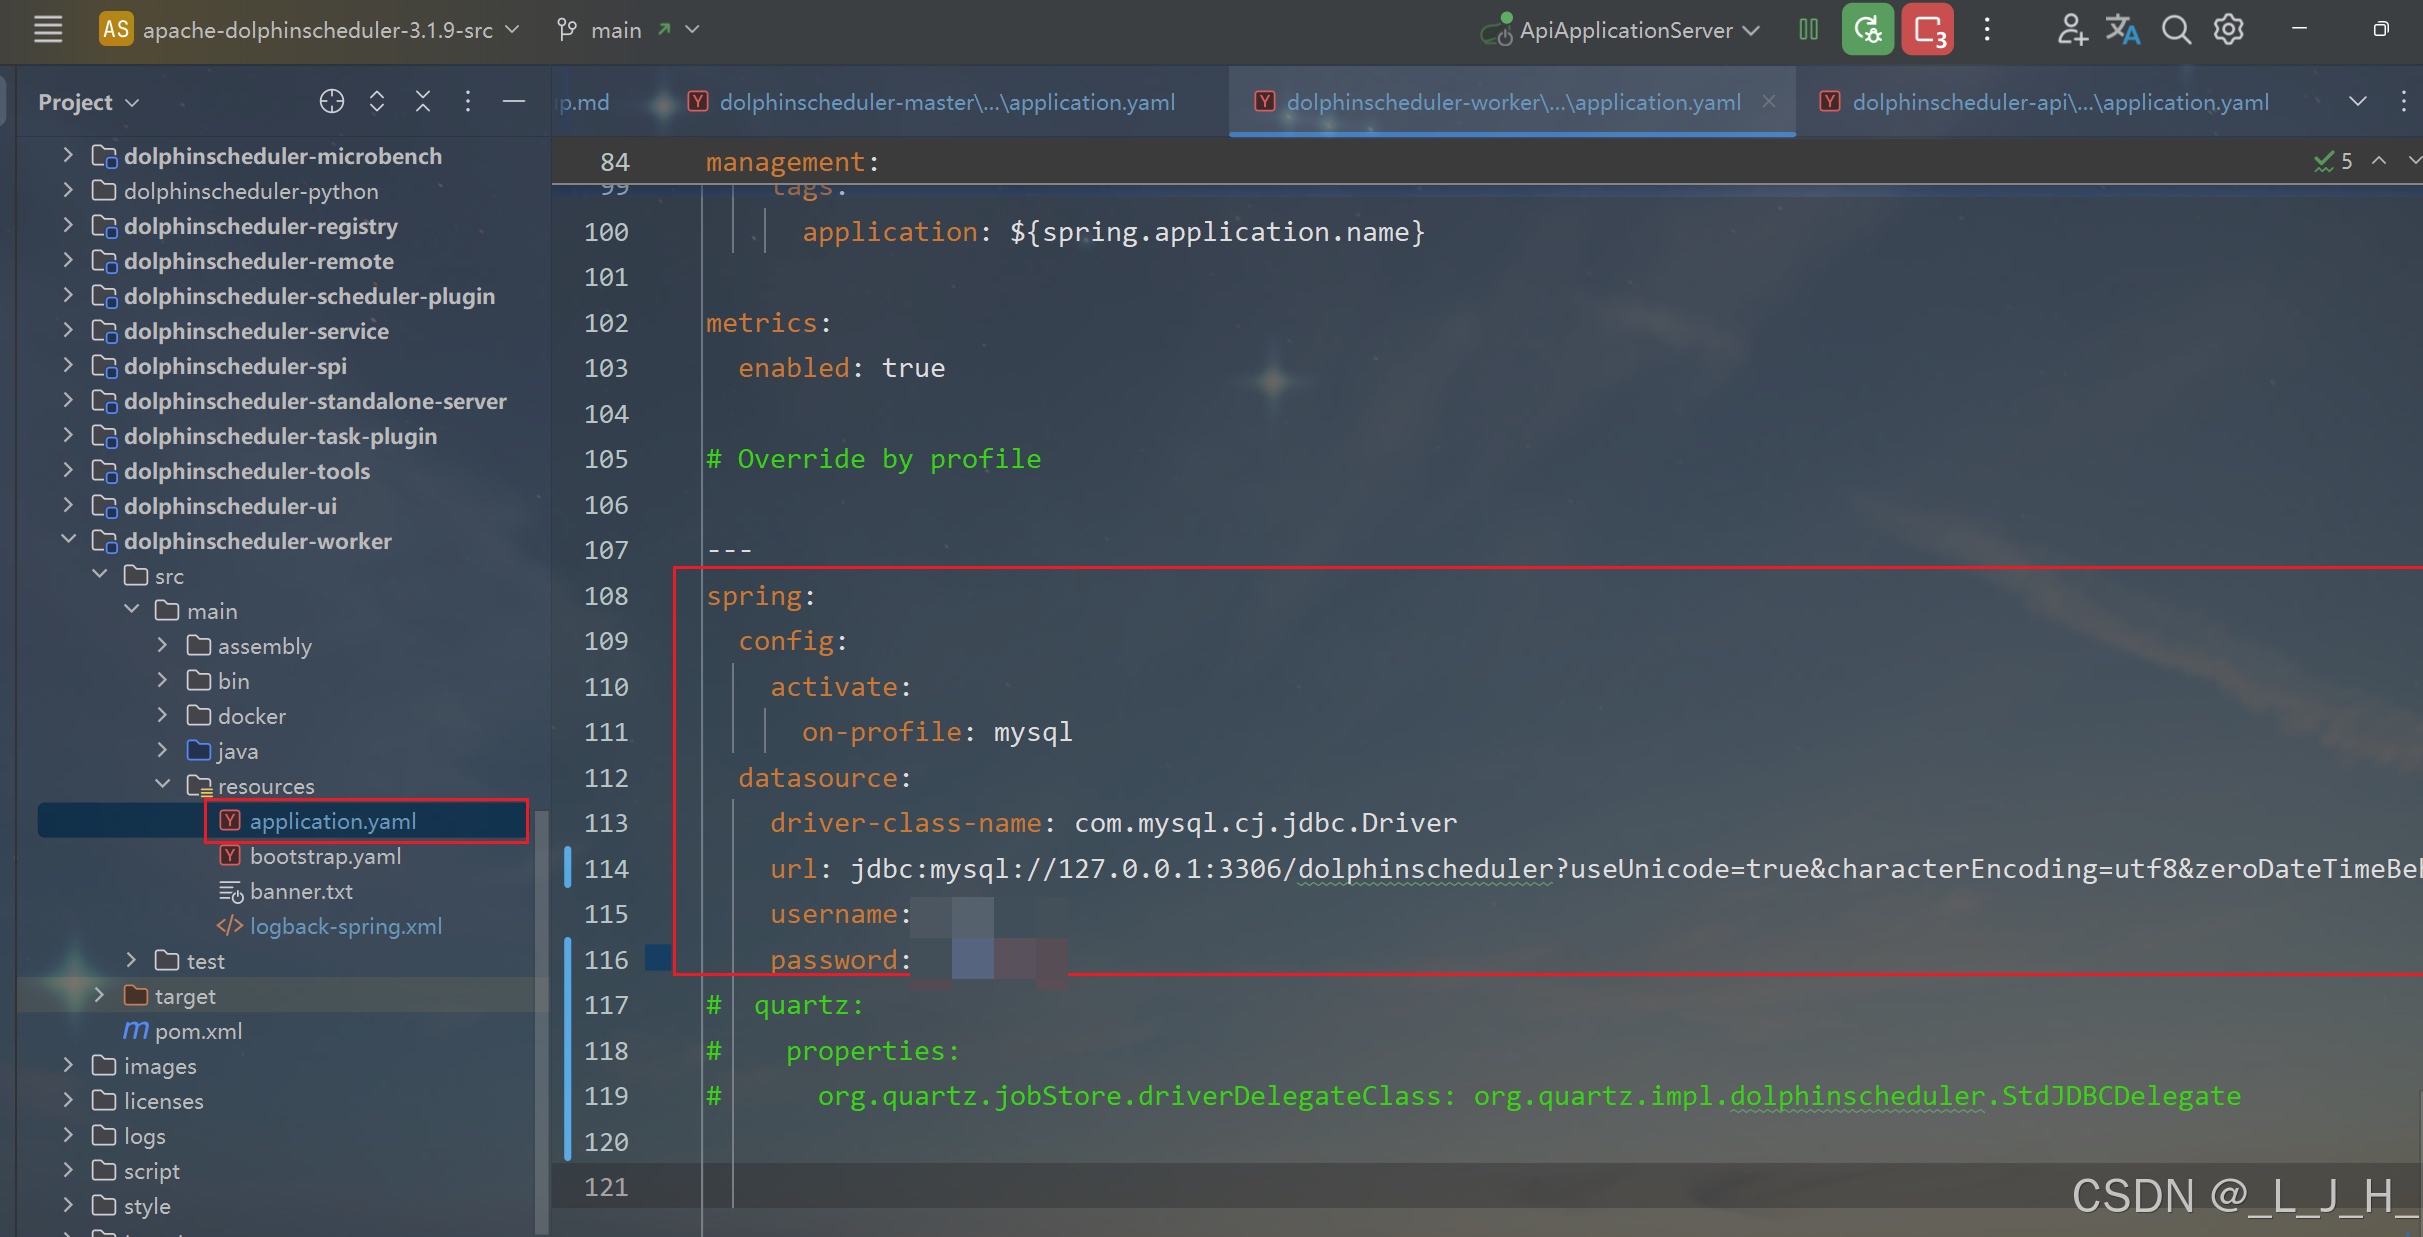
如图,配置文件中修改这些数据:三个内容都是一样的
spring:
  config:
    activate:
      on-profile: mysql
  datasource:
    driver-class-name: com.mysql.cj.jdbc.Driver
    url: jdbc:mysql://127.0.0.1:3306/dolphinscheduler?useUnicode=true&characterEncoding=utf8&zeroDateTimeBehavior=convertToNull&useSSL=true&serverTimezone=GMT%2B8
    username: 账户名
    password: 数据库密码
5-2:dolphinscheduler-worker
5-3:dolphinscheduler-api

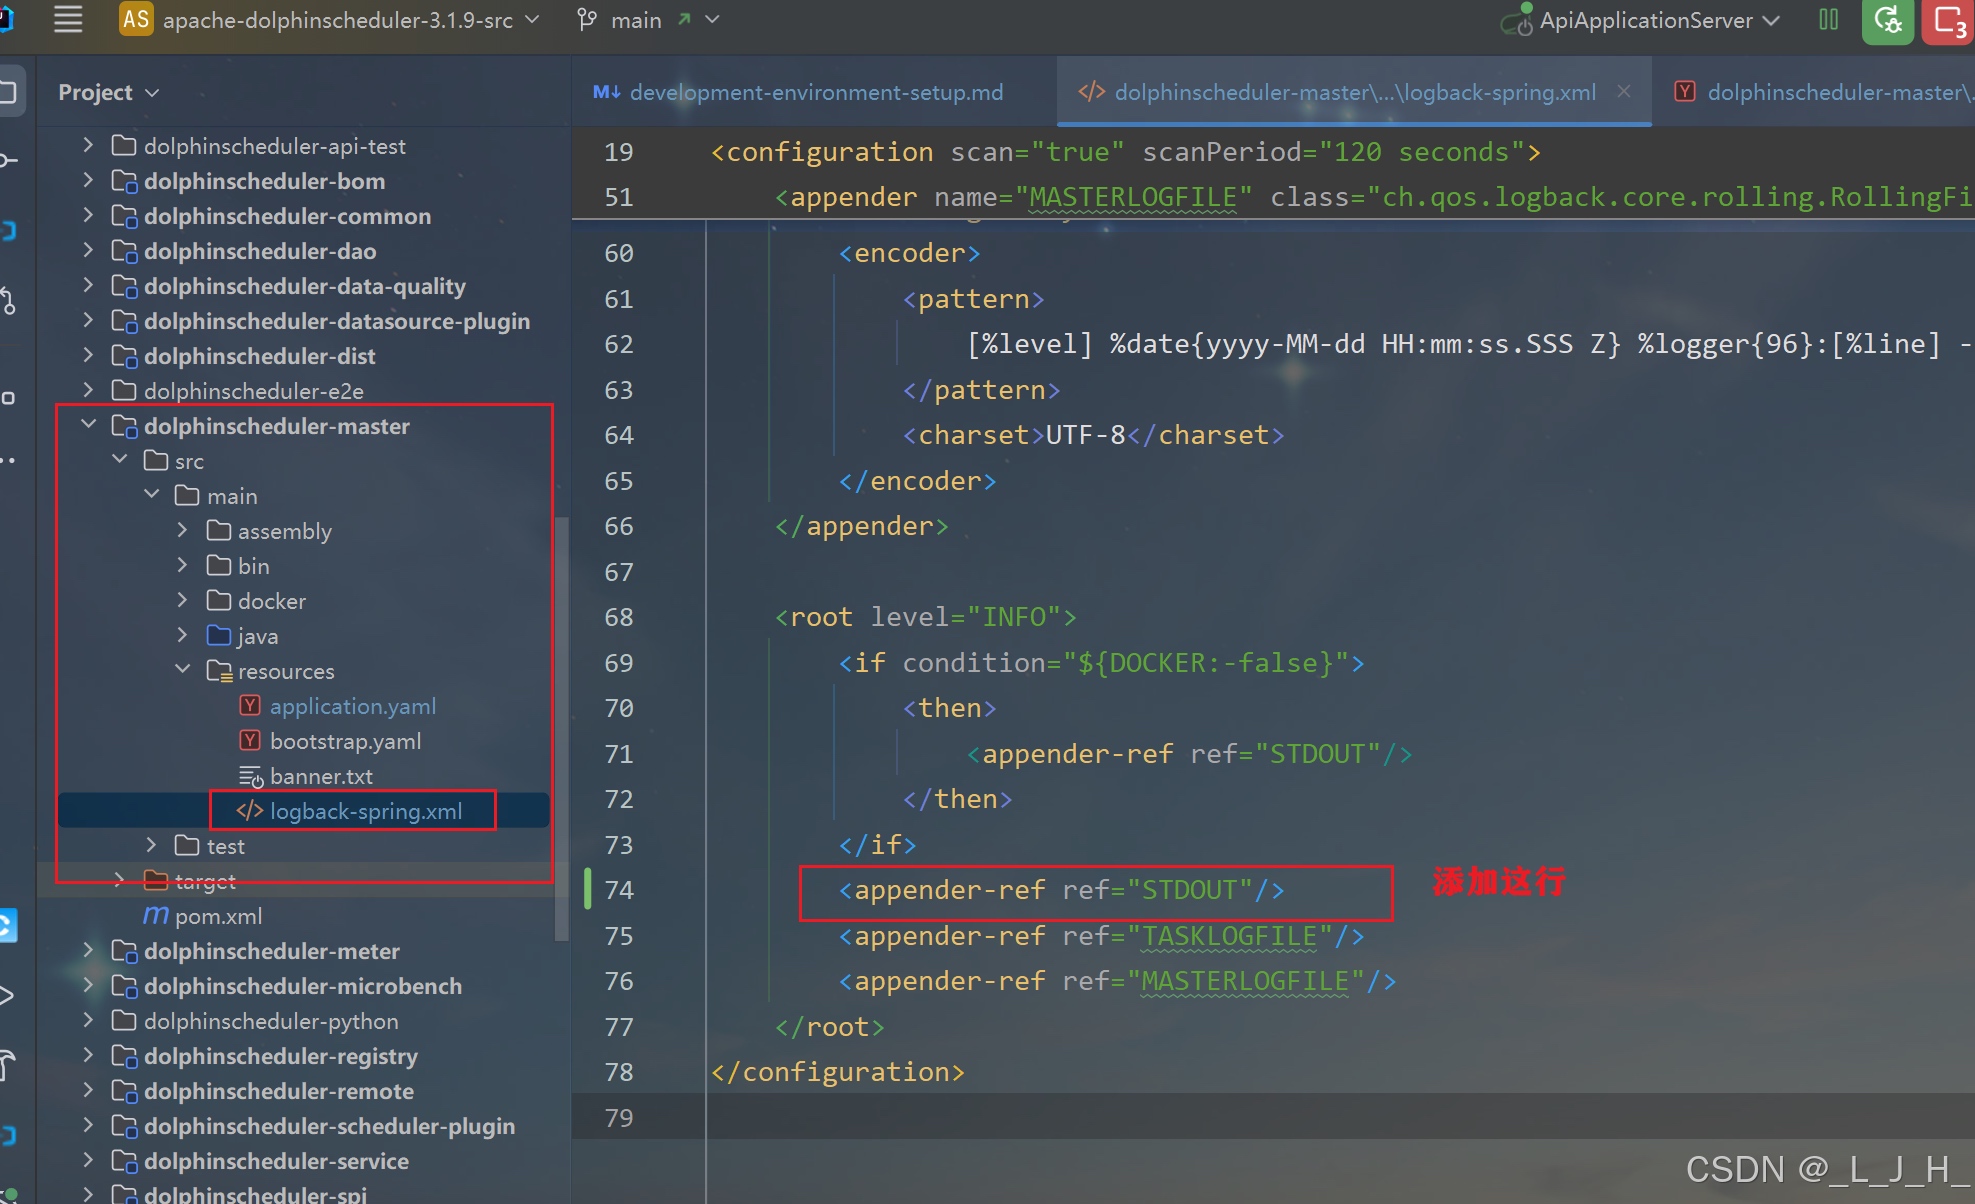
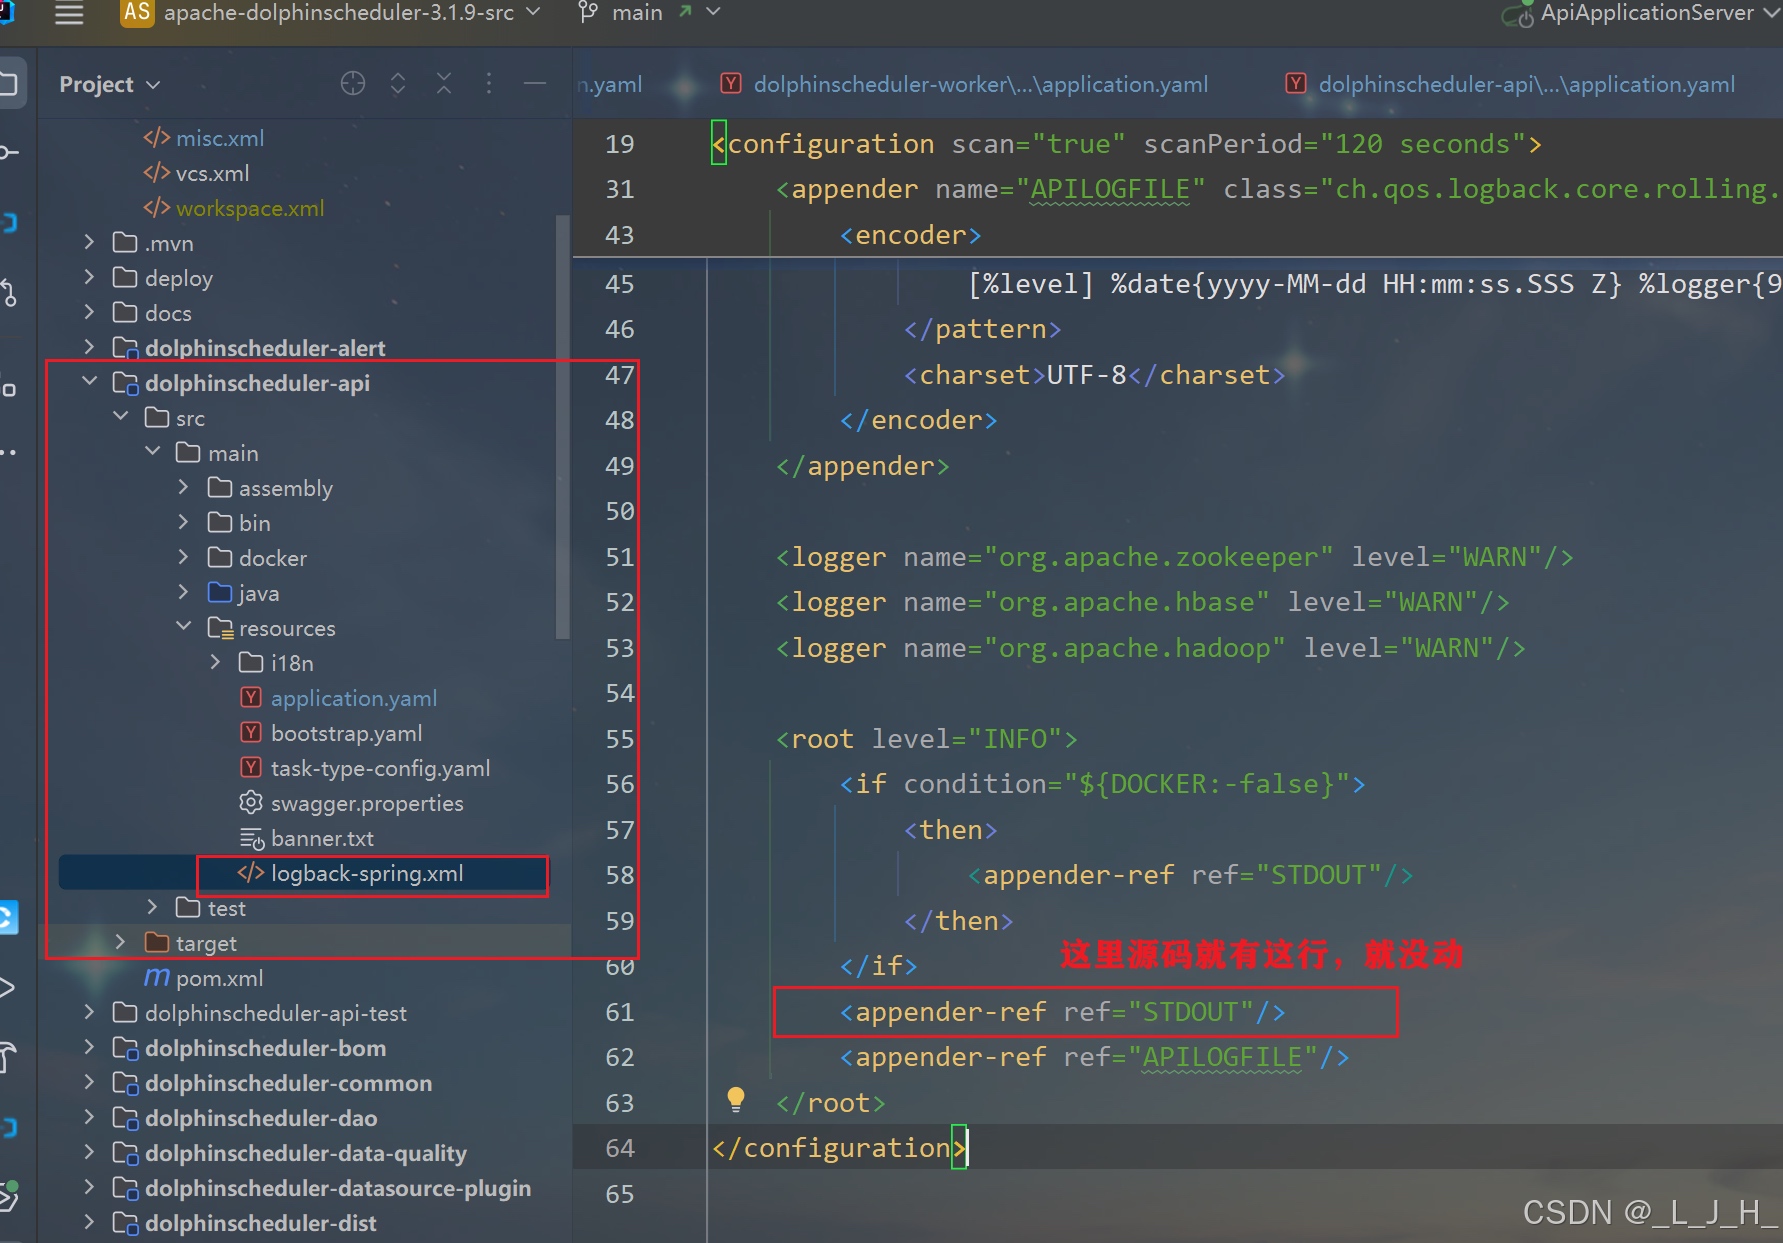
6、logback-spring.xml 修改日志级别

6-1:dolphinscheduler-master
<appender-ref ref="STDOUT"/>
6-2:dolphinscheduler-worker

6-3:dolphinscheduler-api
7、启动后端三个服务
我们需要启动三个服务,包括 MasterServer,WorkerServer,ApiApplicationServer
* MasterServer:在 Intellij IDEA 中执行 `org.apache.dolphinscheduler.server.master.MasterServer` 中的 `main` 方法,并配置 *VM Options* `-Dlogging.config=classpath:logback-spring.xml -Ddruid.mysql.usePingMethod=false -Dspring.profiles.active=mysql`
* WorkerServer:在 Intellij IDEA 中执行 `org.apache.dolphinscheduler.server.worker.WorkerServer` 中的 `main` 方法,并配置 *VM Options* `-Dlogging.config=classpath:logback-spring.xml -Ddruid.mysql.usePingMethod=false -Dspring.profiles.active=mysql`
* ApiApplicationServer:在 Intellij IDEA 中执行 `org.apache.dolphinscheduler.api.ApiApplicationServer` 中的 `main` 方法,并配置 *VM Options* `-Dlogging.config=classpath:logback-spring.xml -Dspring.profiles.active=api,mysql`。启动完成可以浏览 Open API 文档,地址为 http://localhost:12345/dolphinscheduler/swagger-ui/index.html
> VM Options `-Dspring.profiles.active=mysql` 中 `mysql` 表示指定的配置文件
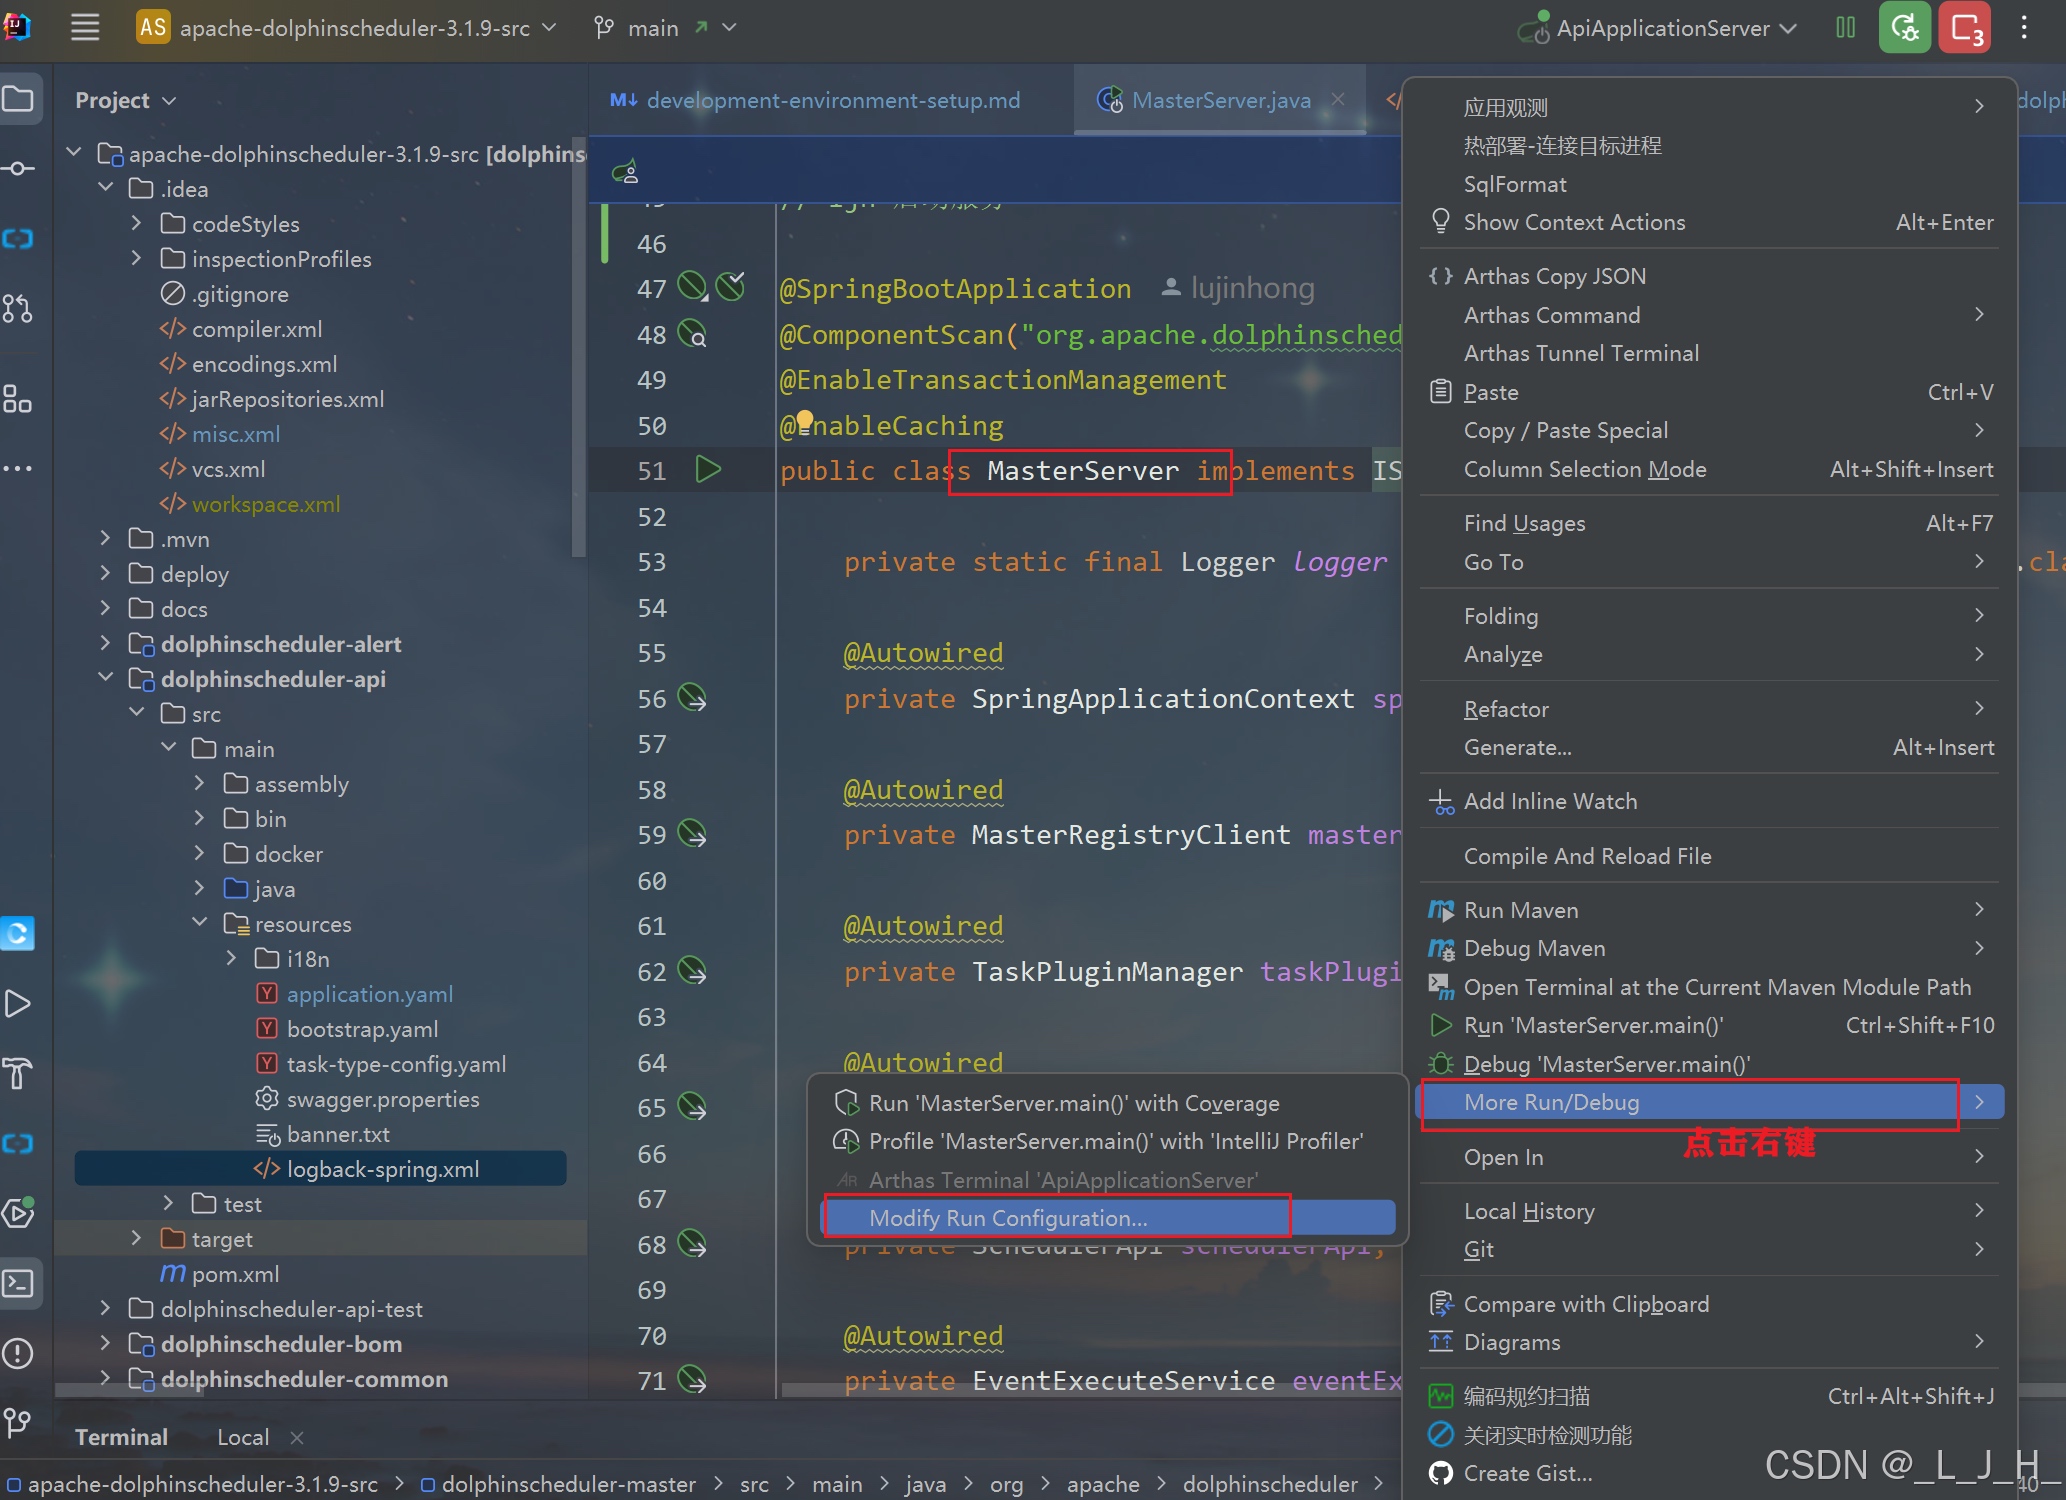
7-1:MasterServer
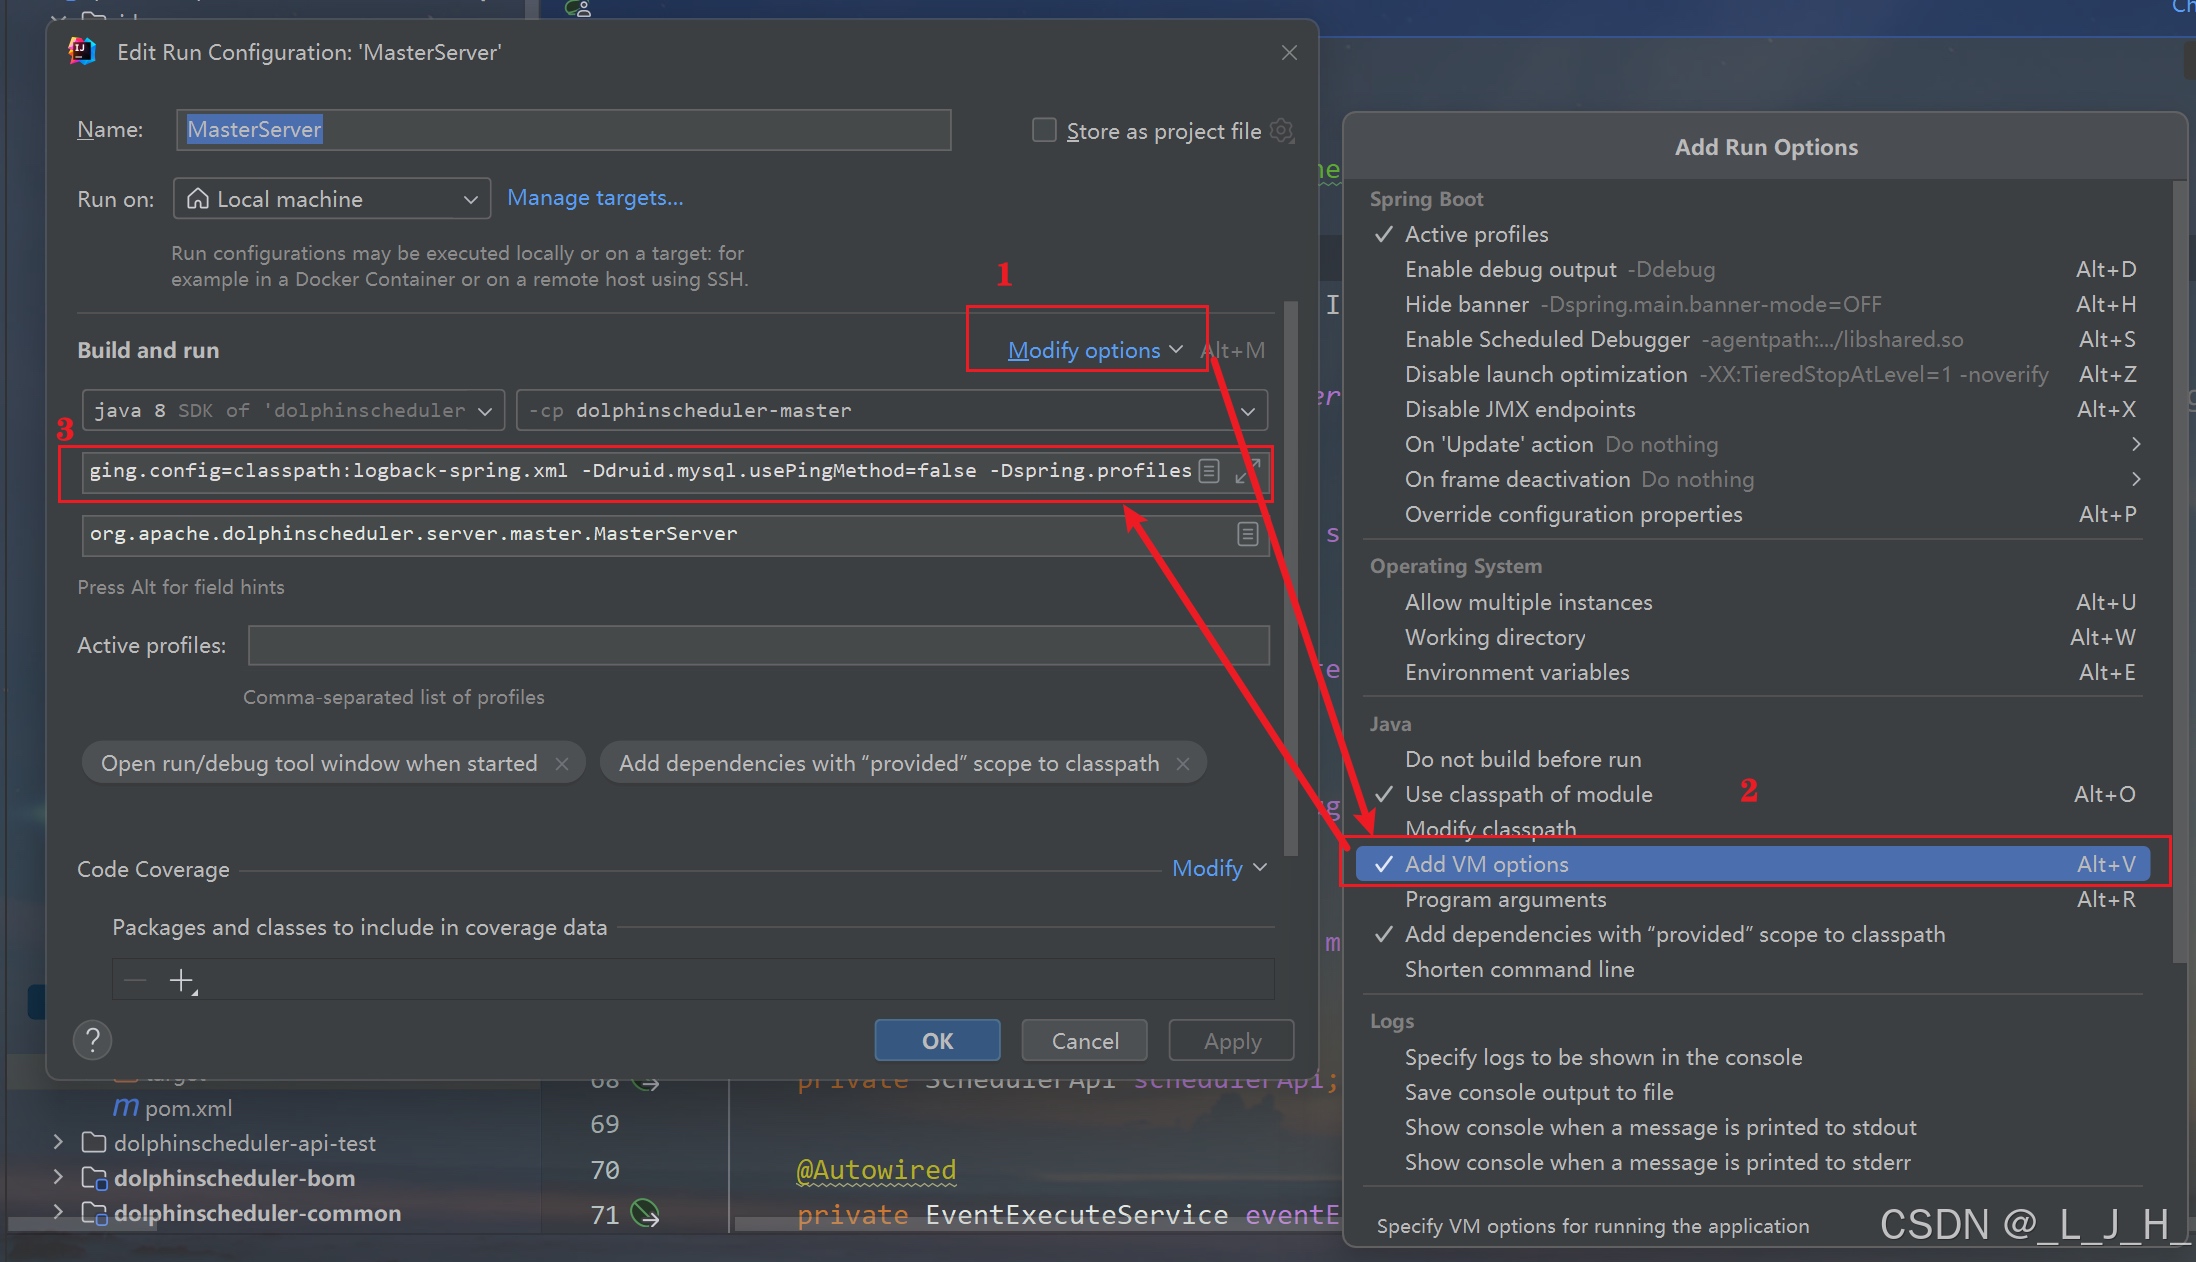
配置 VM Options
按照操作配置这个:打开后填入即可
-Dlogging.config=classpath:logback-spring.xml -Ddruid.mysql.usePingMethod=false -Dspring.profiles.active=mysql
7-2:WorkerServer
配置 VM Options
跟上面一样操作:
-Dlogging.config=classpath:logback-spring.xml -Ddruid.mysql.usePingMethod=false -Dspring.profiles.active=mysql
7-3:ApiApplicationServer
配置 VM Options
-Dlogging.config=classpath:logback-spring.xml -Dspring.profiles.active=api,mysql

总的就这三个:
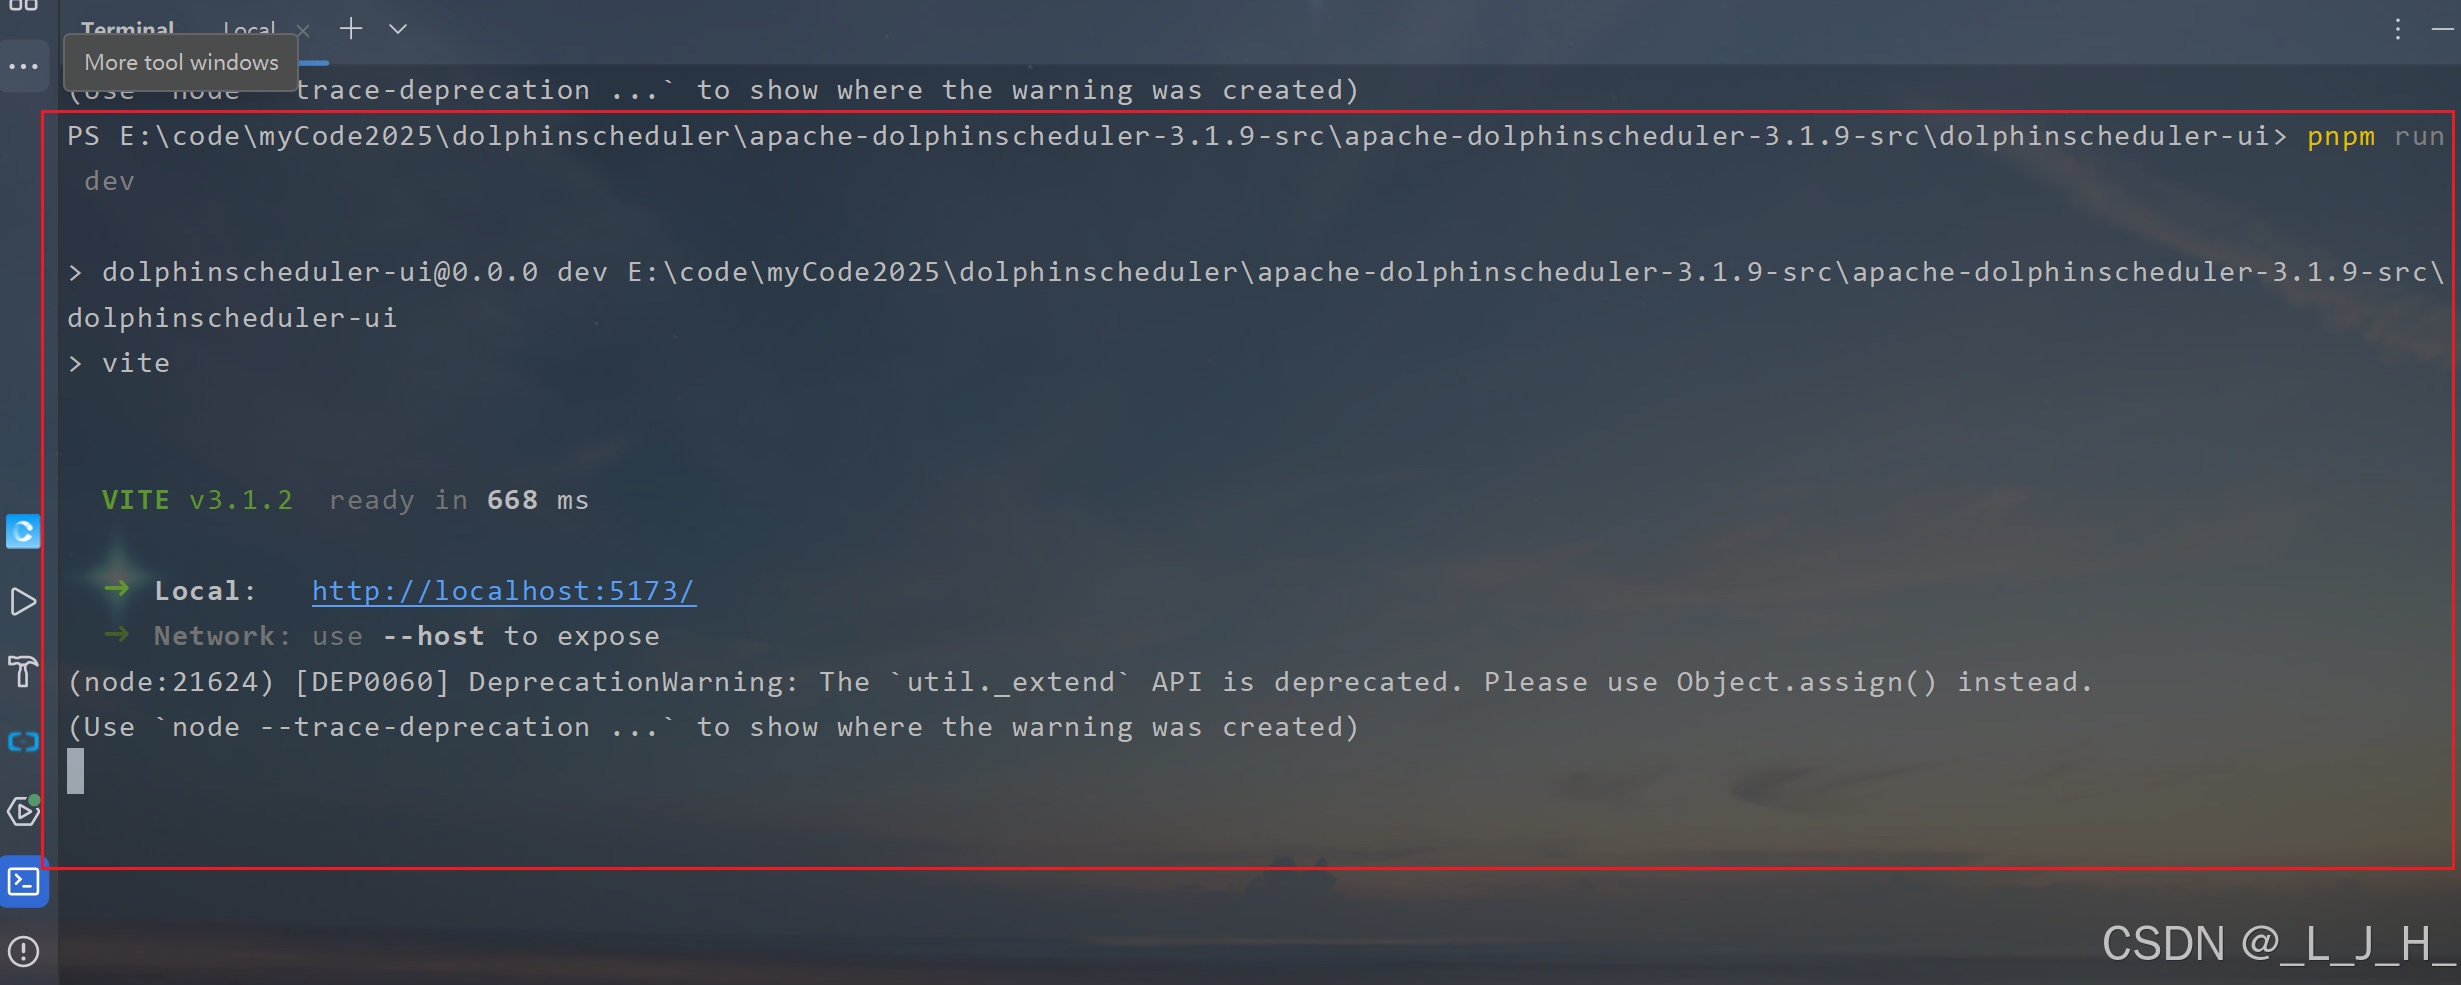
8、启动前端服务
命令:
安装前端依赖并运行前端组件
cd dolphinscheduler-ui
pnpm install
pnpm run dev

9、浏览器访问
账号密码:
浏览器访问:
http://localhost:5173/home
默认账号密码:
账号:admin
密码:dolphinscheduler123
成功访问:

相关问题
1、存储未启用、租户\用户 指定
问题:测试能否创建文件夹、上传文件等,提示【存储未启用】

问题:当前登录用户的租户信息未被指定
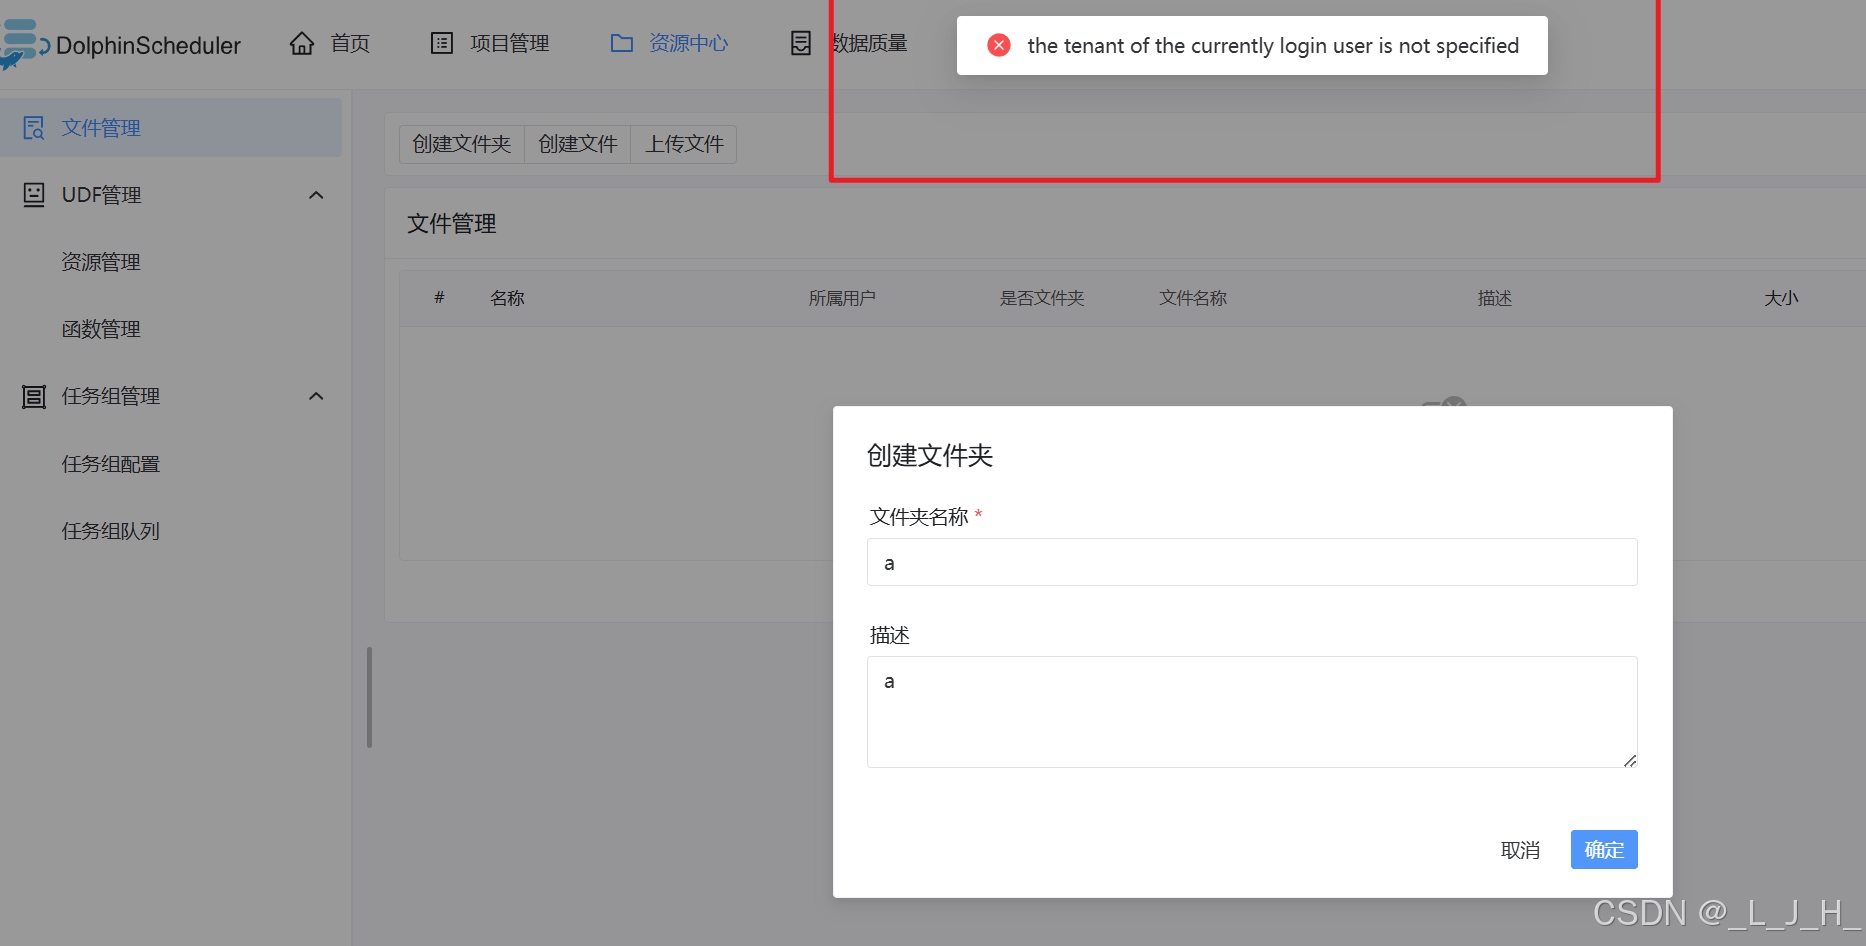
解决方法:
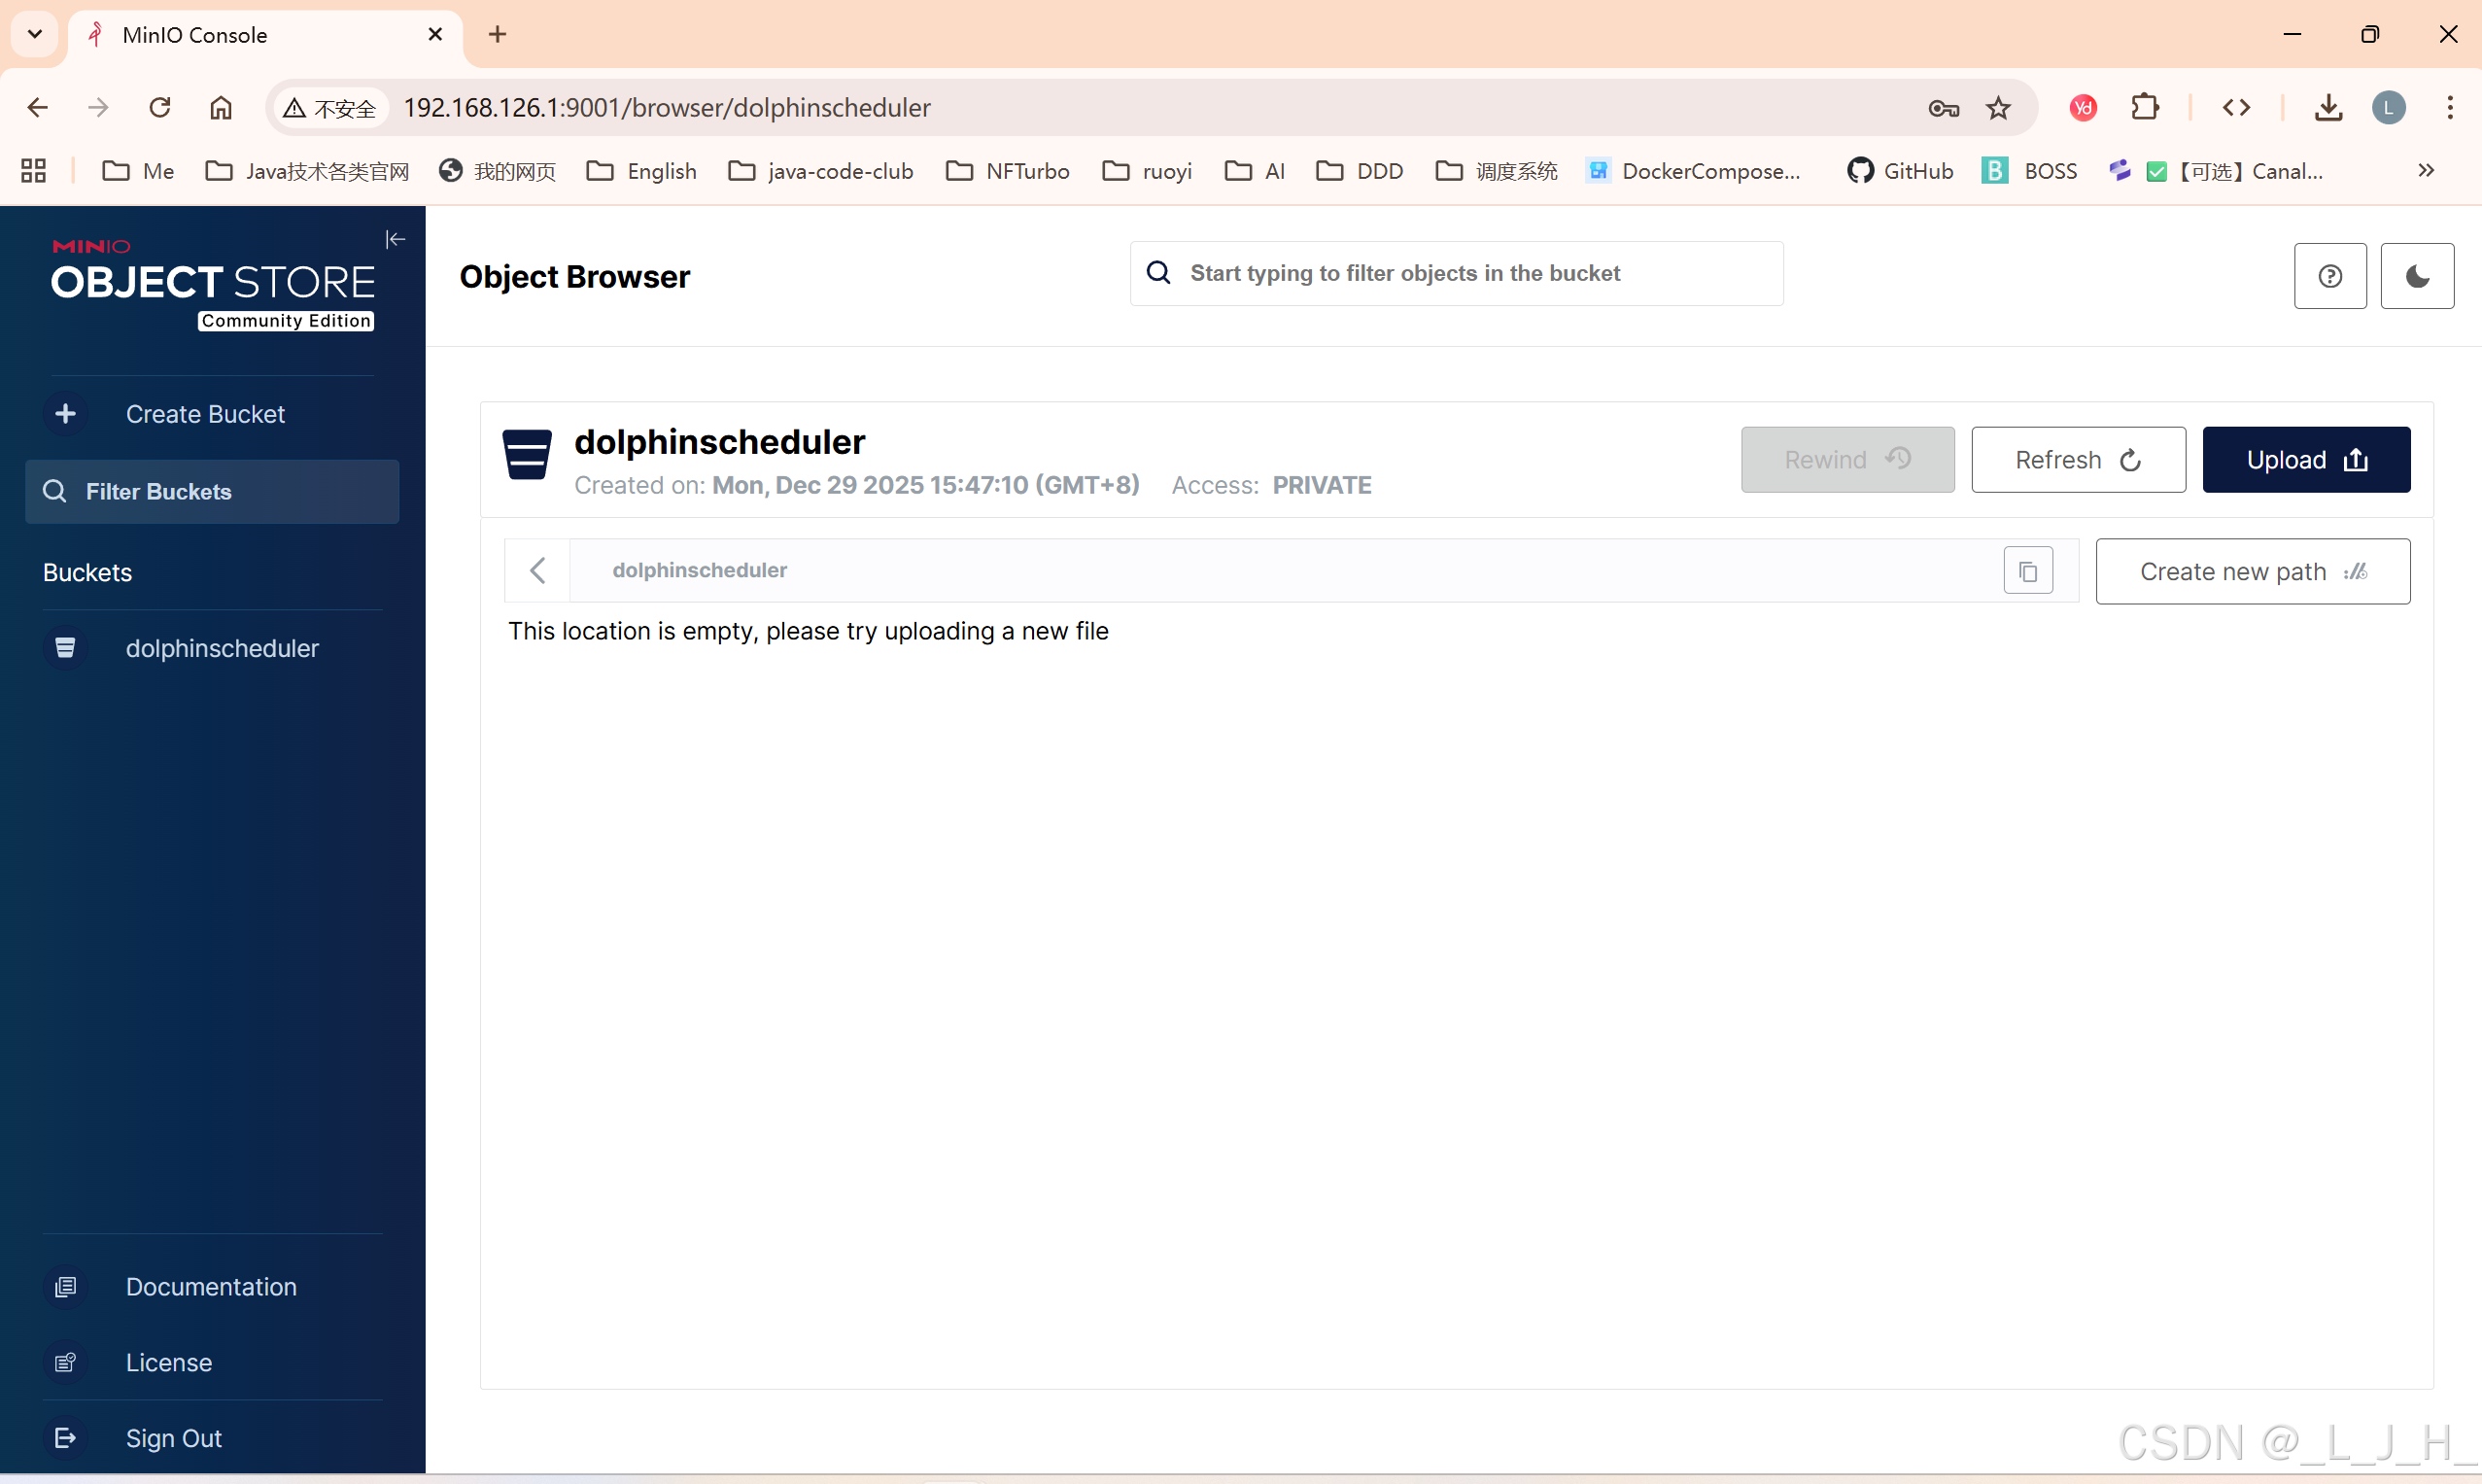
我这里直接用minio来尝试:
1、minio 创建 dolphinscheduler 桶
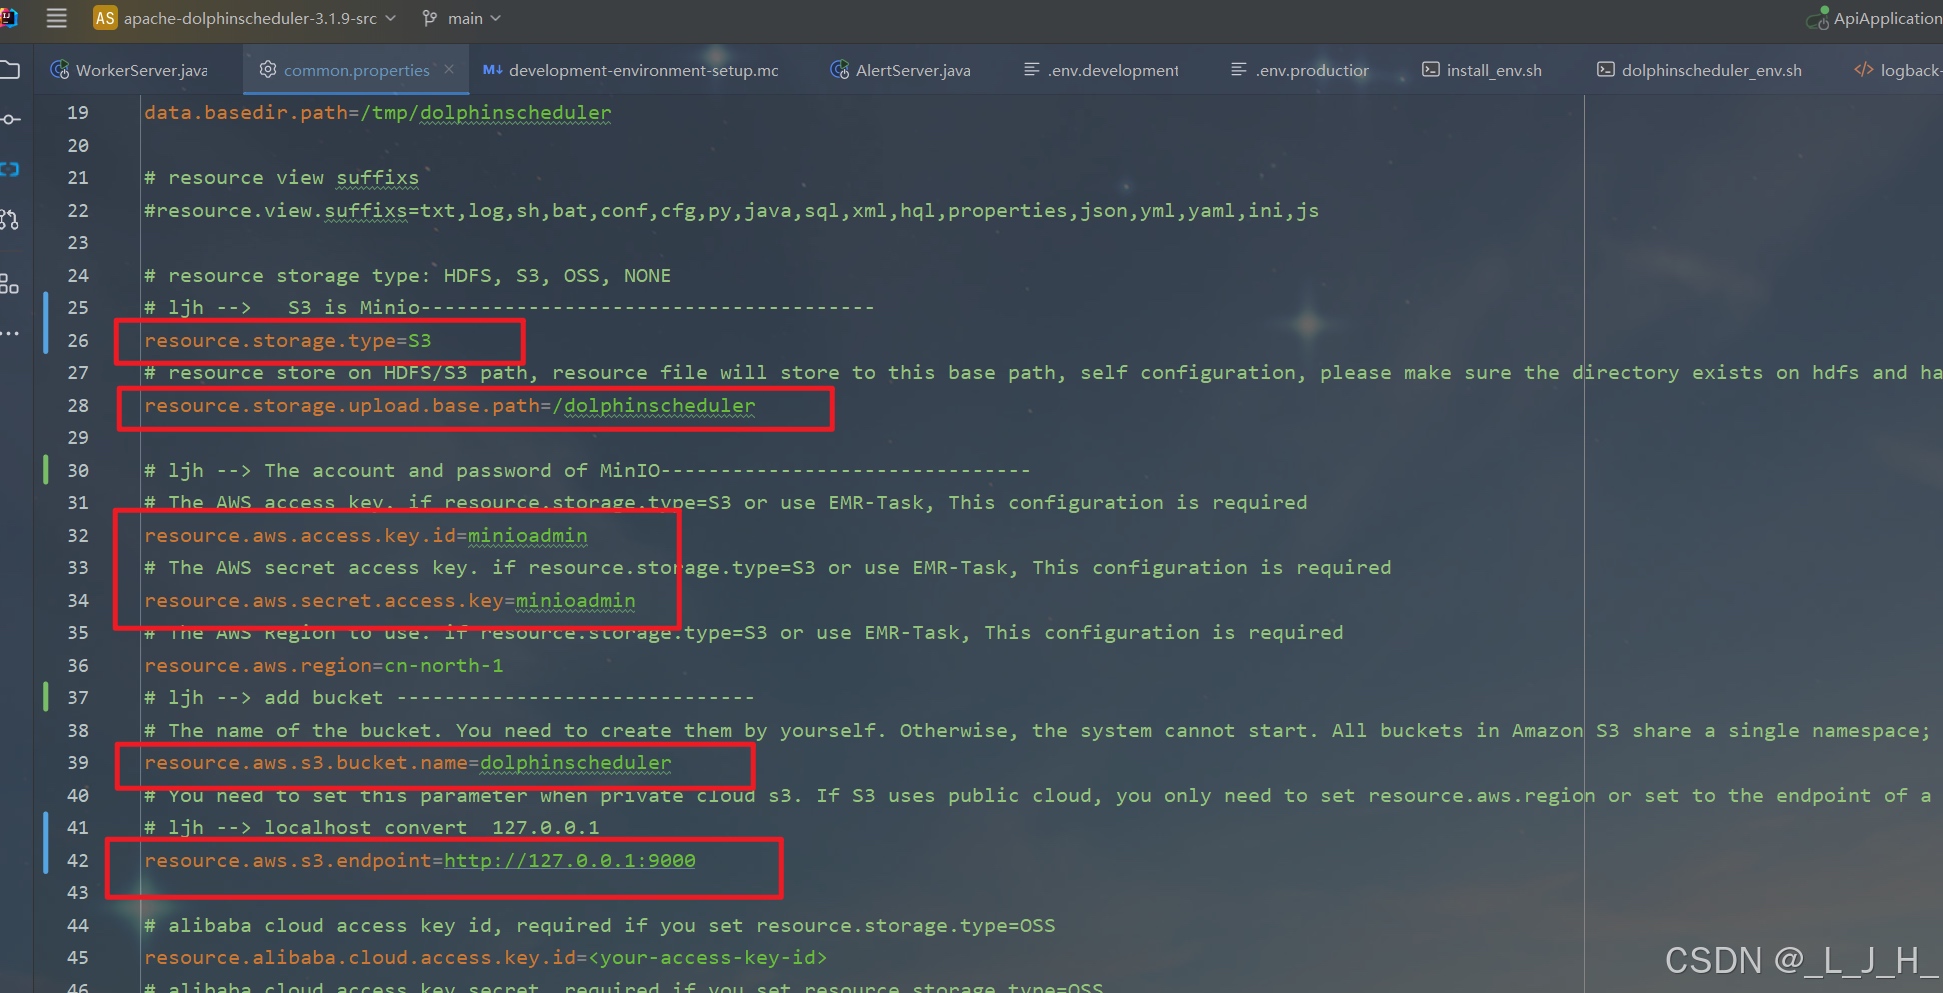
2、commom.properties 修改
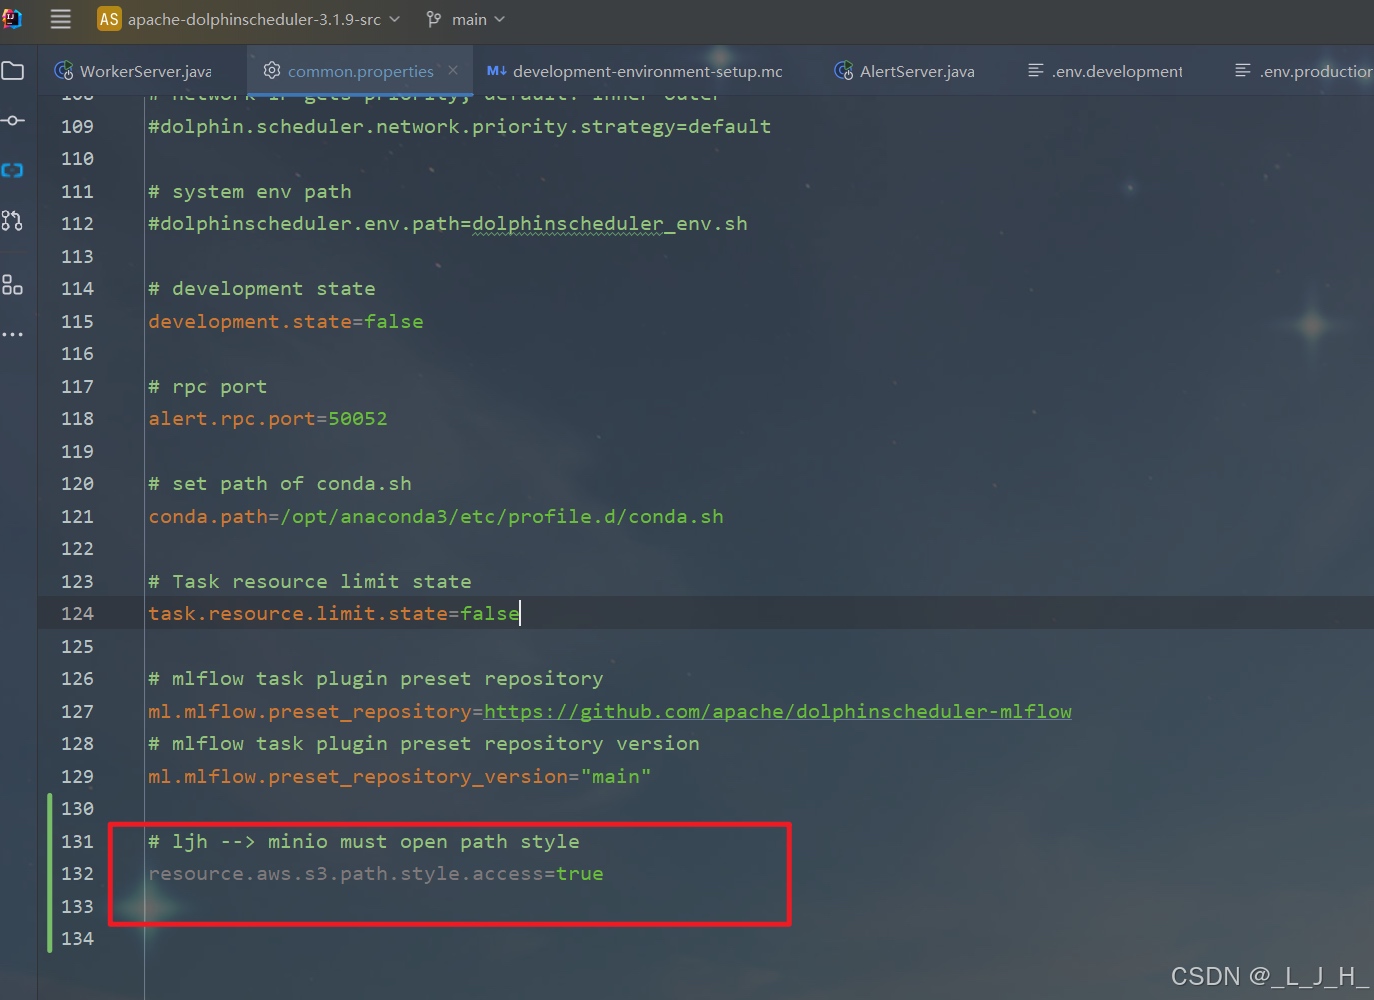
配置文件改了这些地方
# Licensed to the Apache Software Foundation (ASF) under one or more
# contributor license agreements.  See the NOTICE file distributed with
# this work for additional information regarding copyright ownership.
# The ASF licenses this file to You under the Apache License, Version 2.0
# (the "License"); you may not use this file except in compliance with
# the License.  You may obtain a copy of the License at
#
#     http://www.apache.org/licenses/LICENSE-2.0
#
# Unless required by applicable law or agreed to in writing, software
# distributed under the License is distributed on an "AS IS" BASIS,
# WITHOUT WARRANTIES OR CONDITIONS OF ANY KIND, either express or implied.
# See the License for the specific language governing permissions and
# limitations under the License.
#
# user data local directory path, please make sure the directory exists and have read write permissions
data.basedir.path=/tmp/dolphinscheduler
# resource view suffixs
#resource.view.suffixs=txt,log,sh,bat,conf,cfg,py,java,sql,xml,hql,properties,json,yml,yaml,ini,js
# resource storage type: HDFS, S3, OSS, NONE
# ljh -->   S3 is Minio--------------------------------------
resource.storage.type=S3
# resource store on HDFS/S3 path, resource file will store to this base path, self configuration, please make sure the directory exists on hdfs and have read write permissions. "/dolphinscheduler" is recommended
resource.storage.upload.base.path=/dolphinscheduler
# ljh --> The account and password of MinIO-------------------------------
# The AWS access key. if resource.storage.type=S3 or use EMR-Task, This configuration is required
resource.aws.access.key.id=minioadmin
# The AWS secret access key. if resource.storage.type=S3 or use EMR-Task, This configuration is required
resource.aws.secret.access.key=minioadmin
# The AWS Region to use. if resource.storage.type=S3 or use EMR-Task, This configuration is required
resource.aws.region=cn-north-1
# ljh --> add bucket ------------------------------
# The name of the bucket. You need to create them by yourself. Otherwise, the system cannot start. All buckets in Amazon S3 share a single namespace; ensure the bucket is given a unique name.
resource.aws.s3.bucket.name=dolphinscheduler
# You need to set this parameter when private cloud s3. If S3 uses public cloud, you only need to set resource.aws.region or set to the endpoint of a public cloud such as S3.cn-north-1.amazonaws.com.cn
# ljh --> localhost convert  127.0.0.1
resource.aws.s3.endpoint=http://127.0.0.1:9000
# alibaba cloud access key id, required if you set resource.storage.type=OSS
resource.alibaba.cloud.access.key.id=<your-access-key-id>
# alibaba cloud access key secret, required if you set resource.storage.type=OSS
resource.alibaba.cloud.access.key.secret=<your-access-key-secret>
# alibaba cloud region, required if you set resource.storage.type=OSS
resource.alibaba.cloud.region=cn-hangzhou
# oss bucket name, required if you set resource.storage.type=OSS
resource.alibaba.cloud.oss.bucket.name=dolphinscheduler
# oss bucket endpoint, required if you set resource.storage.type=OSS
resource.alibaba.cloud.oss.endpoint=https://oss-cn-hangzhou.aliyuncs.com
# if resource.storage.type=HDFS, the user must have the permission to create directories under the HDFS root path
resource.hdfs.root.user=hdfs
# if resource.storage.type=S3, the value like: s3a://dolphinscheduler; if resource.storage.type=HDFS and namenode HA is enabled, you need to copy core-site.xml and hdfs-site.xml to conf dir
resource.hdfs.fs.defaultFS=hdfs://mycluster:8020
# whether to startup kerberos
hadoop.security.authentication.startup.state=false
# java.security.krb5.conf path
java.security.krb5.conf.path=/opt/krb5.conf
# login user from keytab username
login.user.keytab.username=hdfs-mycluster@ESZ.COM
# login user from keytab path
login.user.keytab.path=/opt/hdfs.headless.keytab
# kerberos expire time, the unit is hour
kerberos.expire.time=2
# resourcemanager port, the default value is 8088 if not specified
resource.manager.httpaddress.port=8088
# if resourcemanager HA is enabled, please set the HA IPs; if resourcemanager is single, keep this value empty
yarn.resourcemanager.ha.rm.ids=192.168.xx.xx,192.168.xx.xx
# if resourcemanager HA is enabled or not use resourcemanager, please keep the default value; If resourcemanager is single, you only need to replace ds1 to actual resourcemanager hostname
yarn.application.status.address=http://ds1:%s/ws/v1/cluster/apps/%s
# job history status url when application number threshold is reached(default 10000, maybe it was set to 1000)
yarn.job.history.status.address=http://ds1:19888/ws/v1/history/mapreduce/jobs/%s
# datasource encryption enable
datasource.encryption.enable=false
# datasource encryption salt
datasource.encryption.salt=!@#$%^&*
# data quality option
data-quality.jar.name=dolphinscheduler-data-quality-dev-SNAPSHOT.jar
#data-quality.error.output.path=/tmp/data-quality-error-data
# Network IP gets priority, default inner outer
# Whether hive SQL is executed in the same session
support.hive.oneSession=false
# use sudo or not, if set true, executing user is tenant user and deploy user needs sudo permissions; if set false, executing user is the deploy user and doesn't need sudo permissions
sudo.enable=true
setTaskDirToTenant.enable=false
# network interface preferred like eth0, default: empty
#dolphin.scheduler.network.interface.preferred=
# network IP gets priority, default: inner outer
#dolphin.scheduler.network.priority.strategy=default
# system env path
#dolphinscheduler.env.path=dolphinscheduler_env.sh
# development state
development.state=false
# rpc port
alert.rpc.port=50052
# set path of conda.sh
conda.path=/opt/anaconda3/etc/profile.d/conda.sh
# Task resource limit state
task.resource.limit.state=false
# mlflow task plugin preset repository
ml.mlflow.preset_repository=https://github.com/apache/dolphinscheduler-mlflow
# mlflow task plugin preset repository version
ml.mlflow.preset_repository_version="main"
# ljh --> minio must open path style
resource.aws.s3.path.style.access=true
3、dolphinscheduler 可视化页面添加租户
安全中心 - 租户管理 - 创建租户

用户添加租户

演示
创建文件夹、上传文件成功
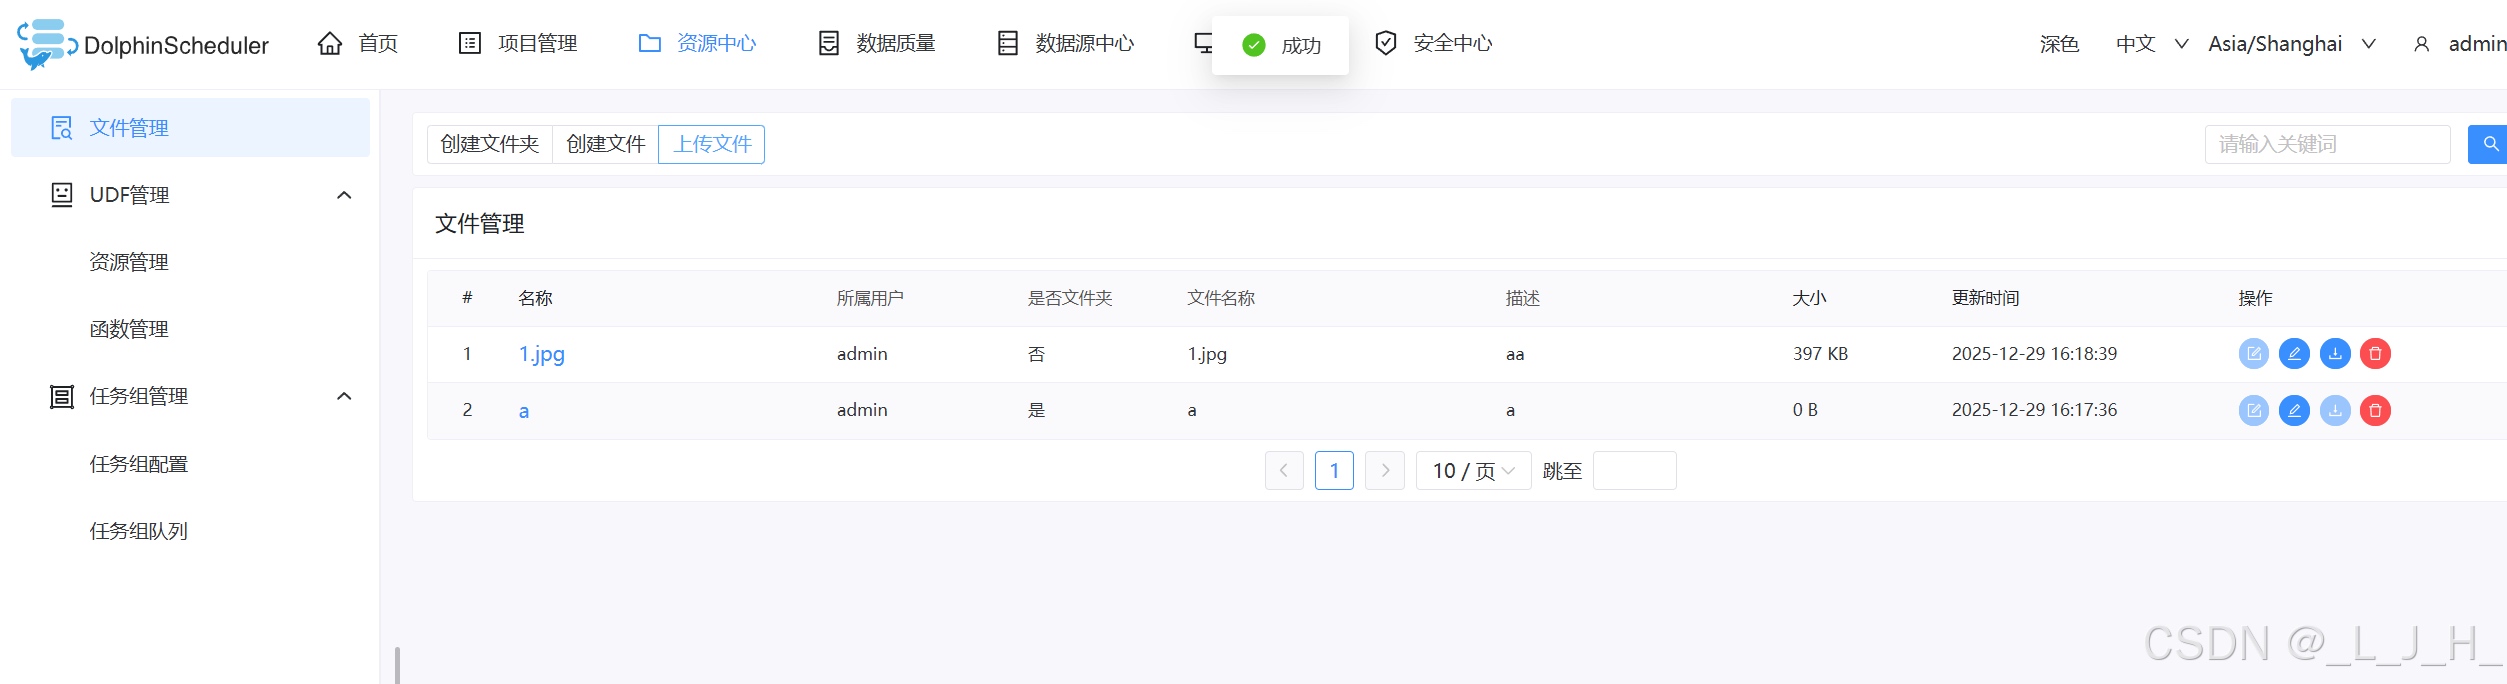
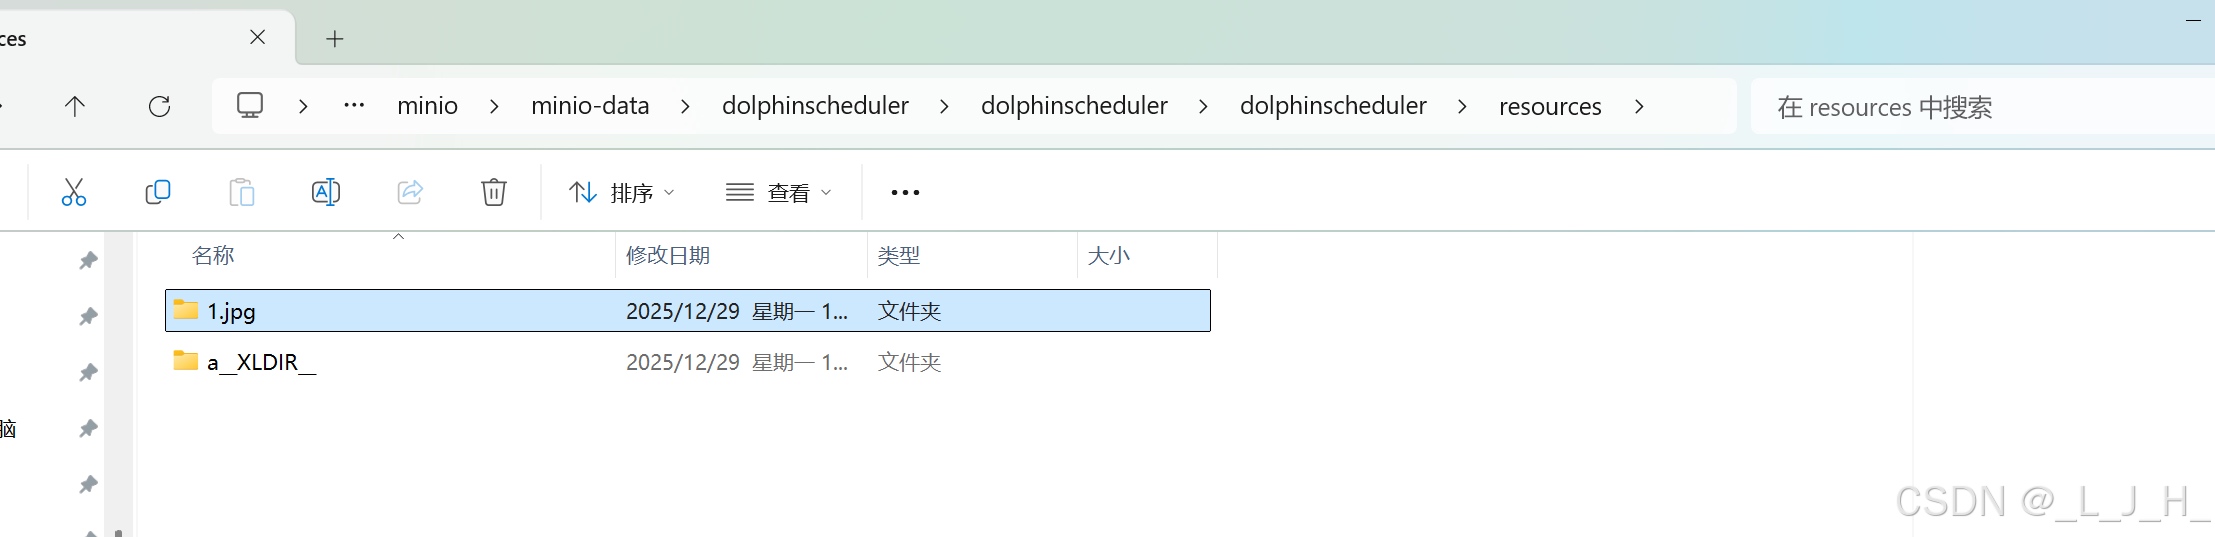
如图,数据已经存放在我指定的minio文件夹里面了
来自 “ ITPUB博客 ” ,链接:https://blog.itpub.net/70014275/viewspace-3108658/ ,如需转载,请注明出处,否则将追究法律责任。

请登录后发表评论
登录
全部评论
最新文章
- 任务失败了,日志却消失了?一次DolphinScheduler异常任务排查
- 数据生产到智能应用:Apache DolphinScheduler 数仓落地实践
- DolphinScheduler 的 Master 是怎么跑起来的?带你看懂启动源码
- Apache DolphinScheduler 3.4.3 发布!权限安全与稳定性全面增强,调度补火即将上线
- 以 Harness 重构数据工程:Agent 时代的新范式
- Apache DolphinScheduler 8 月报:权限安全加固,调度补火上线,性能与稳定性持续提升
- DolphinScheduler 任务实例 Host 为空?一次内存保护机制引发的调度罢工
- DolphinScheduler 挂了你不知道?Prometheus + Grafana 监控兜底方案,亲测可用
- 把 ApacheDolphinScheduler 变成 Agent 的“手和脚”:从调度平台到自然语言数据入口
- 希望你永远用不上:Apache DolphinScheduler 任务阻塞死锁排查与解决方案
