本文分享自天翼云开发者社区 @《Springfox与SpringDoc——swagger如何选择(SpringDoc入门)》,作者: 才开始学技术的小白
链接:
https://www.ctyun.cn/developer/article/381687816880197?track=|cp:cz_bk|tgdy:wenzhang|ttjh:bokeshequ|key:bw308|pf:PC
0.引言
之前写过一篇关于 swagger(实际上是springfox)的使用指南(https://www.ctyun.cn/developer/article/371704742199365),涵盖了本人在开发与学习的时候碰到的各种大坑。但由于springfox已经不更新了,很多项目都在往springdoc迁移
笔者也是花了一些时间试了一下这个号称 “把springfox按在地下摩擦”的springdoc究竟好不好使,本文就来简单介绍下springdoc的使用以及优劣势
1.引入maven依赖
这里有个大坑一定要注意!!!
如果你跟我一样,现在使用的是 springfox,但是想往springdoc迁移,结果试了一下发现还是springfox好用/懒得改那么多注解,还是想换回springfox, 一定要把 springdoc的maven依赖删掉!!!不然springboot会默认你用的是springdoc,导致swagger界面出不来
< dependency >
< groupId > org . springdoc </ groupId >
< artifactId > springdoc - openapi - ui </ artifactId >
< version > 1.6.11 </ version >
</ dependency >
2.springdoc配置类
实际上 springdoc的配置非常简单,使用的是OpenAPI类与GroupedOpenApi来配置
/**
* SpringDoc API文档相关配置
* Created by macro on 2023/02/02.
*/ @Configuration public class SpringDocConfig {
@Bean
public OpenAPI mallTinyOpenAPI () {
return new OpenAPI ()
. info ( new Info (). title ( "CTYUN API" )
. description ( "SpringDoc API 演示" )
. version ( "v1.0.0" )
. license ( new License (). name ( "Apache 2.0" ). url ( " )))
. externalDocs ( new ExternalDocumentation ()
. description ( "SpringBoot项目" )
. url ( " ));
}
@Bean
public GroupedOpenApi adminApi () {
return GroupedOpenApi . builder ()
. group ( "admin" )
. pathsToMatch ( "/**" )
. build ();
}
//可以创建不同的GroupedOpenApi来判断不同的controller
@Bean
public GroupedOpenApi userApi () {
return GroupedOpenApi . builder ()
. group ( "user" )
. pathsToMatch ( "/user/**" )
. build ();
}}
3.启动
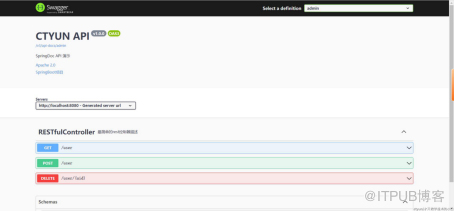
默认配置之后直接进入: 即可
注意这里与 springfox略有不同()
4.与SpringFox的注解对照
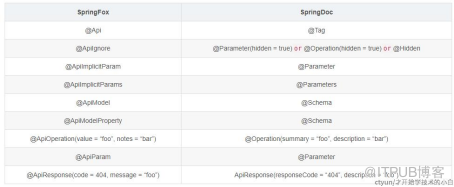
5.SpringDoc基本注解用法
这里转载一个写的非常全面的示例接口,原文可以去看: https://blog.csdn.net/zhenghongcs/article/details/123812583
/**
* 品牌管理Controller
* Created by macro on 2019/4/19.
*/ @Tag( name = "PmsBrandController" , description = "商品品牌管理" )@Controller@RequestMapping( "/brand" ) public class PmsBrandController {
@Autowired
private PmsBrandService brandService ;
private static final Logger LOGGER = LoggerFactory . getLogger ( PmsBrandController . class );
@Operation( summary = "获取所有品牌列表" , description = "需要登录后访问" )
@RequestMapping( value = "listAll" , method = RequestMethod . GET )
@ResponseBody
public CommonResult < List < PmsBrand >> getBrandList () {
return CommonResult . success ( brandService . listAllBrand ());
}
@Operation( summary = "添加品牌" )
@RequestMapping( value = "/create" , method = RequestMethod . POST )
@ResponseBody
@PreAuthorize( "hasRole('ADMIN')" )
public CommonResult createBrand (@RequestBody PmsBrand pmsBrand ) {
CommonResult commonResult ;
int count = brandService . createBrand ( pmsBrand );
if ( count == 1 ) {
commonResult = CommonResult . success ( pmsBrand );
LOGGER . debug ( "createBrand success:{}" , pmsBrand );
} else {
commonResult = CommonResult . failed ( "操作失败" );
LOGGER . debug ( "createBrand failed:{}" , pmsBrand );
}
return commonResult ;
}
@Operation( summary = "更新指定id品牌信息" )
@RequestMapping( value = "/update/{id}" , method = RequestMethod . POST )
@ResponseBody
@PreAuthorize( "hasRole('ADMIN')" )
public CommonResult updateBrand (@PathVariable( "id" ) Long id , @RequestBody PmsBrand pmsBrandDto , BindingResult result ) {
CommonResult commonResult ;
int count = brandService . updateBrand ( id , pmsBrandDto );
if ( count == 1 ) {
commonResult = CommonResult . success ( pmsBrandDto );
LOGGER . debug ( "updateBrand success:{}" , pmsBrandDto );
} else {
commonResult = CommonResult . failed ( "操作失败" );
LOGGER . debug ( "updateBrand failed:{}" , pmsBrandDto );
}
return commonResult ;
}
@Operation( summary = "删除指定id的品牌" )
@RequestMapping( value = "/delete/{id}" , method = RequestMethod . GET )
@ResponseBody
@PreAuthorize( "hasRole('ADMIN')" )
public CommonResult deleteBrand (@PathVariable( "id" ) Long id ) {
int count = brandService . deleteBrand ( id );
if ( count == 1 ) {
LOGGER . debug ( "deleteBrand success :id={}" , id );
return CommonResult . success ( null );
} else {
LOGGER . debug ( "deleteBrand failed :id={}" , id );
return CommonResult . failed ( "操作失败" );
}
}
@Operation( summary = "分页查询品牌列表" )
@RequestMapping( value = "/list" , method = RequestMethod . GET )
@ResponseBody
@PreAuthorize( "hasRole('ADMIN')" )
public CommonResult < CommonPage < PmsBrand >> listBrand (@RequestParam( value = "pageNum" , defaultValue = "1" )
@Parameter( description = "页码" ) Integer pageNum ,
@RequestParam( value = "pageSize" , defaultValue = "3" )
@Parameter( description = "每页数量" ) Integer pageSize ) {
List < PmsBrand > brandList = brandService . listBrand ( pageNum , pageSize );
return CommonResult . success ( CommonPage . restPage ( brandList ));
}
@Operation( summary = "获取指定id的品牌详情" )
@RequestMapping( value = "/{id}" , method = RequestMethod . GET )
@ResponseBody
@PreAuthorize( "hasRole('ADMIN')" )
public CommonResult < PmsBrand > brand (@PathVariable( "id" ) Long id ) {
return CommonResult . success ( brandService . getBrand ( id ));
}}
6.与SpringSecurity的结合
如果项目中使用了 SpringSecurity,需要做两个配置来让springdoc正常使用:
1.在SpringSecurity配置类中放行白名单:"/v3/api-docs/**", "/swagger-ui/**"
2.在SpringDoc配置中增加对应内容,如下:
@Configuration public class SpringDocConfig {
private static final String SECURITY_SCHEME_NAME = "BearerAuth" ;
@Bean
public OpenAPI managerOpenAPI () {
return new OpenAPI ()
. info ( new Info (). title ( "Galaxy-Cluster-Manager后端接口文档" )
. description ( "提供给前端界面(portal)的接口文档" )
. version ( "v1.0.0" )
. license ( new License (). name ( "galaxy 1.2.0" ). url ( " )))
. externalDocs ( new ExternalDocumentation ()
. description ( "弹性高性能计算(CTHPC)" )
. url ( " ))
//以下是针对SpringSecurity的设置,同时还有设置白名单
. addSecurityItem ( new SecurityRequirement (). addList ( SECURITY_SCHEME_NAME ))
. components ( new Components ()
. addSecuritySchemes ( SECURITY_SCHEME_NAME ,
new SecurityScheme ()
. name ( SECURITY_SCHEME_NAME )
. type ( SecurityScheme . Type . HTTP )
. scheme ( "bearer" )
. bearerFormat ( "JWT" )));
}
@Bean
public GroupedOpenApi publicApi () {
return GroupedOpenApi . builder ()
. group ( "portal" )
. pathsToMatch ( "/api/**" )
. build ();
}
}
7.SpringDoc使用对象作为Query参数的问题
实际上 springfox也会有这个问题,使用对象作为query传参的时候,页面通常是这样的:
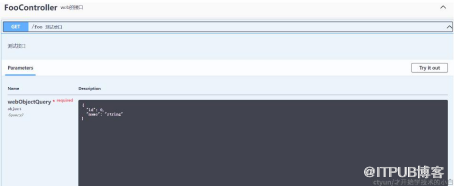
就没有办法逐个描述参数,也不能逐个调试(只能用 json调试),非常的麻烦;springdoc有一个解决这个问题非常方便的注解:@ParameterObject
比如某一个控制器的入参是 User user,我们只需要在这前面加上注解变为:@ParameterObject User user 即可,结果如下;
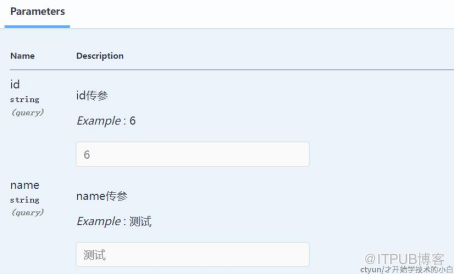
这里也有一个大坑:参数的类型可能会不正确,比如这里我们的 id参数实际上是int,但显示出来是string,这个时候就需要我们在User类的属性中加上对应的注解 ,比如:
@Parameter(description = "id传参",example = "6")
再重启 UI就会发现参数类型正确了
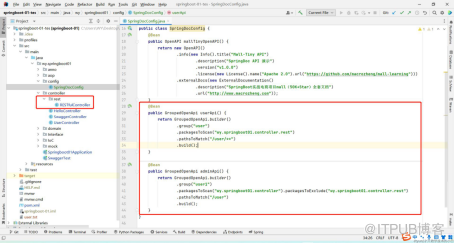
8.SpringDoc配置扫包范围
有的时候仅仅使用 @Hidden并不能满足我们的需要,因为可能需要配置不同group的controller类,这个时候就需要在配置类中取设置扫包范围代码如下:
9.SpringDoc的优劣势
优势: SpringDoc有着非常好看的UI,以及比Springfox更加完善的参数注解体系,看起来非常舒服,并且还在不断更新与维护中
劣势:一些冷门功能还不完善,比如:
a.有十个接口,他们的url是一样的但是可以通过query参数来分别(如:@PostMapping(params = "action=QueryUsers"))这个时候springdoc只能通过扫包范围配置,来写多个GroupOpenApi来解决,非常的麻烦;springfox可以在docket创建的时候使用:docket.enableUrlTemplating(true); 这个方法即可解决
b.springdoc的网络配置可能会与springfox冲突,如果迁移,需要逐个尝试网络配置是否合适(主要是GsonHttpMessageConverter的配置)
c.兼容性问题仍需要观望,相对于springfox,springdoc的兼容性并没有那么好,在许多时候可能会出现序列化的乱码问题
总结:如果当前项目 /工程已经集成了完备的springfox,建议不要轻易尝试迁移到springdoc,尤其是接口类型比较复杂、springfox配置docket比较多的项目;但如果是从头开始的项目,由于接口相对比较简单,可以采用springdoc,毕竟可以获得更加清晰明了的显示界面与参数解释。
来自 “ ITPUB博客 ” ,链接:https://blog.itpub.net/70014251/viewspace-2944055/ ,如需转载,请注明出处,否则将追究法律责任。

