周五临近下班,原本打算摸摸鱼,结果产品经理来个新需求。领导觉得 AI 服务器报价太贵,想先做个“低成本替代方案”来演示一下分析效果。于是,需求会议就开了。其中有一块功能是 **“检索内容高亮显示并展示匹配度”**,产品经理说这可以考虑用 **Elasticsearch** 实现。行吧,需求是他提的,代码自然就得咱来写了。那就开干吧 💪
## 一、启动 Elasticsearch 服务(Docker 简单搞定)
这里用的是 **Elasticsearch 8.xx**,主要是考虑我们项目还在用 **JDK 8**。
### 1. docker
```shell
docker run \
-d \
--privileged=true \
--name elasticsearch \
-p 9200:9200 \
-p 9300:9300 \
-e "ES_JAVA_OPTS=-Xms1024m -Xmx2048m" \
-e "discovery.type=single-node" \
-e "ELASTIC_PASSWORD=elastic" \
-e "xpack.security.enabled=true" \
-e TZ=Asia/Shanghai \
-v /etc/localtime:/etc/localtime:ro \
-v /home/bugshare/elasticsearch/config/elasticsearch.yml:/usr/share/elasticsearch/config/elasticsearch.yml:ro \
-v /home/bugshare/elasticsearch/data:/usr/share/elasticsearch/data \
-v /home/bugshare/elasticsearch/plugins:/usr/share/elasticsearch/plugins \
elasticsearch:8.19.6
```
### 2. 配置文件
```yaml
# elasticsearch.yml
cluster.name: "docker-cluster"
network.host: 0.0.0.0
http.cors.enabled: true
http.cors.allow-origin: "*"
http.cors.allow-headers: Authorization
```
验证下是否启动成功:浏览器访问 http://127.0.0.1:9200,用户名密码:`elastic / elastic`,推荐装个浏览器插件 **es-client** 来操作更方便。

## 二、Java 集成 Elasticsearch
官方提供的 Java API 用起来有点繁琐,于是我去找了两个现成的封装框架:
- **Easy-ES**
- **BBoss-Elasticsearch**
下面是我整理的一份对比(AI 协助分析 👇):
### 详细对比表格
| 维度 | Easy-ES | BBoss-Elasticsearch |
| ----------- | --------------------------------------- | ------------------------------- |
| 核心定位 | 极简 ORM,对标 MyBatis-Plus | 企业级 ES 客户端 & 数据同步框架 |
| 设计理念 | 用对象操作 ES,屏蔽复杂性 | 简化但不屏蔽,保留灵活控制 |
| 学习曲线 | 非常平缓(MyBatis-Plus 用户零上手成本) | 中等,需要理解 DSL 构建 |
| 查询 DSL | 自动生成 | 可手写,灵活度高 |
| ORM 支持 | 强 | 基础支持 |
| 数据同步 | 无 | 内置高性能数据同步 |
| 代码侵入性 | 较高(依赖注解) | 较低(注解可选) |
| 性能 | 简单查询快,复杂查询略逊 | 高性能,生产验证完善 |
| 文档 & 社区 | 中文文档完善 | 文档详尽,维护积极 |
| 适用场景 | 快速原型、轻量搜索 | 企业级复杂查询、数据同步 |
我个人更偏爱能写 DSL 的方案,于是选择了 **BBoss**。
## 三、Spring Boot 整合 BBoss
### 1. 引入依赖
```groovy
// build.gradle
implementation 'com.bbossgroups.plugins:bboss-elasticsearch-spring-boot-starter:7.5.3'
```
### 2. 配置文件
```yaml
spring:
elasticsearch:
bboss:
elasticUser: elastic
elasticPassword: elastic
elasticsearch:
rest:
hostNames: 127.0.0.1:9200
```
### 3. 定义映射文件(resources/esmapper/demo.xml)
```xml
// resources/esmapper/demo.xml
<properties>
<!-- 创建Indice -->
<property name="createDemoIndice">
<![CDATA[
{
"settings": {
"number_of_shards": 6,
"index.refresh_interval": "5s"
},
"mappings": {
"properties": {
"demoId":{
"type": "text"
},
"contentBody": {
"type": "text"
}
}
}
}
]]>
</property>
<!-- 高亮查询 -->
<property name="testHighlightSearch" cacheDsl="false">
<![CDATA[
{
"query": {
"bool": {
"must": [
{
"match" : {
"contentBody" : {
"query" : #[condition]
}
}
}
]
}
},
"size":1000,
"highlight": {
"pre_tags": [
"<mark class='mark'>"
],
"post_tags": [
"</mark>"
],
"fields": {
"*": {}
},
"fragment_size": 2147483647
}
}
]]>
</property>
</properties>
```
## 四、代码部分
### 1. 实体类
```java
// Demo.java
@Data
@ToString(callSuper = true)
@EqualsAndHashCode(callSuper = true)
public class Demo extends ESBaseData {
// Set the document identity field
@ESId(readSet = true, persistent = false)
private String demoId;
private String contentBody;
}
```
### 2. 控制器
```java
// DemoController.java
@Slf4j
@RestController
@RequestMapping("/es")
public class ElasticSearchController {
@Autowired
private BBossESStarter bbossESStarter;
private static final String MAP_PATH = "esmapper/elasticsearch.xml";
@GetMapping("/init")
public ResponseWrapper<Boolean, ?> init() {
this.dropAndCreateAndGetIndice();
this.addDocuments();
return new ResponseWrapper<>().success().setMessage("初始化成功!");
}
@GetMapping("/dropAndCreateAndGetIndice")
public void dropAndCreateAndGetIndice() {
ClientInterface clientUtil = this.bbossESStarter.getConfigRestClient(MAP_PATH);
boolean exist = clientUtil.existIndice("demo");
log.info("exist: {}", exist);
if (exist) {
String r = clientUtil.dropIndice("demo");
log.debug("r: {}", r);
}
// Create index demo
clientUtil.createIndiceMapping("demo", "createDemoIndice");
String demoIndice = clientUtil.getIndice("demo");
log.debug("demoIndice: {}", demoIndice);
}
@GetMapping("/addDocuments")
public void addDocuments() {
ClientInterface clientUtil = this.bbossESStarter.getRestClient();
List<String> contents = ListUtil.of(
"在本系列文章中,我们将从一个新的角度来了解 Elasticsearch。",
"本系列文章的动机是让您更好地了解 Elasticsearch、Lucene 以及搜索引擎的底层工作原理。",
"我们先从基础索引结构开始,也就是倒排索引……",
"倒排索引将 term 映射到包含相应项的文档……",
"通过查找所有项及其出现次数……",
"Elasticsearch 索引由一个或多个分片组成……",
"“分片”是 Elasticsearch 的基本扩展单位……",
"Elasticsearch 有一个“事务日志”,其中附加了要编制索引的文档……"
);
for (int i = 0; i < contents.size(); i++) {
Demo demo = new Demo();
demo.setDemoId(Convert.toStr(i + 1));
demo.setContentBody(contents.get(i));
String response = clientUtil.addDocument("demo", demo, "refresh=true");
log.debug("response: {}", response);
}
}
@GetMapping("/highlightSearch")
public List<Map<String, Object>> highlightSearch(@RequestParam String content) {
List<Map<String, Object>> list = new ArrayList<>();
ClientInterface clientUtil = ElasticSearchHelper.getConfigRestClientUtil(MAP_PATH);
Map<String, Object> params = new HashMap<>();
params.put("condition", content);
ESDatas<Demo> esDatas = clientUtil.searchList(
"demo/_search",
"testHighlightSearch",
params,
Demo.class
);
log.debug("esDatas: {}", esDatas);
// 获取总记录数
long totalSize = esDatas.getTotalSize();
log.debug("totalSize: {}", totalSize);
// 获取结果对象列表,最多返回1000条记录
List<Demo> demos = esDatas.getDatas();
log.debug("demos: {}", demos);
// maxScore
RestResponse restResponse = (RestResponse) esDatas.getRestResponse();
Double maxScore = restResponse.getSearchHits().getMaxScore();
log.debug("maxScore: {}", maxScore);
for (int i = 0; demos != null && i < demos.size(); i++) {
Demo demo = demos.get(i);
Double score = demo.getScore();
// 记录中匹配上检索条件的所有字段的高亮内容
Map<String, List<Object>> highLights = demo.getHighlight();
log.debug("highLights: {}", highLights);
Iterator<Map.Entry<String, List<Object>>> entries = highLights.entrySet().iterator();
while (entries.hasNext()) {
Map.Entry<String, List<Object>> entry = entries.next();
String fieldName = entry.getKey();
List<Object> fieldHighLightSegments = entry.getValue();
for (Object highLightSegment : fieldHighLightSegments) {
list.add(
MapUtil.builder(new HashMap<String, Object>())
.put("highlight", highLightSegment)
.put("score", NumberUtil.formatPercent(NumberUtil.div(score, maxScore), 2))
.build()
);
}
}
}
return list;
}
}
```
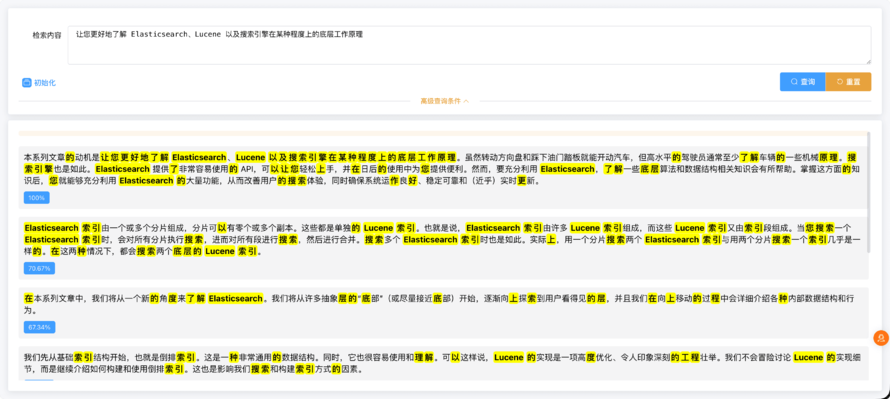
前端部分就略过了,主要看效果:
> 匹配度 = 当前得分 / 最大得分
## 五、中文分词支持(IK Analyzer)
发现中文没分词,默认是按单个字匹配。验证下:
```http
POST /demo/_analyze
{
"field": "contentbody",
"text": "搜索引擎"
}
```
果然,默认没有中文分词。
### 1. 安装 **analysis-ik** 插件
```shell
# 进入docker容器
docker exec -it elasticsearch bash
# 注意跟es版本一致,不要高于es版本
elasticsearch-plugin install https://get.infini.cloud/elasticsearch/analysis-ik/8.19.6
# 重启
exit
docker restart elasticsearch
# 验证
docker exec -it elasticsearch bash
elasticsearch-plugin list
```
### 2. 修改索引映射:
```xml
// resources/esmapper/demo.xml
<properties>
<property name="createDemoIndice">
...
"contentBody": {
"type": "text",
"analyzer": "ik_max_word",
"search_analyzer": "ik_max_word"
}
...
</property>
<property name="testHighlightSearch" cacheDsl="false">
...
"match" : {
"contentBody" : {
"query" : #[condition],
"analyzer": "ik_max_word"
}
}
...
</property>
<!-- 分词查询 -->
<property name="analyzeQuery" cacheDsl="false">
<![CDATA[
{
##"analyzer": "standard",
"analyzer": "ik_max_word",
"text": #[condition]
}
]]>
</property>
</properties>
```
### 3. 控制器代码
```java
@GetMapping("/analyze")
public String analyze(@RequestParam String content) {
ClientInterface clientUtil = ElasticSearchHelper.getConfigRestClientUtil(MAP_PATH);
String result = clientUtil.executeHttp("demo/_analyze",
"analyzeQuery",
MapUtil.of("condition", content),
ClientInterface.HTTP_POST
);
System.out.println("result: " + result);
return result;
}
```
重启项目、重新初始化数据,再搜索一下,完美分词 ✅
## 六、效果展示
至此,一个小巧的 **Elasticsearch 高亮搜索 + 匹配度演示 Demo** 就完成了。
下周领导要看效果?没问题,稳妥得很 😎

来自 “ ITPUB博客 ” ,链接:https://blog.itpub.net/70047890/viewspace-3101209/ ,如需转载,请注明出处,否则将追究法律责任。

最新文章
- 不只是“多线程下载”:Hydra,一款真正懂得抢速度的开源下载器
- 一个命令告诉你「这个进程为什么会运行」!比 ps、lsof 更直观的神器:witr
- 告别 IDM!这款 1.5 万 Star 的开源下载神器,让下载速度直接起飞
- 一款“终端里的监控中心”:Glances 让系统状态一目了然
- Mac 上原生开发的开源免费、尽享丝滑数据库工具
- 告别 ELK 全家桶!OpenObserve:一个二进制搞定日志、指标、链路追踪
- 阿里开源的 AI 代码审查工具 open-code-review 来了
- Claude Code 原生终端仪表盘
- 你的 AI 编程 CLI 配置管理工具来了
- macOS 原生定时任务应用,简洁优雅、所见所得
