前提
* JDK1.8
* SpringCloud Greenwich.RELEASE
* SpringBoot 2.1.8.RELEASE
注
先看一下项目结构
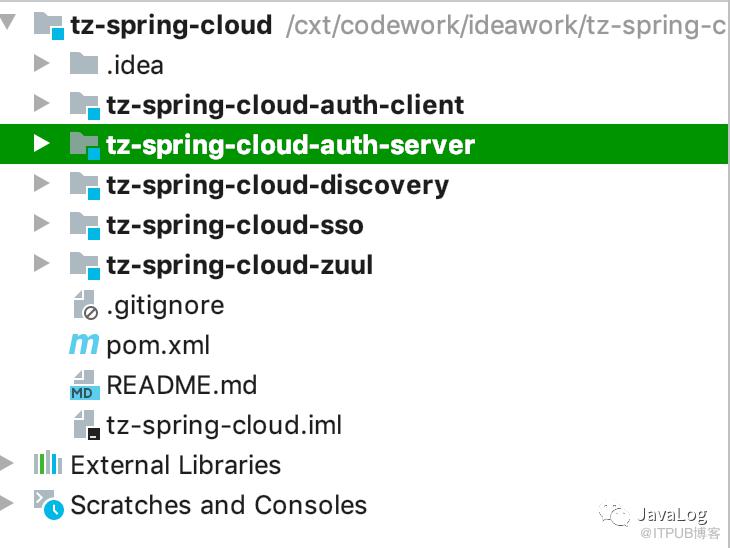
现在开始搭建,首先建立一个maven项目,即父maven工程,pom文件内容如下
<parent><artifactId>spring-boot-starter-parent</artifactId><groupId>org.springframework.boot</groupId><version>2.1.8.RELEASE</version></parent><properties><project.build.sourceEncoding>UTF-8</project.build.sourceEncoding><project.reporting.outputEncoding>UTF-8</project.reporting.outputEncoding><java.version>1.8</java.version><mysql.version>8.0.16</mysql.version></properties><packaging>pom</packaging><dependencyManagement><dependencies><!-- 控制spring-cloud版本 --><dependency><groupId>org.springframework.cloud</groupId><artifactId>spring-cloud-dependencies</artifactId><version>Greenwich.RELEASE</version><type>pom</type><scope>import</scope></dependency><dependency><groupId>javax.servlet</groupId><artifactId>javax.servlet-api</artifactId><version>3.1.0</version><scope>provided</scope></dependency><dependency><groupId>com.alibaba</groupId><artifactId>fastjson</artifactId><version>1.2.54</version></dependency><dependency><groupId>org.projectlombok</groupId><artifactId>lombok</artifactId><version>1.18.10</version></dependency><dependency><groupId>mysql</groupId><artifactId>mysql-connector-java</artifactId><version>8.0.18</version></dependency><dependency><groupId>org.springframework.security</groupId><artifactId>spring-security-jwt</artifactId><version>1.0.11.RELEASE</version></dependency><dependency><groupId>org.springframework.security.oauth.boot</groupId><artifactId>spring-security-oauth2-autoconfigure</artifactId><version>2.0.1.RELEASE</version></dependency></dependencies></dependencyManagement><dependencies><dependency><groupId>mysql</groupId><artifactId>mysql-connector-java</artifactId><version>${mysql.version}</version><scope>runtime</scope></dependency><!--druid依赖--><dependency><groupId>com.alibaba</groupId><artifactId>druid</artifactId><version>1.1.3</version></dependency><dependency><groupId>com.baomidou</groupId><artifactId>mybatis-plus-boot-starter</artifactId><version>3.2.0</version></dependency><!--代码生成--><dependency><groupId>com.baomidou</groupId><artifactId>mybatis-plus-generator</artifactId><version>3.2.0</version></dependency><!--swagger 文档注释--><dependency><groupId>io.springfox</groupId><artifactId>springfox-swagger2</artifactId><version>2.7.0</version></dependency><dependency><groupId>io.springfox</groupId><artifactId>springfox-swagger-ui</artifactId><version>2.7.0</version></dependency><!--swagger--><!--fast-json--><dependency><groupId>com.alibaba</groupId><artifactId>fastjson</artifactId></dependency><!--lombok--><dependency><groupId>org.projectlombok</groupId><artifactId>lombok</artifactId></dependency><!--log4j druid使用--><dependency><groupId>log4j</groupId><artifactId>log4j</artifactId><version>1.2.17</version></dependency><!--健康检查--><dependency><groupId>org.springframework.boot</groupId><artifactId>spring-boot-starter-actuator</artifactId></dependency></dependencies>
此处引入了基本都需要使用的依赖,并使用dependencyManagement 固定使用依赖的版本
下面开始搭建授权服务
新建springBoot工程,pom如下,指定父pom为上面的文件,并引入auth需要的jar包,
<parent><groupId>com.tz</groupId><artifactId>spring-cloud</artifactId><version>1.0-SNAPSHOT</version></parent><dependencies><dependency><groupId>org.springframework.cloud</groupId><artifactId>spring-cloud-starter-netflix-eureka-client</artifactId></dependency><dependency><groupId>org.springframework.boot</groupId><artifactId>spring-boot-starter-web</artifactId></dependency><dependency><groupId>org.springframework.boot</groupId><artifactId>spring-boot-starter-freemarker</artifactId></dependency><dependency><groupId>org.springframework.boot</groupId><artifactId>spring-boot-starter-test</artifactId><scope>test</scope></dependency><!-- 断路器 --><dependency><groupId>org.springframework.cloud</groupId><artifactId>spring-cloud-starter-netflix-hystrix</artifactId></dependency><dependency><groupId>com.netflix.hystrix</groupId><artifactId>hystrix-javanica</artifactId></dependency><!-- ribbon --><dependency><groupId>org.springframework.cloud</groupId><artifactId>spring-cloud-starter-netflix-ribbon</artifactId></dependency><!-- feign --><dependency><groupId>org.springframework.cloud</groupId><artifactId>spring-cloud-starter-openfeign</artifactId></dependency><!-- 重试机制 --><dependency><groupId>org.springframework.retry</groupId><artifactId>spring-retry</artifactId></dependency><dependency><groupId>org.springframework.data</groupId><artifactId>spring-data-commons</artifactId></dependency><dependency><groupId>org.springframework.cloud</groupId><artifactId>spring-cloud-starter-security</artifactId></dependency><dependency><groupId>org.springframework.cloud</groupId><artifactId>spring-cloud-starter-oauth2</artifactId></dependency><dependency><groupId>org.springframework.security</groupId><artifactId>spring-security-jwt</artifactId></dependency><dependency><groupId>javax.interceptor</groupId><artifactId>javax.interceptor-api</artifactId><version>1.2</version></dependency></dependencies>
配置AuthorizationServer
public class AuthorizationServer extends AuthorizationServerConfigurerAdapter {/*** 令牌存储*/private TokenStore tokenStore;/*** 客户端管理*/private ClientDetailsService clientDetailsService;private AuthorizationCodeServices authorizationCodeServices;private AuthenticationManager authenticationManager;/*** A 配置客户端详情,支持哪些客户端* @param clients* @throws Exception*/public void configure(ClientDetailsServiceConfigurer clients) throws Exception {clients.inMemory()// 客户端id.withClient("c1")// 客户端密钥.secret(new BCryptPasswordEncoder().encode("secret"))// 资源列表.resourceIds("res1")// 该client允许的授权类型,.authorizedGrantTypes("authorization_code","password","client_credentials","implicit","refresh_token")// 允许的授权范围,就是一个标识,read,write.scopes("all").autoApprove(false)// 验证回调地址.redirectUris("http://www.baidu.com");}/*** B 令牌访问端点,即url* @param endpoints* @throws Exception*/public void configure(AuthorizationServerEndpointsConfigurer endpoints) throws Exception {endpoints// 密码模式需要.authenticationManager(authenticationManager)// 授权码模式需要.authorizationCodeServices(authorizationCodeServices)// 令牌管理服务.tokenServices(tokenServices())//允许post提交.allowedTokenEndpointRequestMethods(HttpMethod.POST);}/*** C 配置令牌端点 安全约束* @param security* @throws Exception*/public void configure(AuthorizationServerSecurityConfigurer security) throws Exception {security// /oauth/token_key url 公开.tokenKeyAccess("permitAll()")// /oauth/check_token 公开.checkTokenAccess("permitAll()")// 表单验证,申请令牌.allowFormAuthenticationForClients();}/*** D 定义tokenServices* @return*/public AuthorizationServerTokenServices tokenServices(){DefaultTokenServices services = new DefaultTokenServices();services.setClientDetailsService(clientDetailsService);services.setSupportRefreshToken(true);services.setTokenStore(tokenStore);// 令牌默认有限期2小时services.setAccessTokenValiditySeconds(7200);// 刷新令牌默认有限期3天services.setRefreshTokenValiditySeconds(259200);return services;}/*** 设置授权码如何存储* @param* @return*/public AuthorizationCodeServices authorizationCodeServices() {return new InMemoryAuthorizationCodeServices();}}
定义令牌存储方式,TokenConfig
public class TokenConfig {/*** 令牌存储测试*/public TokenStore tokenStore(){// 内存方式,普通令牌return new InMemoryTokenStore();}}
定义web配置,配置拦截url
(securedEnabled = true,prePostEnabled = true)public class WebSecurityConfig extends WebSecurityConfigurerAdapter {/*** 认证管理器* @return* @throws Exception*/public AuthenticationManager authenticationManager() throws Exception{return super.authenticationManager();}/*** 密码编码器* @return*/public PasswordEncoder passwordEncoder(){return new BCryptPasswordEncoder();}/*** D 安全拦截机制* @param http* @throws Exception*/protected void configure(HttpSecurity http) throws Exception {// 关闭csrfhttp.csrf().disable()// 开启验证.authorizeRequests()// 访问/r/r1需要p1.antMatchers("/r/r1").hasAnyAuthority("p1")// login* 不需要拦截.antMatchers("/login*").permitAll()// 其他的url都需要拦截.anyRequest().authenticated().and()// 支持表单登录.formLogin();}}
application.properties
因为引入了数据源,所以此处需要配置,但是此时没有用到,后续用到时使用
spring.application.name=oauth-serverserver.port=8762spring.main.allow-bean-definition-overriding=truelogging.level.root = infologgin.level.org.springframework.web = infoserver.servlet.context-path=/oauth# 数据源配置 startspring.datasource.url=jdbc:mysql://localhost:3306/springcloud-oauth2?useUnicode=truespring.datasource.username=rootspring.datasource.password=rootspring.datasource.driver-class-name=com.mysql.cj.jdbc.Driverspring.datasource.type=com.alibaba.druid.pool.DruidDataSource#durid登陆账号密码loginUsername=rootloginPassword=root# 下面为连接池的补充设置,应用到上面所有数据源中spring.datasource.initialSize=5spring.datasource.minIdle=5spring.datasource.maxActive=20# 配置获取连接等待超时的时间spring.datasource.maxWait=60000# 配置间隔多久才进行一次检测,检测需要关闭的空闲连接,单位是毫秒spring.datasource.timeBetweenEvictionRunsMillis=60000# 配置一个连接在池中最小生存的时间,单位是毫秒spring.datasource.minEvictableIdleTimeMillis=300000spring.datasource.validationQuery=SELECT 1 FROM DUALspring.datasource.testWhileIdle=truespring.datasource.testOnBorrow=falsespring.datasource.testOnReturn=false# 配置监控统计拦截的filters,去掉后监控界面sql无法统计,'wall'用于防火墙,防止sql注入spring.datasource.filters=stat,wall,log4jspring.datasource.logSlowSql=true# 数据源配置endeureka.client.enabled=falseeureka.client.allow-redirects=falseeureka.client.serviceUrl.defaultZone = http://localhost:8761/eureka/eureka.instance.preferIpAddress = trueeureka.instance.instance-id = ${spring.application.name}:${spring.cloud.client.ip-address}:${spring.application.instance_id:${server.port}}management.endpoints.web.exposure.include=refresh,health,info,envfeign.hystrix.enabled=truefeign.compression.request.enabled=truefeign.compression.request.mime-types[0]=text/htmlfeign.compression.request.mime-types[1]=application/xmlfeign.compression.request.mime-types[2]=application/jsonfeign.compression.request.min-request-size=2048feign.compression.response.enabled=true#mybatis-plus配置控制台打印完整带参数SQL语句#mybatis-plus.configuration.log-impl=org.apache.ibatis.logging.stdout.StdOutImplsecurity.oauth2.client.access-token-uri=http://localhost:8762/auth/oauth/tokensecurity.oauth2.client.user-authorization-uri=http://localhost:8762/auth/oauth/authorizesecurity.oauth2.client.authorized-grant-types=authorization_codesecurity.oauth2.resource.user-info-uri=http://localhost:8780/dashboard/user
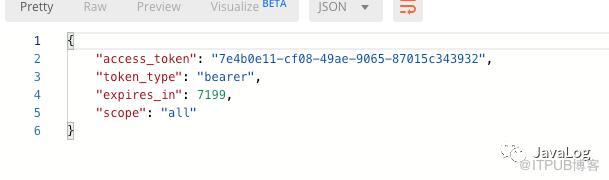
客户端模式,post 请求获取token
http://127.0.0.1:8762/oauth/oauth/token?client_id=c1&client_secret=secret&grant_type=client_credentials返回结果如下
用户名密码模式
定义userDetailService
public class MyUserDetailService implements UserDetailsService {public UserDetails loadUserByUsername(String username) throws UsernameNotFoundException {// 用户名tz,密码123UserDetails userDetails = User.withUsername("tz").password("$2a$10$pTffBwh9mawjeGG9K5ZhbenBfWQRV1aFVgZqVt59eM67iJhDqARyG").authorities("p1").build();return userDetails;}
加密的密码生成,生成的密码每次都不一样,但是都代表123
@Testpublic void createBCryptPw(){String gensalt = BCrypt.gensalt();System.out.println(gensalt);String hashpw = BCrypt.hashpw("123", gensalt);System.out.println(hashpw);}
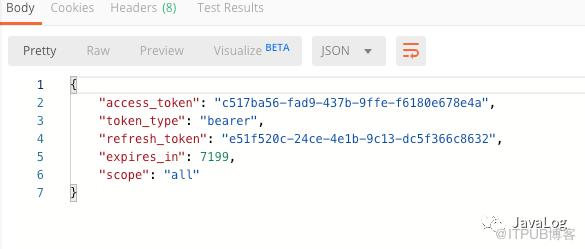
用户名密码 post 请求,会返回refresh_token
http://127.0.0.1:8762/oauth/oauth/token?client_id=c1&client_secret=secret&username=tz&password=123&grant_type=password返回结果
好了,授权服务器简单模式搭建完成,详细点击原文链接查看README,欢迎继续关注下一篇客户资源服务器搭建
原文作者:醉鱼Java;如有侵权,请联系管理员删除。

请登录后发表评论
登录
全部评论
