上一篇文章我们使用SpringCloud实现了Oauth2.0的认证服务器
这一篇我们开始搭建一个资源服务器,通过认证的服务来进行资源的访问
创建资源服务resource-service
pom完整如下
<project xmlns="http://maven.apache.org/POM/4.0.0" xmlns:xsi="http://www.w3.org/2001/XMLSchema-instance"xsi:schemaLocation="http://maven.apache.org/POM/4.0.0 https://maven.apache.org/xsd/maven-4.0.0.xsd"><modelVersion>4.0.0</modelVersion><parent><groupId>com.tz</groupId><artifactId>demo</artifactId><version>1.0-SNAPSHOT</version></parent><artifactId>client</artifactId><version>0.0.1-SNAPSHOT</version><name>client</name><description>资源服务</description><properties><java.version>1.8</java.version></properties><dependencies><dependency><groupId>org.springframework.boot</groupId><artifactId>spring-boot-starter-web</artifactId></dependency><dependency><groupId>org.springframework.boot</groupId><artifactId>spring-boot-starter-test</artifactId><scope>test</scope></dependency><dependency><groupId>org.springframework.cloud</groupId><artifactId>spring-cloud-starter-netflix-eureka-client</artifactId></dependency><dependency><groupId>org.springframework.cloud</groupId><artifactId>spring-cloud-starter-security</artifactId></dependency><dependency><groupId>org.springframework.cloud</groupId><artifactId>spring-cloud-starter-oauth2</artifactId></dependency><!-- feign --><dependency><groupId>org.springframework.cloud</groupId><artifactId>spring-cloud-starter-openfeign</artifactId></dependency><dependency><groupId>javax.interceptor</groupId><artifactId>javax.interceptor-api</artifactId><version>1.2</version></dependency></dependencies><build><plugins><plugin><groupId>org.springframework.boot</groupId><artifactId>spring-boot-maven-plugin</artifactId></plugin></plugins></build></project>
配置controller资源url
/*** r1 需要p1权限才可以访问,r2需要p2访问*/public String r1() {Object username = SecurityContextHolder.getContext().getAuthentication().getPrincipal();return username+ "访问资源r1";}public String r2(){return "访问资源r2";}
配置拦截进行验证ResourceServerConfig
package com.tz.client.config;import org.springframework.beans.factory.annotation.Autowired;import org.springframework.boot.SpringBootConfiguration;import org.springframework.context.annotation.Bean;import org.springframework.security.config.annotation.web.builders.HttpSecurity;import org.springframework.security.config.http.SessionCreationPolicy;import org.springframework.security.oauth2.config.annotation.web.configuration.EnableResourceServer;import org.springframework.security.oauth2.config.annotation.web.configuration.ResourceServerConfigurerAdapter;import org.springframework.security.oauth2.config.annotation.web.configurers.ResourceServerSecurityConfigurer;import org.springframework.security.oauth2.provider.token.RemoteTokenServices;import org.springframework.security.oauth2.provider.token.ResourceServerTokenServices;import org.springframework.security.oauth2.provider.token.TokenStore;/*** 资源配置* @author tz*/public class ResourceServerConfig extends ResourceServerConfigurerAdapter {/*** 资源id*/private static final String RESOURCES_ID = "res1";public void configure(ResourceServerSecurityConfigurer resources) throws Exception {resources// 资源id.resourceId(RESOURCES_ID)// 验证令牌的服务.tokenServices(tokenServices()).stateless(true);}public void configure(HttpSecurity http) throws Exception {http.authorizeRequests().antMatchers("/**").access("#oauth2.hasScope('all')").and().csrf().disable().sessionManagement().sessionCreationPolicy(SessionCreationPolicy.STATELESS);}/*** 令牌验证*/public ResourceServerTokenServices tokenServices(){// 使用远程服务请求校验token,指定校验token的url,client_id,client_secretRemoteTokenServices remoteTokenServices = new RemoteTokenServices();remoteTokenServices.setCheckTokenEndpointUrl("http://127.0.0.1:8762/oauth/oauth/check_token");remoteTokenServices.setClientId("c1");remoteTokenServices.setClientSecret("secret");return remoteTokenServices;}}
定义token存储方式
package com.tz.client.config;import org.springframework.context.annotation.Bean;import org.springframework.context.annotation.Configuration;import org.springframework.security.oauth2.provider.token.TokenStore;import org.springframework.security.oauth2.provider.token.store.InMemoryTokenStore;import org.springframework.security.oauth2.provider.token.store.JwtAccessTokenConverter;import org.springframework.security.oauth2.provider.token.store.JwtTokenStore;/*** @author tz* @Classname TokenConfig* @Description* @Date 2019-12-24 16:16*/public class TokenConfig {/*** 令牌存储测试*/public TokenStore tokenStore(){// 内存方式,普通令牌return new InMemoryTokenStore();}}
application.yml配置
spring:application:name: client-servicemain:: truehttp:encoding:enabled: truecharset: UTF-8force: truefreemarker:enabled: truesuffix: .html: rc: text/htmlcharset: UTF-8mvc:: trueresources:: falsedatasource:url: jdbc:mysql://localhost:3306/springcloud-oauth2?useUnicode=trueusername: rootpassword: root: com.mysql.cj.jdbc.Drivereureka:client:enabled: false:defaultZone: http://localhost:8761/eureka/instance:: true: ${spring.application.name}:${spring.cloud.client.ip-address}:${spring.application.instance_id:${server.port}}server:port: 8764tomcat:: x-forwarded-for: x-forwarded-proto: trueservlet:: /clientlogging:level:root: infoorg:springframework:web: info
启动上一篇文章搭建的auth-server,刚刚搭建的client-server
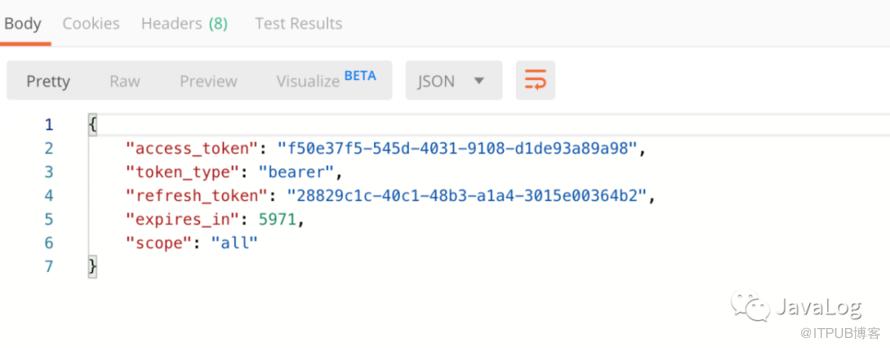
访问申请令牌
http://127.0.0.1:8762/oauth/oauth/token?client_id=c1&client_secret=secret&username=tz&password=123&grant_type=password
使用access_token访问资源
localhost:8764/client/r/r1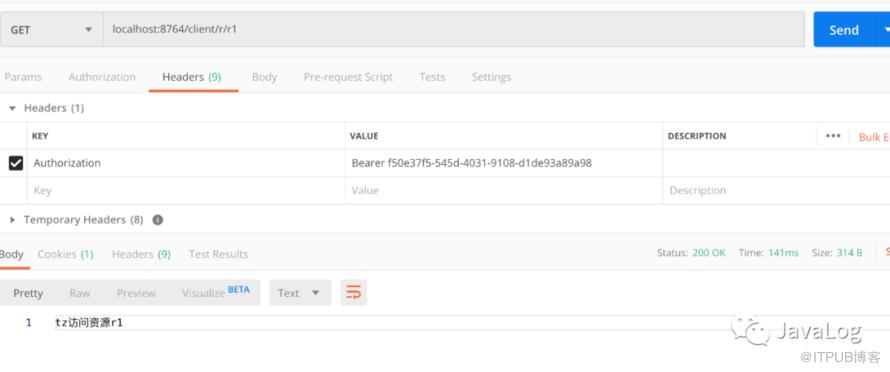
可以看到已经能够成功访问,到此简单的demo就搭建完成了。完成详细代码以及mysql存储客户端详情,token令牌详见github
https://github.com/TianPuJun/spring-cloud-init
原文作者:醉鱼Java;如有侵权,请联系管理员删除。

请登录后发表评论
登录
全部评论
