
- 前言 -
随着微服务的流行,服务和服务之间的稳定性变得越来越重要。Sentinel 以流量为切入点,从流量控制、熔断降级、系统负载保护等多个维度保护服务的稳定性。

- Sentinel 介绍 -
1、理论篇
以下是经过多年分布式经验总结的两个理论基础:
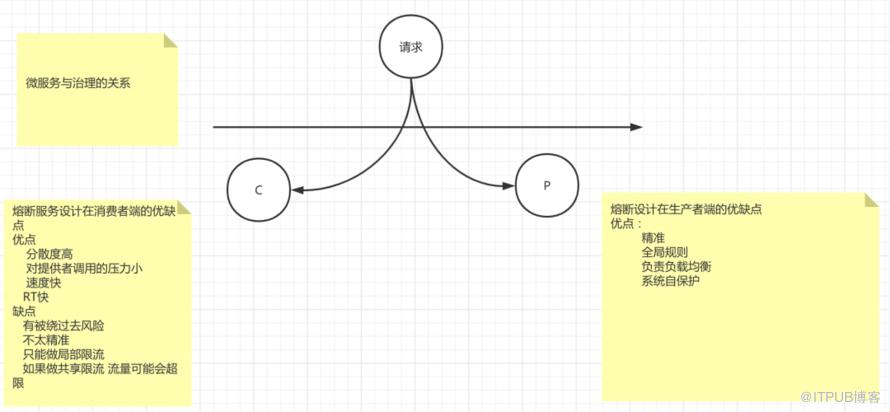
(1)微服务与治理的关系
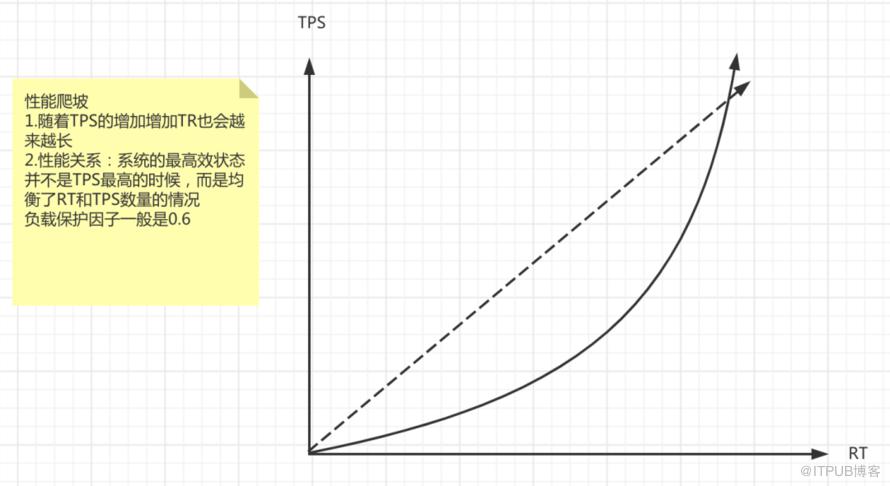
(2)爬坡理论
我们今天的主题分为以下两个主要部分:
Sentinel设计原理
Sentinel运行流程源码剖析

- Sentinel 设计原理 -
1、特性
丰富的应用场景:阿里 10 年双十一积累场景,含秒杀、双十一零点持续洪峰、热点商品探测、预热、消息队列削峰填谷、集群流量控制、实时熔断下游不可用应用等多样化的场景。
广泛的开源生态:提供开箱即用的与其它开源框架/库的整合模块,如Dubbo、Spring Cloud、gRPC、Zuul、Reactor 等。
完善的 SPI 扩展点:提供简单易用、完善的 SPI 扩展接口;可通过实现扩展接口来快速地定制逻辑。
完备的实时监控:提供实时的监控功能,可看到接入应用的单台机器秒级数据,及500 台以下规模的集群汇总运行情况。
2、核心关键点
(1)资源:限流的对象
如下代码/user/select即为一个资源:
即被SentinelResource注解修饰的API:
(2)入口:sentinel为每个资源创建一个Entry。
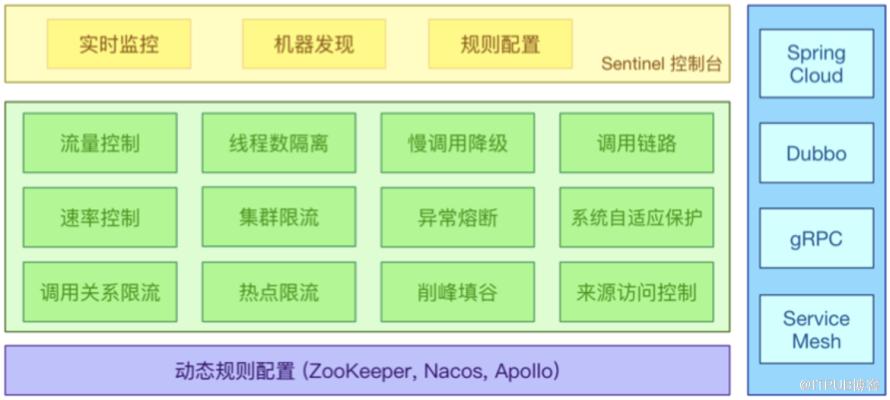
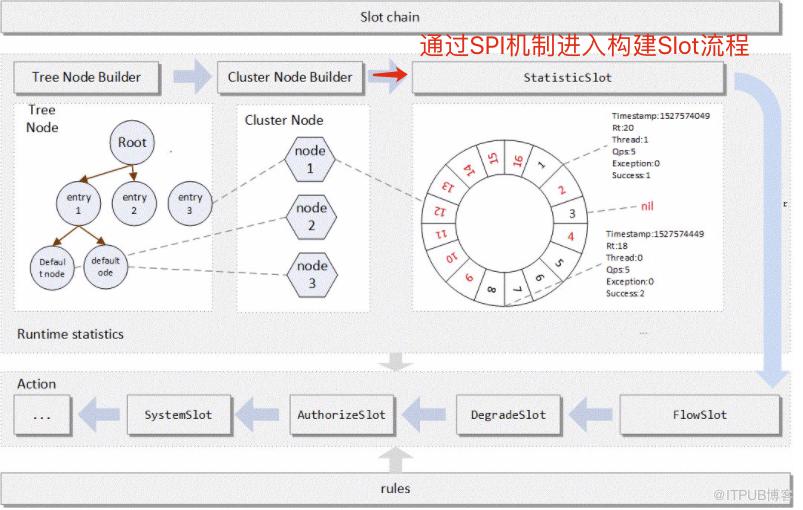
(3)槽链:每个Entry都会有一条用于记录限流以及各种控制的信息Slot chain,以此来实现下图中绿色部分的功能。

- Sentinel 运行流程源码剖析 -
此图为官网全局流程图,接下来我们通过源码,分解该过程:

1、入口处
核心代码 SphU#lookProcessChain(ResourceWrapper resourceWrapper)
2、入口逻辑
3、上下文信息
Context
Context是当前线程所持有的Sentinel上下文。
进入Sentinel的逻辑时,会首先获取当前线程的Context,如果没有则新建。当任务执行完毕后,会清除当前线程的context。Context 代表调用链路上下文,贯穿一次调用链路中的所有 Entry。
Context 维持着入口节点(entranceNode)、本次调用链路的 当前节点(curNode)、调用来源(origin)等信息。Context 名称即为调用链路入口名称。
Node
Node是对一个@SentinelResource标记的资源的统计包装。
Context中记录本当前线程资源调用的入口节点。
我们可以通过入口节点的childList,可以追溯资源的调用情况。而每个节点都对应一个@SentinelResource标记的资源及其统计数据,例如:passQps,blockQps,rt等数据。
Entry
Entry是Sentinel中用来表示是否通过限流的一个凭证,如果能正常返回,则说明你可以访问被Sentinel保护的后方服务,否则Sentinel会抛出一个BlockException。
另外,它保存了本次执行entry()方法的一些基本信息,包括资源的Context、Node、对应的责任链等信息,后续完成资源调用后,还需要更具获得的这个Entry去执行一些善后操作,包括退出Entry对应的责任链,完成节点的一些统计信息更新,清除当前线程的Context信息等。
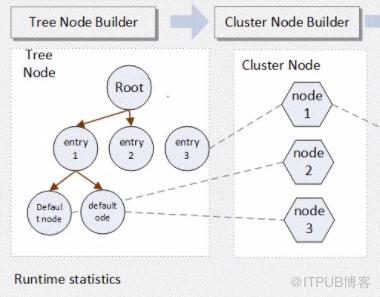
在构建Context时已经完成下图部分:
4、核心流程
这里有两个需要注意的点:
ProcessorSlot chain = lookProcessChain(resourceWrapper); 构建链路。
chain.entry(context, resourceWrapper, null, count, prioritized, args); 进行链路调用首先来看链路是如何构建的。
5、获取槽链
已有直接获取;
没有去创建。
6、创建槽链
SlotChainProvider.newSlotChain();
7、SPI加载ProcessorSlot
这里采用了spi的机制来扩展SlotChainBuilder,默认是采用DefaultSlotChainBuilder来实现的,可以看到sentinel源码的sentinel-core包下,META-INF/services/com.alibaba.csp.sentinel.slotchain.SlotChainBuilder文件下,默认属性是:
所以默认采用DefaultSlotChainBuilder来构建链路,因此找到DefaultSlotChainBuilder.build()方法。
8、DefaultSlotChainBuilder
9、遍历ProcessorSlots
这里也是通过spi的机制,读取文件META-INF/services/com.alibaba.csp.sentinel.slotchain.ProcessorSlot:
从这里看出,链路由这些节点组成,而slot之间的顺序是根据每个slot节点的@SpiOrder注解的值来确定的。
NodeSelectorSlot -> ClusterBuilderSlot -> LogSlot -> StatisticSlot -> AuthoritySlot -> SystemSlot -> FlowSlot -> DegradeSlot

- 链路调用 -
chain.entry(…)
上面已经构建好了链路,下面就要开始进行链路的调用了。
回到CtSph#entryWithPriority
1、NodeSelectorSlot
NodeSelectorSlot(@SpiOrder(-10000))
直接进入NodeSelectorSlot类的entry方法。
根据官方文档,NodeSelectorSlot类的作用为:
负责收集资源的路径,并将这些资源的调用路径,以树状结构存储起来,用于根据调用路径来限流降级。
2、ClusterBuilderSlot
ClusterBuilderSlot(@SpiOrder(-9000))
根据官方文档,ClusterBuilderSlot的作用为:
此插槽用于构建资源的 ClusterNode 以及调用来源节点。ClusterNode 保持某个资源运行统计信息(响应时间、QPS、block 数目、线程数、异常数等)以及调用来源统计信息列表。调用来源的名称由 ContextUtil.enter(contextName,origin) 中的 origin 标记。
3、LogSlot
LogSlot(@SpiOrder(-8000))
该类对链路的传递不做处理,只有在抛出BlockException的时候,向上层层传递的过程中,会通过该类来输入一些日志信息:
4、StatisticSlot
StatisticSlot(@SpiOrder(-7000))
官方文档:
StatisticSlot用于记录、统计不同纬度的 runtime 指标监控信息。
StatisticSlot 会先将链往下执行,等到后面的节点全部执行完毕,再进行数据统计。
5、AuthoritySlot
@SpiOrder(-6000)
AuthoritySlot
官方文档:
AuthoritySlot:根据配置的黑白名单和调用来源信息,来做黑白名单控制。
6、SystemSlot
@SpiOrder(-5000)
SystemSlot
官方文档:
SystemSlot:这个 slot 会根据对于当前系统的整体情况,对入口资源的调用进行动态调配。其原理是让入口的流量和当前系统的预计容量达到一个动态平衡。
@Override
public void entry(Context context, ResourceWrapper resourceWrapper, DefaultNode node, int count,
                  boolean prioritized, Object... args) throws Throwable {
    // 系统规则校验
    SystemRuleManager.checkSystem(resourceWrapper);
    fireEntry(context, resourceWrapper, node, count, prioritized, args);
}
7、FlowSlot 限流规则引擎
@SpiOrder(-2000)
FlowSlot
官方文档:
这个 slot 主要根据预设的资源的统计信息,按照固定的次序,依次生效。如果一个资源对应两条或者多条流控规则,则会根据如下次序依次检验,直到全部通过或者有一个规则生效为止:
指定应用生效的规则,即针对调用方限流的;
调用方为 other 的规则;
调用方为 default 的规则。

- 入口 -
@Override
public void entry(Context context, ResourceWrapper resourceWrapper, DefaultNode node, int count,
                  boolean prioritized, Object... args) throws Throwable {
    // 检查限流规则
    checkFlow(resourceWrapper, context, node, count, prioritized);

    fireEntry(context, resourceWrapper, node, count, prioritized, args);
}

void checkFlow(ResourceWrapper resource, Context context, DefaultNode node, int count, boolean prioritized)
    throws BlockException {
    checker.checkFlow(ruleProvider, resource, context, node, count, prioritized);
}
1、所有规则检查
调用了FlowRuleChecker.checkFlow(…)方法。
public void checkFlow(Function<String, Collection<FlowRule>> ruleProvider, ResourceWrapper resource,
                      Context context, DefaultNode node, int count, boolean prioritized) throws BlockException {
    if (ruleProvider == null || resource == null) {
        return;
    }
    // 根据资源名称找到对应的
    Collection<FlowRule> rules = ruleProvider.apply(resource.getName());
    if (rules != null) {
        // 遍历规则,依次判断是否通过
        for (FlowRule rule : rules) {
            if (!canPassCheck(rule, context, node, count, prioritized)) {
                throw new FlowException(rule.getLimitApp(), rule);
            }
        }
    }
}
2、单个规则检查
public boolean canPassCheck(/*@NonNull*/ FlowRule rule, Context context, DefaultNode node, int acquireCount,
                                                boolean prioritized) {
    String limitApp = rule.getLimitApp();
    if (limitApp == null) {
        return true;
    }
    // 集群限流的判断
    if (rule.isClusterMode()) {
        return passClusterCheck(rule, context, node, acquireCount, prioritized);
    }
    // 本地节点的判断
    return passLocalCheck(rule, context, node, acquireCount, prioritized);
}
3、非集群模式的限流判断
private static boolean passLocalCheck(FlowRule rule, Context context, DefaultNode node, int acquireCount,
                                      boolean prioritized) {
    // 根据请求的信息及策略,选择不同的node节点
    Node selectedNode = selectNodeByRequesterAndStrategy(rule, context, node);
    if (selectedNode == null) {
        return true;
    }
    // 根据当前规则,获取规则控制器,调用canPass方法进行判断
//        rule.getRater()放回的是TrafficShapingController接口的实现类,使用了策略模式,根据使用的控制措施来选择使用哪种实现。
    return rule.getRater().canPass(selectedNode, acquireCount, prioritized);
}
这里是先根据请求和当前规则的策略,找到该规则下存储统计信息的节点,然后根据当前规则获取相应控制器,通过控制器的canPass(…)方法进行判断。
4、获取节点
static Node selectNodeByRequesterAndStrategy(/*@NonNull*/ FlowRule rule, Context context, DefaultNode node) {
    // The limit app should not be empty.
    String limitApp = rule.getLimitApp();
    int strategy = rule.getStrategy();
    String origin = context.getOrigin();

    // 判断调用来源,这种情况下origin不能为default或other
    if (limitApp.equals(origin) && filterOrigin(origin)) {
        // 如果调用关系策略为STRATEGY_DIRECT,表示仅判断自己,则返回origin statistic node.
        if (strategy == RuleConstant.STRATEGY_DIRECT) {
            // Matches limit origin, return origin statistic node.
            return context.getOriginNode();
        }

        // 采用调用来源进行判断的策略
        return selectReferenceNode(rule, context, node);
    } else if (RuleConstant.LIMIT_APP_DEFAULT.equals(limitApp)) { // 如果调用来源为default默认的
        if (strategy == RuleConstant.STRATEGY_DIRECT) { // 如果调用关系策略为STRATEGY_DIRECT,则返回clusterNode
            // Return the cluster node.
            return node.getClusterNode();
        }

        return selectReferenceNode(rule, context, node);
    } else if (RuleConstant.LIMIT_APP_OTHER.equals(limitApp)
        && FlowRuleManager.isOtherOrigin(origin, rule.getResource())) { // 如果调用来源为other,且调用来源不在限制规则内,为其他来源
        if (strategy == RuleConstant.STRATEGY_DIRECT) {
            return context.getOriginNode();
        }
        return selectReferenceNode(rule, context, node);
    }
    return null;
}
5、流量整形控制器
rule.getRater()方法会返回一个控制器,接口为TrafficShapingController,该接口的实现类图如下:

从类图可以看出,是很明显的策略模式,分别针对不同的限流控制策略。
1、默认策略
DefaultController该策略是sentinel的默认策略,如果请求超出阈值,则直接拒绝请求。
@Override
public boolean canPass(Node node, int acquireCount, boolean prioritized) {
    // 当前已经统计的数
    int curCount = avgUsedTokens(node);
    if (curCount + acquireCount > count) {
        // 如果是高优先级的,且是基于qps的限流方式,则可以尝试从下个未来的滑动窗口中预支
        if (prioritized && grade == RuleConstant.FLOW_GRADE_QPS) {
            long currentTime;
            long waitInMs;
            currentTime = TimeUtil.currentTimeMillis();
            // 从下个滑动窗口中提前透支
            waitInMs = node.tryOccupyNext(currentTime, acquireCount, count);
            if (waitInMs < OccupyTimeoutProperty.getOccupyTimeout()) {
                node.addWaitingRequest(currentTime + waitInMs, acquireCount);
                node.addOccupiedPass(acquireCount);
                sleep(waitInMs);

                // PriorityWaitException indicates that the request will pass after waiting for {@link @waitInMs}.
                throw new PriorityWaitException(waitInMs);
            }
        }
        return false;
    }
    return true;
}

private int avgUsedTokens(Node node) {
    if (node == null) {
        return DEFAULT_AVG_USED_TOKENS;
    }
    // 如果当前是线程数限流,则返回node.curThreadNum()当前线程数
    // 如果是QPS限流,则返回node.passQps()当前已经通过的qps数据
    return grade == RuleConstant.FLOW_GRADE_THREAD ? node.curThreadNum() : (int)(node.passQps());
}

private void sleep(long timeMillis) {
    try {
        Thread.sleep(timeMillis);
    } catch (InterruptedException e) {
        // Ignore.
    }
}
2、匀速排队策略
RateLimiterController
@Override
public boolean canPass(Node node, int acquireCount, boolean prioritized) {
    // Pass when acquire count is less or equal than 0.
    if (acquireCount <= 0) {
        return true;
    }
    // Reject when count is less or equal than 0.
    // Otherwise,the costTime will be max of long and waitTime will overflow in some cases.
    if (count <= 0) {
        return false;
    }

    long currentTime = TimeUtil.currentTimeMillis();
    // Calculate the interval between every two requests.
    // 计算两个请求之间的时间间隔
    long costTime = Math.round(1.0 * (acquireCount) / count * 1000);

    // Expected pass time of this request. 该请求的预计通过时间 = 上一次通过的时间 + 时间间隔
    long expectedTime = costTime + latestPassedTime.get();

    // 如果预计时间比当前时间小,表示可以请求完全可以通过
    if (expectedTime <= currentTime) {
        // Contention may exist here, but it's okay.
        // 这里可能存在竞争,但是不影响。
        latestPassedTime.set(currentTime);
        return true;
    } else {
        // Calculate the time to wait.
        // 计算等待时间
        long waitTime = costTime + latestPassedTime.get() - TimeUtil.currentTimeMillis();
        // 如果等待时间超出了等待队列的最大时间,则无法放入等待队列,直接拒绝
        if (waitTime > maxQueueingTimeMs) {
            return false;
        } else {
            long oldTime = latestPassedTime.addAndGet(costTime);
            try {
                // 重新计算等待时间
                waitTime = oldTime - TimeUtil.currentTimeMillis();
                // 判断等待时间是否超过等待队列的最大时间,如果超过了,拒绝,并且将latestPassedTime最后一次请求时间重新设置为原值
                if (waitTime > maxQueueingTimeMs) {
                    latestPassedTime.addAndGet(-costTime);
                    return false;
                }
                // in race condition waitTime may <= 0
                // 线程等待
                if (waitTime > 0) {
                    Thread.sleep(waitTime);
                }
                return true;
            } catch (InterruptedException e) {
            }
        }
    }
    return false;
}
从代码可以看出,匀速排队策略是使用了虚拟队列的方法,通过控制阈值来计算出请求的时间间隔,然后将上一次请求的时间加上时间间隔,表示下一次请求的时间,如果当前时间比这个值大,说明已经超出时间间隔了,当然可以请求,反之,表示需要等待,那么等待的时长就应该是要等到当前时间达到预期时间才能请求,这里就有个虚拟的等待队列,而等待其实是通过线程的等待来实现的。而这里所说的虚拟队列实际上是由一系列的处于sleep状态的线程组成的,但是实际的数据结构上并没有构成队列。
3、预热/冷启动策略
WarmUpController
首先看WarmUpController的属性和构造方法:
// 阈值
protected double count;
/**
 * 冷启动的因子 ,默认为3 {@link SentinelConfig#coldFactor()}
 */
private int coldFactor;
// 转折点的令牌数
protected int warningToken = 0;
// 最大令牌数
private int maxToken;
// 折线初始斜率,标志流量的变化程度
protected double slope;

// 累积的令牌数 ,累积的令牌数越多,说明系统利用率越低,说明当前流量低,是冷状态
protected AtomicLong storedTokens = new AtomicLong(0);
// 最后更新令牌的时间
protected AtomicLong lastFilledTime = new AtomicLong(0);

public WarmUpController(double count, int warmUpPeriodInSec, int coldFactor) {
    construct(count, warmUpPeriodInSec, coldFactor);
}

public WarmUpController(double count, int warmUpPeriodInSec) {
    construct(count, warmUpPeriodInSec, 3);
}

/**
 * @param count             用户设定的阈值(这里假设设定为100)
 * @param warmUpPeriodInSec 默认为10
 * @param coldFactor        默认为3
 */
private void construct(double count, int warmUpPeriodInSec, int coldFactor) {

    if (coldFactor <= 1) {
        throw new IllegalArgumentException("Cold factor should be larger than 1");
    }

    this.count = count;

    this.coldFactor = coldFactor;

    // thresholdPermits = 0.5 * warmupPeriod / stableInterval.
    // warningToken = 100;

    // 按默认的warmUpPeriodInSec = 10,表示1秒钟10个请求,则每个请求为间隔stableInterval = 100ms,那么coldInterval=stableInterval * coldFactor = 100 * 3 = 300ms
    // warningToken = 10 * 100 / (3 - 1) = 500
    // thresholdPermits = warningToken = 0.5 * warmupPeriod / stableInterval = 0.5 * warmupPeriod / 100ms = 500 ==>> warmupPeriod = 100000ms
    warningToken = (int)(warmUpPeriodInSec * count) / (coldFactor - 1);

    // / maxPermits = thresholdPermits + 2 * warmupPeriod /
    // (stableInterval + coldInterval)
    // maxToken = 200

    // maxPermits = 500 + 2 * 100000ms / (100ms + 300ms) = 1000
    // maxToken = 500 + (2 * 10 * 100 / (1.0 + 3)) = 1000
    // maxPermits = maxToken
    maxToken = warningToken + (int)(2 * warmUpPeriodInSec * count / (1.0 + coldFactor));

    // slope
    // slope = (coldIntervalMicros - stableIntervalMicros) / (maxPermits
    // - thresholdPermits);

    // slope = (3 - 1.0) / 100 / (600 - 500) = 0.0002
    slope = (coldFactor - 1.0) / count / (maxToken - warningToken);

}
属性说明:
count: 用户设定的qps阈值。
coldFactor: 冷启动的因子,初始默认为3,通过SentinelConfig类的coldFactor()方法获取,这里会有个判断,如果启动因子小于等于1,则会设置为默认值3,因为如果是小于等于1,是没有意义的,就不是预热启动了。
warningToken:转折点的令牌数,当令牌数开始小于该值得时候,就要开启预热了。
maxToken:最大令牌数。
slope:折线的斜率。
storedTokens:当前存储的令牌数。
lastFilledTime:上一次更新令牌的时间。
总体思路:当系统存储的令牌为最大值时,说明系统访问流量较低,处于冷状态,这时候当有正常请求过来时,会让请求通过,并且会补充消耗的令牌数。当瞬时流量来临时,一旦剩余的令牌数小于警戒令牌数(restToken <= warningToken),则表示有大流量过来,需要开启预热过程,开始逐渐增大允许的qps。当qps达到用户设定的阈值后,系统已经预热完毕,这时候就进入了正常的请求阶段。
源码分析如下:
@Override
public boolean canPass(Node node, int acquireCount, boolean prioritized) {
    // 当前已经通过的qps
    long passQps = (long) node.passQps();

    // 上一个滑动窗口的qps
    long previousQps = (long) node.previousPassQps();
    // 同步令牌,如果是出于冷启动或预热完毕状态,则考虑要添加令牌
    syncToken(previousQps);

    // 开始计算它的斜率
    // 如果进入了警戒线,开始调整他的qps
    long restToken = storedTokens.get();
    if (restToken >= warningToken) { // 说明一瞬间有大流量过来,消耗了大量的存储令牌,造成剩余令牌数第一警戒值,则要开启预热默认,逐渐增加qps
        // 计算当前离警戒线的距离
        long aboveToken = restToken - warningToken;
        // 消耗的速度要比warning快,但是要比慢
        // current interval = restToken*slope+1/count
        // restToken越小,interval就越小,表示系统越热
        // 随着aboveToken的减小,warningQps会逐渐增大
        double warningQps = Math.nextUp(1.0 / (aboveToken * slope + 1.0 / count));
        if (passQps + acquireCount <= warningQps) { // 随着warningQps的增大,acquireCount = 1,那么passQps允许的范围就变大,相应的流量就越大,系统越热
            return true;
        }
    } else {
        if (passQps + acquireCount <= count) {
            return true;
        }
    }

    return false;
}

/**
 * 同步令牌
 * @param passQps
 */
protected void syncToken(long passQps) {
    long currentTime = TimeUtil.currentTimeMillis();
    // 把当前时间的后三位置为0 e.g. 1601456312835 = 1601456312835 - 1601456312835 % 1000 = 1601456312000
    currentTime = currentTime - currentTime % 1000;
    // 获取上一次更新令牌的时间
    long oldLastFillTime = lastFilledTime.get();
    if (currentTime <= oldLastFillTime) {
        return;
    }

    // 获得目前的令牌数
    long oldValue = storedTokens.get();
    // 获取新的令牌数
    long newValue = coolDownTokens(currentTime, passQps);

    // 更新累积令牌数
    if (storedTokens.compareAndSet(oldValue, newValue)) {
        // 去除上一次的qps,设置剩下的令牌数
        long currentValue = storedTokens.addAndGet(0 - passQps);
        if (currentValue < 0) {
            // 如果剩下的令牌数小于0,则置为0。
            storedTokens.set(0L);
        }
        // 设置令牌更新时间
        lastFilledTime.set(currentTime);
    }
}

private long coolDownTokens(long currentTime, long passQps) {
    // 当前拥有的令牌数
    long oldValue = storedTokens.get();
    long newValue = oldValue;

    // 添加令牌的判断前提条件:
    // 当令牌的消耗程度远远低于警戒线的时候
    if (oldValue < warningToken) { // 这种情况表示已经预热结束,可以开始生成令牌了
        // 这里按照count = 100来计算的话,表示旧值oldValue + 距离上次更新的秒数时间差 * count ,表示每秒增加count个令牌
        // 这里的currentTime 和 lastFilledTime.get() 都是已经去掉毫秒数的
        newValue = (long)(oldValue + (currentTime - lastFilledTime.get()) * count / 1000);
    } else if (oldValue > warningToken) { // 进入这里表示当前是冷状态或正处于预热状态
        if (passQps < (int)count / coldFactor) { // 如果是冷状态,则补充令牌数,避免令牌数为0
            newValue = (long)(oldValue + (currentTime - lastFilledTime.get()) * count / 1000);
        }
        // 预热阶段则不添加令牌数,从而限制流量的急剧攀升
    }
    // 限制令牌数不能超过最大令牌数maxToken
    return Math.min(newValue, maxToken);
}
4、预热的匀速排队策略
WarmUpRateLimiterController
这种是匀速排队模式和预热模式的结合,这里不深入了。搞懂了上面两种,再看这种也比较清晰了。
5、DegradeSlot
官方文档说明:
这个 slot 主要针对资源的平均响应时间(RT)以及异常比率,来决定资源是否在接下来的时间被自动熔断掉。
源码解析:
@Override
public void entry(Context context, ResourceWrapper resourceWrapper, DefaultNode node, int count,
                  boolean prioritized, Object... args) throws Throwable {
    //降级判断
    performChecking(context, resourceWrapper);

    // 如果有自定义的slot,还会继续进行
    fireEntry(context, resourceWrapper, node, count, prioritized, args);
}

void performChecking(Context context, ResourceWrapper r) throws BlockException {
    // 使用DegradeRuleManager获得当前资源的熔断器
    List<CircuitBreaker> circuitBreakers = DegradeRuleManager.getCircuitBreakers(r.getName());
    if (circuitBreakers == null || circuitBreakers.isEmpty()) {
        return;
    }
    // 遍历熔断器,只要有任何一个满足熔断条件,就抛出DegradeException异常。
    for (CircuitBreaker cb : circuitBreakers) {
        if (!cb.tryPass(context)) {
            throw new DegradeException(cb.getRule().getLimitApp(), cb.getRule());
        }
    }
}
这里有个关键类,DegradeRuleManager,该类中会保存所有的熔断规则,使用Map<String, List>的格式进行保存。当需要使用的时候,就直接根据资源名称,从该map中获取对应的熔断器列表。
那么规则是如何加载的呢?我们看到DegradeRuleManager这个类,在加载时候,有个静态代码块:
private static final RulePropertyListener LISTENER = new RulePropertyListener();
private static SentinelProperty<List<DegradeRule>> currentProperty
    = new DynamicSentinelProperty<>();

static {
    currentProperty.addListener(LISTENER);
}
currentProperty.addListener(LISTENER);继续分析该段代码,找到DynamicSentinelProperty的addListener(…)方法:
@Override
public void addListener(PropertyListener<T> listener) {
    listeners.add(listener);
    listener.configLoad(value);
}
12345
发现会调用监听器的configLoad(…)方法,最终会调用RulePropertyListener这个类的reloadFrom(…)方法。具体怎么解析的其实就是将规则根据资源名称进行归类,并保存为map格式。

- FlowSlot 限流规则引擎之限流算法原理 -
1、滑动窗口实现原理
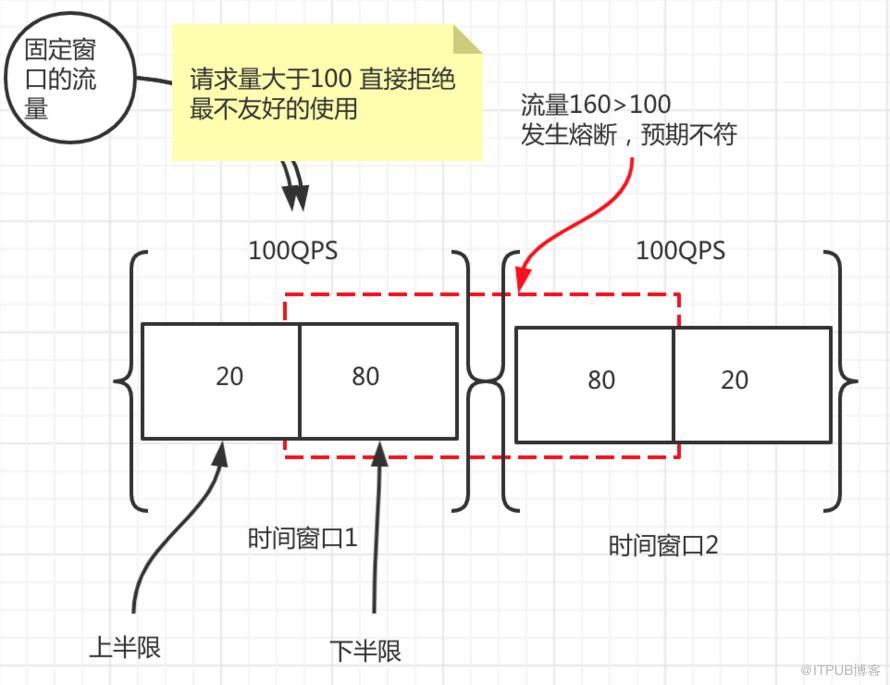
每个时间窗口最大流量为100QPS;
20和80表示当时的真实QPS数量;
一个时间窗口分为两个半限,上半限和下半限;
-
如果时间窗口1的下半限和时间窗口2的上半限的峰值超过100QPS,那么就丢失一部分流量。
但是这样并不是我们想要的,那么我们来看看计数器滑动窗口。
2、计数器滑动窗口原理
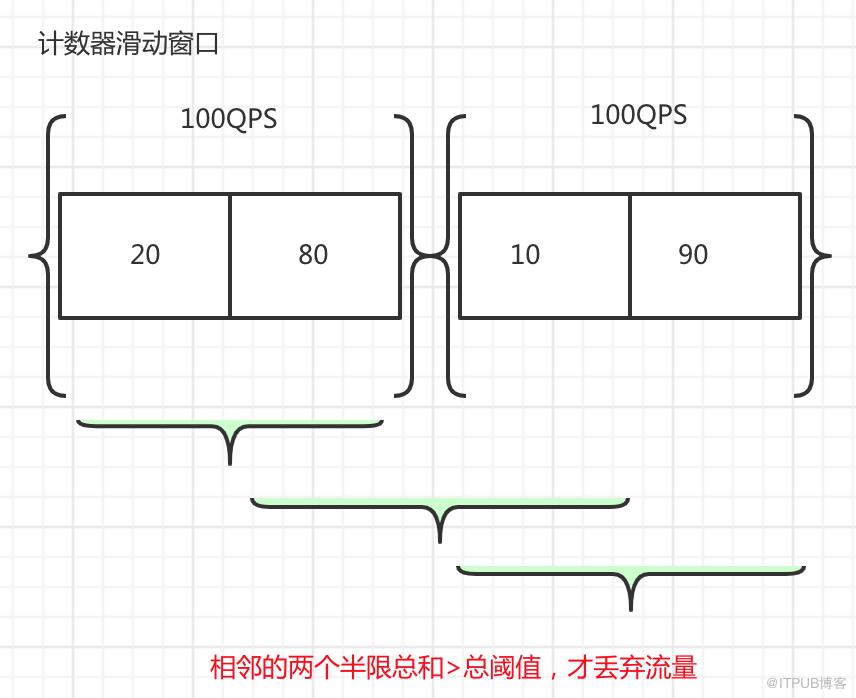
在滑动窗口算法上优化;
相邻的两个半限总和>总阈值,才丢弃流量。
3、令牌桶算法

令牌漏斗桶存着所有的Token;
按期发放Token;
如果桶满了,就会熔断;
达到Token的Request可以获取资源;
-
得不到的就抛弃。

- 图文总结 -
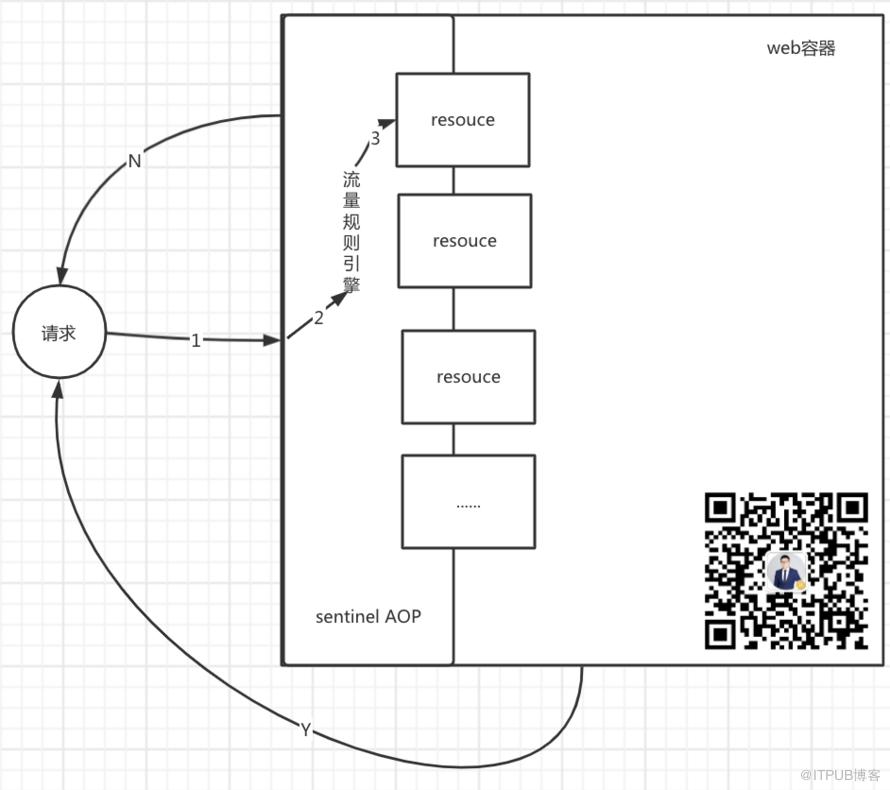
1、整体流程
(1)请求发送到web容器;
(2)Sentinel Aop拦截所有Sentinel Resouce;
(3)如果资源的规则通过则执行正常流程;
(4)不通过则返回流控异常提示。
2、Sentinel AOP切面运行流程
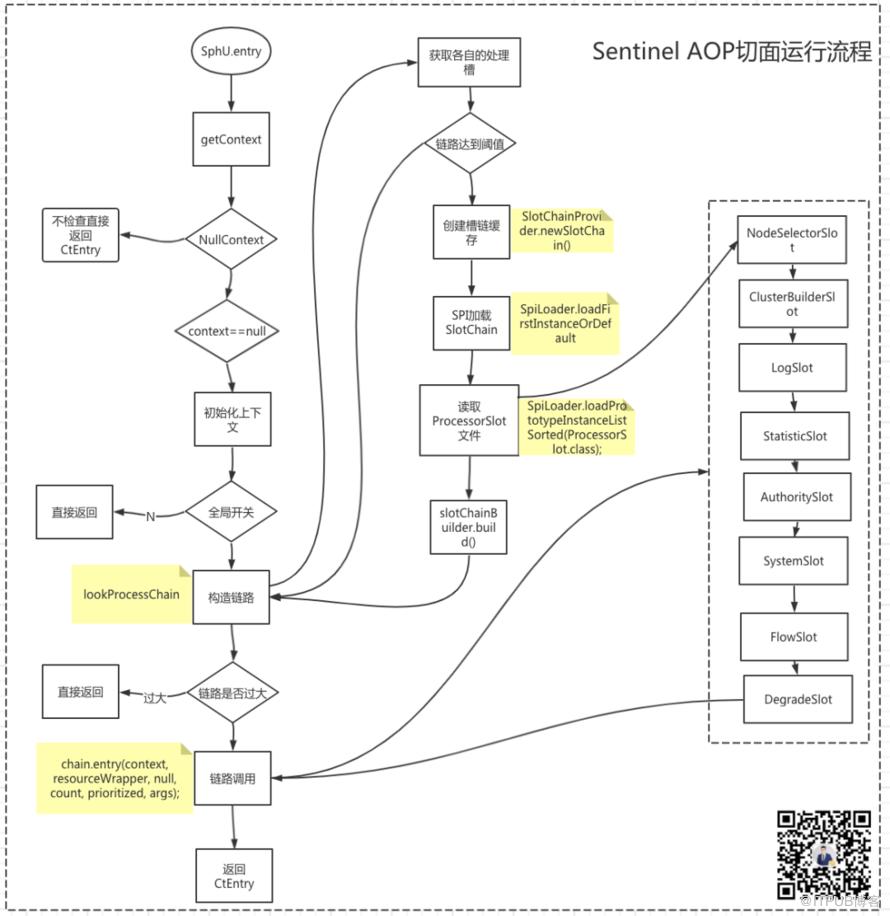
希望对大家有帮助!


原文作者:玄姐聊AGI;如有侵权,请联系管理员删除。

