Android 截屏分为四种:View 截屏、WebView 截屏、系统截屏 和 adb 截屏
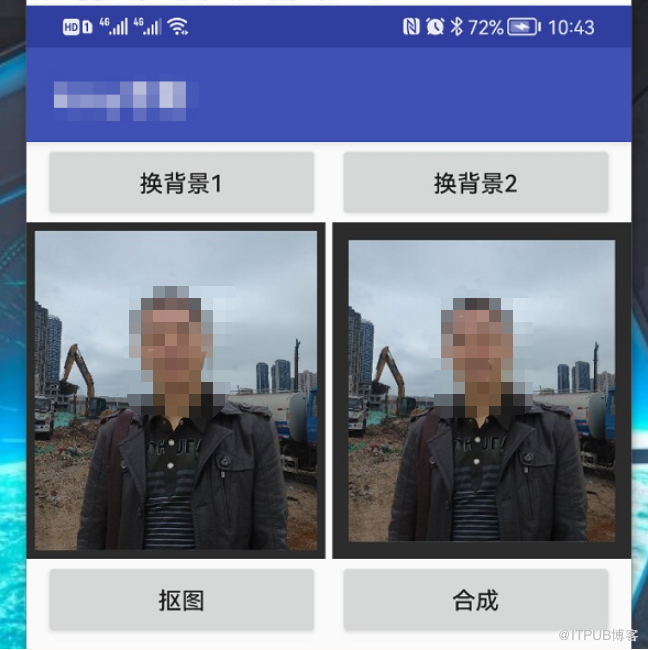
1、View 截屏
View 截图是将当前 View 界面截取下来,而对于屏幕上其他信息比如:状态栏或其他应用的界面将无法截取。
1.1 截取除了导航栏之外的屏幕
// 开始截屏
private static byte[] screenshotView() {
// ⬇⬇⬇ 可直接放入点击事件中 ⬇⬇⬇
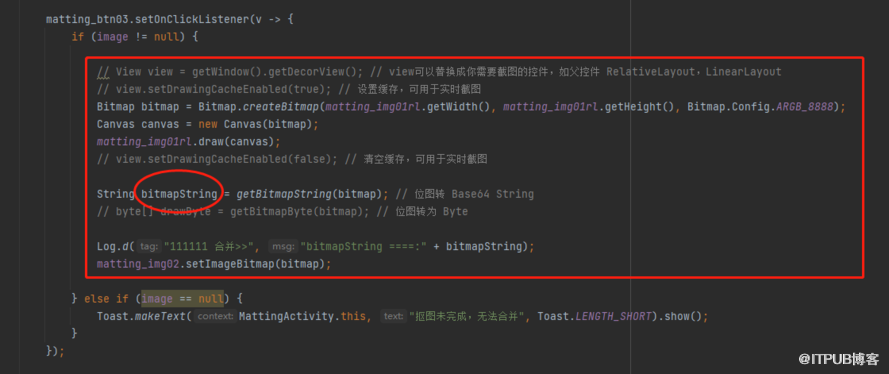
View view = getWindow().getDecorView(); // view可以替换成你需要截图的控件,如父控件 RelativeLayout,LinearLayout
// view.setDrawingCacheEnabled(true); // 设置缓存,可用于实时截图
Bitmap bitmap = Bitmap.createBitmap(view.getWidth(), view.getHeight(), Bitmap.Config.ARGB_8888);
Canvas canvas = new Canvas(bitmap);
view.draw(canvas);
// view.setDrawingCacheEnabled(false); // 清空缓存,可用于实时截图
String bitmapString = getBitmapString(bitmap); // 位图转 Base64 String
// byte[] drawByte = getBitmapByte(bitmap); // 位图转为 Byted
Log.d("111111 合并>>", "bitmapString ====:" + bitmapString);
matting_img02.setImageBitmap(bitmap); // ImageView控件直接图片展示截好的图片
// ⬆⬆⬆ 可直接放入点击事件中 ⬆⬆⬆
return drawByte;
}
// 位图转 Base64 String
private static String getBitmapString(Bitmap bitmap) {
String result = null;
ByteArrayOutputStream out = null;
try {
if (bitmap != null) {
out = new ByteArrayOutputStream();
bitmap.compress(Bitmap.CompressFormat.PNG, 100, out);
out.flush();
out.close();
byte[] bitmapBytes = out.toByteArray();
result = Base64.encodeToString(bitmapBytes, Base64.DEFAULT); // Base64.DEFAULT会自动换行,传给前端会报错,所以要用Base64.NO_WRAP
}
} catch (IOException e) {
e.printStackTrace();
} finally {
try {
if (out != null) {
out.flush();
out.close();
}
} catch (IOException e) {
e.printStackTrace();
}
}
return result;
}
// 位图转 Byte
private static byte[] getBitmapByte(Bitmap bitmap) {
ByteArrayOutputStream out = new ByteArrayOutputStream();
// 参数1转换类型,参数2压缩质量,参数3字节流资源
bitmap.compress(Bitmap.CompressFormat.PNG, 100, out);
try {
out.flush();
out.close();
} catch (IOException e) {
e.printStackTrace();
}
return out.toByteArray();
}
1.2 截取某个控件或者区域
// 方法1
private static byte[] screenshotView1() {
View view = title;
view.setDrawingCacheEnabled(true);
view.buildDrawingCache();
Bitmap bitmap = Bitmap.createBitmap(view.getDrawingCache());
byte[] drawByte = getBitmapByte(bitmap);
return drawByte;
}
// 方法2
private static byte[] screenshotView2() {
View view = title;
Bitmap bitmap = Bitmap.createBitmap(view.getWidth(), view.getHeight(), Bitmap.Config.ARGB_8888);
// 使用 Canvas,调用自定义 view 控件的 onDraw 方法,绘制图片
Canvas canvas = new Canvas(bitmap);
dView.draw(canvas);
byte[] drawByte = getBitmapByte(bitmap);
return drawByte;
}
2、WebView 截屏
WebView 截屏有四种方式
2.1 使用 capturePicture() 方法(已废弃)
private static byte[] screenshotWebView() {
Picture picture = webview.capturePicture();
//创建位图
Bitmap bitmap = Bitmap.createBitmap(picture.getWidth(), picture.getHeight(), Bitmap.Config.ARGB_8888);
Canvas canvas = new Canvas(bitmap);
// 绘制(会调用 native 方法,完成图形绘制)
picture.draw(canvas);
byte[] drawByte = getBitmapByte(bitmap);
return drawByte;
}
2.2 使用 getScale() 方法(已废弃)
private static byte[] screenshotWebView() {
float scale = webView.getScale();
int webViewHeight = (int) (webView.getContentHeight()*scale+0.5);
Bitmap bitmap = Bitmap.createBitmap(webView.getWidth(),webViewHeight, Bitmap.Config.ARGB_8888);
Canvas canvas = new Canvas(bitmap);
webView.draw(canvas);
byte[] drawByte = getBitmapByte(bitmap);
return drawByte;
}
2.3 使用 getDrawingCache() 方法
private static byte[] screenshotWebView() {
Bitmap bitmap = webView.getDrawingCache();
byte[] drawByte = getBitmapByte(bmp);
return drawByte;
}
2.4 使用 draw() 方法
private static byte[] screenshotWebView() {
// webView.setDrawingCacheEnabled(true); // 设置缓存
Bitmap bitmap = Bitmap.createBitmap(webView.getWidth(), webView.getHeight(), Bitmap.Config.ARGB_8888);
Canvas canvas = new Canvas(bitmap);
webView.draw(canvas);
webView.destroyDrawingCache();
byte[] drawByte = getBitmapByte(bitmap);
// webView.setDrawingCacheEnabled(false); // 清空缓存
return drawByte;
}
2.5 截长图配置
if (Build.VERSION.SDK_INT >= Build.VERSION_CODES.LOLLIPOP) {
WebView.enableSlowWholeDocumentDraw();
}
setContentView(R.layout.activity_webview);
WebView 截图可能截取不到 cavans 元素,原因是开启了硬件加速,可在 AndroidManifest.xml 中设置属性 android:hardwareAccelerated="false"
关闭硬件加速可能导致页面出现意外情况
3、系统截屏
3.1 MediaProjection
public static final int REQUEST_MEDIA_PROJECTION = 10001;
// 申请截屏权限
private void getScreenShotPower() {
if (Build.VERSION.SDK_INT >= Build.VERSION_CODES.M) {
MediaProjectionManager mProjectionManager = (MediaProjectionManager) getSystemService(Context.MEDIA_PROJECTION_SERVICE);
if (mProjectionManager != null) {
startActivityForResult(mProjectionManager.createScreenCaptureIntent(), REQUEST_MEDIA_PROJECTION);
}
}
}
private MediaProjection mMediaProjection;
// 回调
@Override
protected void onActivityResult(int requestCode, int resultCode, Intent data) {
super.onActivityResult(requestCode, resultCode, data);
if (requestCode == REQUEST_MEDIA_PROJECTION && data != null) {
if (resultCode == RESULT_OK) {
MediaProjection mediaProjection = mMediaProjectionManager.getMediaProjection(resultCode, data);
if (mediaProjection == null) {
Toast.makeText(this,"程序发生错误:MediaProjection@1",Toast.LENGTH_SHORT).show();
return;
}
// mediaProjection 就是当前屏幕流
} else if (resultCode == RESULT_CANCELED) {
Log.d(TAG, "用户取消");
}
}
}
3.2 Surface(需要 root 权限)
使用前需要:
在 AndroidMenifest.xml 中添加 android:sharedUserId="android.uid.system" 属性
需要给程序添加系统签名
或者 root 系统
使用 Java 反射机制,调用系统 API 截图:
private void screenshotSystem() {
Class<?> surfaceClass;
Method method = null;
Bitmap bitmap = null;
try {
if (android.os.Build.VERSION.SDK_INT >= android.os.Build.VERSION_CODES.JELLY_BEAN_MR2) {
surfaceClass = Class.forName("android.view.SurfaceControl");
} else {
surfaceClass = Class.forName("android.view.Surface");
}
method = surfaceClass.getDeclaredMethod("screenshot", Integer.TYPE, Integer.TYPE);
method.setAccessible(true);
bitmap = (Bitmap)method.invoke((Object)null, webview.getWidth(), webview.getHeight());
byte[] drawByte = getBitmapByte(bitmap);
} catch (ClassNotFoundException e){
e.printStackTrace();
} catch (NoSuchMethodException e){
e.printStackTrace();
} catch (IllegalAccessException e){
e.printStackTrace();
} catch (InvocationTargetException e){
e.printStackTrace();
}
}
3.3 PixelCopy
private void screenshotSystem() {
if (Build.VERSION.SDK_INT >= Build.VERSION_CODES.O) {
PixelCopy.request(getWindow(), bitmap, new PixelCopy.OnPixelCopyFinishedListener() {
@Override
public void onPixelCopyFinished(int copyResult){
if (PixelCopy.SUCCESS == copyResult) {
byte[] drawByte = getBitmapByte(bitmap);
} else {
// onErrorCallback()
}
}
}, new Handler());
}
}
3.4 framebuffer(需要 root 权限)
String DEVICE_NAME = "/dev/graphics/fb0";
File deviceFile = new File(DEVICE_NAME);
Process localProcess = Runtime.getRuntime().exec("supersu");
String str = "cat " + deviceFile.getAbsolutePath() + "\n";
localProcess.getOutputStream().write(str.getBytes());
return localProcess.getInputStream();
3.5 screencap 命令(需要 root 权限)
private static String getScreenshot(){
Process process = null;
String filePath = "mnt/sdcard/" + System.currentTimeMillis() + ".png";
try {
process = Runtime.getRuntime().exec("su");
PrintStream outputStream = null;
outputStream = new PrintStream(new BufferedOutputStream(process.getOutputStream(), 8192));
outputStream.println("screencap -p " + filePath);
outputStream.flush();
outputStream.close();
process.waitFor();
} catch (Exception e) {
e.printStackTrace();
} finally {
if(process != null){
process.destroy();
}
}
return filePath;
}
4、adb 截屏
-
$ adb shell
-
shell@ $ screencap /sdcard / screen.png
-
shell@ $ exit
-
$ adb pull /sdcard / screen.png
来自 “ ITPUB博客 ” ,链接:https://blog.itpub.net/70033950/viewspace-2987340/ ,如需转载,请注明出处,否则将追究法律责任。

