来源:WU双
不好意思,是xxx-spring-boot-starter。
1
If you are just getting started with Spring, you may want to begin using the Spring Framework by creating a Spring Boot-based application. Spring Boot provides a quick (and opinionated) way to create a production-ready Spring-based application.

<?xml version="1.0" encoding="UTF-8"?><beans xmlns="http://www.springframework.org/schema/beans"xmlns:xsi="http://www.w3.org/2001/XMLSchema-instance"xsi:schemaLocation="http://www.springframework.org/schema/beanshttps://www.springframework.org/schema/beans/spring-beans.xsd"><bean id="transferService" class="com.acme.TransferServiceImpl"/><!-- more bean definitions go here --></beans>
@Configurationpublic class AppConfig {@Beanpublic TransferServiceImpl transferService() {return new TransferServiceImpl();}}
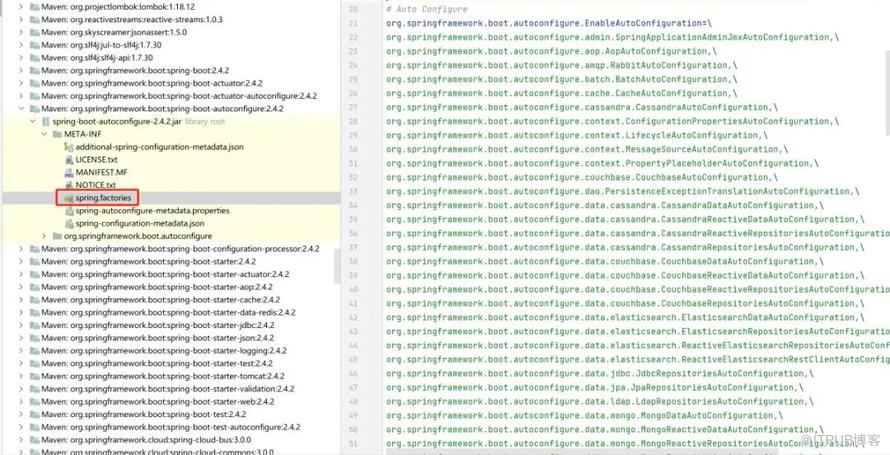
2

1. The autoconfigure module that contains the auto-configuration code for "acme". 2. The starter module that provides a dependency to the autoconfigure module as well as "acme" and any additional dependencies that are typically useful.
<?xml version="1.0" encoding="UTF-8"?><project xsi:schemaLocation="http://maven.apache.org/POM/4.0.0 http://maven.apache.org/xsd/maven-4.0.0.xsd" xmlns="http://maven.apache.org/POM/4.0.0" xmlns:xsi="http://www.w3.org/2001/XMLSchema-instance"> <!-- This module was also published with a richer model, Gradle metadata, --> <!-- which should be used instead. Do not delete the following line which --> <!-- is to indicate to Gradle or any Gradle module metadata file consumer --> <!-- that they should prefer consuming it instead. --> <!-- do_not_remove: published-with-gradle-metadata --> <modelVersion>4.0.0</modelVersion> <groupId>org.springframework.boot</groupId> <artifactId>spring-boot-starter-data-redis</artifactId> <version>2.4.2</version> <name>spring-boot-starter-data-redis</name> <description>Starter for using Redis key-value data store with Spring Data Redis and the Lettuce client</description> <url>https://spring.io/projects/spring-boot</url> <organization> <name>Pivotal Software, Inc.</name> <url>https://spring.io</url> </organization> <licenses> <license> <name>Apache License, Version 2.0</name> <url>https://www.apache.org/licenses/LICENSE-2.0</url> </license> </licenses> <developers> <developer> <name>Pivotal</name> <email>info@pivotal.io</email> <organization>Pivotal Software, Inc.</organization> <organizationUrl>https://www.spring.io</organizationUrl> </developer> </developers> <scm> <connection>scm:git:git://github.com/spring-projects/spring-boot.git</connection> <developerConnection>scm:git:ssh://git@github.com/spring-projects/spring-boot.git</developerConnection> <url>https://github.com/spring-projects/spring-boot</url> </scm> <issueManagement> <system>GitHub</system> <url>https://github.com/spring-projects/spring-boot/issues</url> </issueManagement> <dependencies> <dependency> <groupId>org.springframework.boot</groupId> <artifactId>spring-boot-starter</artifactId> <version>2.4.2</version> <scope>compile</scope> </dependency> <dependency> <groupId>org.springframework.data</groupId> <artifactId>spring-data-redis</artifactId> <version>2.4.3</version> <scope>compile</scope> </dependency> <dependency> <groupId>io.lettuce</groupId> <artifactId>lettuce-core</artifactId> <version>6.0.2.RELEASE</version> <scope>compile</scope> </dependency> </dependencies></project>
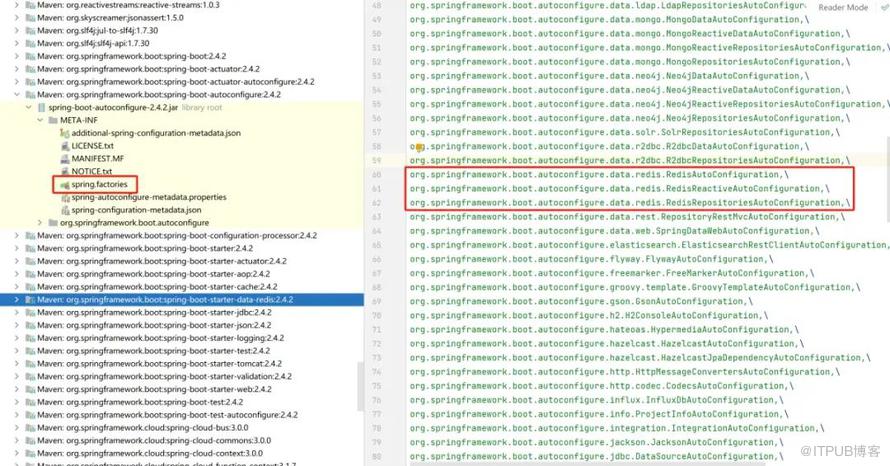
// 这里表示只有项目依赖中有RedisOperations这个类,下面的配置才会生效,正是因为我们引入了spring-boot-starter-data-redis依赖,然后项目中才会有RedisOperations类,所以该自动配置才会生效// RedisProperties为redis相关的配置,包括集群地址、连接池配置等信息都可以通过这个类来进行配置// 这里是导入了其他的配置类,为Redis连接池相关的配置public class RedisAutoConfiguration {public RedisTemplate<Object, Object> redisTemplate(RedisConnectionFactory redisConnectionFactory) {RedisTemplate<Object, Object> template = new RedisTemplate<>();template.setConnectionFactory(redisConnectionFactory);return template;}public StringRedisTemplate stringRedisTemplate(RedisConnectionFactory redisConnectionFactory) {StringRedisTemplate template = new StringRedisTemplate();template.setConnectionFactory(redisConnectionFactory);return template;}}
public class CacheService {// 因为Spring Boot已经自动注入了StringRedisTemplate,所以这里我们代码里直接使用即可private StringRedisTemplate redisTemplate;public void set(String key, Object value) {redisTemplate.opsForValue().set(key, JSON.toJSONString(value));}public void set(String key, Object value, long expireTimeout, TimeUnit timeUnit) {redisTemplate.opsForValue().set(key, JSON.toJSONString(value), expireTimeout, timeUnit);}public <T> T get(String key, Class<T> clazz) {return JSON.parseObject(redisTemplate.opsForValue().get(key), clazz);}public void delete(String key) {redisTemplate.delete(key);}}
3
写一个自己的
@ConfigurationProperties(prefix = "scheduler")public class SchedulerProperties {/*** 定时任务调度时间,单位ms,默认值1000ms*/private long period = 1000L;/*** 定时任务名称*/private String taskName;public long getPeriod() {return period;}public void setPeriod(long period) {this.period = period;}public String getTaskName() {return taskName;}public void setTaskName(String taskName) {this.taskName = taskName;}}
public class SchedulerAutoConfiguration {public Scheduler schedulerTask(ScheduledThreadPoolExecutor scheduledThreadPoolExecutor, SchedulerProperties schedulerProperties) {return new Scheduler(scheduledThreadPoolExecutor, schedulerProperties);}}
public class SchedulerExecutorConfiguration {public ScheduledThreadPoolExecutor scheduledThreadPoolExecutor() {return new ScheduledThreadPoolExecutor(1);}}
public class Scheduler {public static final Logger LOGGER = LoggerFactory.getLogger(Scheduler.class);private final ScheduledThreadPoolExecutor scheduledThreadPoolExecutor;private final SchedulerProperties schedulerProperties;public Scheduler(ScheduledThreadPoolExecutor scheduledThreadPoolExecutor, SchedulerProperties schedulerProperties) {this.scheduledThreadPoolExecutor = scheduledThreadPoolExecutor;this.schedulerProperties = schedulerProperties;this.init();}public void init() {scheduledThreadPoolExecutor.scheduleAtFixedRate(() -> {LOGGER.info("scheduler task [{}], period [{}ms], currentTime [{}]", schedulerProperties.getTaskName(), schedulerProperties.getPeriod(), LocalDateTime.now().format(DateTimeFormatter.ofPattern("yyyy-MM-dd HH:mm:ss")));}, 0, schedulerProperties.getPeriod(), TimeUnit.MILLISECONDS);}}
org.springframework.boot.autoconfigure.EnableAutoConfiguration=\com.example.scheduler.SchedulerAutoConfiguration
<dependency> <groupId>com.example</groupId> <artifactId>scheduler-spring-boot-starter</artifactId> <version>${scheduler-spring-boot-starter-version}</version></dependency>2023-10-11 14:22:20.683 INFO 25680 --- [pool-1-thread-1] com.example.scheduler.Scheduler : scheduler task [test-example], period [5000ms], currentTime [2023-10-11 14:22:20]2023-10-11 14:22:25.689 INFO 25680 --- [pool-1-thread-1] com.example.scheduler.Scheduler : scheduler task [test-example], period [5000ms], currentTime [2023-10-11 14:22:25]2023-10-11 14:22:30.685 INFO 25680 --- [pool-1-thread-1] com.example.scheduler.Scheduler : scheduler task [test-example], period [5000ms], currentTime [2023-10-11 14:22:30]2023-10-11 14:22:35.681 INFO 25680 --- [pool-1-thread-1] com.example.scheduler.Scheduler : scheduler task [test-example], period [5000ms], currentTime [2023-10-11 14:22:35]
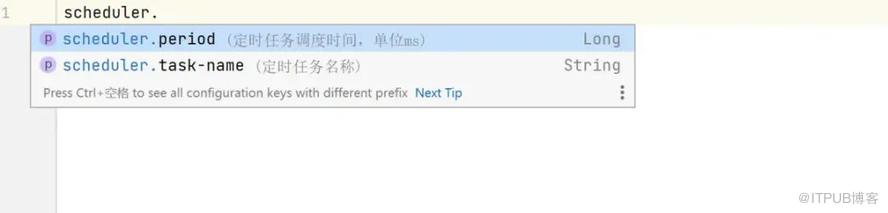
{ "groups": [ { "name": "scheduler", "type": "com.example.scheduler.SchedulerProperties", "sourceType": "com.example.scheduler.SchedulerProperties" } ], "properties": [ { "name": "scheduler.period", "type": "java.lang.Long", "description": "定时任务调度时间,单位ms", "sourceType": "com.example.scheduler.SchedulerProperties" }, { "name": "scheduler.task-name", "type": "java.lang.String", "description": "定时任务名称", "sourceType": "com.example.scheduler.SchedulerProperties" } ], "hints": []}4
测试你的spring-boot-starter
class SchedulerAutoConfigurationTest {// 通过contextRunner来模拟运行环境,这里是模拟配置了SchedulerAutoConfiguration类的应用环境,实际也就是引用了scheduler-spring-boot-starter后生效的配置private final ApplicationContextRunner contextRunner = new ApplicationContextRunner().withConfiguration(AutoConfigurations.of(SchedulerAutoConfiguration.class));void testAutoConfiguration() {this.contextRunner.run((context) -> {// 测试自动配置有没有注入ScheduledThreadPoolExecutor BeanassertThat(context).hasSingleBean(ScheduledThreadPoolExecutor.class);// 测试自动配置有没有注入SchedulerProperties BeanassertThat(context).hasSingleBean(SchedulerProperties.class);// 测试自动配置有没有注入Scheduler BeanassertThat(context).hasSingleBean(Scheduler.class);});}void testProperties() {// 模拟环境配置了相应的参数this.contextRunner.withPropertyValues("scheduler.period=5000", "scheduler.task-name=test-example").run((context) -> {// 测试对应参数设置是否生效assertThat(context.getBean(SchedulerProperties.class).getPeriod()).isEqualTo(5000);assertThat(context.getBean(SchedulerProperties.class).getTaskName()).isEqualTo("test-example");});}}
来自 “ ITPUB博客 ” ,链接:https://blog.itpub.net/70024922/viewspace-2989078/ ,如需转载,请注明出处,否则将追究法律责任。
上一篇:
你知道那几种数据迁移工具?

请登录后发表评论
登录
全部评论
