redhat7.6安装Oracle11G RAC
1 关闭防火墙
查看防火墙的状态,此防火墙是关闭的
[root@localhost ~]# systemctl status firewalld
● firewalld.service - firewalld - dynamic firewall daemon
Loaded: loaded (/usr/lib/systemd/system/firewalld.service; disabled; vendor preset: enabled)
Active: inactive (dead)
Docs: man:firewalld(1)
永久关闭防火墙
[root@localhost ~]# systemctl disable firewalld
临时关闭防火墙
[root@localhost ~]# systemctl stop firewalld
2 修改主机名
查看主机名:
[root@localhost ~]# hostnamectl status
Static hostname: localhost.localdomain
Icon name: computer-server
Chassis: server
Machine ID: 06b1c1b5f9984c23b62ab95683170e1c
Boot ID: 35edf6b5eb464561a03c07b7e8aa4c5d
Operating System: Red Hat Enterprise Linux Server 7.6 (Maipo)
CPE OS Name: cpe:/o:redhat:enterprise_linux:7.6:GA:server
Kernel: Linux 3.10.0-957.el7.x86_64
Architecture: x86-64
设置主机名
[root@localhost ~]# hostname testdb1
修改/etc/hostname文件如下:
[root@localhost ~]# cat /etc/hostname
#localhost.localdomain
127.0.0.1 localhost localhost.localdomain localhost4 localhost4.localdomain4
::1 localhost localhost.localdomain localhost6 localhost6.localdomain6
#public ip:
17.95.211.153 testdb1
17.95.211.154 testdb2
#vip
17.95.211.198 testdb1-vip
17.95.211.199 testdb2-vip
#priv ip
18.96.211.153 testdb1-priv
18.96.211.154 testdb2-priv
#scan ip
17.95.211.200 testdb-scan
3 关闭SELINUX
[root@localhost ~]# cat /etc/selinux/config
# This file controls the state of SELinux on the system.
# SELINUX= can take one of these three values:
# enforcing - SELinux security policy is enforced.
# permissive - SELinux prints warnings instead of enforcing.
# disabled - No SELinux policy is loaded.
SELINUX=disabled
# SELINUXTYPE= can take one of three values:
# targeted - Targeted processes are protected,
# minimum - Modification of targeted policy. Only selected processes are protected.
# mls - Multi Level Security protection.
SELINUXTYPE=targeted
4 检查系统相关配置:
内存:grep MemTotal /proc/meminfo
swap: grep SwapTotal /proc/meminfo
临时空间: df -k /tmp
安装数据库的目录:
5 安装软件包:
使用如下命令检查:
rpm -q --queryformat "%{NAME}-%{VERSION}.%{RELEASE} (%{ARCH})\n" \
binutils \
compat-libstdc++-33 \
ksh \
gcc \
gcc-c++ \
glibc \
glibc-common \
glibc-devel \
glibc-headers \
libaio \
libaio-devel \
libgcc \
libstdc++ \
libstdc++-devel \
make \
sysstat \
compat-libcap1 \
cpp \
mpfr \
libXp \
xorg-x11-utils \
xorg-x11-xauth \
smartmontools \
ethtool \
bind-utils \
pam |grep not
package compat-libstdc++-33 is not installed --此RPM需要从其它版本上传进行安装,
剩余的几个在安装的镜像文件中是有的
package ksh is not installed
package libaio-devel is not installed
package libXp is not installed
6 修改系统的内核参数 /etc/sysctl.conf(#注释的参数后续会根据情况进行调整的)
kernel.shmmni = 4096
kernel.shmall =46121446
kernel.shmmax =188913445683
fs.file-max = 6815744
net.ipv4.ip_local_port_range = 9000 65500
#net.ipv4.conf.enp175s0.rp_filter = 2
#net.ipv4.conf.enp59s0.rp_filter = 2
net.ipv4.conf.bond0.rp_filter = 1
net.core.rmem_default = 4194304
net.core.rmem_max = 26214400
net.core.wmem_default = 262144
net.core.wmem_max = 4194304
kernel.randomize_va_space=0
net.ipv4.ipfrag_high_thresh = 16777216
net.ipv4.ipfrag_low_thresh = 15728640
vm.vfs_cache_pressure=200
vm.swappiness = 0
vm.dirty_background_ratio = 3
vm.dirty_ratio = 80
vm.dirty_expire_centisecs = 600
vm.dirty_writeback_centisecs = 120
vm.min_free_kbytes=4096000
kernel.sem=4096 524288 4096 128
kernel.watchdog_thresh=30
fs.aio-max-nr=50000000
vm.min_free_kbytes=1543503
#vm.nr_hugepages=37683
执行如下命令,使其生效: sysctl -p
7 资源限制修改 /etc/security/limits.conf
grid soft nproc 2047
grid hard nproc 16384
grid soft nofile 1024
grid hard nofile 65536
oracle soft nproc 2047
oracle hard nproc 16384
oracle soft nofile 1024
oracle hard nofile 65536
8 登陆参数调整 /etc/pam.d/login
session required /lib64/security/pam_limits.so
9 /etc/profile 的配置
if [ $USER = "oracle" ] || [ $USER = "grid" ]; then
if [ \$SHELL = "/bin/ksh" ]; then
ulimit -p 16384
ulimit -n 65536
else
ulimit -u 16384 -n 65536
fi
umask 022
fi
10 创建组、用户、目录及设置环境变量
(节点1和节点2都要执行)
10.1 创建用户和组 (grid\oracle 两个节点的用户的密码必须一致)
groupadd -g 600 oinstall
groupadd -g 601 asmadmin
groupadd -g 602 dba
groupadd -g 603 oper
groupadd -g 604 asmdba
groupadd -g 605 asmoper
useradd -u 701 -g oinstall -G asmadmin,asmdba,asmoper,dba grid
useradd -u 702 -g oinstall -G dba,oper,asmdba oracle
设置用户密码:Oracle11g_test
passwd grid
passwd grid
10.2 创建目录
mkdir -p /u01/app/11.2.0/grid
chown -R grid:oinstall /u01
mkdir /u01/app/oracle
chown oracle:oinstall /u01/app/oracle
chmod -R 775 /u01
10.3 修改grid用户的环境变量
alias ls="ls -FA"
ORACLE_SID=+ASM1;export ORACLE_SID
ORACLE_BASE=/u01/app/grid; export ORACLE_BASE
ORACLE_HOME=/u01/app/11.2.0/grid;export ORACLE_HOME
GRID_HOME=/u01/app/11.2.0/grid; export GRID_HOME
ORACLE_PATH=/u01/app/u01/common/u01/sql;export ORACLE_PATH
ORACLE_TERM=xterm;export ORACLE_TERM
TNS_ADMIN=$ORACLE_HOME/network/admin;export TNS_ADMIN
PATH=.:${JAVA_HOME}/bin:${PATH}:$HOME/bin:$ORACLE_HOME/bin
PATH=${PATH}:/usr/bin:/bin:/usr/bin/X11:/usr/local/bin
PATH=${PATH}:/u01/app/common/oracle/bin
PATH=$PATH:$ORACLE_HOME/oracm/bin:$ORACLE_HOME/OPatch
export PATH
LD_LIBRARY_PATH=$ORACLE_HOME/lib
LD_LIBRARY_PATH=${LD_LIBRARY_PATH}:$ORACLE_HOME/oracm/lib
LD_LIBRARY_PATH=${LD_LIBRARY_PATH}:/lib/usr/lib:/usr/local/lib
LD_LIBRARY_PATH=${LD_LIBRARY_PATH}:$ORACLE_HOME/ctx/lib
export LD_LIBRARY_PATH
CLASSPATH=$ORACLE_HOME/JRE
CLASSPATH=${CLASSPATH}:$ORACLE_HOME/jlib
CLASSPATH=${CLASSPATH}:$ORACLE_HOME/rdbms/jlib
CLASSPATH=${CLASSPATH}:$ORACLE_HOME/ctx/lib
export CLASSPATH
export TMP=/tmp
export TMPDIR=/tmp
export NLS_LANG=AMERICAN_AMERICA.ZHS16GBK
export SQLPATH=~/admin/sql:/$ORACLE_HOME/sqlplus/admin
export NLS_DATE_FORMAT='yyyy-mm-dd hh24:mi:ss'
umask 022
10.4 修改Oracle用户的环境变量(节点1、2对应不同的ORACLE_SID,如节点1-ractest1,节点2-ractest2)
ORACLE_SID=testdb1;export ORACLE_SID
ORACLE_UNQNAME=testdb;export ORACLE_UNQNAME
ORACLE_BASE=/u01/app/oracle;export ORACLE_BASE
ORACLE_HOME=$ORACLE_BASE/product/11.2.0/db_1; export ORACLE_HOME
ORACLE_PATH=/u01/app/common/u01/sql; export ORACLE_PATH
ORACLE_TERM=xterm; export ORACLE_TERM
TNS_ADMIN=$ORACLE_HOME/network/admin; export TNS_ADMIN
PATH=.:${JAVA_HOME}/bin:${PATH}:$HOME/bin:$ORACLE_HOME/bin
PATH=${PATH}:/usr/bin:/bin:/usr/bin/X11:/usr/local/bin
PATH=${PATH}:/u01/app/common/oracle/bin
PATH=${PATH}:$ORACLE_HOME/oracm/bin:$ORACLE_HOME/OPatch
export PATH
LD_LIBRARY_PATH=$ORACLE_HOME/lib
LD_LIBRARY_PATH=${LD_LIBRARY_PATH}:$ORACLE_HOME/oracm/lib
LD_LIBRARY_PATH=${LD_LIBRARY_PATH}:/lib:/usr/lib:/usr/local/lib
LD_LIBRARY_PATH=${LD_LIBRARY_PATH}:$ORACLE_HOME/ctx/lib
export LD_LIBRARY_PATH
CLASSPATH=$ORACLE_HOME/JRE
CLASSPATH=${CLASSPATH}:$ORACLE_HOME/jlib
CLASSPATH=${CLASSPATH}:$ORACLE_HOME/rdbms/jlib
CLASSPATH=${CLASSPATH}:$ORACLE_HOME/network/jlib
export CLASSPATH
export TMP=/tmp
export TMPDIR=/tmp
#export NLS_LANG=AMERICAN_AMERICAN.ZHS16GBK ---此环境变量会影响数据库软件及dbca的安装,最好不要使用
export NLS_DATE_FORMAT='yyyy-mm-dd hh24:mi:ss'
umask 022
11 配置用户有效性 Oracle11g_test
使用如下命令创建用户等效性,效率比较高:
sshsetup/sshUserSetup.sh -user grid -hosts "testdb1 testdb2" -advanced -noPromptPassphrase
sshsetup/sshUserSetup.sh -user oracle -hosts "testdb1 testdb2" -advanced -noPromptPassphrase
ssh testdb1 date
ssh testdb2 date
12. 配置时钟同步,
由于在RHEL7开始时间同步,默认使用chrony进行时间同步,故使用chrony 或NTPD其中一种方法即可。
chrony配置--主机组已完成
在RHEL7开始时间同步,默认使用chrony进行时间同步,使用chrony需要注意修改以下内容:
# vi /etc/chrony.conf
将makestep 10 3这一条注释掉,在最后添加时间服务器:
server xxx.xxx.xxx.xx
重启chrony服务:
# systemctl restart chronyd
检查chrony的同步情况:
# chronyc sourcestats
查看/etc/chrony.conf 参数文件:
[root@testdb1 ~]# cat /etc/chrony.conf |grep -v "#"
server 17.95.196.58 prefer
server 17.95.196.59 iburst
driftfile /var/lib/chrony/drift
makestep 1.0 3
rtcsync
logdir /var/log/chrony
[root@testdb1 ~]#
##################################################################
修改ntp--主机组已完成,需检查
在RHEL7开始时间同步,默认使用chrony,推荐使用chrony,但也可以使用NTP,以下是NTP的配置方法:
打开/etc/sysconfig/ntpd文件,修改如下:
# Command line options for ntpd
OPTIONS="-x"
修改完成,需要重启ntpd服务
# systemctl restart ntpd
# ps -ef | grep ntp | grep -v grep
ntp 72819 1 0 09:34 ? 00:00:00 /usr/sbin/ntpd -u ntp:ntp -x
root 72822 72819 0 09:34 ? 00:00:00 /usr/sbin/ntpd -u ntp:ntp -x
注意:chronyd服务的启用导致NTPD服务无法默认开机启动,解决办法就是
# systemctl disable chronyd
# systemctl stop chronyd
**********检查脚本
ntpq -p
####################################################################################
13 禁用透明大页
13.1 查看透明大页
[root@testdb1 ~]# cat /sys/kernel/mm/transparent_hugepage/enabled
[always] madvise never
13.2 修改配置
[root@testdb2 ~]# cat /etc/default/grub
GRUB_TIMEOUT=5
GRUB_DISTRIBUTOR="$(sed 's, release .*$,,g' /etc/system-release)"
GRUB_DEFAULT=saved
GRUB_DISABLE_SUBMENU=true
GRUB_TERMINAL_OUTPUT="console"
GRUB_CMDLINE_LINUX="crashkernel=auto rd.lvm.lv=rhel/root rd.lvm.lv=rhel/swap rhgb quiet"
GRUB_DISABLE_RECOVERY="true"
将transparent_hugepage=never 新增到GRUB_CMDLINE_LINUX中去,如下
GRUB_CMDLINE_LINUX="crashkernel=auto rd.lvm.lv=rhel/root rd.lvm.lv=rhel/swap rhgb quiet transparent_hugepage=never"
13.3 重新生成grud文件 Run the grub2–mkconfig command to regenerate the grub.cfg file.
[root@testdb2 ~]# grub2-mkconfig -o /boot/grub2/grub.cfg
Generating grub configuration file ...
Found linux image: /boot/vmlinuz-3.10.0-957.el7.x86_64
Found initrd image: /boot/initramfs-3.10.0-957.el7.x86_64.img
Found linux image: /boot/vmlinuz-0-rescue-12239f6780934a17a9cc2fd6fb9c80fc
Found initrd image: /boot/initramfs-0-rescue-12239f6780934a17a9cc2fd6fb9c80fc.img
done
13.4 重启服务器,验证配置是否生效
[xunjian@testdb1 ~]$ cat /sys/kernel/mm/transparent_hugepage/enabled
always madvise [never]
14 禁用avahi-daemon
systemctl stop avahi-daemon.socket
systemctl stop avahi-daemon.service
systemctl disable avahi-daemon.socket
systemctl disable avahi-daemon.service
systemctl status avahi-daemon.socket
systemctl status avahi-daemon.service
15 设置RemoveIPC=false
# vi /etc/systemd/logind.conf
RemoveIPC=no
重启systemd-logind服务或重启主机
# systemctl daemon-reload
# systemctl restart systemd-logind
参考:ALERT: Setting RemoveIPC=yes on Redhat 7.2 Crashes ASM and Database Instances as Well as Any
Application That Uses a Shared Memory Segment (SHM) or Semaphores (SEM) (文档 ID 2081410.1)
如果后续OS升级后,也需要检查这个参数,以避免相关问题
16 设置/etc/sysconfig/network
禁止将HAIP(169.254.0.0/16)加入路由表,需要在/etc/sysconfig/network中添加:
cat >> /etc/sysconfig/network<<EOF
NOZEROCONF=yes
EOF
设置路径过滤宽松模式
在RHEL 7默认情况下,路径过滤是严格限制,这在心跳多网卡的情况下可能会造成问题,需要设置路径过滤宽松模式
# vi /etc/sysctl.d/98-oracle.conf
net.ipv4.conf.eno33557248.rp_filter = 2
16 配置存储
16.1 编辑参数文件:
[root@dbssvra rules.d]# cat 99-oracle-asmdevices.rules
KERNEL=="dm-*",ENV{DM_UUID}=="mpath-360000000000009a000000106",SYMLINK+="asm/ocr_001",OWNER="grid",GROUP="oinstall",MODE="0660"
KERNEL=="dm-*",ENV{DM_UUID}=="mpath-360000000000009a000000107",SYMLINK+="asm/ocr_002",OWNER="grid",GROUP="oinstall",MODE="0660"
KERNEL=="dm-*",ENV{DM_UUID}=="mpath-360000000000009a000000108",SYMLINK+="asm/ocr_003",OWNER="grid",GROUP="oinstall",MODE="0660"
KERNEL=="dm-*",ENV{DM_UUID}=="mpath-360000000000009a00000010b",SYMLINK+="asm/ogg_001",OWNER="grid",GROUP="oinstall",MODE="0660"
KERNEL=="dm-*",ENV{DM_UUID}=="mpath-360000000000009a00000010c",SYMLINK+="asm/data_001",OWNER="grid",GROUP="oinstall",MODE="0660"
此处的用户属组为oinstall ,跟个人的安装习惯有关,由于在安装grid和database软件时,我自己习惯性将所有属组都选择
为oinstall,故在存储配置时,设置为oinstall. 按照Oracle的建议,最好是asmadmin
16.2 重启服务器,或执行如下命令,生成设备别名
/sbin//udevadm control --reload-rules
/sbin/udevadm trigger --action=change
17 准备安装GRID
export DISPLAY=17.95.22.125:0.0
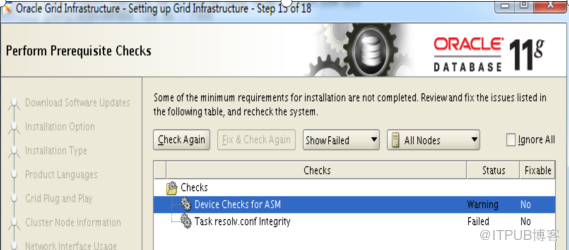
解压grid的包,然后修改如下文件,否则在检测依赖包时,发现elfutils-libelf-devel 和 pdksh-5.2.14 没有相关的依赖包
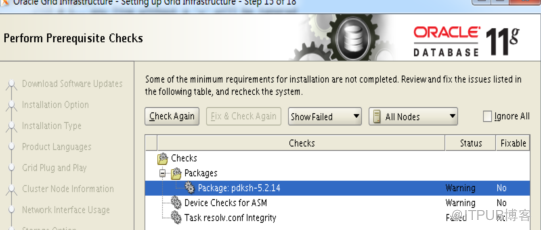
解决方法:
[root@testdb1 admin]# pwd
/tmp/software/grid/stage/cvu/cv/admin
[root@testdb1 admin]# cat cvu_config |grep CV_ASSUME_DISTID
CV_ASSUME_DISTID=OEL6
退出./runInstaller 并重新执行,即可。
执行root.sh时,会报如下错误,即ohasd无法启动,此问题时由于redhat7的命令同redhat6发生变化引起的
profile reader pa cert TP
profile reader peer cert TP
peer user cert
pa user cert
Adding Clusterware entries to inittab
ohasd failed to start --报错,发现不能启动,按照后续步骤进行操作,就OK了
Failed to start the Clusterware. Last 20 lines of the alert log follow: --
2021-10-18 15:47:44.647:
[client(208520)]CRS-2101:The OLR was formatted using version 3.
在执行root.sh前,首先创建如下文件:
[root@testdb1 ~]# touch /usr/lib/systemd/system/ohas.service
[root@testdb1 ~]# chmod 777 /usr/lib/systemd/system/ohas.service
[root@testdb1 ~]# vi /usr/lib/systemd/system/ohas.service
[Unit]
Description=Oracle High Availability Services
After=syslog.target
[Service]
ExecStart=/etc/init.d/init.ohasd run >/dev/null 2>&1 Type=simple
Restart=always
[Install]
WantedBy=multi-user.target
~
"/usr/lib/systemd/system/ohas.service" 9L, 201C written
[root@testdb1 ~]# systemctl daemon-reload
[root@testdb1 ~]# systemctl enable ohas.service
在执行root.sh过程中,时刻检查,并执行如下命令,发现执行root.sh没有任何报错:
[root@testdb1 ~]# ls -ltr /etc/init.d/init.ohasd
ls: cannot access /etc/init.d/init.ohasd: No such file or directory
[root@testdb1 ~]# ls -ltr /etc/init.d/init.ohasd
ls: cannot access /etc/init.d/init.ohasd: No such file or directory
[root@testdb1 ~]# ls -ltr /etc/init.d/init.ohasd
ls: cannot access /etc/init.d/init.ohasd: No such file or directory
[root@testdb1 ~]# ls -ltr /etc/init.d/init.ohasd
ls: cannot access /etc/init.d/init.ohasd: No such file or directory
[root@testdb1 ~]# ls -ltr /etc/init.d/init.ohasd
ls: cannot access /etc/init.d/init.ohasd: No such file or directory
[root@testdb1 ~]# ls -ltr /etc/init.d/init.ohasd
ls: cannot access /etc/init.d/init.ohasd: No such file or directory
[root@testdb1 ~]# ls -ltr /etc/init.d/init.ohasd
-rwxr-xr-x 1 root root 8782 Oct 18 16:20 /etc/init.d/init.ohasd
[root@testdb1 ~]# systemctl start ohas.service systemctl restart ohas.service
[root@testdb1 ~]# systemctl status ohas.service
● ohas.service - Oracle High Availability Services
Loaded: loaded (/usr/lib/systemd/system/ohas.service; enabled; vendor preset: disabled)
Active: active (running) since Mon 2021-10-18 16:21:50 CST; 13s ago
Main PID: 242990 (init.ohasd)
Tasks: 1
CGroup: /system.slice/ohas.service
└─242990 /bin/sh /etc/init.d/init.ohasd run >/dev/null 2>&1 Type=simple
Oct 18 16:21:50 testdb1 systemd[1]: Started Oracle High Availability Services.
以下为安装grid软件,执行root.sh时没有任何报错的详细信息:
[root@testdb1 ~]# /u01/app/oraInventory/orainstRoot.sh
Changing permissions of /u01/app/oraInventory.
Adding read,write permissions for group.
Removing read,write,execute permissions for world.
Changing groupname of /u01/app/oraInventory to oinstall.
The execution of the script is complete.
[root@testdb1 ~]# /u01/app/11.2.0/grid/root.sh
Performing root user operation for Oracle 11g
The following environment variables are set as:
ORACLE_OWNER= grid
ORACLE_HOME= /u01/app/11.2.0/grid
Enter the full pathname of the local bin directory: [/usr/local/bin]:
The contents of "dbhome" have not changed. No need to overwrite.
The contents of "oraenv" have not changed. No need to overwrite.
The contents of "coraenv" have not changed. No need to overwrite.
Creating /etc/oratab file...
Entries will be added to the /etc/oratab file as needed by
Database Configuration Assistant when a database is created
Finished running generic part of root script.
Now product-specific root actions will be performed.
Using configuration parameter file: /u01/app/11.2.0/grid/crs/install/crsconfig_params
Creating trace directory
User ignored Prerequisites during installation
Installing Trace File Analyzer
OLR initialization - successful
root wallet
root wallet cert
root cert export
peer wallet
profile reader wallet
pa wallet
peer wallet keys
pa wallet keys
peer cert request
pa cert request
peer cert
pa cert
peer root cert TP
profile reader root cert TP
pa root cert TP
peer pa cert TP
pa peer cert TP
profile reader pa cert TP
profile reader peer cert TP
peer user cert
pa user cert
Adding Clusterware entries to inittab
CRS-2672: Attempting to start 'ora.mdnsd' on 'testdb1'
CRS-2676: Start of 'ora.mdnsd' on 'testdb1' succeeded
CRS-2672: Attempting to start 'ora.gpnpd' on 'testdb1'
CRS-2676: Start of 'ora.gpnpd' on 'testdb1' succeeded
CRS-2672: Attempting to start 'ora.cssdmonitor' on 'testdb1'
CRS-2672: Attempting to start 'ora.gipcd' on 'testdb1'
CRS-2676: Start of 'ora.cssdmonitor' on 'testdb1' succeeded
CRS-2676: Start of 'ora.gipcd' on 'testdb1' succeeded
CRS-2672: Attempting to start 'ora.cssd' on 'testdb1'
CRS-2672: Attempting to start 'ora.diskmon' on 'testdb1'
CRS-2676: Start of 'ora.diskmon' on 'testdb1' succeeded
CRS-2676: Start of 'ora.cssd' on 'testdb1' succeeded
ASM created and started successfully.
Disk Group CRS created successfully.
clscfg: -install mode specified
Successfully accumulated necessary OCR keys.
Creating OCR keys for user 'root', privgrp 'root'..
Operation successful.
CRS-4256: Updating the profile
Successful addition of voting disk 809cce57a60b4fa8bf36107a1c5c346a.
Successful addition of voting disk 240cf275a8044fc8bffa75eb297efe4f.
Successful addition of voting disk 6d3f31fff2284f68bf9d18da4ae254f7.
Successfully replaced voting disk group with +CRS.
CRS-4256: Updating the profile
CRS-4266: Voting file(s) successfully replaced
## STATE File Universal Id File Name Disk group
-- ----- ----------------- --------- ---------
1. ONLINE 809cce57a60b4fa8bf36107a1c5c346a (/dev/asm/ocr_001) [CRS]
2. ONLINE 240cf275a8044fc8bffa75eb297efe4f (/dev/asm/ocr_002) [CRS]
3. ONLINE 6d3f31fff2284f68bf9d18da4ae254f7 (/dev/asm/ocr_003) [CRS]
Located 3 voting disk(s).
CRS-2672: Attempting to start 'ora.asm' on 'testdb1'
CRS-2676: Start of 'ora.asm' on 'testdb1' succeeded
CRS-2672: Attempting to start 'ora.CRS.dg' on 'testdb1'
CRS-2676: Start of 'ora.CRS.dg' on 'testdb1' succeeded
Configure Oracle Grid Infrastructure for a Cluster ... succeeded
[grid@testdb1 ~]$ crs_stat -t
Name Type Target State Host
------------------------------------------------------------
ora.CRS.dg ora....up.type ONLINE ONLINE testdb1
ora....N1.lsnr ora....er.type ONLINE ONLINE testdb1
ora.asm ora.asm.type ONLINE ONLINE testdb1
ora.cvu ora.cvu.type ONLINE ONLINE testdb1
ora.gsd ora.gsd.type OFFLINE OFFLINE
ora....network ora....rk.type ONLINE ONLINE testdb1
ora.oc4j ora.oc4j.type ONLINE ONLINE testdb1
ora.ons ora.ons.type ONLINE ONLINE testdb1
ora.scan1.vip ora....ip.type ONLINE ONLINE testdb1
ora....SM1.asm application ONLINE ONLINE testdb1
ora....db1.gsd application OFFLINE OFFLINE
ora....db1.ons application ONLINE ONLINE testdb1
ora....db1.vip ora....t1.type ONLINE ONLINE testdb1
18 安装oracle database软件
解压,并按照17步的操作进行修改,否则又会报依赖包不全。
在安装的过程中,会报如下错误:
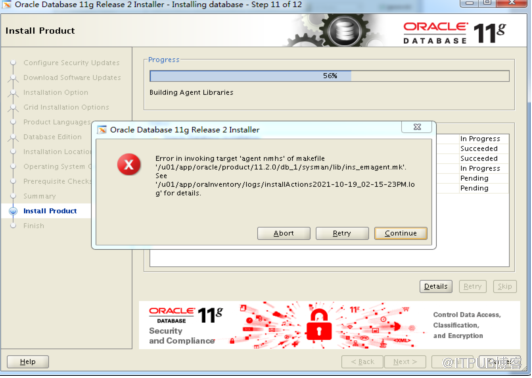
使用如下方法解决:
只在节点1进行修改
vi $ORACLE_HOME/sysman/lib/
原内容:
#===========================
# emdctl
#===========================
$(SYSMANBIN)emdctl:
$(MK_EMAGENT_NMECTL)
修改内容如下
#===========================
# emdctl
#===========================
$(SYSMANBIN)emdctl:
$(MK_EMAGENT_NMECTL)-lnnz11
结果如下:
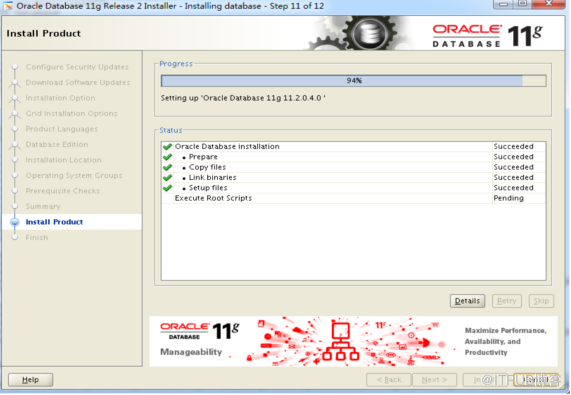
19 为数据库打PSU,发现在执行的过程中报CRS-4124错误,集群无法启动
[root@testdb1 software]# /u01/app/11.2.0/grid/OPatch/opatch auto /tmp/software/32131250
Executing /u01/app/11.2.0/grid/perl/bin/perl /u01/app/11.2.0/grid/OPatch/crs/patch11203.pl -patchdir /tmp/software -patchn 32131250 -paramfile /u01/app/11.2.0/grid/crs/install/crsconfig_params
This is the main log file: /u01/app/11.2.0/grid/cfgtoollogs/opatchauto2021-10-21_08-54-01.log
This file will show your detected configuration and all the steps that opatchauto attempted to do on your system:
/u01/app/11.2.0/grid/cfgtoollogs/opatchauto2021-10-21_08-54-01.report.log
2021-10-21 08:54:01: Starting Clusterware Patch Setup
Using configuration parameter file: /u01/app/11.2.0/grid/crs/install/crsconfig_params
Stopping RAC /u01/app/oracle/product/11.2.0/db_1 ...
Stopped RAC /u01/app/oracle/product/11.2.0/db_1 successfully
patch /tmp/software/32131250/29938455/custom/server/29938455 apply successful for home /u01/app/oracle/product/11.2.0/db_1
patch /tmp/software/32131250/31983472 apply successful for home /u01/app/oracle/product/11.2.0/db_1
Stopping CRS...
Stopped CRS successfully
patch /tmp/software/32131250/29938455 apply successful for home /u01/app/11.2.0/grid
patch /tmp/software/32131250/31983472 apply successful for home /u01/app/11.2.0/grid
patch /tmp/software/32131250/29509309 apply successful for home /u01/app/11.2.0/grid
Starting CRS...
Installing Trace File Analyzer
CRS-4124: Oracle High Availability Services startup failed.
CRS-4000: Command Start failed, or completed with errors.
Oracle Grid Infrastructure stack start initiated but failed to complete at /tmp/software/32131250
/29938455/files/crs/install/crsconfig_lib.pm line 11821.
根据如上报错,可以确定补丁是成功在grid和database软件打上了,但由于启动CRS失败导致后续操作没有执行。
按照网上的说法,是删除/var/tmp/.oracle/npohasd文件就可解决,经过多次测试,不行。重启服务器,问题解决。
由于补丁可以重复多次执行,再次执行打补丁,避免后续有些脚本没有执行,发现一切OK,至此,才算完美收关。
以下为第二次执行PSU的信息:
[root@testdb1 ~]# /u01/app/11.2.0/grid/OPatch/opatch auto /tmp/software/32131250
Executing /u01/app/11.2.0/grid/perl/bin/perl /u01/app/11.2.0/grid/OPatch/crs/patch11203.pl -patchdir
/tmp/software -patchn 32131250 -paramfile /u01/app/11.2.0/grid/crs/install/crsconfig_params
This is the main log file: /u01/app/11.2.0/grid/cfgtoollogs/opatchauto2021-10-21_09-41-53.log
This file will show your detected configuration and all the steps that opatchauto attempted to do on your system:
/u01/app/11.2.0/grid/cfgtoollogs/opatchauto2021-10-21_09-41-53.report.log
2021-10-21 09:41:53: Starting Clusterware Patch Setup
Using configuration parameter file: /u01/app/11.2.0/grid/crs/install/crsconfig_params
Stopping RAC /u01/app/oracle/product/11.2.0/db_1 ...
Stopped RAC /u01/app/oracle/product/11.2.0/db_1 successfully
Stopping CRS...
Stopped CRS successfully
Starting CRS...
Installing Trace File Analyzer
CRS-4123: Oracle High Availability Services has been started.
Starting RAC /u01/app/oracle/product/11.2.0/db_1 ...
Started RAC /u01/app/oracle/product/11.2.0/db_1 successfully
opatch auto succeeded.
至于CRS-4124 即CRS-4000导致集群无法启动,经过对进程的trace,,发现是操作系统的配置有问题导致的,
在下一篇文章中详细说明
来自 “ ITPUB博客 ” ,链接:https://blog.itpub.net/69996316/viewspace-2838813/ ,如需转载,请注明出处,否则将追究法律责任。

最新文章
- ogg复制进程报ORA-01438错误处理
- logminer进行数据挖掘分析测试
- 大事务导致的OGG抽取进程每天7:39定时延时,运行极其缓慢
- EXPDP导出报ORA-31693 ORA-29913 ORA-01861错误
- goldengate的sqlexec测试
- AWR占用sysaux表空间太大
- DataPump Export ORA-31626 ORA-31633 ORA-00955
- ERROR: failed to update diskgroup resource ora.OCR_NEW.dg
- 高水位线导致OGG延迟过长
- expdp导出报ORA-31693、ORA-02354、ORA-01466
