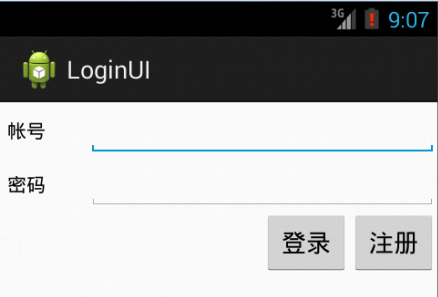
使用RelativeLayout与TableLayout分别实现两种游戏陪玩源码的登录界面,学习RelativeLayout布局中如何实现游戏陪玩源码对齐与调整组件相对位置,使用TableLayout实现游戏陪玩源码登录界面,学习如何设置列的长度,与对齐方式等。
RelativeLayout中使用如下属性调整组件相对位置
layout_alignParentLeft :表示组件左对齐布局
layout_alignParentRight:表示组件有对齐布局
layout_below="@+id/edit1":表示组件在edit1组件下面
layout_toRightOf="@+id/edit1":表示组件放在edit1的右边
效果图:


TableLayout实现效果:
RelatvieLayout实现登录的XML文件
<?xml version="1.0" encoding="utf-8"?>
<RelativeLayout xmlns:android="http://schemas.android.com/apk/res/android"
	android:id="@+id/RelativeLayout01"
	android:layout_width="fill_parent"
	android:layout_height="fill_parent">
	<TextView android:layout_height="wrap_content"
		android:id="@+id/textView1"
		android:layout_width="wrap_content"
		android:text="用户名:"
		android:layout_marginLeft="5dp"
		android:textColor="@color/green"
		android:layout_marginRight="5dp"
		android:layout_alignParentLeft="true">
	</TextView>
	<EditText android:layout_height="wrap_content"
		android:layout_width="fill_parent"
		android:layout_toRightOf="@+id/textView1"
		android:id="@+id/editText1">
	</EditText>
	<TextView android:layout_height="wrap_content"
		android:id="@+id/textView2"
		android:layout_width="wrap_content"
		android:text="密码:"
		android:layout_marginLeft="5dp"
		android:textColor="@color/green"
		android:layout_marginRight="5dp"
		android:layout_below="@+id/editText1"
		android:layout_alignParentLeft="true">
	</TextView>
	<EditText android:layout_height="wrap_content"
		android:layout_width="fill_parent"
		android:layout_toRightOf="@+id/textView2"
		android:id="@+id/editText2"
		android:layout_below="@+id/editText1">
	</EditText>
	<Button android:layout_height="wrap_content"
		android:text="登录"
		android:layout_width="wrap_content"
		android:layout_below="@+id/editText2"
		android:layout_alignParentLeft="true"
		android:id="@+id/button1">
	</Button>
	<Button android:layout_height="wrap_content"
		android:text="注册"
		android:layout_width="wrap_content"
		android:layout_below="@+id/editText2"
		android:layout_toRightOf="@+id/button1"
		android:id="@+id/button2">
	</Button>
</RelativeLayout>
TableLayout实现登录的XML文件
<TableLayout xmlns:android="http://schemas.android.com/apk/res/android"
	android:id="@+id/tableLayout1"
	android:layout_width="fill_parent"
	android:layout_height="fill_parent">
		<TableRow android:id="@+id/TableRow01">
			<TextView android:layout_height="wrap_content"
					android:layout_width="wrap_content"
					android:text="帐号"
					android:textColor="@color/green"
					android:layout_marginLeft="5dp"
					android:layout_marginRight="5dp">
			</TextView>
			<EditText android:layout_width="0dp"
					android:layout_height="wrap_content"
					android:layout_weight="1"/>
		</TableRow>
		<TableRow android:id="@+id/TableRow02">
			<TextView android:layout_height="wrap_content"
					android:layout_width="wrap_content"
					android:text="密码"
					android:textColor="@color/green"
					android:layout_marginLeft="5dp"
					android:layout_marginRight="5dp">
			</TextView>
			<EditText android:layout_width="0dp"
					android:layout_height="wrap_content"
					android:layout_weight="1"/>
		</TableRow>
		<TableRow android:id="@+id/TableRow03"
				android:layout_height="wrap_content"
				android:layout_width="fill_parent"
				android:gravity="right">
			<Button android:id="@+id/login_btn"
					android:layout_width="wrap_content"
					android:layout_height="wrap_content"
					android:text="登录"
					android:textColor="@color/green"
					/>
			<Button android:id="@+id/register_btn"
					android:layout_width="wrap_content"
					android:layout_height="wrap_content"
					android:text="注册"
					android:textColor="@color/green"
					/>
		</TableRow>
</TableLayout>
声明:本文由云豹科技转发自贾志刚博客,如有侵权请联系作者删除
来自 “ ITPUB博客 ” ,链接:https://blog.itpub.net/69982461/viewspace-2792043/ ,如需转载,请注明出处,否则将追究法律责任。
上一篇:
数据安全,是陪玩游戏系统时刻关注的问题

请登录后发表评论
登录
全部评论
