监控是指对行为、活动或其他变动中信息的一种持续性关注,通常是为了对人达成影响、管理、指导或保护的目的。
独孤九剑级别的命令
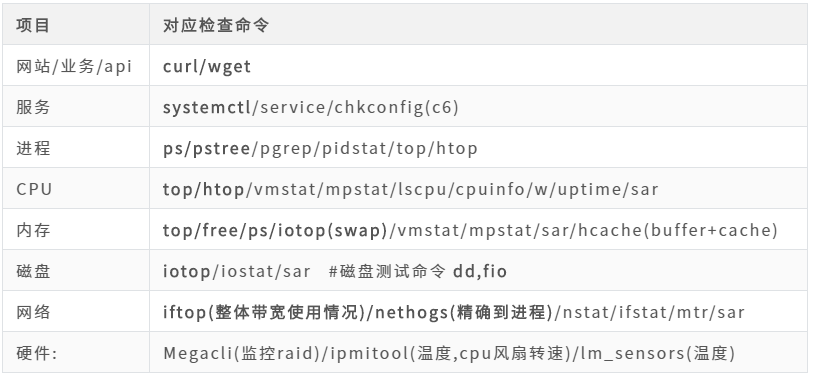
#进程pgrep  过滤出指定服务的进程pid  #   ps -ef |grep  ##pidstat #CPU##vmstat [root@aliyun-ansible ~]# vmstat procs -----------memory---------- ---swap-- -----io---- -system-- ------cpu-----
 r  b   swpd   free   buff  cache   si   so    bi    bo   in   cs us sy id wa st 0  0      0 6298256   2104 1254900    0    0     3     8   64  208  0  0 100  0  0
   Procs
       r: The number of runnable processes (running or waiting for run time). #cpu 正在运行或等待运行的进程数
       b: The number of processes blocked waiting for I/O to complete. #处于io状态进程数量 #自行回顾: ps,top 详细信息  进程状态 ##mpstat#内存 https://github.com/silenceshell/hcache#网络nstat/ifstat/mtr/sar##ifstat [root@aliyun-ansible ~]# ifstat #kernelInterface        RX Pkts/Rate    TX Pkts/Rate    RX Data/Rate    TX Data/Rate
                 RX Errs/Drop    TX Errs/Drop    RX Over/Rate    TX Coll/Rate
lo                    22 0            22 0          1264 0          1264 0
                       0 0             0 0             0 0             0 0      eth0                1583 0          2365 0        118089 0        315050 0
                       0 0             0 0             0 0             0 0      [root@aliyun-ansible ~]# ##mtr  [root@aliyun-ansible ~]# #动态 tracert 或traceroute 路由追踪 [root@aliyun-ansible ~]# mtr
当被面试官问到“你们公司监控是如何做的?”时,我们可以从cpu、内存、磁盘、网卡、进程、服务等方面展开。
回答运维面试相关问题时,尽量避免y1s1,要达到分层次、框架,避免问什么答什么。
角度01:单台机器
硬件信息: 磁盘,raid状态,温度,风扇转速, 机房温度,湿度
系统信息: cpu,内存(内存,swap) ,磁盘(io,使用率,inode),负载,网络(in/out)...
服务信息:各种服务状态, 进程,端口,状态,特定的信息(不同服务)
业务(应用/api)信息: 应用,程序代码是否有问题(需要我们与开发沟通,书写一个页面)
角度02:网站集群监控(用户访问流程)
DNS解析: ping/dig/nslookup/host
DNS解析域CDN是否ok,本质是通过全局访问测试工具(模仿用户在全国(全球)各地访问我们的网站)
TCP三次握手-网站负载均衡监控ss -ant
HTTP请求报文-监控web日志查看(状态码)HTTP响应报文-监控web日志查看(状态码)
TCP四次挥手-网站负载均衡监控ss -ant
断开连接
角度03:其他
错误日志监控,error.log,catalina.out
网站性能监控: apm监控:skywalking...
舆情监控
监控宝-监控图形
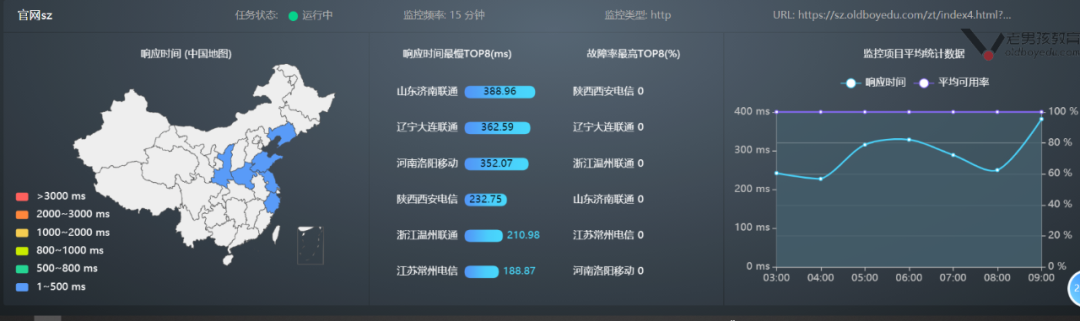
监控体系说明图

监控的脚本时代-过去时
#脚本取出内存使用率cat  /server/scripts/check_mem.sh#!/bin/bash# author: lidao996# desc:   check  system  memory usage MEM=`free -m|awk 'NR==2{print $NF}'`if [ $MEM -le 100 ];then
   echo "当前的内存还剩余 $MEM"|mail -s '内存不足了!oom'  youjiu_linux@qq.com
fi
监控的现代时

Zabbix监控架构
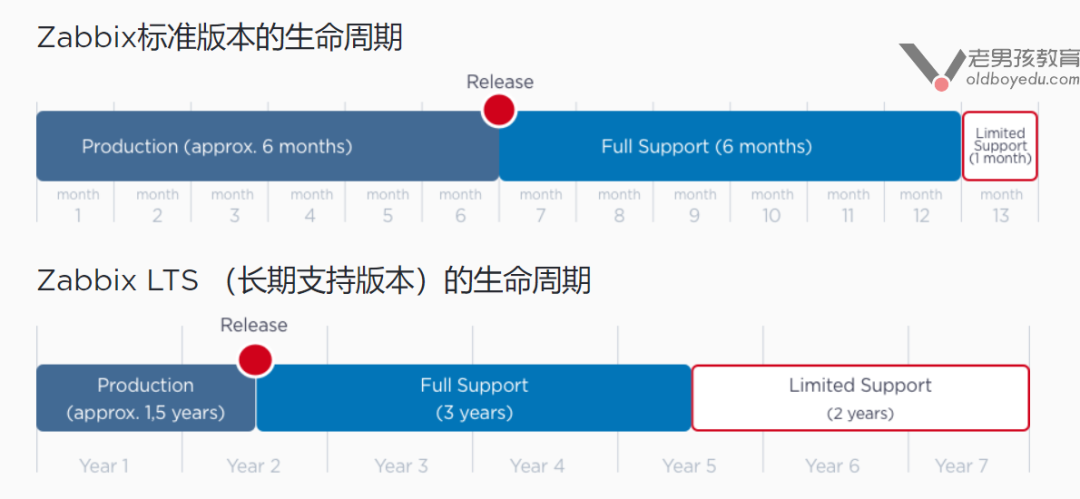
生命周期
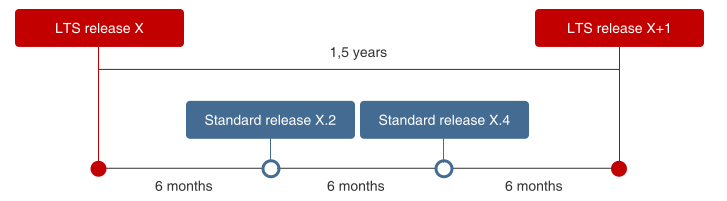
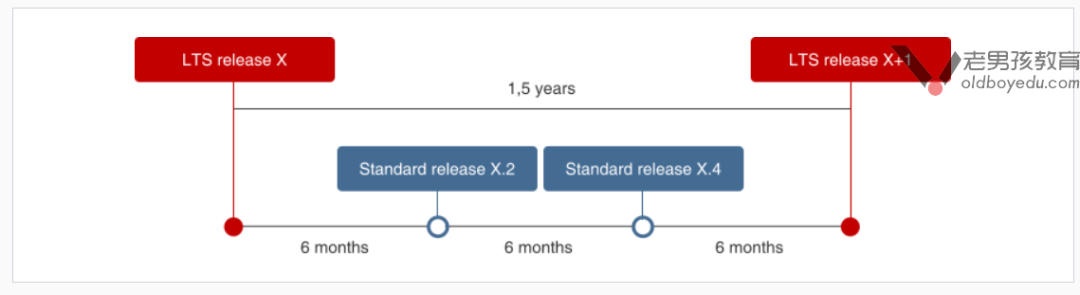
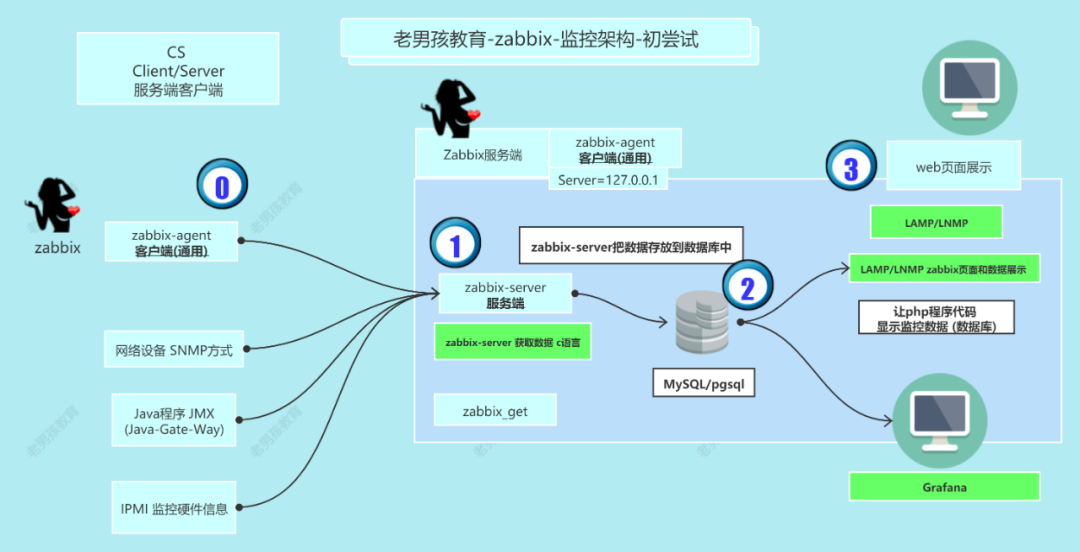
Zabbix监控架构
Zabbix是一个CS(服务端/客户端)架构的服务。
Zabbix-Agent获取数据 -发送给->Zabbix-Server服务端-数据会被存放-数据库<-Zabbix Web页面展示数据。
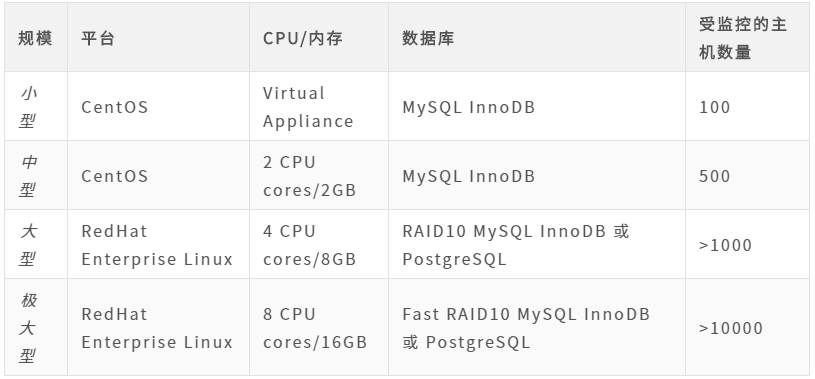
Zabbix生产快速实践指南
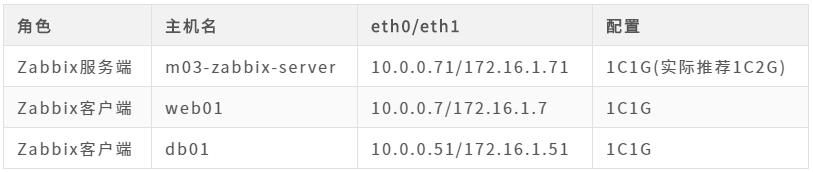
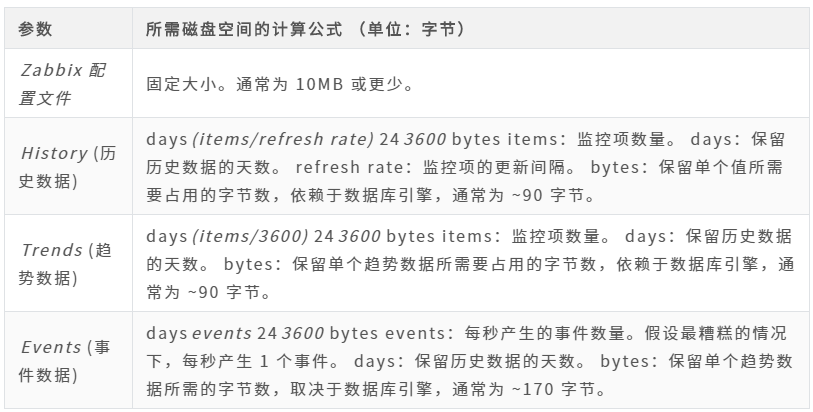
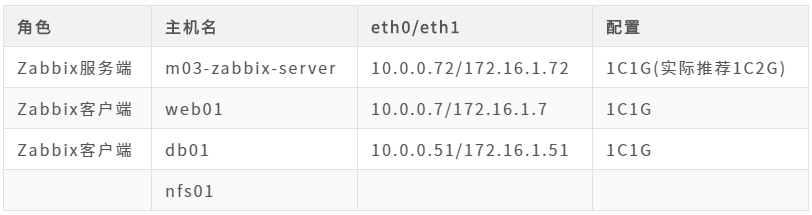
主机规划
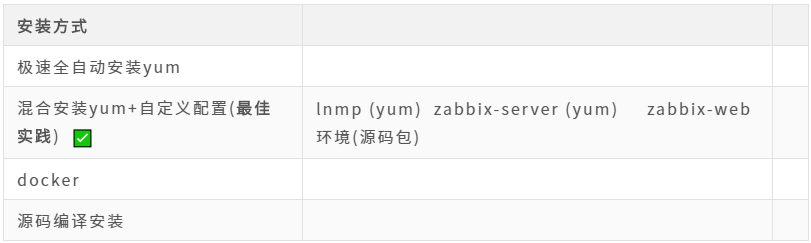
企业Zabbix安装最佳实践-CentOS7
nginx环境
#m03   zabbix-server  10.0.0.72/172.16.1.72 ###配置nginx源 [root@m03 ~]# cat /etc/yum.repos.d/nginx.repo [nginx-stable]name=nginx stable repo
baseurl=http://nginx.org/packages/centos/$releasever/$basearch/gpgcheck=1enabled=0gpgkey=https://nginx.org/keys/nginx_signing.key
module_hotfixes=true[root@m03 ~]# yum install   nginx  --enablerepo=nginx-stable
php
#nginx 1.20.1   php7.2 curl -o /etc/yum.repos.d/CentOS-Base.repo http://mirrors.aliyun.com/repo/Centos-7.repo
yum install epel-release.noarch -y    #webtatic 要求 curl -o /etc/yum.repos.d/epel.repo http://mirrors.aliyun.com/repo/epel-7.repo
rpm -Uvh https://mirror.webtatic.com/yum/el7/webtatic-release.rpm  #webtatic源 yum install  php72w-cli php72w-fpm php72w-gd php72w-mbstring php72w-bcmath php72w-xml php72w-ldap php72w-mysqlnd -y[root@m03 ~]# rpm -qa |egrep 'nginx|php72w'php72w-fpm-7.2.34-1.w7.x86_64
php72w-mbstring-7.2.34-1.w7.x86_64
nginx-1.20.1-2.el7.x86_64
php72w-common-7.2.34-1.w7.x86_64
php72w-pdo-7.2.34-1.w7.x86_64
php72w-mysqlnd-7.2.34-1.w7.x86_64
php72w-cli-7.2.34-1.w7.x86_64
php72w-ldap-7.2.34-1.w7.x86_64
php72w-xml-7.2.34-1.w7.x86_64
nginx-filesystem-1.20.1-2.el7.noarch
php72w-gd-7.2.34-1.w7.x86_64
php72w-bcmath-7.2.34-1.w7.x86_64
nginx+php
#01 [root@m03 ~]# systemctl enable nginx php-fpm.service Created symlink from /etc/systemd/system/multi-user.target.wants/nginx.service to /usr/lib/systemd/system/nginx.service.Created symlink from /etc/systemd/system/multi-user.target.wants/php-fpm.service to /usr/lib/systemd/system/php-fpm.service.[root@m03 ~]# systemctl start  nginx php-fpm.service [root@m03 ~]# #02 nginx配置 [root@m03-zabbix-server ~]# cat /etc/nginx/conf.d/zbx.oldboylinux.cn.confserver {
  listen 80;
  server_name zbx.oldboylinux.cn;
  root /app/code/zbx;
  location / {
    index index.php;
  }
  location  ~ \.php$ {
    fastcgi_pass  127.0.0.1:9000;
    fastcgi_index index.php;
    fastcgi_param SCRIPT_FILENAME   /app/code/zbx$fastcgi_script_name;
    include fastcgi_params;
  }}[root@m03 ~]# nginx -t nginx: the configuration file /etc/nginx/nginx.conf syntax is ok
nginx: configuration file /etc/nginx/nginx.conf test is successful[root@m03 ~]# systemctl reload nginx #03 php 配置 #修改php用户#准备 php会话保持目录 [root@m03 ~]# sed -ri  '/^(user|group)/s#apache#nginx#g' /etc/php-fpm.d/[root@m03 ~]# egrep '^(user|group)'  /etc/php-fpm.d/
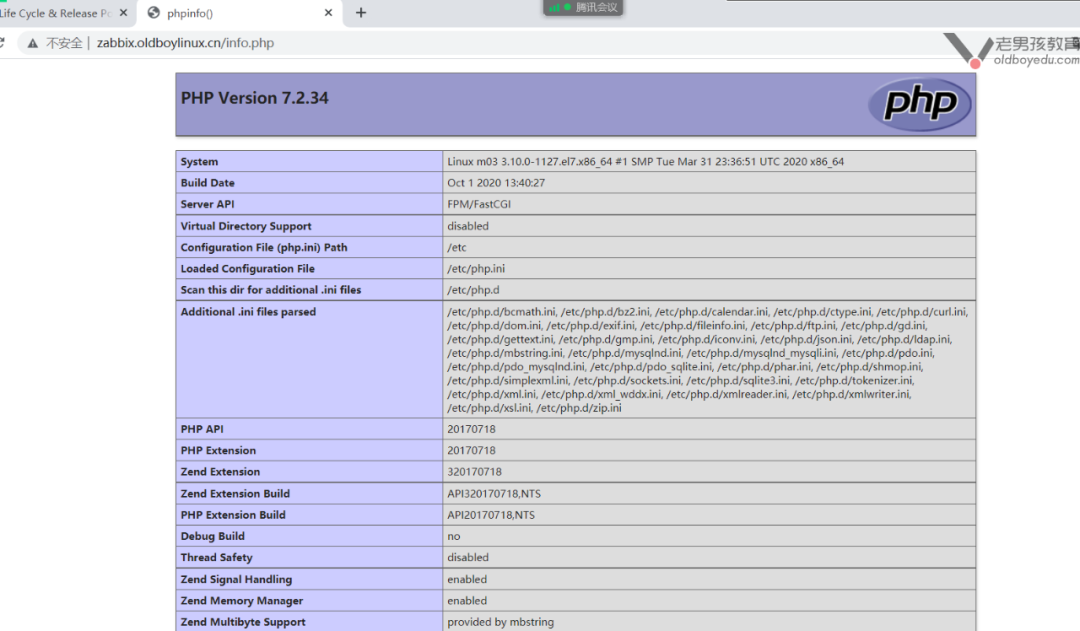
group = nginx[root@m03 ~]# grep 'var/lib/php/session' /etc/php-fpm.d/[session.save_path]    = /var/lib/php/session[root@m03 ~]# mkdir -p  /var/lib/php/session [root@m03 ~]# chown nginx.nginx /var/lib/php/session[root@m03 ~]# php-fpm -t [15-Jul-2021 15:33:44] NOTICE: configuration file /etc/php-fpm.conf test is successful[root@m03 ~]# systemctl reload php-fpm.service #04 php+nginx测试[root@m03 ~]# mkdir -p /code/zabbix [root@m03 ~]# chown nginx.nginx /code/zabbix[root@m03 ~]# vim /code/zabbix/info.php[root@m03 ~]# cat /code/zabbix/info.php<?php
phpinfo();?>[root@m03 ~]#
php-nginx测试完成
数据库
[root@m03 ~]# yum install -y  mariadb-server [root@m03 ~]# mysql_secure_installation NOTE: RUNNING ALL PARTS OF THIS SCRIPT IS RECOMMENDED FOR ALL MariaDB
      SERVERS IN PRODUCTION USE!  PLEASE READ EACH STEP CAREFULLY!
In order to log into MariaDB to secure it, we'll need the current
password for the root user.  If you've just installed MariaDB, andyou haven't set the root password yet, the password will be blank,so you should just press enter here.Enter current password for root (enter for none): OK, successfully used password, moving on...Setting the root password ensures that nobody can log into the MariaDB
root user without the proper authorisation.Set root password? [Y/n] Y
New password: Re-enter new password: Password updated successfully!
Reloading privilege tables..
 ... Success!
By default, a MariaDB installation has an anonymous user, allowing anyone
to log into MariaDB without having to have a user account created forthem.  This is intended only for testing, and to make the installation
go a bit smoother.  You should remove them before moving into a
production environment.Remove anonymous users? [Y/n] Y ... Success!
Normally, root should only be allowed to connect from 'localhost'.  This
ensures that someone cannot guess at the root password from the network.Disallow root login remotely? [Y/n] Y........By default, MariaDB comes with a database named 'test' that anyone can
access.  This is also intended only for testing, and should be removed
before moving into a production environment.Remove test database and access to it? [Y/n] Y - Dropping test database...
 ... Success! - Removing privileges on test database...
 ... Success!
Reloading the privilege tables will ensure that all changes made so far
will take effect immediately.Reload privilege tables now? [Y/n] Y ... Success!
Cleaning up...All done!  If you've completed all of the above steps, your MariaDB
installation should now be secure.Thanks for using MariaDB!
MariaDB [(none)]> select user,host  from   mysql.user ; +------+-----------+| user | host      |+------+-----------+| root | 127.0.0.1 || root | ::1       || root | localhost || root | m03       |+------+-----------+4 rows in set (0.00 sec)MariaDB [(none)]> show databases;MariaDB [(none)]> show databases;+--------------------+| Database           |+--------------------+| information_schema || mysql              || performance_schema |+--------------------+3 rows in set (0.00 sec)MariaDB [(none)]> create database  zabbix charset utf8    collate utf8_bin;grant all on zabbix.*  to 'zabbix'@'localhost' identified by '1' ;
 grant all on zabbix.*  to 'zabbix'@'172.16.1.%' identified by '1' ; MariaDB [(none)]> show databases; MariaDB [(none)]> select user,host from mysql.user;+--------+------------+| user   | host       |+--------+------------+| root   | 127.0.0.1  || zabbix | 172.16.1.% || root   | ::1        || root   | localhost  || zabbix | localhost  |+--------+------------+5 rows in set (0.00 sec)
cat   mysqli.php<?php//$link_id=mysqli_connect('主机名','用户','密码');$link_id=mysqli_connect('localhost','zabbix','1') or mysqli_error();
 if($link_id){
 echo "mysql successful by oldboy !";
 }else{
 echo mysqli_error();
 }//这是php单行注释
?>

zabbix-服务端
# 安装zabbix yum源 rpm -Uvh https://mirror.tuna.tsinghua.edu.cn/zabbix/zabbix/5.0/rhel/7/x86_64/zabbix-release-5.0-1.el7.noarch.rpm
sed -i  's#http://repo.zabbix.com#https://mirrors.tuna.tsinghua.edu.cn/zabbix#g'   /etc/yum.repos.d/zabbix.repo#zabbix-release.....rpm  zabbix yum源的配置文件 [root@m03 ~]# cat   /etc/yum.repos.d/zabbix.repo[zabbix]name=Zabbix Official Repository - $basearch
baseurl=https://mirror.tuna.tsinghua.edu.cn/zabbix/zabbix/5.0/rhel/7/$basearch/enabled=1gpgcheck=1gpgkey=file:///etc/pki/rpm-gpg/RPM-GPG-KEY-ZABBIX-A14FE591[zabbix-frontend]name=Zabbix Official Repository frontend - $basearch
baseurl=https://mirror.tuna.tsinghua.edu.cn/zabbix/zabbix/5.0/rhel/7/$basearch/frontend
enabled=0gpgcheck=1gpgkey=file:///etc/pki/rpm-gpg/RPM-GPG-KEY-ZABBIX-A14FE591[zabbix-debuginfo]name=Zabbix Official Repository debuginfo - $basearch
baseurl=https://mirror.tuna.tsinghua.edu.cn/zabbix/zabbix/5.0/rhel/7/$basearch/debuginfo/enabled=0gpgkey=file:///etc/pki/rpm-gpg/RPM-GPG-KEY-ZABBIX-A14FE591
gpgcheck=1[zabbix-non-supported]name=Zabbix Official Repository non-supported - $basearch
baseurl=http://repo.zabbix.com/non-supported/rhel/7/$basearch/enabled=1gpgkey=file:///etc/pki/rpm-gpg/RPM-GPG-KEY-ZABBIX
gpgcheck=1# 安装 zabbix-server [root@m03 ~]# yum install -y zabbix-server-mysql zabbix-agent2# zabbix 数据库导入数据[root@m03 ~]# zcat   /usr/share/doc/zabbix-server-mysql-5.0.18/create.sql.gz  |mysql -uzabbix -p123456 zabbix# zabbix 服务端 配置连接数据库 [root@m03 ~]# vim /etc/zabbix/zabbix_server.conf [root@m03 ~]# grep  ^DB /etc/zabbix/zabbix_server.conf DBHost=localhost
DBName=zabbix
DBUser=zabbix
DBPassword=123456[root@m03-zabbix-server ~]# grep -n '^DB' /etc/zabbix/zabbix_server.conf 91:DBHost=localhost100:DBName=zabbix116:DBUser=zabbix124:DBPassword=1#修改后 zabbix 服务端开启的功能  (不用修改) [root@m03 ~]# grep '^[a-Z]'   /etc/zabbix/zabbix_server.conf LogFile=/var/log/zabbix/zabbix_server.log
LogFileSize=0PidFile=/var/run/zabbix/zabbix_server.pid
SocketDir=/var/run/zabbix
DBHost=localhost
DBName=zabbix
DBUser=zabbix
DBPassword=123456SNMPTrapperFile=/var/log/snmptrap/snmptrap.log
Timeout=4AlertScriptsPath=/usr/lib/zabbix/alertscripts
ExternalScripts=/usr/lib/zabbix/externalscripts
LogSlowQueries=3000StatsAllowedIP=127.0.0.1#启动 zabbix-server root@m03 ~]# systemctl enable zabbix-server.service Created symlink from /etc/systemd/system/multi-user.target.wants/zabbix-server.service to /usr/lib/systemd/system/zabbix-server.service.[root@m03 ~]# systemctl start zabbix-server.service [root@m03 ~]# [root@m03 ~]# ss -lntup |grep zabbix tcp    LISTEN     0      128       *:10051                 *:*                   users:(("zabbix_server
来自 “ ITPUB博客 ” ,链接:https://blog.itpub.net/69952968/viewspace-3100583/ ,如需转载,请注明出处,否则将追究法律责任。

