Oracle10.2.0.1 install on linux6.4
安装介质在百度上就可以下载到:http://blog.csdn.net/zlsunnan/article/details/8058235
1、依赖包的检查
[root@gy yum.repos.d]# rpm -q binutils compat-libstdc++-33 compat-libstdc++-33.i686 elfutils-libelf elfutils-libelf-devel gcc gcc-c++ glibc glibc.i686 glibc-common glibc-devel glibc-devel.i686 glibc-headers ksh libaio libaio.i686 libaio-devel libaio-devel.i686 libgcc libgcc.i686 libstdc++ libstdc++.i686 libstdc++-devel make sysstat
binutils-2.20.51.0.2-5.36.el6.x86_64
package compat-libstdc++-33 is not installed
package compat-libstdc++-33.i686 is not installed
elfutils-libelf-0.152-1.el6.x86_64
package elfutils-libelf-devel is not installed
package gcc is not installed
package gcc-c++ is not installed
glibc-2.12-1.107.el6.x86_64
package glibc.i686 is not installed
glibc-common-2.12-1.107.el6.x86_64
package glibc-devel is not installed
package glibc-devel.i686 is not installed
package glibc-headers is not installed
package ksh is not installed
libaio-0.3.107-10.el6.x86_64
package libaio.i686 is not installed
package libaio-devel is not installed
package libaio-devel.i686 is not installed
libgcc-4.4.7-3.el6.x86_64
package libgcc.i686 is not installed
libstdc++-4.4.7-3.el6.x86_64
package libstdc++.i686 is not installed
package libstdc++-devel is not installed
make-3.81-20.el6.x86_64
sysstat-9.0.4-20.el6.x86_64
[root@gy yum.repos.d]#
安装依赖包
[root@gy yum.repos.d]# yum install binutils compat-libstdc++-33 compat-libstdc++-33.i686 elfutils-libelf elfutils-libelf-devel gcc gcc-c++ glibc glibc.i686 glibc-common glibc-devel glibc-devel.i686 glibc-headers ksh libaio libaio.i686 libaio-devel libaio-devel.i686 libgcc libgcc.i686 libstdc++ libstdc++.i686 libstdc++-devel make sysstat
Loaded plugins: product-id, refresh-packagekit, security, subscription-manager
This system is not registered to Red Hat Subscription Management. You can use subscription-manager to register.
rhe16 | 3.9 kB 00:00 ...
rhe16/primary_db | 3.1 MB 00:00 ...
Setting up Install Process
Package binutils-2.20.51.0.2-5.36.el6.x86_64 already installed and latest version
Package elfutils-libelf-0.152-1.el6.x86_64 already installed and latest version
Package glibc-2.12-1.107.el6.x86_64 already installed and latest version
Package glibc-common-2.12-1.107.el6.x86_64 already installed and latest version
Package libaio-0.3.107-10.el6.x86_64 already installed and latest version
Package libgcc-4.4.7-3.el6.x86_64 already installed and latest version
Package libstdc++-4.4.7-3.el6.x86_64 already installed and latest version
Package 1:make-3.81-20.el6.x86_64 already installed and latest version
Package sysstat-9.0.4-20.el6.x86_64 already installed and latest version
Resolving Dependencies
--> Running transaction check
---> Package compat-libstdc++-33.i686 0:3.2.3-69.el6 will be installed
---> Package compat-libstdc++-33.x86_64 0:3.2.3-69.el6 will be installed
---> Package elfutils-libelf-devel.x86_64 0:0.152-1.el6 will be installed
.
.
.
Verifying : cpp-4.4.7-3.el6.x86_64 22/22
Installed:
compat-libstdc++-33.i686 0:3.2.3-69.el6 compat-libstdc++-33.x86_64 0:3.2.3-69.el6 elfutils-libelf-devel.x86_64 0:0.152-1.el6 gcc.x86_64 0:4.4.7-3.el6 gcc-c++.x86_64 0:4.4.7-3.el6
glibc.i686 0:2.12-1.107.el6 glibc-devel.i686 0:2.12-1.107.el6 glibc-devel.x86_64 0:2.12-1.107.el6 glibc-headers.x86_64 0:2.12-1.107.el6 ksh.x86_64 0:20100621-19.el6
libaio.i686 0:0.3.107-10.el6 libaio-devel.i686 0:0.3.107-10.el6 libaio-devel.x86_64 0:0.3.107-10.el6 libgcc.i686 0:4.4.7-3.el6 libstdc++.i686 0:4.4.7-3.el6
libstdc++-devel.x86_64 0:4.4.7-3.el6
Dependency Installed:
cloog-ppl.x86_64 0:0.15.7-1.2.el6 cpp.x86_64 0:4.4.7-3.el6 kernel-headers.x86_64 0:2.6.32-358.el6 mpfr.x86_64 0:2.4.1-6.el6 nss-softokn-freebl.i686 0:3.12.9-11.el6 ppl.x86_64 0:0.10.2-11.el6
Complete!
[root@gy yum.repos.d]#
再次检查通过:
[root@gy yum.repos.d]# rpm -q binutils compat-libstdc++-33 compat-libstdc++-33.i686 elfutils-libelf elfutils-libelf-devel gcc gcc-c++ glibc glibc.i686 glibc-common glibc-devel glibc-devel.i686 glibc-headers ksh libaio libaio.i686 libaio-devel libaio-devel.i686 libgcc libgcc.i686 libstdc++ libstdc++.i686 libstdc++-devel make sysstat
binutils-2.20.51.0.2-5.36.el6.x86_64
compat-libstdc++-33-3.2.3-69.el6.x86_64
compat-libstdc++-33-3.2.3-69.el6.i686
compat-libstdc++-33-3.2.3-69.el6.i686
elfutils-libelf-0.152-1.el6.x86_64
elfutils-libelf-devel-0.152-1.el6.x86_64
gcc-4.4.7-3.el6.x86_64
gcc-c++-4.4.7-3.el6.x86_64
glibc-2.12-1.107.el6.x86_64
glibc-2.12-1.107.el6.i686
glibc-2.12-1.107.el6.i686
glibc-common-2.12-1.107.el6.x86_64
glibc-devel-2.12-1.107.el6.i686
glibc-devel-2.12-1.107.el6.x86_64
glibc-devel-2.12-1.107.el6.i686
glibc-headers-2.12-1.107.el6.x86_64
ksh-20100621-19.el6.x86_64
libaio-0.3.107-10.el6.x86_64
libaio-0.3.107-10.el6.i686
libaio-0.3.107-10.el6.i686
libaio-devel-0.3.107-10.el6.x86_64
libaio-devel-0.3.107-10.el6.i686
libaio-devel-0.3.107-10.el6.i686
libgcc-4.4.7-3.el6.x86_64
libgcc-4.4.7-3.el6.i686
libgcc-4.4.7-3.el6.i686
libstdc++-4.4.7-3.el6.x86_64
libstdc++-4.4.7-3.el6.i686
libstdc++-4.4.7-3.el6.i686
libstdc++-devel-4.4.7-3.el6.x86_64
make-3.81-20.el6.x86_64
sysstat-9.0.4-20.el6.x86_64
[root@gy yum.repos.d]#
2、 vi /etc/sysctl.conf
#use for oracle
kernel.shmall = 2097152
kernel.shmmax = 2147483648
kernel.shmmni = 4096
kernel.sem = 250 32000 100 128
fs.file-max = 65536
net.ipv4.ip_local_port_range = 1024 65000
net.core.rmem_default = 262144
net.core.rmem_max = 262144
net.core.wmem_default = 262144
net.core.wmem_max = 262144
3、vi /etc/security/limits.conf
#use for oracle
* soft nproc 2047
* hard nproc 16384
* soft nofile 1024
* hard nofile 65536
4、vi /etc/pam.d/login
# use for oracle
session required pam_limits.so
5、vi /etc/selinux/config
SELINUX=disabled
SELINUXTYPE=disabled
6、创建用户和组
groupadd oinstall 添加两个组
groupadd dba
useradd -m -g oinstall -G dba oracle 添加用户
id oracle 为Oracle用户设置密码
passwd oracle
7、创建安装目录
mkdir -p /opt/app/oracle/product/10.2
使用如下命令创建Oracle的安装目录并更改权限:
mkdir -p /u01/app/oracle/
chown -R oracle.oinstall /u01/app/oracle
chown -R 775 /u01/app/oracle
8、创建oracle环境变量
vi .bash_profile
TMP=/tmp; export TMP
TMPDIR=$TMP; export TMPDIR
ORACLE_BASE=/u01/app/oracle
ORACLE_HOME=$ORACLE_BASE/product/10.2.0/db_1
ORACLE_SID=orcl
ORACLE_TERM=xterm
PATH=$PATH:/usr/sbin:$ORACLE_HOME/bin
LD_LIBRARY_PATH=$ORACLE_HOME/lib:/lib:/usr/lib:/lib64:/usr/lib64
TNS_ADMIN=$ORACLE_HOME/network/admin
ORACLE_ADMIN=$ORACLE_BASE/admin
#CLASSPATH=.:$ORACLE_HOME/jre:$ORACLE_HOME/jlib:$ORACLE_HOME/rdbms/jlib
export ORACLE_BASE ORACLE_HOME ORACLE_SID ORACLE_TERM PATH LD_LIBRARY_PATH TNS_ADMIN ORACLE_ADMIN
#export CLASSPATH
9、解压安装包,准备安装oracle数据库
gunzip 10201_database_linux_x86_64.cpio.gz
若为.cpio.gz
文件,则再次执行:
cpio -idmv < 10201_database_linux_x86_64.cpio
[oracle@gy u01]$ ls
10201_database_linux_x86_64.cpio app database
[oracle@gy u01]$
[oracle@gy u01]$ cd database/
[oracle@gy database]$
[oracle@gy database]$ ls
doc install response runInstaller stage welcome.html

在这里我安装需要的包:
[root@gy ~]# yum install libXp.so.6
运行继续报错

安装运行报错许需要的包:
[root@gy media]# yum install libXtst.so.6
运行成功,开始安装

选择高级安装即可

指定证书存放的目录。

选择安装的数据库类型及oracle所支持的语言,这里选择企业版,语言选择英文

指定oracle环境变量,及安装路径。因为我们在.bash_profile中已经声明,所以这里会自动填充。

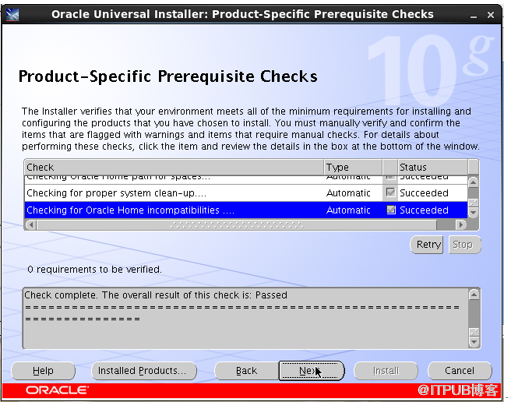
Oracle开始进行安装前的检查工作。
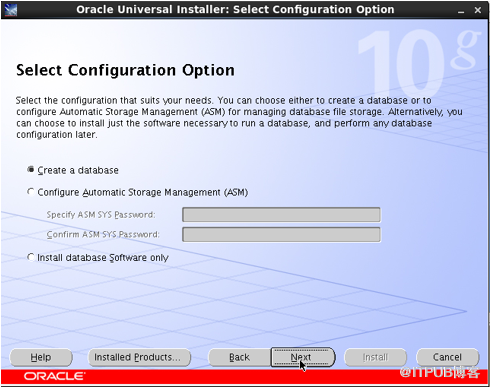

选择配置选项,在这有三个选择项:创建数据库、配置自动存储管理、只安装数
据软件。 我们在此选择第一项,创建数据库。创建数据库后,我们就不必再执行"dbca"进行数据库的创建。
在这里我设置的sid不符合,所以使用下面的SID


选择创建的数据库模式,我们在此选择第一项一般用途。因为"Advanced"后面有很多SGA文件系统都可以自行设置。


选择创建的数据库模式,我们在此选择第一项一般用途。因为"Advanced"后面有很多SGA,文件系统都可以自行设置。

指定oracle数据库默认的SID。指定字符集为库所用的字符集。

显示安装概要,再次确认相关配置是否正确。


安装进度大约到65%时会有错误提示:Error in invoking target'collector' of makefile'/opt/oracle/102/sysman/lib/ins_emdb.mk'.
可以忽略此错误继续安装,对系统没什么影响。

ORA-27125:unable to create shared memory segment
解决:
1.确定安装
oracle
所使用的用户组
#id oracle
可以看到oracle组
[root@gy ~]# id oracle
uid=501(oracle) gid=501(oinstall) groups=501(oinstall),502(dba)
[root@gy ~]#


用root执行这2个脚本
[root@gy ~]# /u01/app/oracle/oraInventory/orainstRoot.sh
Changing permissions of /u01/app/oracle/oraInventory to 770.
Changing groupname of /u01/app/oracle/oraInventory to oinstall.
The execution of the script is complete
[root@gy ~]# /u01/app/oracle/product/10.2.0/db_1/root.sh
Running Oracle10 root.sh script...
The following environment variables are set as:
ORACLE_OWNER= oracle
ORACLE_HOME= /u01/app/oracle/product/10.2.0/db_1
Enter the full pathname of the local bin directory: [/usr/local/bin]:
Copying dbhome to /usr/local/bin ...
Copying oraenv to /usr/local/bin ...
Copying coraenv to /usr/local/bin ...
Creating /etc/oratab file...
Entries will be added to the /etc/oratab file as needed by
Database Configuration Assistant when a database is created
Finished running generic part of root.sh script.
Now product-specific root actions will be performed.
[root@gy ~]#

检查数据库是否安装完成
[oracle@gy ~]$ sqlplus / as sysdba
SQL*Plus: Release 10.2.0.1.0 - Production on Thu Apr 13 10:43:35 2017
Copyright (c) 1982, 2005, Oracle. All rights reserved.
Connected to:
Oracle Database 10g Enterprise Edition Release 10.2.0.1.0 - 64bit Production
With the Partitioning, OLAP and Data Mining options
SQL>
SQL> select version from v$timezone_file;
VERSION
----------
2
来自 “ ITPUB博客 ” ,链接:https://blog.itpub.net/31467250/viewspace-2140700/ ,如需转载,请注明出处,否则将追究法律责任。

