一、创建工程
创建 SpringBoot 工程项目,创建时只需要加入
spring-boot-starter-web 依赖即可,
Maven 仓库搜索 Swagger2 依赖:

<dependency>
    <groupId>io.springfox</groupId>
    <artifactId>springfox-swagger2</artifactId>
    <version>2.9.2</version></dependency>12345
<!-- https://mvnrepository.com/artifact/io.springfox/springfox-swagger-ui --><dependency>
    <groupId>io.springfox</groupId>
    <artifactId>springfox-swagger-ui</artifactId>
    <version>2.9.2</version></dependency>1234567
二、Swagger2 配置
Swagger2的配置也是比较容易的,在项目创建成功之后,只需要开发者自己提供一个Docket的Bean即可,如下:
import org.springframework.context.annotation.Bean;import org.springframework.context.annotation.Configuration;import springfox.documentation.builders.ApiInfoBuilder;import springfox.documentation.builders.PathSelectors;import springfox.documentation.builders.RequestHandlerSelectors;import springfox.documentation.service.Contact;import springfox.documentation.spi.DocumentationType;import springfox.documentation.spring.web.plugins.Docket;import springfox.documentation.swagger2.annotations.EnableSwagger2WebFlux;@Configuration@EnableSwagger2public class Swagger2Config {
    @Bean
    Docket docket() {
        return new Docket(DocumentationType.SWAGGER_2)
                .select()
                .apis(RequestHandlerSelectors.basePackage("org.yolo.swagger2.controller"))
                .paths(PathSelectors.any())
                .build().apiInfo(new ApiInfoBuilder()
                        //网站描述
                        .description("接口文档的描述信息")
                        .title("微人事项目接口文档")
                        //联系人信息
                        .contact(new Contact("yolo","blog.csdn.net","xxxx@gmail.com"))
                        //版本
                        .version("v1.0")
                        .license("Apache2.0")
                        .build());
    }}12345678910111213141516171819202122232425262728293031
这里提供一个配置类,首先通过
@EnableSwagger2WebFlux注解启用
Swagger2,然后配置一个Docket Bean,这个Bean中,配置映射路径和要扫描的接口的位置,在apiInfo中,主要配置一下Swagger2文档网站的信息,例如网站的title,网站的描述,联系人的信息,使用的协议等等。
http://dxb.myzx.cn/hebei/
三、简单示例
(1)定义 User
public class User {
    private Integer id;
    private String username;
    private String address;
    //get,set 方法省略}123456
(2)定义 Controller
http://dxb.myzx.cn/anhui/
@RestControllerpublic class UserController {
    @GetMapping("/user")
    public User getUserById(Integer id){
        User user = new User();
        user.setId(id);
        return user;
    }}123456789
在这种 restful 风格的代码里,需要明确指定接口是什么请求(get/post 等),不能直接写成
requestMapping,不然前端会生成6个方法,get,post 等都能发,会比较混乱。
http://ask.baikezh.com/heilongjiang/
启动项目,访问:http://localhost:8080/swagger-ui.html

也可以配置成中文描述
四、中文配置案例
http://dxb.myzx.cn
(1)对于参数的描述可以放在实体类中
@ApiModel(value = "用户实体类",description = "用户信息描述类")public class User {
    @ApiModelProperty(value = "用户id")
    private Integer id;
    @ApiModelProperty(value = "用户名")
    private String username;
    @ApiModelProperty(value = "用户地址")
    private String address;
	//get,set 方法省略}12345678910
(2)创建接口
http://zzdxb.baikezh.com/
@RestController@Api(tags = "用户数据接口")public class UserController {
    @ApiOperation(value = "查询用户", notes = "根据用户id查询用户")
    @ApiImplicitParam(name = "id", value = "用户id", required = true, defaultValue = "99")
    @GetMapping("/user")
    public User getUserById(Integer id) {
        User user = new User();
        user.setId(id);
        return user;
    }
    @ApiOperation(value = "删除用户", notes = "根据用户id删除用户")
    @ApiImplicitParam(name = "id", value = "用户id", required = true, defaultValue = "99")
    @ApiResponses({
            @ApiResponse(code = 200, message = "删除成功"),
            @ApiResponse(code = 500, message = "删除失败")
    })
    @DeleteMapping("/user/{id}")
    public void deleteUserById(@PathVariable Integer id) {
        System.out.println("deleteUserById:" + id);
    }
    @PutMapping("/user")
    @ApiImplicitParams({
            @ApiImplicitParam(name = "id", value = "用户id", required = true, defaultValue = "99"),
            @ApiImplicitParam(name = "username", value = "用户名", required = true, defaultValue = "javaboy")
    })
    @ApiOperation(value = "更新用户", notes = "根据用户id更新用户名")//    @ApiIgnore
    public User updateUsernameById(String username, Integer id) {
        User user = new User();
        user.setId(id);
        user.setUsername(username);
        return user;
    }
    @PostMapping("/user")
    @ApiOperation(value = "添加用户", notes = "添加用户接口")
    public User addUser(@RequestBody User user) {
        return user;
    }}12345678910111213141516171819202122232425262728293031323334353637383940414243
(1)
@Api注解可以用来标记当前
Controller的功能。
(2)
@ApiOperation注解用来标记一个方法的作用。
(3)
@ApiImplicitParam注解用来描述一个参数,可以配置参数的中文含义,也可以给参数设置默认值,这样在接口测试的时候可以避免手动输入。
(4)如果有多个参数,则需要使用多个
@ApiImplicitParam注解来描述,多个
@ApiImplicitParam注解需要放在一个
@ApiImplicitParams注解中。
(5)需要注意的是,
@ApiImplicitParam注解中虽然可以指定参数是必填的,但是却不能代替
@RequestParam(required = true),前者的必填只是在Swagger2框架内必填,抛弃了Swagger2,这个限制就没用了,所以假如开发者需要指定一个参数必填,
@RequestParam(required = true)注解还是不能省略。
(3)效果展示
http://dxb.myzx.cn/henan/

可以看到,所有的接口这里都列出来了,包括接口请求方式,接口地址以及接口的名字等,点开一个接口,可以看到如下信息:
http://zzdxb.baikezh.com/jiyuan/
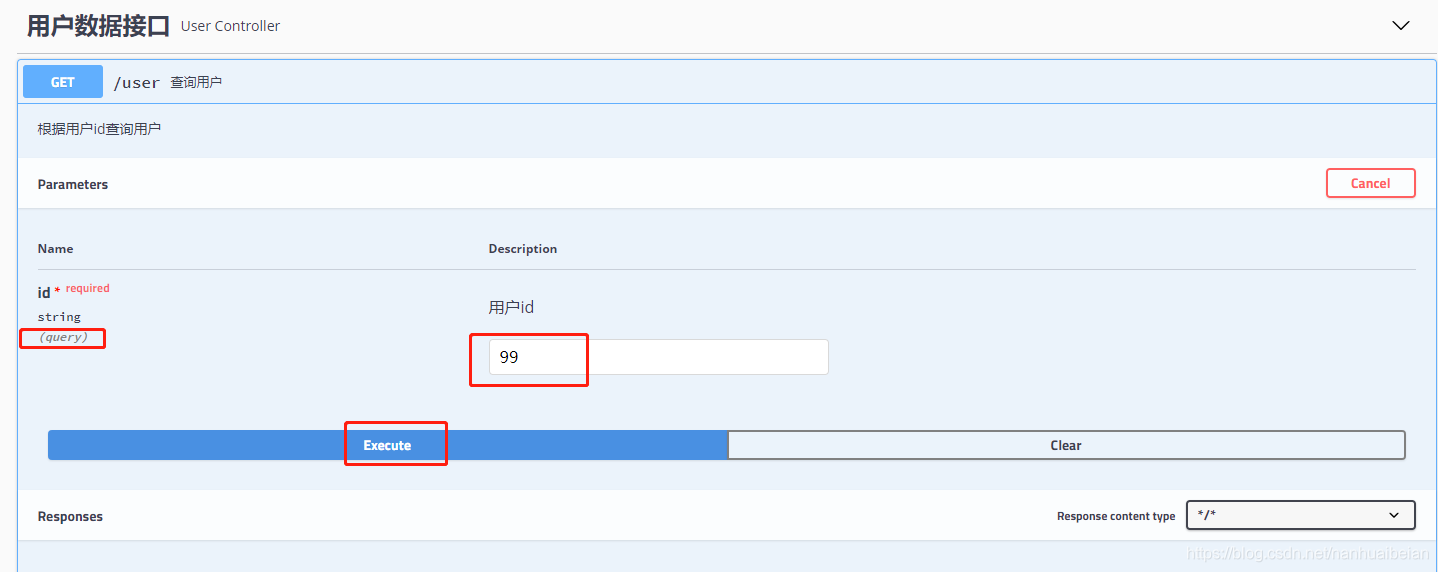
可以看到,接口的参数,参数要求,参数默认值等等统统都展示出来了,参数类型下的
query表示参数以
key/value的形式传递,点击右上角的
Try it out,就可以进行接口测试:
点击Execute按钮,表示发送请求进行测试。测试结果会展示在下面的Response中。
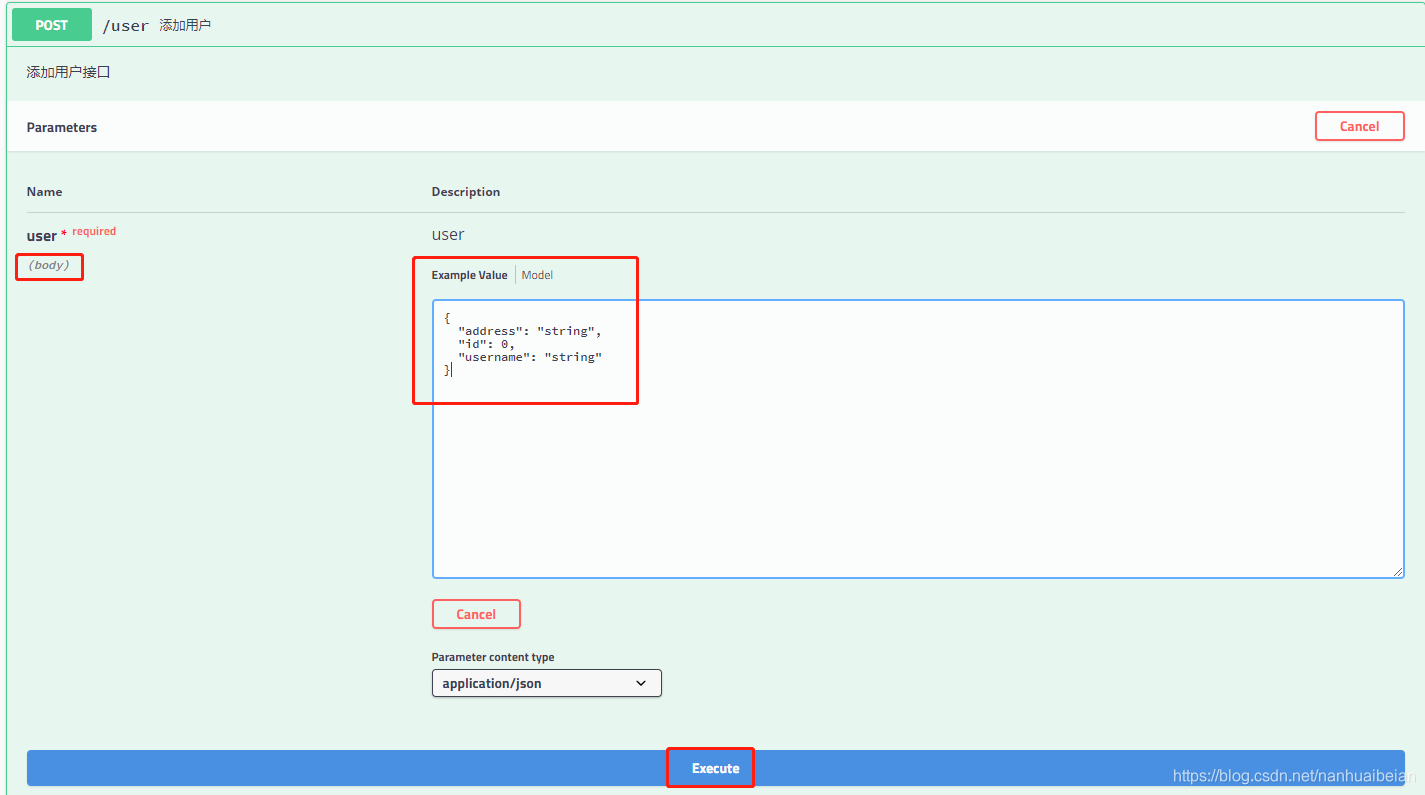
小伙伴们注意,参数类型下面的
query表示参数以
key/value的形式传递,这里的值也可能是
body,
body表示参数以请求体的方式传递,例如上文的更新接口,如下:
http://dxb.myzx.cn/question/
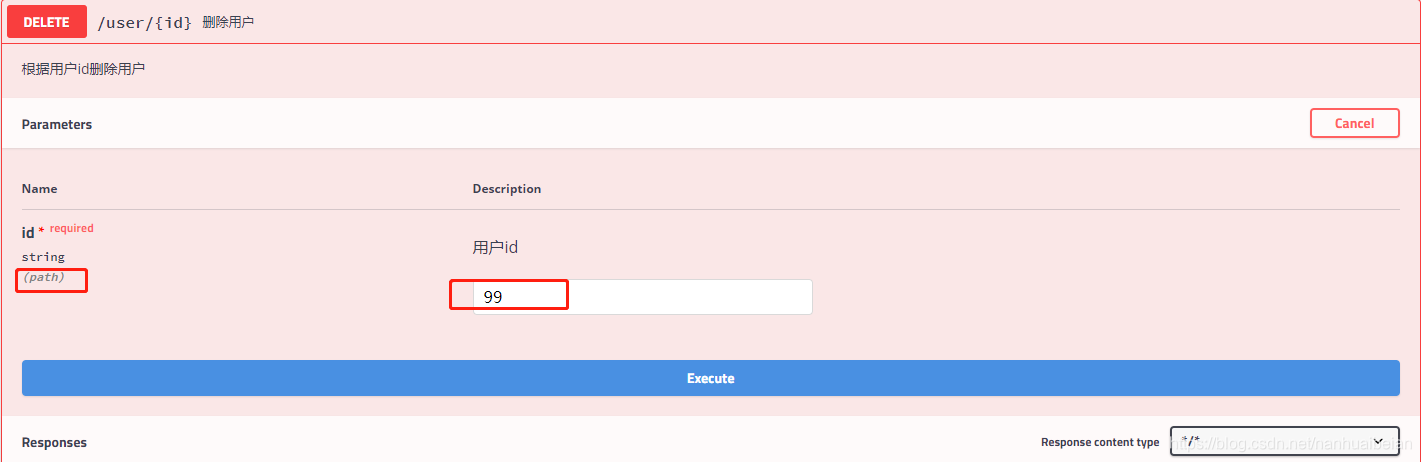
当然还有一种可能就是这里的参数为path,表示参数放在路径中传递,例如根据id查询用户的接口:
五、在 Security 中的配置
http://ask.baikezh.com/
如果我们的Spring Boot项目中集成了Spring Security,那么如果不做额外配置,Swagger2文档可能会被拦截,此时只需要在Spring Security的配置类中重写configure方法,添加如下过滤即可:
@Overridepublic void configure(WebSecurity web) throws Exception {
    web.ignoring()
            .antMatchers("/swagger-ui.html")
            .antMatchers("/v2/**")
            .antMatchers("/swagger-resources/**");}1234567
如此之后,Swagger2文件就不需要认证就能访问了。
来自 “ ITPUB博客 ” ,链接:https://blog.itpub.net/30239065/viewspace-2729638/
,如需转载,请注明出处,否则将追究法律责任。

