linux下MySQL的卸载和安装
1. 首先检查当前系统上是否安装过MySQL
[root@oracle ~]# rpm -qa |grep -i mysql
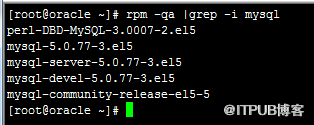
可以看到在我当前系统上以安装过Mysql,不过版本较低,因此先卸载掉Mysql,再重新安装高版本的。卸载Mysql之前,先停止Mysql的服务:
a) 检查Mysql的服务状态
命令: [root@oracle ~]# service mysqld status

b) 如果Mysql的服务是开启的,则需要先停止Mysql的服务
命令: [root@oracle ~]# service mysqld stop
相应的,开启Mysql的服务命令为[root@oracle ~]# service mysqld start
2. Mysql的服务停止后,就可以删除掉在第一步中检查出的Mysql包
命令: [root@oracle ~]# rpm -ev 包名
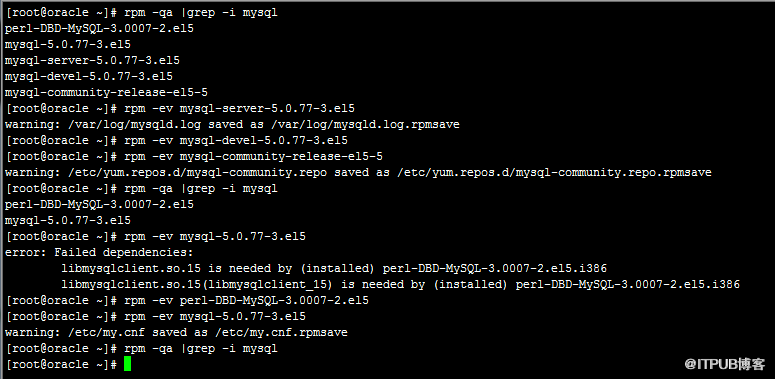
在删除的过程中,包与包之间可能有依赖关系,删除的时候会报错,例如上面perl-DBD-MySQL-3.0007-2.el5包依赖mysql-5.0.77-3.el5包,那么就先删除
perl-DBD-MySQL-3.0007-2.el5包,再删除mysql-5.0.77-3.el5包。
3. 最后删除老版本的Mysql文件和目录
命令: [root@oracle ~]# rm -rf /var/lib/mysql
注意:卸载Mysql后不会删除Mysql的配置文件my.cnf(Mysql的配置文件为/etc/my.cnf),在上面删除Mysql的相关包的提示里,是把my.cnf改名为my.cnf.rpmsave保存,
可以把它也删除掉,如果my.cnf没有改名另存,也是需要将它删除掉的。

命令: [root@oracle ~]# rm -rf /etc/my.cnf.rpmsave
4. 再次检查当前系统是否安装Mysql

无结果表示已经彻底卸载,接下来就可以安装Mysql了。
5. 准备Mysql的rpm包
因为我的系统是32位的Red Hat Enterprise Linux 5.4,所以我下载的包为
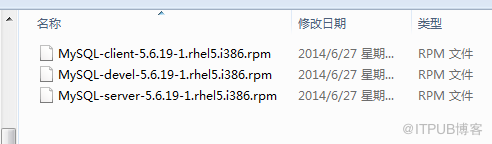
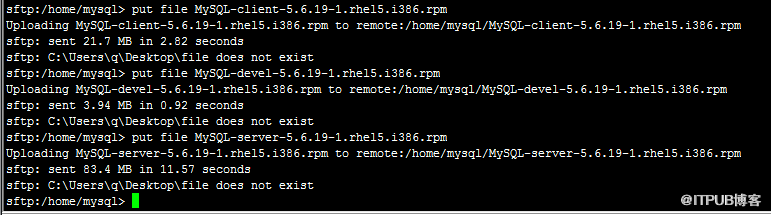
用xshell将包上传到linux中
6. 安装Mysql服务端
因为我将rpm包上传到了/home/mysql/下,cd /home/mysql进入该目录

安装server过程
[root@oracle mysql]# rpm -ivh MySQL-server-5.6.19-1.rhel5.i386.rpm
Preparing... ########################################### [100%]
1:MySQL-server ########################################### [100%]
2014-06-27 14:21:25 0 [Warning] TIMESTAMP with implicit DEFAULT value is deprecated. Please use --explicit_defaults_for_timestamp server option (see documentation for more details).
2014-06-27 14:21:26 7726 [Note] InnoDB: Using mutexes to ref count buffer pool pages
2014-06-27 14:21:26 7726 [Note] InnoDB: The InnoDB memory heap is disabled
2014-06-27 14:21:26 7726 [Note] InnoDB: Mutexes and rw_locks use InnoDB's own implementation
2014-06-27 14:21:26 7726 [Note] InnoDB: Compressed tables use zlib 1.2.3
2014-06-27 14:21:26 7726 [Note] InnoDB: Using Linux native AIO
2014-06-27 14:21:26 7726 [Note] InnoDB: Not using CPU crc32 instructions
2014-06-27 14:21:26 7726 [Note] InnoDB: Initializing buffer pool, size = 128.0M
2014-06-27 14:21:26 7726 [Note] InnoDB: Completed initialization of buffer pool
2014-06-27 14:21:26 7726 [Note] InnoDB: The first specified data file ./ibdata1 did not exist: a new database to be created!
2014-06-27 14:21:26 7726 [Note] InnoDB: Setting file ./ibdata1 size to 12 MB
2014-06-27 14:21:26 7726 [Note] InnoDB: Database physically writes the file full: wait...
2014-06-27 14:21:26 7726 [Note] InnoDB: Setting log file ./ib_logfile101 size to 48 MB
2014-06-27 14:21:27 7726 [Note] InnoDB: Setting log file ./ib_logfile1 size to 48 MB
2014-06-27 14:21:28 7726 [Note] InnoDB: Renaming log file ./ib_logfile101 to ./ib_logfile0
2014-06-27 14:21:28 7726 [Warning] InnoDB: New log files created, LSN=45781
2014-06-27 14:21:28 7726 [Note] InnoDB: Doublewrite buffer not found: creating new
2014-06-27 14:21:28 7726 [Note] InnoDB: Doublewrite buffer created
2014-06-27 14:21:28 7726 [Note] InnoDB: 128 rollback segment(s) are active.
2014-06-27 14:21:28 7726 [Warning] InnoDB: Creating foreign key constraint system tables.
2014-06-27 14:21:28 7726 [Note] InnoDB: Foreign key constraint system tables created
2014-06-27 14:21:28 7726 [Note] InnoDB: Creating tablespace and datafile system tables.
2014-06-27 14:21:28 7726 [Note] InnoDB: Tablespace and datafile system tables created.
2014-06-27 14:21:28 7726 [Note] InnoDB: Waiting for purge to start
2014-06-27 14:21:28 7726 [Note] InnoDB: 5.6.19 started; log sequence number 0
A random root password has been set. You will find it in '/root/.mysql_secret'.
2014-06-27 14:21:29 7726 [Note] Binlog end
2014-06-27 14:21:29 7726 [Note] InnoDB: FTS optimize thread exiting.
2014-06-27 14:21:29 7726 [Note] InnoDB: Starting shutdown...
2014-06-27 14:21:30 7726 [Note] InnoDB: Shutdown completed; log sequence number 1625977
2014-06-27 14:21:30 0 [Warning] TIMESTAMP with implicit DEFAULT value is deprecated. Please use --explicit_defaults_for_timestamp server option (see documentation for more details).
2014-06-27 14:21:30 7749 [Note] InnoDB: Using mutexes to ref count buffer pool pages
2014-06-27 14:21:30 7749 [Note] InnoDB: The InnoDB memory heap is disabled
2014-06-27 14:21:30 7749 [Note] InnoDB: Mutexes and rw_locks use InnoDB's own implementation
2014-06-27 14:21:30 7749 [Note] InnoDB: Compressed tables use zlib 1.2.3
2014-06-27 14:21:30 7749 [Note] InnoDB: Using Linux native AIO
2014-06-27 14:21:30 7749 [Note] InnoDB: Not using CPU crc32 instructions
2014-06-27 14:21:30 7749 [Note] InnoDB: Initializing buffer pool, size = 128.0M
2014-06-27 14:21:30 7749 [Note] InnoDB: Completed initialization of buffer pool
2014-06-27 14:21:30 7749 [Note] InnoDB: Highest supported file format is Barracuda.
2014-06-27 14:21:30 7749 [Note] InnoDB: 128 rollback segment(s) are active.
2014-06-27 14:21:30 7749 [Note] InnoDB: Waiting for purge to start
2014-06-27 14:21:30 7749 [Note] InnoDB: 5.6.19 started; log sequence number 1625977
2014-06-27 14:21:31 7749 [Note] Binlog end
2014-06-27 14:21:31 7749 [Note] InnoDB: FTS optimize thread exiting.
2014-06-27 14:21:31 7749 [Note] InnoDB: Starting shutdown...
2014-06-27 14:21:32 7749 [Note] InnoDB: Shutdown completed; log sequence number 1625987
A RANDOM PASSWORD HAS BEEN SET FOR THE MySQL root USER !
You will find that password in '/root/.mysql_secret'.
You must change that password on your first connect,
no other statement but 'SET PASSWORD' will be accepted.
See the manual for the semantics of the 'password expired' flag.
Also, the account for the anonymous user has been removed.
In addition, you can run:
/usr/bin/mysql_secure_installation
which will also give you the option of removing the test database.
This is strongly recommended for production servers.
See the manual for more instructions.
Please report any problems at http://bugs.mysql.com/
The latest information about MySQL is available on the web at
http://www.mysql.com
Support MySQL by buying support/licenses at http://shop.mysql.com
New default config file was created as /usr/my.cnf and
will be used by default by the server when you start it.
You may edit this file to change server settings
[root@oracle mysql]#
7. 再安装client和devel包
[root@oracle mysql]# rpm -ivh MySQL-devel-5.6.19-1.rhel5.i386.rpm
Preparing... ########################################### [100%]
1:MySQL-devel ########################################### [100%]
[root@oracle mysql]# rpm -ivh MySQL-client-5.6.19-1.rhel5.i386.rpm
Preparing... ########################################### [100%]
1:MySQL-client ########################################### [100%]
[root@oracle mysql]#
注意:Mysql 5.5之后的安装都需要通过cmake包,因此需要在系统上先安装cmake包,而cmake包又需要c 的编译,因此安装cmake之前需要安装
gcc和gcc++包
8. 上述三个包安装完毕就可以启动Mysql了
命令: [root@oracle mysql]# service mysql start

9. 启动Mysql后就可以通过mysql命令进入mysql了,另外此处需要注意,在上面安装mysql的server包时,有个提示,说已给root用户创建了密码
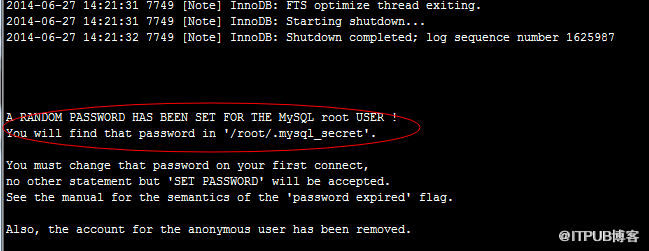
因此,查看初始化密码

连接mysql
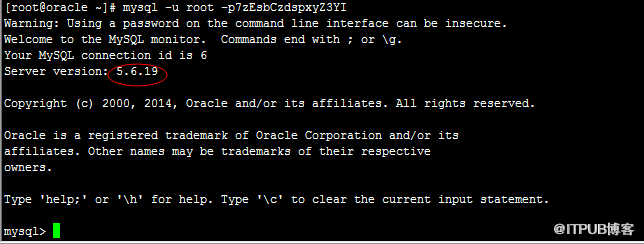
可以看到已经连接成功,并且连接信息里有安装的mysql版本信息,至此,mysql的安装完毕。
10. 更改root密码
在第9步中登陆成功后,可以通过SET PASSWORD来修改密码
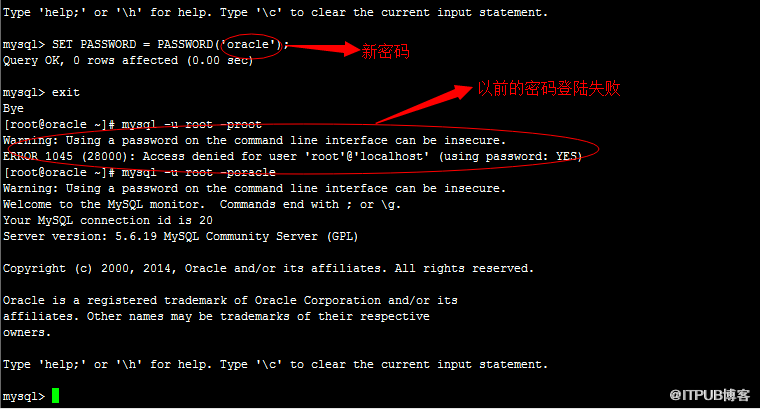
也可以在登陆时通过mysqladmin来修改root密码
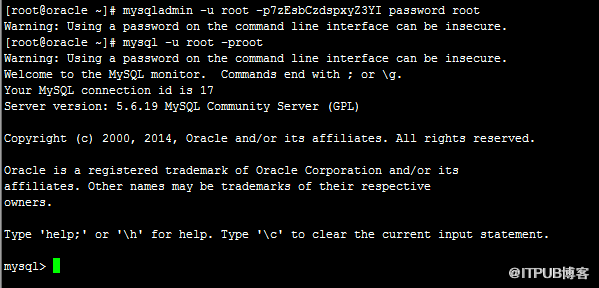
修改root密码为root,并登陆,成功。
11. 查看mysql服务
在Mysql 5.6里,查看Mysql的服务状态不再是service mysqld status,而是service mysql status
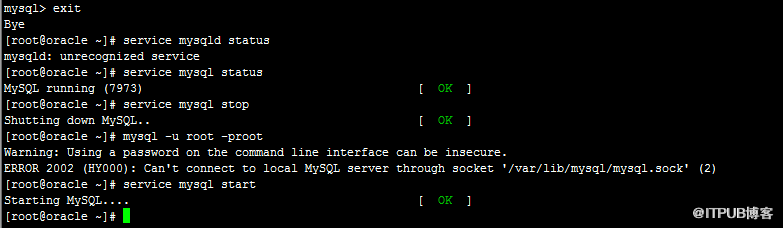
12. 另外根据安装server包的提示,新的配置文件my.cnf生成在/usr/目录下

不再是之前的/etc/my.cnf文件,而是/usr/my.cnf
[root@oracle ~]# rpm -qa |grep -i mysql
可以看到在我当前系统上以安装过Mysql,不过版本较低,因此先卸载掉Mysql,再重新安装高版本的。卸载Mysql之前,先停止Mysql的服务:
a) 检查Mysql的服务状态
命令: [root@oracle ~]# service mysqld status
b) 如果Mysql的服务是开启的,则需要先停止Mysql的服务
命令: [root@oracle ~]# service mysqld stop
相应的,开启Mysql的服务命令为[root@oracle ~]# service mysqld start
2. Mysql的服务停止后,就可以删除掉在第一步中检查出的Mysql包
命令: [root@oracle ~]# rpm -ev 包名
在删除的过程中,包与包之间可能有依赖关系,删除的时候会报错,例如上面perl-DBD-MySQL-3.0007-2.el5包依赖mysql-5.0.77-3.el5包,那么就先删除
perl-DBD-MySQL-3.0007-2.el5包,再删除mysql-5.0.77-3.el5包。
3. 最后删除老版本的Mysql文件和目录
命令: [root@oracle ~]# rm -rf /var/lib/mysql
注意:卸载Mysql后不会删除Mysql的配置文件my.cnf(Mysql的配置文件为/etc/my.cnf),在上面删除Mysql的相关包的提示里,是把my.cnf改名为my.cnf.rpmsave保存,
可以把它也删除掉,如果my.cnf没有改名另存,也是需要将它删除掉的。
命令: [root@oracle ~]# rm -rf /etc/my.cnf.rpmsave
4. 再次检查当前系统是否安装Mysql
无结果表示已经彻底卸载,接下来就可以安装Mysql了。
5. 准备Mysql的rpm包
因为我的系统是32位的Red Hat Enterprise Linux 5.4,所以我下载的包为
用xshell将包上传到linux中
6. 安装Mysql服务端
因为我将rpm包上传到了/home/mysql/下,cd /home/mysql进入该目录
安装server过程
[root@oracle mysql]# rpm -ivh MySQL-server-5.6.19-1.rhel5.i386.rpm
Preparing... ########################################### [100%]
1:MySQL-server ########################################### [100%]
2014-06-27 14:21:25 0 [Warning] TIMESTAMP with implicit DEFAULT value is deprecated. Please use --explicit_defaults_for_timestamp server option (see documentation for more details).
2014-06-27 14:21:26 7726 [Note] InnoDB: Using mutexes to ref count buffer pool pages
2014-06-27 14:21:26 7726 [Note] InnoDB: The InnoDB memory heap is disabled
2014-06-27 14:21:26 7726 [Note] InnoDB: Mutexes and rw_locks use InnoDB's own implementation
2014-06-27 14:21:26 7726 [Note] InnoDB: Compressed tables use zlib 1.2.3
2014-06-27 14:21:26 7726 [Note] InnoDB: Using Linux native AIO
2014-06-27 14:21:26 7726 [Note] InnoDB: Not using CPU crc32 instructions
2014-06-27 14:21:26 7726 [Note] InnoDB: Initializing buffer pool, size = 128.0M
2014-06-27 14:21:26 7726 [Note] InnoDB: Completed initialization of buffer pool
2014-06-27 14:21:26 7726 [Note] InnoDB: The first specified data file ./ibdata1 did not exist: a new database to be created!
2014-06-27 14:21:26 7726 [Note] InnoDB: Setting file ./ibdata1 size to 12 MB
2014-06-27 14:21:26 7726 [Note] InnoDB: Database physically writes the file full: wait...
2014-06-27 14:21:26 7726 [Note] InnoDB: Setting log file ./ib_logfile101 size to 48 MB
2014-06-27 14:21:27 7726 [Note] InnoDB: Setting log file ./ib_logfile1 size to 48 MB
2014-06-27 14:21:28 7726 [Note] InnoDB: Renaming log file ./ib_logfile101 to ./ib_logfile0
2014-06-27 14:21:28 7726 [Warning] InnoDB: New log files created, LSN=45781
2014-06-27 14:21:28 7726 [Note] InnoDB: Doublewrite buffer not found: creating new
2014-06-27 14:21:28 7726 [Note] InnoDB: Doublewrite buffer created
2014-06-27 14:21:28 7726 [Note] InnoDB: 128 rollback segment(s) are active.
2014-06-27 14:21:28 7726 [Warning] InnoDB: Creating foreign key constraint system tables.
2014-06-27 14:21:28 7726 [Note] InnoDB: Foreign key constraint system tables created
2014-06-27 14:21:28 7726 [Note] InnoDB: Creating tablespace and datafile system tables.
2014-06-27 14:21:28 7726 [Note] InnoDB: Tablespace and datafile system tables created.
2014-06-27 14:21:28 7726 [Note] InnoDB: Waiting for purge to start
2014-06-27 14:21:28 7726 [Note] InnoDB: 5.6.19 started; log sequence number 0
A random root password has been set. You will find it in '/root/.mysql_secret'.
2014-06-27 14:21:29 7726 [Note] Binlog end
2014-06-27 14:21:29 7726 [Note] InnoDB: FTS optimize thread exiting.
2014-06-27 14:21:29 7726 [Note] InnoDB: Starting shutdown...
2014-06-27 14:21:30 7726 [Note] InnoDB: Shutdown completed; log sequence number 1625977
2014-06-27 14:21:30 0 [Warning] TIMESTAMP with implicit DEFAULT value is deprecated. Please use --explicit_defaults_for_timestamp server option (see documentation for more details).
2014-06-27 14:21:30 7749 [Note] InnoDB: Using mutexes to ref count buffer pool pages
2014-06-27 14:21:30 7749 [Note] InnoDB: The InnoDB memory heap is disabled
2014-06-27 14:21:30 7749 [Note] InnoDB: Mutexes and rw_locks use InnoDB's own implementation
2014-06-27 14:21:30 7749 [Note] InnoDB: Compressed tables use zlib 1.2.3
2014-06-27 14:21:30 7749 [Note] InnoDB: Using Linux native AIO
2014-06-27 14:21:30 7749 [Note] InnoDB: Not using CPU crc32 instructions
2014-06-27 14:21:30 7749 [Note] InnoDB: Initializing buffer pool, size = 128.0M
2014-06-27 14:21:30 7749 [Note] InnoDB: Completed initialization of buffer pool
2014-06-27 14:21:30 7749 [Note] InnoDB: Highest supported file format is Barracuda.
2014-06-27 14:21:30 7749 [Note] InnoDB: 128 rollback segment(s) are active.
2014-06-27 14:21:30 7749 [Note] InnoDB: Waiting for purge to start
2014-06-27 14:21:30 7749 [Note] InnoDB: 5.6.19 started; log sequence number 1625977
2014-06-27 14:21:31 7749 [Note] Binlog end
2014-06-27 14:21:31 7749 [Note] InnoDB: FTS optimize thread exiting.
2014-06-27 14:21:31 7749 [Note] InnoDB: Starting shutdown...
2014-06-27 14:21:32 7749 [Note] InnoDB: Shutdown completed; log sequence number 1625987
A RANDOM PASSWORD HAS BEEN SET FOR THE MySQL root USER !
You will find that password in '/root/.mysql_secret'.
You must change that password on your first connect,
no other statement but 'SET PASSWORD' will be accepted.
See the manual for the semantics of the 'password expired' flag.
Also, the account for the anonymous user has been removed.
In addition, you can run:
/usr/bin/mysql_secure_installation
which will also give you the option of removing the test database.
This is strongly recommended for production servers.
See the manual for more instructions.
Please report any problems at http://bugs.mysql.com/
The latest information about MySQL is available on the web at
http://www.mysql.com
Support MySQL by buying support/licenses at http://shop.mysql.com
New default config file was created as /usr/my.cnf and
will be used by default by the server when you start it.
You may edit this file to change server settings
[root@oracle mysql]#
7. 再安装client和devel包
[root@oracle mysql]# rpm -ivh MySQL-devel-5.6.19-1.rhel5.i386.rpm
Preparing... ########################################### [100%]
1:MySQL-devel ########################################### [100%]
[root@oracle mysql]# rpm -ivh MySQL-client-5.6.19-1.rhel5.i386.rpm
Preparing... ########################################### [100%]
1:MySQL-client ########################################### [100%]
[root@oracle mysql]#
注意:Mysql 5.5之后的安装都需要通过cmake包,因此需要在系统上先安装cmake包,而cmake包又需要c 的编译,因此安装cmake之前需要安装
gcc和gcc++包
8. 上述三个包安装完毕就可以启动Mysql了
命令: [root@oracle mysql]# service mysql start
9. 启动Mysql后就可以通过mysql命令进入mysql了,另外此处需要注意,在上面安装mysql的server包时,有个提示,说已给root用户创建了密码
因此,查看初始化密码
连接mysql
- mysql -u root -p7zEsbCzdspxyZ3YI
可以看到已经连接成功,并且连接信息里有安装的mysql版本信息,至此,mysql的安装完毕。
10. 更改root密码
在第9步中登陆成功后,可以通过SET PASSWORD来修改密码
- SET PASSWORD = PASSWORD(\'新密码\');
也可以在登陆时通过mysqladmin来修改root密码
- mysqladmin -u root -p旧密码 password 新密码
修改root密码为root,并登陆,成功。
11. 查看mysql服务
在Mysql 5.6里,查看Mysql的服务状态不再是service mysqld status,而是service mysql status
12. 另外根据安装server包的提示,新的配置文件my.cnf生成在/usr/目录下
不再是之前的/etc/my.cnf文件,而是/usr/my.cnf
来自 “ ITPUB博客 ” ,链接:https://blog.itpub.net/29660208/viewspace-1196207/ ,如需转载,请注明出处,否则将追究法律责任。
下一篇:
Linux下MySQL日志的启用

请登录后发表评论
登录
全部评论
