openEuler 22.03-LTS 搭建Nginx服务器
1 Nginx服务器
1.1 概述
Nginx 是一款轻量级的 Web 服务器/反向代理服务器及电子邮件(IMAP/POP3)代理服务器,其特点是占用内存少,并发能力强,事实上nginx的并发能力在同类型的网页服务器中表现较好,支持FastCGI、SSL、Virtual Host、URL Rewrite、Gzip等功能,并且支持很多第三方的模块扩展。
Nginx (engine x) 是一个高性能的HTTP和反向代理web服务器 ,同时也提供了IMAP/POP3/SMTP服务。Nginx是由伊戈尔·赛索耶夫为俄罗斯访问量第二的Rambler.ru站点(俄文:Рамблер)开发的,公开版本1.19.6发布于2020年12月15日。
其将源代码以类BSD许可证的形式发布,因它的稳定性、丰富的功能集、简单的配置文件和低系统资源的消耗而闻名。2022年01月25日,nginx 1.21.6发布。
1.2 安装
配置本地yum源,详细信息请参考《openEuler 22.03-LTS 搭建repo服务器》。
清除缓存。
# dnf clean all
例如示例命令如下:
[root@superman-21 ~]# dnf clean all
36 files removed
[root@superman-21 ~]#
创建缓存。
# dnf makecache
例如示例命令如下:
[root@superman-21 ~]# dnf makecache
OS                                                                                           6.8 MB/s | 3.4 MB     00:00
everything                                                                                    19 MB/s |  16 MB     00:00
EPOL                                                                                         3.9 MB/s | 2.6 MB     00:00
debuginfo                                                                                    3.3 MB/s | 3.9 MB     00:01
source                                                                                       1.1 MB/s | 1.7 MB     00:01
update                                                                                        25 MB/s |  28 MB     00:01
Metadata cache created.
[root@superman-21 ~]#
在root权限下安装nginx服务。
# dnf install nginx
例如示例命令如下:
[root@superman-21 ~]# dnf install nginx
Last metadata expiration check: 0:00:34 ago on 2022年12月03日 星期六 10时39分32秒.
Dependencies resolved.
=============================================================================================================================
 Package                                   Architecture         Version                           Repository            Size
=============================================================================================================================
Installing:
 nginx                                     x86_64               1:1.21.5-3.oe2203                 update               498 k
Installing dependencies:
 gd                                        x86_64               2.3.2-2.oe2203                    update               127 k
 libXpm                                    x86_64               3.5.13-1.oe2203                   OS                    41 k
 libwebp                                   x86_64               1.2.1-1.oe2203                    OS                   246 k
 nginx-all-modules                         noarch               1:1.21.5-3.oe2203                 update               7.6 k
 nginx-filesystem                          noarch               1:1.21.5-3.oe2203                 update               8.7 k
 nginx-mod-http-image-filter               x86_64               1:1.21.5-3.oe2203                 update                18 k
 nginx-mod-http-perl                       x86_64               1:1.21.5-3.oe2203                 update                27 k
 nginx-mod-http-xslt-filter                x86_64               1:1.21.5-3.oe2203                 update                17 k
 nginx-mod-mail                            x86_64               1:1.21.5-3.oe2203                 update                49 k
 nginx-mod-stream                          x86_64               1:1.21.5-3.oe2203                 update                71 k

Transaction Summary
=============================================================================================================================
Install  11 Packages

Total download size: 1.1 M
Installed size: 3.0 M
Is this ok [y/N]: y
Downloading Packages:
(1/11): libXpm-3.5.13-1.oe2203.x86_64.rpm                                                    248 kB/s |  41 kB     00:00
(2/11): gd-2.3.2-2.oe2203.x86_64.rpm                                                         562 kB/s | 127 kB     00:00
(3/11): nginx-all-modules-1.21.5-3.oe2203.noarch.rpm                                         168 kB/s | 7.6 kB     00:00
(4/11): nginx-filesystem-1.21.5-3.oe2203.noarch.rpm                                          186 kB/s | 8.7 kB     00:00
(5/11): nginx-mod-http-image-filter-1.21.5-3.oe2203.x86_64.rpm                               385 kB/s |  18 kB     00:00
(6/11): libwebp-1.2.1-1.oe2203.x86_64.rpm                                                    611 kB/s | 246 kB     00:00
(7/11): nginx-mod-http-perl-1.21.5-3.oe2203.x86_64.rpm                                       431 kB/s |  27 kB     00:00
(8/11): nginx-mod-http-xslt-filter-1.21.5-3.oe2203.x86_64.rpm                                395 kB/s |  17 kB     00:00
(9/11): nginx-mod-mail-1.21.5-3.oe2203.x86_64.rpm                                            816 kB/s |  49 kB     00:00
(10/11): nginx-mod-stream-1.21.5-3.oe2203.x86_64.rpm                                         791 kB/s |  71 kB     00:00
(11/11): nginx-1.21.5-3.oe2203.x86_64.rpm                                                    1.1 MB/s | 498 kB     00:00
-----------------------------------------------------------------------------------------------------------------------------
Total                                                                                        1.7 MB/s | 1.1 MB     00:00
Running transaction check
Transaction check succeeded.
Running transaction test
Transaction test succeeded.
Running transaction
  Preparing        :                                                                                                     1/1
  Running scriptlet: nginx-filesystem-1:1.21.5-3.oe2203.noarch                                                          1/11
  Installing       : nginx-filesystem-1:1.21.5-3.oe2203.noarch                                                          1/11
  Installing       : libwebp-1.2.1-1.oe2203.x86_64                                                                      2/11
  Installing       : libXpm-3.5.13-1.oe2203.x86_64                                                                      3/11
  Installing       : gd-2.3.2-2.oe2203.x86_64                                                                           4/11
  Running scriptlet: gd-2.3.2-2.oe2203.x86_64                                                                           4/11
  Installing       : nginx-mod-http-perl-1:1.21.5-3.oe2203.x86_64                                                       5/11
  Running scriptlet: nginx-mod-http-perl-1:1.21.5-3.oe2203.x86_64                                                       5/11
  Installing       : nginx-mod-http-xslt-filter-1:1.21.5-3.oe2203.x86_64                                                6/11
  Running scriptlet: nginx-mod-http-xslt-filter-1:1.21.5-3.oe2203.x86_64                                                6/11
  Installing       : nginx-mod-mail-1:1.21.5-3.oe2203.x86_64                                                            7/11
  Running scriptlet: nginx-mod-mail-1:1.21.5-3.oe2203.x86_64                                                            7/11
  Installing       : nginx-mod-stream-1:1.21.5-3.oe2203.x86_64                                                          8/11
  Running scriptlet: nginx-mod-stream-1:1.21.5-3.oe2203.x86_64                                                          8/11
  Installing       : nginx-1:1.21.5-3.oe2203.x86_64                                                                     9/11
  Running scriptlet: nginx-1:1.21.5-3.oe2203.x86_64                                                                     9/11
  Installing       : nginx-mod-http-image-filter-1:1.21.5-3.oe2203.x86_64                                              10/11
  Running scriptlet: nginx-mod-http-image-filter-1:1.21.5-3.oe2203.x86_64                                              10/11
  Installing       : nginx-all-modules-1:1.21.5-3.oe2203.noarch                                                        11/11
  Running scriptlet: nginx-all-modules-1:1.21.5-3.oe2203.noarch                                                        11/11
  Verifying        : libXpm-3.5.13-1.oe2203.x86_64                                                                      1/11
  Verifying        : libwebp-1.2.1-1.oe2203.x86_64                                                                      2/11
  Verifying        : gd-2.3.2-2.oe2203.x86_64                                                                           3/11
  Verifying        : nginx-1:1.21.5-3.oe2203.x86_64                                                                     4/11
  Verifying        : nginx-all-modules-1:1.21.5-3.oe2203.noarch                                                         5/11
  Verifying        : nginx-filesystem-1:1.21.5-3.oe2203.noarch                                                          6/11
  Verifying        : nginx-mod-http-image-filter-1:1.21.5-3.oe2203.x86_64                                               7/11
  Verifying        : nginx-mod-http-perl-1:1.21.5-3.oe2203.x86_64                                                       8/11
  Verifying        : nginx-mod-http-xslt-filter-1:1.21.5-3.oe2203.x86_64                                                9/11
  Verifying        : nginx-mod-mail-1:1.21.5-3.oe2203.x86_64                                                           10/11
  Verifying        : nginx-mod-stream-1:1.21.5-3.oe2203.x86_64                                                         11/11

Installed:
  gd-2.3.2-2.oe2203.x86_64                                          libXpm-3.5.13-1.oe2203.x86_64
  libwebp-1.2.1-1.oe2203.x86_64                                     nginx-1:1.21.5-3.oe2203.x86_64
  nginx-all-modules-1:1.21.5-3.oe2203.noarch                        nginx-filesystem-1:1.21.5-3.oe2203.noarch
  nginx-mod-http-image-filter-1:1.21.5-3.oe2203.x86_64              nginx-mod-http-perl-1:1.21.5-3.oe2203.x86_64
  nginx-mod-http-xslt-filter-1:1.21.5-3.oe2203.x86_64               nginx-mod-mail-1:1.21.5-3.oe2203.x86_64
  nginx-mod-stream-1:1.21.5-3.oe2203.x86_64

Complete!
[root@superman-21 ~]#
查看安装后的rpm包。
# dnf list all | grep nginx
例如示例命令如下:
[root@superman-21 ~]# dnf list all | grep nginx
nginx.x86_64                                            1:1.21.5-3.oe2203                            @update
nginx-all-modules.noarch                                1:1.21.5-3.oe2203                            @update
nginx-filesystem.noarch                                 1:1.21.5-3.oe2203                            @update
nginx-mod-http-image-filter.x86_64                      1:1.21.5-3.oe2203                            @update
nginx-mod-http-perl.x86_64                              1:1.21.5-3.oe2203                            @update
nginx-mod-http-xslt-filter.x86_64                       1:1.21.5-3.oe2203                            @update
nginx-mod-mail.x86_64                                   1:1.21.5-3.oe2203                            @update
nginx-mod-stream.x86_64                                 1:1.21.5-3.oe2203                            @update
nginx.src                                               1:1.21.5-1.oe2203                            source
nginx-debuginfo.x86_64                                  1:1.21.5-3.oe2203                            update
nginx-debugsource.x86_64                                1:1.21.5-3.oe2203                            update
nginx-help.noarch                                       1:1.21.5-3.oe2203                            update
pcp-pmda-nginx.x86_64                                   5.3.5-6.oe2203                               OS
pcp-pmda-nginx.x86_64                                   5.3.5-6.oe2203                               everything
[root@superman-21 ~]#
1.3 管理nginx
1.3.1 概述
通过systemctl工具,可以对nginx服务进行管理,包括启动、停止、重启服务,以及查看服务状态等。本节介绍nginx服务的管理操作。
1.3.2 前提条件
为了能够使用nginx服务,请确保您的系统中已经安装nginx服务。若未安装,可参考安装进行安装。
启动、停止和重启nginx服务,需要使用root权限。
1.3.3 启动服务
启动并运行nginx服务,命令如下:
# systemctl start nginx
例如示例命令如下:
[root@superman-21 ~]# systemctl start nginx
[root@superman-21 ~]#
假如希望在系统启动时,nginx服务自动启动,则命令和回显如下:
# systemctl enable nginx
Created symlink /etc/systemd/system/multi-user.target.wants/nginx.service → /usr/lib/systemd/system/nginx.service.
例如示例命令如下:
[root@superman-21 ~]# systemctl enable nginx
Created symlink /etc/systemd/system/multi-user.target.wants/nginx.service → /usr/lib/systemd/system/nginx.service.
[root@superman-21 ~]#
说明:假如正在运行的nginx服务器作为一个安全服务器,系统开机启动后需要密码,这个密码使用的是加密的私有SSL密钥。
1.3.4 停止服务
停止运行的nginx服务,命令如下:
# systemctl stop nginx
例如示例命令如下:
[root@superman-21 ~]# systemctl stop nginx
[root@superman-21 ~]#
如果希望防止服务在系统开机阶段自动开启,命令和回显如下:
# systemctl disable nginx
Removed /etc/systemd/system/multi-user.target.wants/nginx.service.
例如示例命令如下:
[root@superman-21 ~]# systemctl disable nginx
Removed /etc/systemd/system/multi-user.target.wants/nginx.service.
[root@superman-21 ~]#
1.3.5 重启服务
重启服务有三种方式:
完全重启服务
# systemctl restart nginx
该命令会停止运行的nginx服务并且立即重新启动它。一般在服务安装以后或者去除一个动态加载的模块(例如PHP)时使用这个命令。
例如示例命令如下:
[root@superman-21 ~]# systemctl restart nginx
[root@superman-21 ~]#
重新加载配置
# systemctl reload nginx
该命令会使运行的nginx服务重新加载它的配置文件。任何当前正在处理的请求将会被中断,从而造成客户端浏览器显示一个错误消息或者重新渲染部分页面。
例如示例命令如下:
[root@superman-21 ~]# systemctl reload nginx
[root@superman-21 ~]#
平滑重启nginx
# ps -ef | grep nginx
# kill -HUP 主进程ID
该命令会使运行的nginx服务重新加载它的配置文件。任何当前正在处理的请求将会继续使用旧的配置文件。
例如示例命令如下:
[root@superman-21 ~]# ps -ef | grep nginx
root        2446       1  0 10:44 ?        00:00:00 nginx: master process /usr/sbin/nginx
nginx       2452    2446  0 10:44 ?        00:00:00 nginx: worker process
nginx       2453    2446  0 10:44 ?        00:00:00 nginx: worker process
root        2463    2069  0 10:45 pts/0    00:00:00 grep --color=auto nginx
[root@superman-21 ~]#
[root@superman-21 ~]# kill -HUP 2446
[root@superman-21 ~]#
[root@superman-21 ~]# ps -ef | grep nginx
root        2446       1  0 10:44 ?        00:00:00 nginx: master process /usr/sbin/nginx
nginx       2464    2446  0 10:45 ?        00:00:00 nginx: worker process
nginx       2465    2446  0 10:45 ?        00:00:00 nginx: worker process
root        2467    2069  0 10:46 pts/0    00:00:00 grep --color=auto nginx
[root@superman-21 ~]#
1.3.6 验证服务状态
验证nginx服务是否正在运行
# systemctl is-active nginx
回显为“active”说明服务处于运行状态。
例如示例命令如下:
[root@superman-21 ~]# systemctl is-active nginx
active
[root@superman-21 ~]#
1.4 配置文件说明
当nginx服启动后,默认情况下它会读取如表2所示的配置文件。
表 2 配置文件说明
虽然默认配置可以适用于多数情况,但是用户至少需要熟悉里面的一些重要配置项。配置文件修改完成后,可以在root权限下使用如下命令检查配置文件可能出现的语法错误。
# nginx -t
如果回显信息中有“syntax is ok”,说明配置文件语法正确。
例如示例命令如下:
[root@superman-21 ~]# nginx -t
nginx: the configuration file /etc/nginx/nginx.conf syntax is ok
nginx: configuration file /etc/nginx/nginx.conf test is successful
[root@superman-21 ~]#
说明:
在修改配置文件之前,请先备份原始文件,以便出现问题时能够快速恢复配置文件。
需要重启web服务,才能使修改后的配置文件生效。
1.5 管理模块
1.5.1 概述
nginx服务是一个模块化的应用,它和许多动态共享对象DSO(Dynamic Shared Objects)一起分发。动态共享对象DSO,在必要情况下,可以在运行时被动态加载或卸载。服务器操作系统中这些模块位于/usr/lib64/nginx/modules/目录下。
本节介绍如何加载和写入模块。
1.5.2 加载模块
为了加载一个特殊的DSO模块,在配置文件中使用加载模块指示。独立软件包提供的模块一般在/usr/share/nginx/modules目录下有他们自己的配置文件。
因openEuler操作系统中使用dnf install nginx安装nginx是会自动加载DSO。
1.6 验证web服务是否搭建成功
Web服务器搭建完成后,可以通过如下方式验证是否搭建成功。
在root权限下查看服务器的IP地址,命令如下:
# ifconfig
回显信息如下,说明服务器IP为 192.168.1.21。
例如示例命令如下:
[root@superman-21 ~]# ifconfig -a
ens33: flags=4163<UP,BROADCAST,RUNNING,MULTICAST>  mtu 1500
        inet 192.168.1.21  netmask 255.255.255.0  broadcast 192.168.1.255
        inet6 fe80::9393:f6ae:ced9:7759  prefixlen 64  scopeid 0x20<link>
        ether 00:0c:29:96:c9:d7  txqueuelen 1000  (Ethernet)
        RX packets 66449  bytes 93282768 (88.9 MiB)
        RX errors 0  dropped 0  overruns 0  frame 0
        TX packets 3734  bytes 377884 (369.0 KiB)
        TX errors 0  dropped 0 overruns 0  carrier 0  collisions 0

lo: flags=73<UP,LOOPBACK,RUNNING>  mtu 65536
        inet 127.0.0.1  netmask 255.0.0.0
        inet6 ::1  prefixlen 128  scopeid 0x10<host>
        loop  txqueuelen 1000  (Local Loopback)
        RX packets 74  bytes 6068 (5.9 KiB)
        RX errors 0  dropped 0  overruns 0  frame 0
        TX packets 74  bytes 6068 (5.9 KiB)
        TX errors 0  dropped 0 overruns 0  carrier 0  collisions 0

virbr0: flags=4099<UP,BROADCAST,MULTICAST>  mtu 1500
        inet 192.168.122.1  netmask 255.255.255.0  broadcast 192.168.122.255
        ether 52:54:00:bc:bb:cd  txqueuelen 1000  (Ethernet)
        RX packets 0  bytes 0 (0.0 B)
        RX errors 0  dropped 0  overruns 0  frame 0
        TX packets 0  bytes 0 (0.0 B)
        TX errors 0  dropped 0 overruns 0  carrier 0  collisions 0

virbr0-nic: flags=4098<BROADCAST,MULTICAST>  mtu 1500
        ether 52:54:00:bc:bb:cd  txqueuelen 1000  (Ethernet)
        RX packets 0  bytes 0 (0.0 B)
        RX errors 0  dropped 0  overruns 0  frame 0
        TX packets 0  bytes 0 (0.0 B)
        TX errors 0  dropped 0 overruns 0  carrier 0  collisions 0

[root@superman-21 ~]#
在root权限下配置防火墙:
# firewall-cmd --add-service=http --permanent
# firewall-cmd --reload
例如示例命令如下:
[root@superman-21 ~]# firewall-cmd --add-service=http --permanent
success
[root@superman-21 ~]#
[root@superman-21 ~]# firewall-cmd --reload
success
[root@superman-21 ~]#
验证web服务器是否搭建成功,用户可选择Linux或Windows系统进行验证。
-
使用Linux系统验证
执行如下命令,查看是否可以访问网页信息,服务搭建成功时,该网页可以正常访问。
# curl http://192.168.1.21
例如示例命令如下:
[root@superman-21 ~]# curl http://192.168.1.21
<!DOCTYPE html PUBLIC "-//W3C//DTD XHTML 1.1//EN" "http://www.w3.org/TR/xhtml11/DTD/xhtml11.dtd">

<html xmlns="http://www.w3.org/1999/xhtml" xml:lang="en">
    <head>
        <meta http-equiv="Content-Type" content="text/html; charset=UTF-8" />
        <title>Test Page for the Nginx HTTP Server on openEuler</title>
        <style type="text/css">
            /*<![CDATA[*/
            body {
                background-color: #fff;
                color: #000;
                font-size: 0.9em;
                font-family: sans-serif,helvetica;
                margin: 0;
                padding: 0;
            }
            :link {
                color: #c00;
            }
            :visited {
                color: #c00;
            }
            a:hover {
                color: #f50;
            }
            h1 {
                text-align: center;
                margin: 0;
                padding: 0.6em 2em 0.4em;
                background-color: #294172;
                color: #fff;
                font-weight: normal;
                font-size: 1.75em;
                border-bottom: 2px solid #000;
            }
            h1 strong {
                font-weight: bold;
                font-size: 1.5em;
            }
            h2 {
                text-align: center;
                background-color: #3C6EB4;
                font-size: 1.1em;
                font-weight: bold;
                color: #fff;
                margin: 0;
                padding: 0.5em;
                border-bottom: 2px solid #294172;
            }
            hr {
                display: none;
            }
            .content {
                padding: 1em 5em;
            }
            .alert {
                border: 2px solid #000;
            }

            img {
                border: 2px solid #fff;
                padding: 2px;
                margin: 2px;
            }
            a:hover img {
                border: 2px solid #294172;
            }
            .logos {
                margin: 1em;
                text-align: center;
            }
            /*]]>*/
        </style>
    </head>

    <body>
        <h1>Welcome to <strong>nginx</strong> on openEuler!</h1>

        <div class="content">
            <p>This page is used to test the proper operation of the
            <strong>nginx</strong> HTTP server after it has been
            installed. If you can read this page, it means that the
            web server installed at this site is working
            properly.</p>

            <div class="alert">
                <h2>Website Administrator</h2>
                <div class="content">
                    <p>This is the default <tt>index.html</tt> page that
                    is distributed with <strong>nginx</strong> on
                    openEuler.  It is located in
                    <tt>/usr/share/nginx/html</tt>.</p>

                    <p>You should now put your content in a location of
                    your choice and edit the <tt>root</tt> configuration
                    directive in the <strong>nginx</strong>
                    configuration file
                    <tt>/etc/nginx/nginx.conf</tt>.</p>

                </div>
            </div>

            <div class="logos">
                <a href="http://nginx.net/"><img
                    src="nginx-logo.png"
                    alt="[ Powered by nginx ]"
                    width="121" height="32" /></a>
            </div>
        </div>
    </body>
</html>
[root@superman-21 ~]#
执行如下命令,查看命令返回值是否为0,返回值为0,说明nginx服务器搭建成功。
# echo $?
例如示例命令如下:
[root@superman-21 ~]# echo $?
0
[root@superman-21 ~]#
使用Windows系统验证
打开浏览器,在地址栏输入如下地址,如果能正常访问网页,说明nginx服务器搭建成功。
http://192.168.1.21
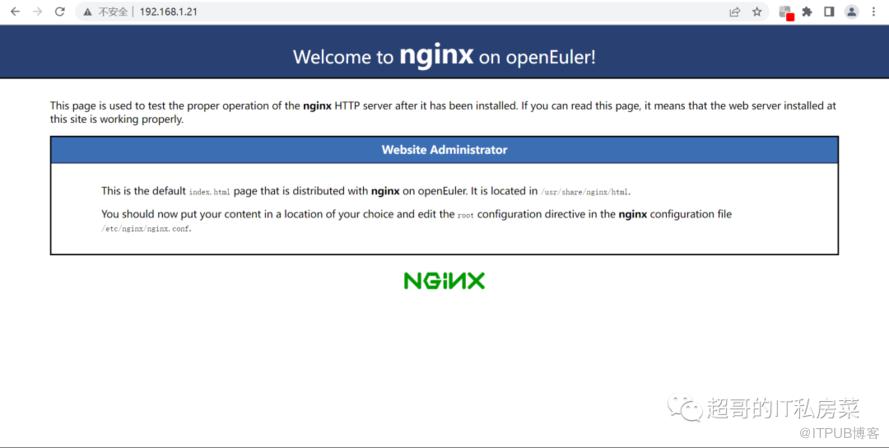
如果修改了端口号,输入地址格式如下:
http://192.168.1.21:端口号

有什么吐槽或反馈意见,直接告诉我!
温馨提示:如出现二维码失效也可直接添加微信号:ysc13803862469。

原文作者:超哥的IT私房菜;如有侵权,请联系管理员删除。

最新文章
- 06 ASM存储入门——Oracle 19c的“存储管家”(可选,针对需要ASM的场景)
- 05 手把手部署Oracle 19c RAC——2节点实例安装全流程(图形化+静默)
- 04 手把手部署Oracle 19c——单实例ASM安装全流程(图形化+静默)
- 03 Oracle 19c初始化配置——让数据库“好用又安全”
- 02 手把手部署Oracle 19c——单实例安装全流程(图形化+静默)
- 01 Oracle 19c部署前的“避坑指南”——环境规划与准备
- 开源堡垒机 JumpServer 社区版实战教程:发布机的配置与Website资产配置使用
- 开源堡垒机 JumpServer 社区版实战教程:一步步构建企业安全运维环境
- 基于 Ubuntu 22.04 离线安装 JumpServer 社区版 v4.4.1
- Harbor镜像仓库实战指南:从安装到高级管理的全面解析
