openEuler 22.03-LTS 搭建repo服务器
1 目标
将openEuler提供的ISO发布包openEuler-22.03-LTS-everything-x86_64-dvd.iso创建为本地repo源,另外使用nginx进行repo源部署,创建http服务器的远端repo源。
2 创建/更新本地repo源
使用mount挂载,将openEuler的ISO发布包openEuler-22.03-LTS-everything-x86_64-dvd.iso创建为本地repo源,并能够对repo源进行更新。
2.1 获取ISO发布包
请从如下网址获取openEuler的ISO发布包。
https://repo.openeuler.org/openEuler-22.03-LTS/ISO/

2.2 挂载ISO创建repo源
将openEuler-22.03-LTS-everything-x86_64-dvd.iso上传到/home目录。
在root权限下使用mount命令挂载ISO发布包。
# mount -o loop /home/openEuler-22.03-LTS-everything-x86_64-dvd.iso /mnt
例如示例命令如下:
[root@repo ~]# mount -o loop /home/openEuler-22.03-LTS-everything-x86_64-dvd.iso /mnt
mount: /mnt: WARNING: source write-protected, mounted read-only.
[root@repo ~]#
[root@repo ~]# df -h
文件系统                  容量  已用  可用 已用% 挂载点
devtmpfs                  1.7G     0  1.7G    0% /dev
tmpfs                     1.7G   12K  1.7G    1% /dev/shm
tmpfs                     677M  9.1M  668M    2% /run
tmpfs                     4.0M     0  4.0M    0% /sys/fs/cgroup
/dev/mapper/vg00-lv_root   41G   19G   20G   48% /
tmpfs                     1.7G     0  1.7G    0% /tmp
/dev/sda1                 974M   88M  819M   10% /boot
/dev/loop0                 16G   16G     0  100% /mnt
[root@repo ~]#
挂载好的mnt目录如下:
# tree -d /mnt
例如示例命令如下:
[root@repo ~]# tree -d /mnt
/mnt
├── docs
├── EFI
│   └── BOOT
│       └── fonts
├── images
│   └── pxeboot
├── isolinux
├── ks
├── Packages
└── repodata

10 directories
[root@repo ~]#
其中,Packages为rpm包所在的目录,repodata为repo源元数据所在的目录,RPM-GPG-KEY-openEuler为openEuler的签名公钥。
2.3 创建本地repo源
可以拷贝ISO发布包中相关文件至本地目录以创建本地repo源。
# mount -o loop /home/openEuler-22.03-LTS-everything-x86_64-dvd.iso /mnt
# mkdir -p /home/repo
# cp -r /mnt/* /home/repo/
例如示例命令如下:
[root@repo ~]# mount -o loop /home/openEuler-22.03-LTS-everything-x86_64-dvd.iso /mnt
mount: /mnt: WARNING: source write-protected, mounted read-only.
[root@repo ~]#
[root@repo ~]# mkdir -p /home/repo
[root@repo ~]#
[root@repo ~]# cp -r /mnt/* /home/repo/
[root@repo ~]#
从而本地repo目录如下:
# tree -d /home/repo
例如示例命令如下:
[root@repo ~]# tree -d /home/repo
/home/repo
├── docs
├── EFI
│   └── BOOT
│       └── fonts
├── images
│   └── pxeboot
├── isolinux
├── ks
├── Packages
└── repodata

10 directories
[root@repo ~]#
Packages为rpm包所在的目录,repodata为repo源元数据所在的目录,RPM-GPG-KEY-openEuler为openEuler的签名公钥。
2.4 更新repo源
更新repo源有两种方式:
通过新版本的ISO更新已有的repo源,与创建repo源的方式相同,即挂载ISO发布包或重新拷贝ISO发布包至本地目录。
在repo源的Packages目录下添加rpm包,然后通过createrepo命令更新repo源。
# createrepo --update --workers=10 /home/repo
其中,--update表示更新,--workers表示线程数,可自定义。
说明:若命令打印信息为“createrepo:未找到命令”,则表示未安装createrepo软件,可在root权限下执行dnf install createrepo进行安装。
例如示例命令如下:
[root@repo ~]# createrepo --update --workers=10 /home/repo
-bash: createrepo:未找到命令
[root@repo ~]#
[root@repo ~]# dnf install createrepo -y
Last metadata expiration check: 1:11:41 ago on 2022年11月29日 星期二 20时22分38秒.
Dependencies resolved.
=============================================================================================================================
 Package                        Architecture             Version                              Repository                Size
=============================================================================================================================
Installing:
 createrepo_c                   x86_64                   0.17.6-1.oe2203                      OS                       137 k
Installing dependencies:
 drpm                           x86_64                   0.5.0-2.oe2203                       update                    60 k

Transaction Summary
=============================================================================================================================
Install  2 Packages

Total download size: 197 k
Installed size: 535 k
Downloading Packages:
(1/2): drpm-0.5.0-2.oe2203.x86_64.rpm                                                        331 kB/s |  60 kB     00:00
(2/2): createrepo_c-0.17.6-1.oe2203.x86_64.rpm                                               539 kB/s | 137 kB     00:00
-----------------------------------------------------------------------------------------------------------------------------
Total                                                                                        722 kB/s | 197 kB     00:00
retrieving repo key for OS unencrypted from http://repo.openeuler.org/openEuler-22.03-LTS/OS/x86_64/RPM-GPG-KEY-openEuler
OS                                                                                            14 kB/s | 2.1 kB     00:00
Importing GPG key 0xB25E7F66:
 Userid     : "private OBS (key without passphrase) <defaultkey@localobs>"
 Fingerprint: 12EA 74AC 9DF4 8D46 C69C A0BE D557 065E B25E 7F66
 From       : http://repo.openeuler.org/openEuler-22.03-LTS/OS/x86_64/RPM-GPG-KEY-openEuler
Key imported successfully
Running transaction check
Transaction check succeeded.
Running transaction test
Transaction test succeeded.
Running transaction
  Preparing        :                                                                                                     1/1
  Installing       : drpm-0.5.0-2.oe2203.x86_64                                                                          1/2
  Installing       : createrepo_c-0.17.6-1.oe2203.x86_64                                                                 2/2
  Running scriptlet: createrepo_c-0.17.6-1.oe2203.x86_64                                                                 2/2
  Verifying        : createrepo_c-0.17.6-1.oe2203.x86_64                                                                 1/2
  Verifying        : drpm-0.5.0-2.oe2203.x86_64                                                                          2/2

Installed:
  createrepo_c-0.17.6-1.oe2203.x86_64                               drpm-0.5.0-2.oe2203.x86_64

Complete!
[root@repo ~]#
[root@repo ~]# createrepo --update --workers=10 /home/repo
Directory walk started
Directory walk done - 16818 packages
type group added to list from path: /home/repo/repodata/93612b651befaec659f6700eab197afbbd9380df1bb302f73621ed1f4764940b-normal.xml
type group_gz added to list from path: /home/repo/repodata/c2a33c2e9423b23416c587e201ad7c690ef870f29998f4387f1cc9bea816d62e-normal.xml.gz
Loaded information about 16818 packages
Temporary output repo path: /home/repo/.repodata/
Preparing sqlite DBs
Pool started (with 10 workers)
Pool finished
[root@repo ~]#
3 部署远端repo源
安装openEuler操作系统,在openEuler上通过nginx部署repo源。
3.1 nginx安装与配置
在root权限下安装nginx。
# dnf install -y nginx
例如示例命令如下:
[root@repo ~]# dnf install -y nginx
Last metadata expiration check: 1:32:43 ago on 2022年11月29日 星期二 20时22分38秒.
Dependencies resolved.
=============================================================================================================================
 Package                                   Architecture         Version                           Repository            Size
=============================================================================================================================
Installing:
 nginx                                     x86_64               1:1.21.5-3.oe2203                 update               498 k
Installing dependencies:
 gd                                        x86_64               2.3.2-2.oe2203                    update               127 k
 libXpm                                    x86_64               3.5.13-1.oe2203                   OS                    41 k
 libwebp                                   x86_64               1.2.1-1.oe2203                    OS                   246 k
 nginx-all-modules                         noarch               1:1.21.5-3.oe2203                 update               7.6 k
 nginx-filesystem                          noarch               1:1.21.5-3.oe2203                 update               8.7 k
 nginx-mod-http-image-filter               x86_64               1:1.21.5-3.oe2203                 update                18 k
 nginx-mod-http-perl                       x86_64               1:1.21.5-3.oe2203                 update                27 k
 nginx-mod-http-xslt-filter                x86_64               1:1.21.5-3.oe2203                 update                17 k
 nginx-mod-mail                            x86_64               1:1.21.5-3.oe2203                 update                49 k
 nginx-mod-stream                          x86_64               1:1.21.5-3.oe2203                 update                71 k

Transaction Summary
=============================================================================================================================
Install  11 Packages

Total download size: 1.1 M
Installed size: 3.0 M
Downloading Packages:
(1/11): libXpm-3.5.13-1.oe2203.x86_64.rpm                                                    187 kB/s |  41 kB     00:00
(2/11): libwebp-1.2.1-1.oe2203.x86_64.rpm                                                    845 kB/s | 246 kB     00:00
(3/11): gd-2.3.2-2.oe2203.x86_64.rpm                                                         427 kB/s | 127 kB     00:00
(4/11): nginx-all-modules-1.21.5-3.oe2203.noarch.rpm                                         155 kB/s | 7.6 kB     00:00
(5/11): nginx-filesystem-1.21.5-3.oe2203.noarch.rpm                                          179 kB/s | 8.7 kB     00:00
(6/11): nginx-mod-http-image-filter-1.21.5-3.oe2203.x86_64.rpm                               368 kB/s |  18 kB     00:00
(7/11): nginx-mod-http-perl-1.21.5-3.oe2203.x86_64.rpm                                       519 kB/s |  27 kB     00:00
(8/11): nginx-mod-http-xslt-filter-1.21.5-3.oe2203.x86_64.rpm                                350 kB/s |  17 kB     00:00
(9/11): nginx-mod-mail-1.21.5-3.oe2203.x86_64.rpm                                            498 kB/s |  49 kB     00:00
(10/11): nginx-mod-stream-1.21.5-3.oe2203.x86_64.rpm                                         1.2 MB/s |  71 kB     00:00
(11/11): nginx-1.21.5-3.oe2203.x86_64.rpm                                                    1.6 MB/s | 498 kB     00:00
-----------------------------------------------------------------------------------------------------------------------------
Total                                                                                        2.0 MB/s | 1.1 MB     00:00
Running transaction check
Transaction check succeeded.
Running transaction test
Transaction test succeeded.
Running transaction
  Preparing        :                                                                                                     1/1
  Running scriptlet: nginx-filesystem-1:1.21.5-3.oe2203.noarch                                                          1/11
  Installing       : nginx-filesystem-1:1.21.5-3.oe2203.noarch                                                          1/11
  Installing       : libwebp-1.2.1-1.oe2203.x86_64                                                                      2/11
  Installing       : libXpm-3.5.13-1.oe2203.x86_64                                                                      3/11
  Installing       : gd-2.3.2-2.oe2203.x86_64                                                                           4/11
  Running scriptlet: gd-2.3.2-2.oe2203.x86_64                                                                           4/11
  Installing       : nginx-mod-http-perl-1:1.21.5-3.oe2203.x86_64                                                       5/11
  Running scriptlet: nginx-mod-http-perl-1:1.21.5-3.oe2203.x86_64                                                       5/11
  Installing       : nginx-mod-http-xslt-filter-1:1.21.5-3.oe2203.x86_64                                                6/11
  Running scriptlet: nginx-mod-http-xslt-filter-1:1.21.5-3.oe2203.x86_64                                                6/11
  Installing       : nginx-mod-mail-1:1.21.5-3.oe2203.x86_64                                                            7/11
  Running scriptlet: nginx-mod-mail-1:1.21.5-3.oe2203.x86_64                                                            7/11
  Installing       : nginx-mod-stream-1:1.21.5-3.oe2203.x86_64                                                          8/11
  Running scriptlet: nginx-mod-stream-1:1.21.5-3.oe2203.x86_64                                                          8/11
  Installing       : nginx-1:1.21.5-3.oe2203.x86_64                                                                     9/11
  Running scriptlet: nginx-1:1.21.5-3.oe2203.x86_64                                                                     9/11
  Installing       : nginx-mod-http-image-filter-1:1.21.5-3.oe2203.x86_64                                              10/11
  Running scriptlet: nginx-mod-http-image-filter-1:1.21.5-3.oe2203.x86_64                                              10/11
  Installing       : nginx-all-modules-1:1.21.5-3.oe2203.noarch                                                        11/11
  Running scriptlet: nginx-all-modules-1:1.21.5-3.oe2203.noarch                                                        11/11
  Verifying        : libXpm-3.5.13-1.oe2203.x86_64                                                                      1/11
  Verifying        : libwebp-1.2.1-1.oe2203.x86_64                                                                      2/11
  Verifying        : gd-2.3.2-2.oe2203.x86_64                                                                           3/11
  Verifying        : nginx-1:1.21.5-3.oe2203.x86_64                                                                     4/11
  Verifying        : nginx-all-modules-1:1.21.5-3.oe2203.noarch                                                         5/11
  Verifying        : nginx-filesystem-1:1.21.5-3.oe2203.noarch                                                          6/11
  Verifying        : nginx-mod-http-image-filter-1:1.21.5-3.oe2203.x86_64                                               7/11
  Verifying        : nginx-mod-http-perl-1:1.21.5-3.oe2203.x86_64                                                       8/11
  Verifying        : nginx-mod-http-xslt-filter-1:1.21.5-3.oe2203.x86_64                                                9/11
  Verifying        : nginx-mod-mail-1:1.21.5-3.oe2203.x86_64                                                           10/11
  Verifying        : nginx-mod-stream-1:1.21.5-3.oe2203.x86_64                                                         11/11

Installed:
  gd-2.3.2-2.oe2203.x86_64                                          libXpm-3.5.13-1.oe2203.x86_64
  libwebp-1.2.1-1.oe2203.x86_64                                     nginx-1:1.21.5-3.oe2203.x86_64
  nginx-all-modules-1:1.21.5-3.oe2203.noarch                        nginx-filesystem-1:1.21.5-3.oe2203.noarch
  nginx-mod-http-image-filter-1:1.21.5-3.oe2203.x86_64              nginx-mod-http-perl-1:1.21.5-3.oe2203.x86_64
  nginx-mod-http-xslt-filter-1:1.21.5-3.oe2203.x86_64               nginx-mod-mail-1:1.21.5-3.oe2203.x86_64
  nginx-mod-stream-1:1.21.5-3.oe2203.x86_64

Complete!
[root@repo ~]#
在root权限下配置/etc/nginx/nginx.conf。
说明:文档中的配置内容仅供参考,请用户根据实际情况(例如安全加固需要)进行配置。
# vi /etc/nginx/nginx.conf
例如示例命令如下:
[root@repo ~]# cat /etc/nginx/nginx.conf
# For more information on configuration, see:
#   * Official English Documentation: http://nginx.org/en/docs/
#   * Official Russian Documentation: http://nginx.org/ru/docs/

user nginx;
worker_processes auto;
error_log /var/log/nginx/error.log;
pid /run/nginx.pid;

# Load dynamic modules. See /usr/share/doc/nginx/README.dynamic.
include /usr/share/nginx/modules/*.conf;

events {
    worker_connections 1024;
}

http {
    log_format  main  '$remote_addr - $remote_user [$time_local] "$request" '
                      '$status $body_bytes_sent "$http_referer" '
                      '"$http_user_agent" "$http_x_forwarded_for"';

    access_log  /var/log/nginx/access.log  main;

    sendfile            on;
    tcp_nopush          on;
    tcp_nodelay         on;
    keepalive_timeout   65;
    types_hash_max_size 4096;

    include             /etc/nginx/mime.types;
    default_type        application/octet-stream;

    # Load modular configuration files from the /etc/nginx/conf.d directory.
    # See http://nginx.org/en/docs/ngx_core_module.html#include
    # for more information.
    include /etc/nginx/conf.d/*.conf;

    server {
        listen       80;
        listen       [::]:80;
        server_name  _;
        root         /usr/share/nginx/repo;

        location / {
            autoindex            on;
            autoindex_exact_size on;
            autoindex_localtime  on;
        }

        # Load configuration files for the default server block.
        include /etc/nginx/default.d/*.conf;

        error_page 404 /404.html;
            location = /40x.html {
        }

        error_page 500 502 503 504 /50x.html;
            location = /50x.html {
        }
    }

# Settings for a TLS enabled server.
#
#    server {
#        listen       443 ssl http2;
#        listen       [::]:443 ssl http2;
#        server_name  _;
#        root         /usr/share/nginx/html;
#
#        ssl_certificate "/etc/pki/nginx/server.crt";
#        ssl_certificate_key "/etc/pki/nginx/private/server.key";
#        ssl_session_cache shared:SSL:1m;
#        ssl_session_timeout  10m;
#        ssl_ciphers PROFILE=SYSTEM;
#        ssl_prefer_server_ciphers on;
#
#        # Load configuration files for the default server block.
#        include /etc/nginx/default.d/*.conf;
#
#        error_page 404 /404.html;
#            location = /40x.html {
#        }
#
#        error_page 500 502 503 504 /50x.html;
#            location = /50x.html {
#        }
#    }

}

[root@repo ~]#
3.2 启动nginx服务
在root权限下通过systemd启动nginx服务。
# systemctl enable nginx
# systemctl start nginx
例如示例命令如下:
[root@repo ~]# systemctl enable nginx
Created symlink /etc/systemd/system/multi-user.target.wants/nginx.service → /usr/lib/systemd/system/nginx.service.
[root@repo ~]#
[root@repo ~]# systemctl start nginx
[root@repo ~]#
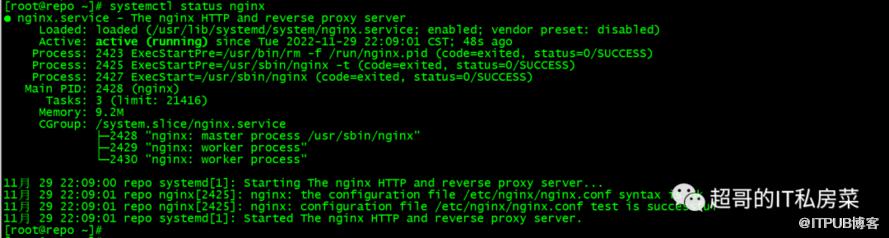
nginx是否启动成功可通过下面命令查看。
$ systemctl status nginx
-
图1 表示nginx服务启动成功:
图 1 nginx服务启动成功
若nginx服务启动失败,查看错误信息并整改。
# systemctl status nginx.service --full
3.3 repo源部署
在root权限下创建nginx配置文件/etc/nginx/nginx.conf中指定的目录/usr/share/nginx/repo。
# mkdir -p /usr/share/nginx/repo
例如示例命令如下:
[root@repo ~]# mkdir -p /usr/share/nginx/repo
[root@repo ~]#
在root权限下修改目录/usr/share/nginx/repo的权限。
# chmod -R 755 /usr/share/nginx/repo
例如示例命令如下:
[root@repo ~]# chmod -R 755 /usr/share/nginx/repo
[root@repo ~]#
设置防火墙规则,开启nginx设置的端口(此处为80端口),在root权限下通过firewall设置端口开启。
# firewall-cmd --add-port=80/tcp --permanent
# firewall-cmd --reload
例如示例命令如下:
[root@repo ~]# firewall-cmd --add-port=80/tcp --permanent
success
[root@repo ~]#
[root@repo ~]# firewall-cmd --reload
success
[root@repo ~]#
在root权限下查询80端口是否开启成功,输出为yes则表示80端口开启成功。
# firewall-cmd --query-port=80/tcp
例如示例命令如下:
[root@repo ~]# firewall-cmd --query-port=80/tcp
yes
[root@repo ~]#
或者也可在root权限下通过iptables来设置80端口开启,本次不使用iptables,只做了解。
# iptables -I INPUT -p tcp --dport 80 -j ACCEPT
nginx服务设置好之后,即可通过ip直接访问网页,如图2:
图 2 nginx部署成功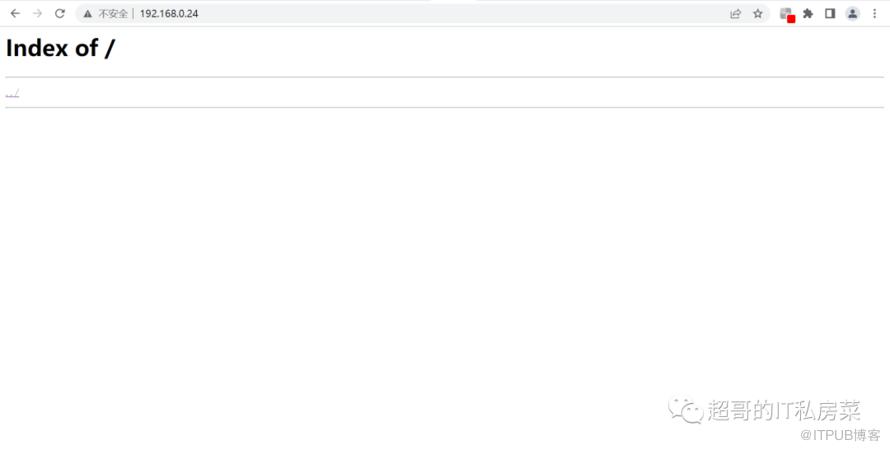
通过下面几种方式将repo源放入到/usr/share/nginx/repo下:
在root权限下拷贝镜像中相关文件至/usr/share/nginx/repo下,并修改目录权限。
# mount -o loop /home/openEuler-22.03-LTS-everything-x86_64-dvd.iso /mnt
# cp -r /mnt/* /usr/share/nginx/repo
# chmod -R 755 /usr/share/nginx/repo
例如示例命令如下:
[root@repo ~]# mount -o loop /home/openEuler-22.03-LTS-everything-x86_64-dvd.iso /mnt
mount: /mnt: WARNING: source write-protected, mounted read-only.
[root@repo ~]#
[root@repo ~]# cp -r /mnt/* /usr/share/nginx/repo
[root@repo ~]#
[root@repo ~]# chmod -R 755 /usr/share/nginx/repo
[root@repo ~]#
openEuler-22.03-LTS-everything-x86_64-dvd.iso存放在/home目录下。
使用root在/usr/share/nginx/repo下创建repo源的软链接。
# ln -s /home/repo/* /usr/share/nginx/repo/
/home/repo为已经创建好的repo源,/usr/share/nginx/repo/将指向/home/repo。
例如示例命令如下:
[root@repo ~]# ln -s /home/repo/* /usr/share/nginx/repo/
[root@repo ~]#
4 使用repo源
repo可配置为yum源,yum(全称为 Yellow dog Updater, Modified)是一个Shell前端软件包管理器。基于RPM包管理,能够从指定的服务器自动下载RPM包并且安装,可以自动处理依赖性关系,并且一次安装所有依赖的软j件包,无须繁琐地一次次下载和安装。
4.1 repo配置为yum源(软件源)
构建好的repo可以配置为yum源使用,在/etc/yum.repos.d/目录下使用root权限创建*.repo的配置文件(必须以.repo为扩展名),分为本地和http服务器配置yum源两种方式:
配置本地yum源
在/etc/yum.repos.d目录下创建openEuler.repo文件,使用构建的本地repo源作为yum源,openEuler.repo的内容如下:
[everything]
name=everything
baseurl=file:///home/repo
enabled=1
gpgcheck=1
gpgkey=file:///home/repo/RPM-GPG-KEY-openEuler
说明:
[repoid]中的repoid为软件仓库(repository)的ID号,所有.repo配置文件中的各repoid不能重复,必须唯一。示例中repoid设置为everything。
name为软件仓库描述的字符串。
baseurl为软件仓库的地址。
enabled为是否启用该软件源仓库,可选值为1和0。默认值为1,表示启用该软件源仓库。
gpgcheck可设置为1或0,1表示进行gpg(GNU Private Guard)校验,0表示不进行gpg校验,gpgcheck可以确定rpm包的来源是有效和安全的。
gpgkey为验证签名用的公钥。
配置http服务器yum源
在/etc/yum.repos.d目录下创建openEuler.repo文件。
若使用用户部署的http服务端的repo源作为yum源,openEuler.repo的内容如下:
[everything]
name=everything
baseurl=http://192.168.0.24/
enabled=1
gpgcheck=1
gpgkey=http://192.168.0.24/RPM-GPG-KEY-openEuler
说明:“192.168.0.24”为示例地址,请根据实际情况进行配置。
若使用openEuler提供的openEuler repo源作为yum源,以x86_64架构的OS repo源为例,openEuler.repo的内容如下:
[base]
name=base
baseurl=http://repo.openeuler.org/openEuler-22.03-LTS/OS/x86_64/
enabled=1
gpgcheck=1
gpgkey=http://repo.openeuler.org/openEuler-22.03-LTS/OS/x86_64/RPM-GPG-KEY-openEuler
4.2 repo优先级
当有多个repo源时,可通过在*.repo文件的priority参数设置repo的优先级(如果不设置,默认优先级是99,当相同优先级的源中存在相同rpm包时,会安装最新的版本)。其中,1为最高优先级,99为最低优先级,如给openEuler.repo配置优先级为2:
[everything]
name=everything
baseurl=http://192.168.0.24/
enabled=1
priority=2
gpgcheck=1
gpgkey=http://192.168.0.24/RPM-GPG-KEY-openEuler
4.3 dnf相关命令
dnf命令在安装升级时能够自动解析包的依赖关系,一般的使用方式如下:
# dnf <command> <packages name>
常用的命令如下:
安装,需要在root权限下执行。
# dnf install <packages name>
例如示例命令如下:
[root@repo ~]# dnf install lrzsz
everything                                                                                   188 MB/s |  16 MB     00:00
Last metadata expiration check: 0:00:04 ago on 2022年11月30日 星期三 20时42分22秒.
Dependencies resolved.
=============================================================================================================================
 Package                  Architecture              Version                              Repository                     Size
=============================================================================================================================
Installing:
 lrzsz                    x86_64                    0.12.20-46.oe2203                    everything                     83 k

Transaction Summary
=============================================================================================================================
Install  1 Package

Total size: 83 k
Installed size: 201 k
Is this ok [y/N]: y
Downloading Packages:
Running transaction check
Transaction check succeeded.
Running transaction test
Transaction test succeeded.
Running transaction
  Preparing        :                                                                                                     1/1
  Installing       : lrzsz-0.12.20-46.oe2203.x86_64                                                                      1/1
  Running scriptlet: lrzsz-0.12.20-46.oe2203.x86_64                                                                      1/1
  Verifying        : lrzsz-0.12.20-46.oe2203.x86_64                                                                      1/1

Installed:
  lrzsz-0.12.20-46.oe2203.x86_64

Complete!
[root@repo ~]#
升级,需要在root权限下执行。
# dnf update <packages name>
例如示例命令如下:
[root@repo ~]# dnf update lrzsz
Last metadata expiration check: 0:00:43 ago on 2022年11月30日 星期三 20时42分22秒.
Dependencies resolved.
Nothing to do.
Complete!
[root@repo ~]#
回退,需要在root权限下执行。
# dnf downgrade <packages name>
例如示例命令如下:
[root@repo ~]# dnf downgrade lrzsz
Last metadata expiration check: 0:01:11 ago on 2022年11月30日 星期三 20时42分22秒.
Package lrzsz of lowest version already installed, cannot downgrade it.
Dependencies resolved.
Nothing to do.
Complete!
[root@repo ~]#
检查更新
# dnf check-update
例如示例命令如下:
[root@repo ~]# dnf check-update
Last metadata expiration check: 0:01:30 ago on 2022年11月30日 星期三 20时42分22秒.
[root@repo ~]#
卸载,需要在root权限下执行。
# dnf remove <packages name>
例如示例命令如下:
[root@repo ~]# dnf remove lrzsz
Dependencies resolved.
=============================================================================================================================
 Package                 Architecture             Version                                Repository                     Size
=============================================================================================================================
Removing:
 lrzsz                   x86_64                   0.12.20-46.oe2203                      @everything                   201 k

Transaction Summary
=============================================================================================================================
Remove  1 Package

Freed space: 201 k
Is this ok [y/N]: y
Running transaction check
Transaction check succeeded.
Running transaction test
Transaction test succeeded.
Running transaction
  Preparing        :                                                                                                     1/1
  Erasing          : lrzsz-0.12.20-46.oe2203.x86_64                                                                      1/1
  Running scriptlet: lrzsz-0.12.20-46.oe2203.x86_64                                                                      1/1
  Verifying        : lrzsz-0.12.20-46.oe2203.x86_64                                                                      1/1

Removed:
  lrzsz-0.12.20-46.oe2203.x86_64

Complete!
[root@repo ~]#
查询
# dnf search <packages name>
例如示例命令如下:
[root@repo ~]# dnf search lrzsz
Last metadata expiration check: 0:02:58 ago on 2022年11月30日 星期三 20时42分22秒.
================================================ Name Exactly Matched: lrzsz ================================================
lrzsz.x86_64 : Free x/y/zmodem implementation
[root@repo ~]#
本地安装,需要在root权限下执行。
# dnf localinstall <absolute path to package name>
例如示例命令如下:
[root@repo ~]# dnf localinstall /home/repo/Packages/lrzsz-0.12.20-46.oe2203.x86_64.rpm
Last metadata expiration check: 0:03:39 ago on 2022年11月30日 星期三 20时42分22秒.
Dependencies resolved.
=============================================================================================================================
 Package                 Architecture             Version                               Repository                      Size
=============================================================================================================================
Installing:
 lrzsz                   x86_64                   0.12.20-46.oe2203                     @commandline                    83 k

Transaction Summary
=============================================================================================================================
Install  1 Package

Total size: 83 k
Installed size: 201 k
Is this ok [y/N]: y
Downloading Packages:
Running transaction check
Transaction check succeeded.
Running transaction test
Transaction test succeeded.
Running transaction
  Preparing        :                                                                                                     1/1
  Installing       : lrzsz-0.12.20-46.oe2203.x86_64                                                                      1/1
  Running scriptlet: lrzsz-0.12.20-46.oe2203.x86_64                                                                      1/1
  Verifying        : lrzsz-0.12.20-46.oe2203.x86_64                                                                      1/1

Installed:
  lrzsz-0.12.20-46.oe2203.x86_64

Complete!
[root@repo ~]#
查看历史记录
# dnf history
例如示例命令如下:
[root@repo ~]# dnf history
ID     | Command line                                                           | Date and time    | Action(s)      | Altered
-----------------------------------------------------------------------------------------------------------------------------
     3 | install -y nginx                                                       | 2022-11-29 21:55 | Install        |   11
     2 | install createrepo -y                                                  | 2022-11-29 21:34 | Install        |    2
     1 |                                                                        | 2022-11-28 21:29 | Install        |  796 EE
[root@repo ~]#
清除缓存目录
# dnf clean all
例如示例命令如下:
[root@repo ~]# dnf clean all
5 files removed
[root@repo ~]#
更新缓存
# dnf makecache
例如示例命令如下:
[root@repo ~]# dnf makecache
everything                                                                                   3.0 MB/s | 3.0 kB     00:00
Metadata cache created.
[root@repo ~]#
有什么吐槽或反馈意见,直接告诉我!
温馨提示:如出现二维码失效也可直接添加微信号:ysc13803862469。

原文作者:超哥的IT私房菜;如有侵权,请联系管理员删除。

最新文章
- 06 ASM存储入门——Oracle 19c的“存储管家”(可选,针对需要ASM的场景)
- 05 手把手部署Oracle 19c RAC——2节点实例安装全流程(图形化+静默)
- 04 手把手部署Oracle 19c——单实例ASM安装全流程(图形化+静默)
- 03 Oracle 19c初始化配置——让数据库“好用又安全”
- 02 手把手部署Oracle 19c——单实例安装全流程(图形化+静默)
- 01 Oracle 19c部署前的“避坑指南”——环境规划与准备
- 开源堡垒机 JumpServer 社区版实战教程:发布机的配置与Website资产配置使用
- 开源堡垒机 JumpServer 社区版实战教程:一步步构建企业安全运维环境
- 基于 Ubuntu 22.04 离线安装 JumpServer 社区版 v4.4.1
- Harbor镜像仓库实战指南:从安装到高级管理的全面解析
