一:资源
集群: gh-cluster
节点1:gh-cluster-node-01 10.44.66.2
节点2:gh-cluster-node-02 10.116.148.103
节点3:gh-cluster-node-03 10.170.142.108
Elasticsearch:elasticsearch-2.4.4.tar.gz
安装目录:/mnt/gh
二:安装 Elasticsearch
1.创建相关文件目录
mkdir -p /mnt/gh/data/logs/elasticsearch
mkdir -p /mnt/gh/data/elasticsearch/{data,work,plugins,scripts}
2.创建新的用户
groupadd elsearch
useradd elsearch -g elsearch -p elsearch
3.操作权限
chown -R elsearch:elsearch /mnt/gh/data/logs/elasticsearch /mnt/gh/data/elasticsearch
4.安装 Elasticsearch
tar -zxvf elasticsearch-2.4.4.tar.gz
5./etc/security/limits.conf 配置
elsearch soft memlock unlimited
elsearch hard memlock unlimited
6.Elasticsearch 配置
vi /mnt/gh/elasticsearch-2.4.4/config/elasticsearch.yml
各节点调整node-name的配置信息,保证唯一。
四: 在节点1上面安装Elasticsearch 插件
1.安装head插件 监控Elasticsearch的运行状态以及数据
./plugin -DproxyPort=4832 -DproxyHost=10.116.4.116 install mobz/elasticsearch-head
红色部分因为是内网,用了代理访问外网
2.安装kopf插件 ---ElasticSearch的管理工具
./plugin -DproxyPort=4832 -DproxyHost=10.116.4.116 install lmenezes/elasticsearch-kopf
五:启动
以elsearch用户启动三个节点
/mnt/gh/elasticsearch-2.4.4/bin/elasticsearch
六:验证
1.http://10.44.66.2:9200/
2.head插件 http://10.44.66.2:9200/_plugin/head/
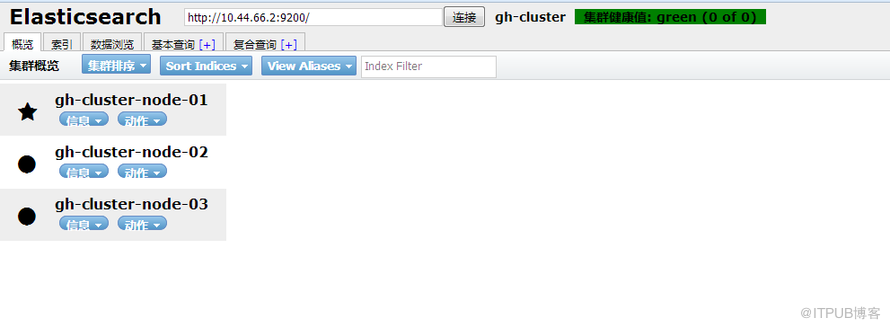
3.kopf插件 http://10.44.66.2:9200/_plugin/kopf/#!/nodes

七:操作命令
1.检查集群的状态
curl '10.44.66.2:9200/_cat/health?v'
2.检查节点的信息
curl '10.44.66.2:9200/_cat/nodes?v'
3.检查索引信息
curl '10.44.66.2:9200/_cat/indices?v'
4.创建索引
curl -XPUT '10.44.66.2:9200/customer?pretty'
5.往索引中,添加文档
curl -XPUT '10.44.66.2:9200/customer/external/1?pretty' -d '{"name":"John Doe"}'
6.查看文档信息
curl -XGET '10.44.66.2:9200/customer/external/1?pretty'
7.查看所有文档数量
curl -XGET '10.44.66.2:9200/_count?pretty' -d '{"query":{"match_all":{}}}'
8.删除索引
curl -XDELETE '10.44.66.2:9200/customer?pretty'
9.随机创建文档信息
curl -XPOST '10.44.66.2:9200/customer/external?pretty' -d '{"name":"Geng Chong"}'
一个 Elasticsearch 请求和任何 HTTP 请求一样由若干相同的部件组成:
curl -X<VERB> '<PROTOCOL>://<HOST>:<PORT>/<PATH>?<QUERY_STRING>' -d '<BODY>'
被 < > 标记的部件:
VERB
适当的 HTTP 方法 或 谓词 : GET`、 `POST`、 `PUT`、 `HEAD 或者 `DELETE`。
PROTOCOL
http 或者 https`(如果你在 Elasticsearch 前面有一个 `https 代理)
HOST
Elasticsearch 集群中任意节点的主机名,或者用 localhost 代表本地机器上的节点。
PORT
运行 Elasticsearch HTTP 服务的端口号,默认是 9200 。
PATH
API 的终端路径(例如 _count 将返回集群中文档数量)。Path 可能包含多个组件,例如:_cluster/stats 和 _nodes/stats/jvm 。
QUERY_STRING
任意可选的查询字符串参数 (例如 ?pretty 将格式化地输出 JSON 返回值,使其更容易阅读)
BODY
一个 JSON 格式的请求体 (如果请求需要的话)
集群: gh-cluster
节点1:gh-cluster-node-01 10.44.66.2
节点2:gh-cluster-node-02 10.116.148.103
节点3:gh-cluster-node-03 10.170.142.108
Elasticsearch:elasticsearch-2.4.4.tar.gz
安装目录:/mnt/gh
二:安装 Elasticsearch
1.创建相关文件目录
mkdir -p /mnt/gh/data/logs/elasticsearch
mkdir -p /mnt/gh/data/elasticsearch/{data,work,plugins,scripts}
2.创建新的用户
groupadd elsearch
useradd elsearch -g elsearch -p elsearch
3.操作权限
chown -R elsearch:elsearch /mnt/gh/data/logs/elasticsearch /mnt/gh/data/elasticsearch
4.安装 Elasticsearch
tar -zxvf elasticsearch-2.4.4.tar.gz
5./etc/security/limits.conf 配置
elsearch soft memlock unlimited
elsearch hard memlock unlimited
6.Elasticsearch 配置
vi /mnt/gh/elasticsearch-2.4.4/config/elasticsearch.yml
点击(此处)折叠或打开
-
# ======================== Elasticsearch Configuration =========================
-
#
-
# NOTE: Elasticsearch comes with reasonable defaults for most settings.
-
# Before you set out to tweak and tune the configuration, make sure you
-
# understand what are you trying to accomplish and the consequences.
-
#
-
# The primary way of configuring a node is via this file. This template lists
-
# the most important settings you may want to configure for a production cluster.
-
#
-
# Please see the documentation for further information on configuration options:
-
# <http://www.elastic.co/guide/en/elasticsearch/reference/current/setup-configuration.html>
-
#
-
# ---------------------------------- Cluster -----------------------------------
-
#
-
# Use a descriptive name for your cluster:
-
#
-
cluster.name: gh-cluster
-
#
-
# ------------------------------------ Node ------------------------------------
-
#
-
# Use a descriptive name for the node:
-
#
-
node.name: gh-cluster-node-01
-
#
-
# Add custom attributes to the node:
-
#
-
# node.rack: r1
-
#
-
# ----------------------------------- Paths ------------------------------------
-
#
-
# Path to directory where to store the data (separate multiple locations by comma):
-
path.data: /mnt/gh/data/elasticsearch/data
-
#
-
# Path to log files:
-
#
-
path.logs : /mnt/gh/data/logs/elasticsearch
-
path.plugins: /mnt/gh/data/elasticsearch/plugins
-
path.scripts: /mnt/gh/data/elasticsearch/scripts
-
#
-
# ----------------------------------- Memory -----------------------------------
-
#
-
# Lock the memory on startup:
-
#
-
bootstrap.memory_lock: true
-
#
-
# Make sure that the `ES_HEAP_SIZE` environment variable is set to about half the memory
-
# available on the system and that the owner of the process is allowed to use this limit.
-
#
-
# Elasticsearch performs poorly when the system is swapping the memory.
-
#
-
# ---------------------------------- Network -----------------------------------
-
#
-
# Set the bind address to a specific IP (IPv4 or IPv6):
-
#
-
network.host: 10.44.66.2
-
#
-
# Set a custom port for HTTP:
-
#
-
http.port: 9200
-
#
-
# For more information, see the documentation at:
-
# <http://www.elastic.co/guide/en/elasticsearch/reference/current/modules-network.html>
-
#
-
# --------------------------------- Discovery ----------------------------------
-
#
-
# Pass an initial list of hosts to perform discovery when new node is started:
-
# The default list of hosts is ["127.0.0.1", "[::1]"]
-
#
-
discovery.zen.ping.multicast.enabled: false
-
discovery.zen.ping_timeout: 120s
-
discovery.zen.fd.ping_timeout: 120s
-
discovery.zen.ping.unicast.hosts: ["10.44.66.2", "10.116.148.103", "10.170.142.108"]
-
#
-
# Prevent the "split brain" by configuring the majority of nodes (total number of nodes / 2 + 1):
-
#
-
discovery.zen.minimum_master_nodes: 2
-
#
-
# For more information, see the documentation at:
-
# <http://www.elastic.co/guide/en/elasticsearch/reference/current/modules-discovery.html>
-
#
-
# ---------------------------------- Gateway -----------------------------------
-
#
-
# Block initial recovery after a full cluster restart until N nodes are started:
-
#
-
gateway.recover_after_nodes: 3
-
gateway.recover_after_time: 30m
-
gateway.expected_nodes: 3
-
#
-
# For more information, see the documentation at:
-
# <http://www.elastic.co/guide/en/elasticsearch/reference/current/modules-gateway.html>
-
#
-
# ---------------------------------- Various -----------------------------------
-
#
-
# Disable starting multiple nodes on a single system:
-
#
-
# node.max_local_storage_nodes: 1
-
#
-
# Require explicit names when deleting indices:
-
#
- # action.destructive_requires_name: true
四: 在节点1上面安装Elasticsearch 插件
1.安装head插件 监控Elasticsearch的运行状态以及数据
./plugin -DproxyPort=4832 -DproxyHost=10.116.4.116 install mobz/elasticsearch-head
红色部分因为是内网,用了代理访问外网
2.安装kopf插件 ---ElasticSearch的管理工具
./plugin -DproxyPort=4832 -DproxyHost=10.116.4.116 install lmenezes/elasticsearch-kopf
五:启动
以elsearch用户启动三个节点
/mnt/gh/elasticsearch-2.4.4/bin/elasticsearch
六:验证
1.http://10.44.66.2:9200/
{
  "name" : "gh-cluster-node-01",
  "cluster_name" : "gh-cluster",
  "cluster_uuid" : "iGovr8lcSW62JdEABzLMyg",
  "version" : {
    "number" : "2.4.4",
    "build_hash" : "fcbb46dfd45562a9cf00c604b30849a6dec6b017",
    "build_timestamp" : "2017-01-03T11:33:16Z",
    "build_snapshot" : false,
    "lucene_version" : "5.5.2"
  },
  "tagline" : "You Know, for Search"
}
2.head插件 http://10.44.66.2:9200/_plugin/head/
3.kopf插件 http://10.44.66.2:9200/_plugin/kopf/#!/nodes

七:操作命令
1.检查集群的状态
curl '10.44.66.2:9200/_cat/health?v'
2.检查节点的信息
curl '10.44.66.2:9200/_cat/nodes?v'
3.检查索引信息
curl '10.44.66.2:9200/_cat/indices?v'
4.创建索引
curl -XPUT '10.44.66.2:9200/customer?pretty'
5.往索引中,添加文档
curl -XPUT '10.44.66.2:9200/customer/external/1?pretty' -d '{"name":"John Doe"}'
6.查看文档信息
curl -XGET '10.44.66.2:9200/customer/external/1?pretty'
7.查看所有文档数量
curl -XGET '10.44.66.2:9200/_count?pretty' -d '{"query":{"match_all":{}}}'
8.删除索引
curl -XDELETE '10.44.66.2:9200/customer?pretty'
9.随机创建文档信息
curl -XPOST '10.44.66.2:9200/customer/external?pretty' -d '{"name":"Geng Chong"}'
一个 Elasticsearch 请求和任何 HTTP 请求一样由若干相同的部件组成:
curl -X<VERB> '<PROTOCOL>://<HOST>:<PORT>/<PATH>?<QUERY_STRING>' -d '<BODY>'
被 < > 标记的部件:
VERB
适当的 HTTP 方法 或 谓词 : GET`、 `POST`、 `PUT`、 `HEAD 或者 `DELETE`。
PROTOCOL
http 或者 https`(如果你在 Elasticsearch 前面有一个 `https 代理)
HOST
Elasticsearch 集群中任意节点的主机名,或者用 localhost 代表本地机器上的节点。
PORT
运行 Elasticsearch HTTP 服务的端口号,默认是 9200 。
PATH
API 的终端路径(例如 _count 将返回集群中文档数量)。Path 可能包含多个组件,例如:_cluster/stats 和 _nodes/stats/jvm 。
QUERY_STRING
任意可选的查询字符串参数 (例如 ?pretty 将格式化地输出 JSON 返回值,使其更容易阅读)
BODY
一个 JSON 格式的请求体 (如果请求需要的话)
来自 “ ITPUB博客 ” ,链接:https://blog.itpub.net/28624388/viewspace-2138064/ ,如需转载,请注明出处,否则将追究法律责任。
上一篇:
ZooKeeper分布式任务调度中心
下一篇:
Elasticsearch 参数配置说明

请登录后发表评论
登录
全部评论
