双节点RAC坏掉一节点:rman全备+重搭RAC
双节点RAC1坏掉,只有RAC2能正常运行,恢复双节点RAC有两种方法:
方法1——可以将坏掉把RAC1从集群中清除,然后再添加,担心这样不稳定。
方法2——rman比导入导出快,所以用RMAN全备接着重搭集群后用RMAN恢复
本文采用方法2。
续:
双节点RAC坏掉一节点:rman全备+重搭RAC(1-2)
http://blog.itpub.net/210154/viewspace-1224742/
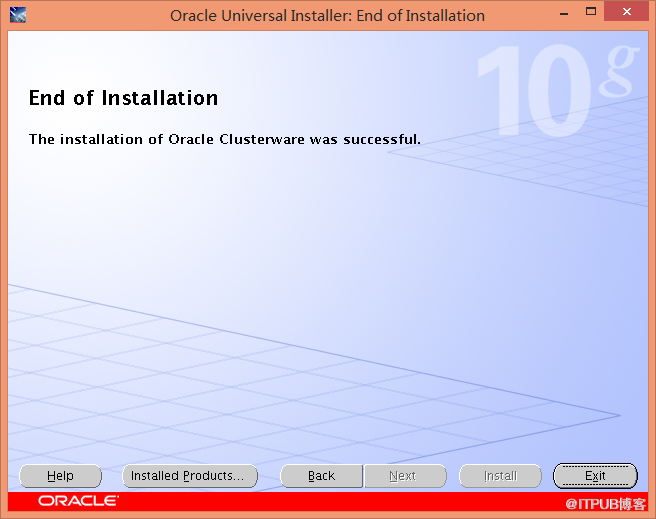
10-07-重新安装10.2.0.0.1 classware on rhel54
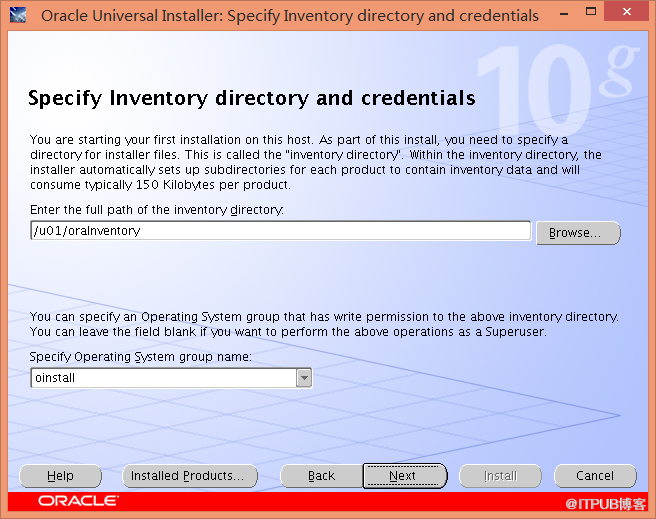
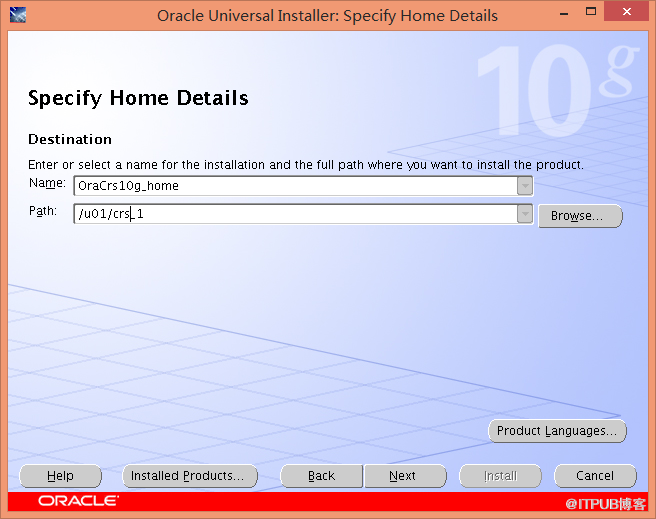
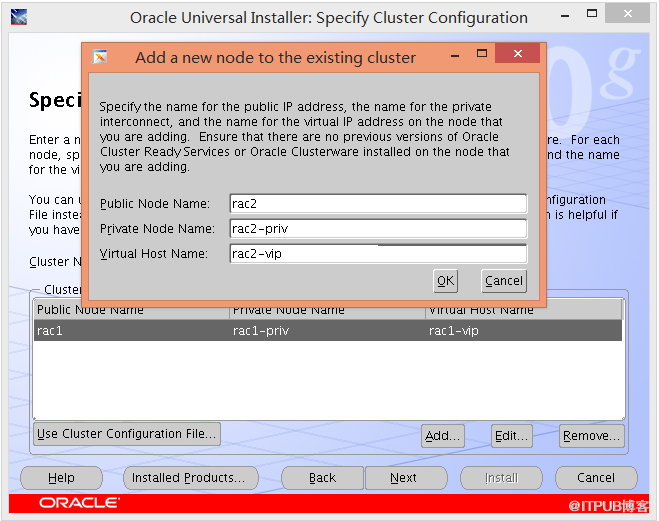
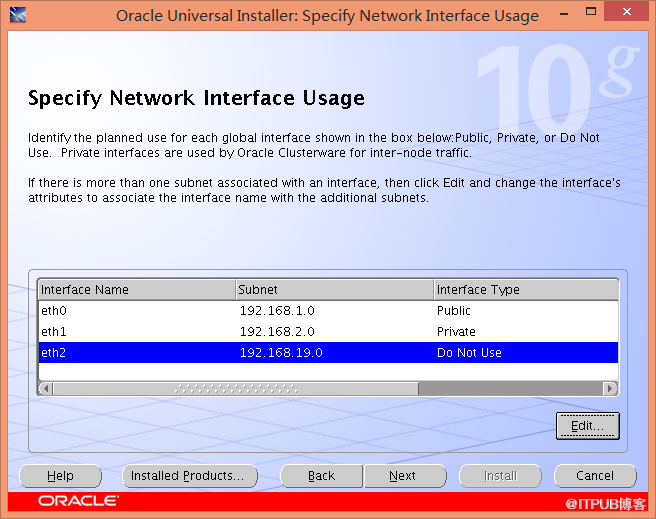
一、安装classware
[oracle@rac1 ~]$ /hsw_media/clusterware/runInstaller
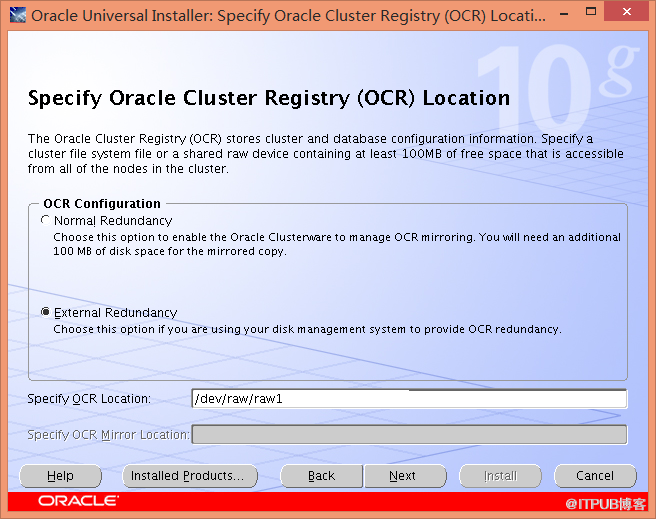
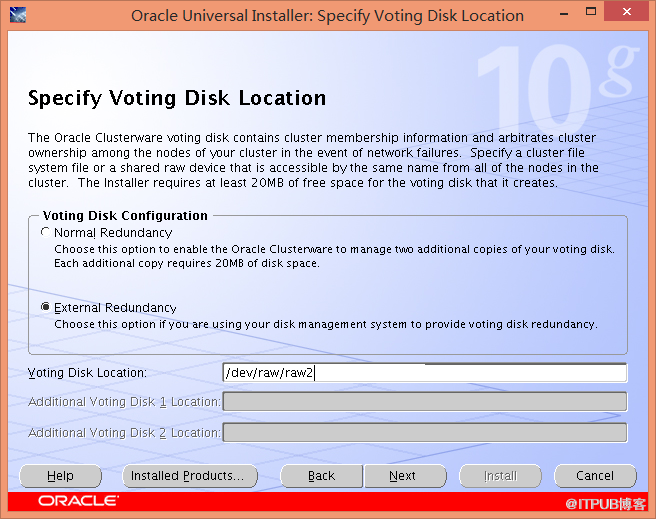

二、安装后脚本本的处理
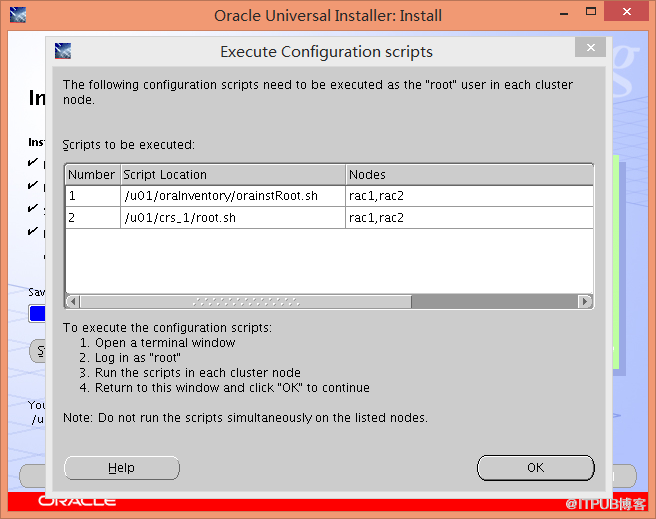
1、出现如下窗口,先不要执行其中的脚本
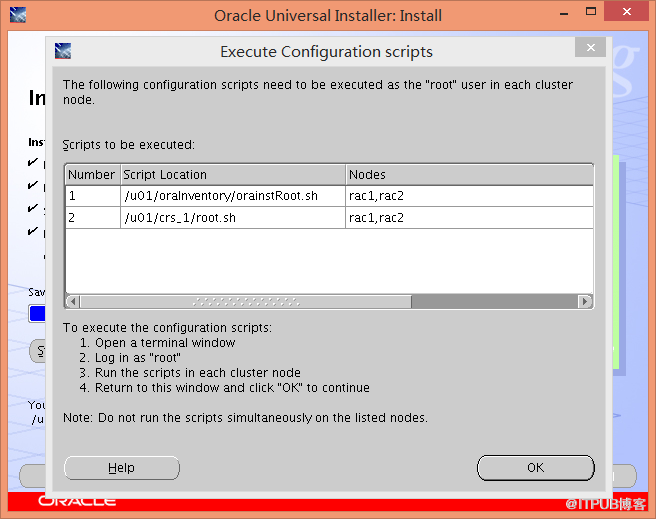
2、在RAC1、RAC2上分别修改两个文件
[oracle@rac1 ~]$ vim `which vipca` 让118~123行失效
117 #Remove this workaround when the bug 3937317 is fixed
118 #arch=`uname -m`
119 #if [ "$arch" = "i686" -o "$arch" = "ia64" ]
120 #then
121 #LD_ASSUME_KERNEL=2.4.19
122 #export LD_ASSUME_KERNEL
123 #fi
[oracle@rac1 ~]$ vim `which srvctl` 让165~166行失效
165 #Remove this workaround when the bug 3937317 is fixed
166 #LD_ASSUME_KERNEL=2.4.19
167 #export LD_ASSUME_KERNEL
3、顺序在各个节点上顺序执行orainstRoot.sh
[root@rac1 ~]# /u01/oraInventory/orainstRoot.sh
Changing permissions of /u01/oraInventory to 770.
Changing groupname of /u01/oraInventory to oinstall.
The execution of the script is complete
[root@rac2 ~]# /u01/oraInventory/orainstRoot.sh
Changing permissions of /u01/oraInventory to 770.
Changing groupname of /u01/oraInventory to oinstall.
The execution of the script is complete
[root@rac1 ~]# /u01/oraInventory/orainstRoot.sh
Changing permissions of /u01/oraInventory to 770.
Changing groupname of /u01/oraInventory to oinstall.
The execution of the script is complete
5、顺序在各个节点上顺序执行root.sh
(1)第一个节点完全成功
[root@rac1 ~]# /u01/crs_1/root.sh
… …
Local node checking complete.
Run root.sh on remaining nodes to start CRS daemons.
(2)第二个节点执行到vipca时出错
[root@rac2 ~]# /u01/crs_1/root.sh
…
Running vipca(silent) for configuring nodeapps
Error 0(Native: listNetInterfaces:[3])
[Error 0(Native: listNetInterfaces:[3])]
(3)第二个节点执行到vipca时出错解决办法如下:
# oifcfg setif -global eth0/192.168.1.0:public
# oifcfg setif -global eth1/192.168.2.0:cluster_interconnect
# oifcfg getif
eth0 192.168.1.0 global public
eth1 192.168.2.0 global cluster_interconnect
# 先vipca在vipca成功后点击[root@rac2 ~]# /u01/crs_1/root.sh的OK
[root@rac2 ~]# vipca

自动填充
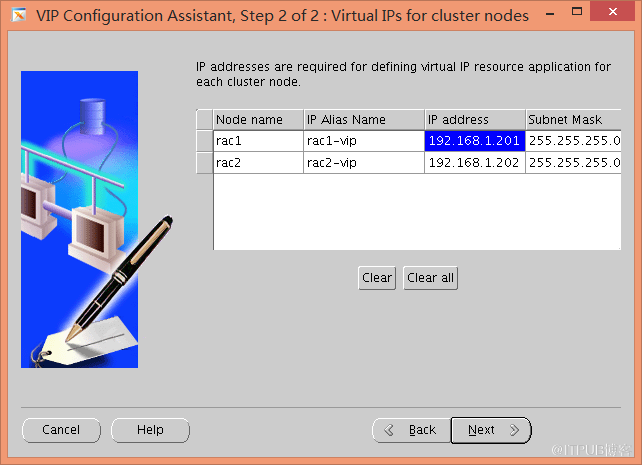
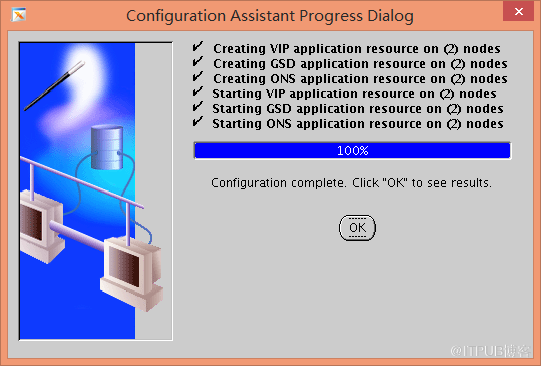
(6)占击/u01/crs_1/root.sh的OK
10-08-重新安装db app
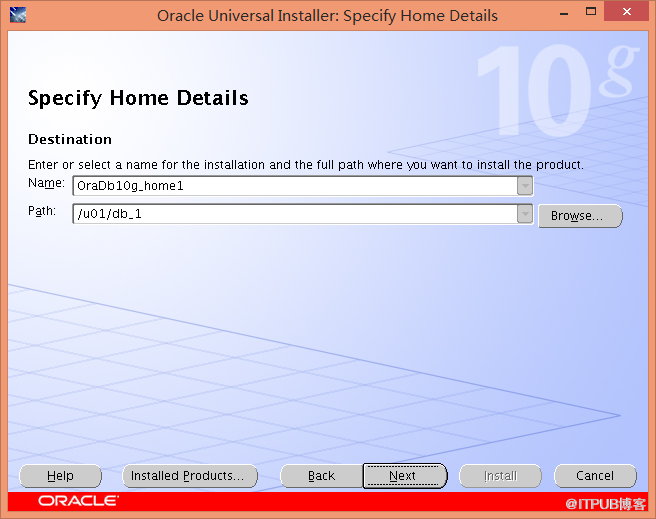
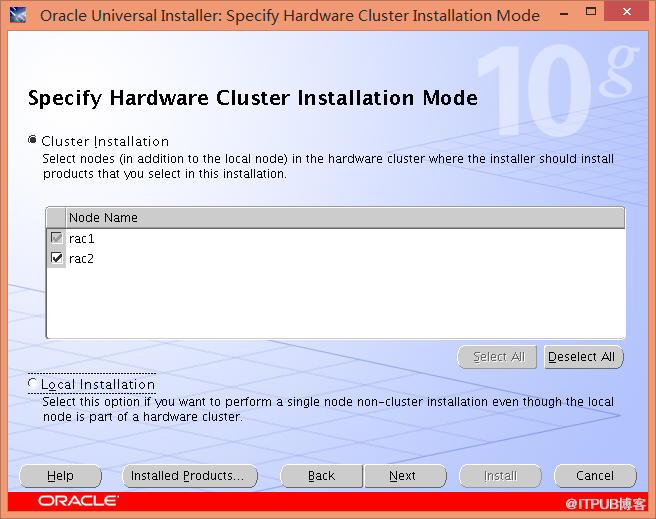
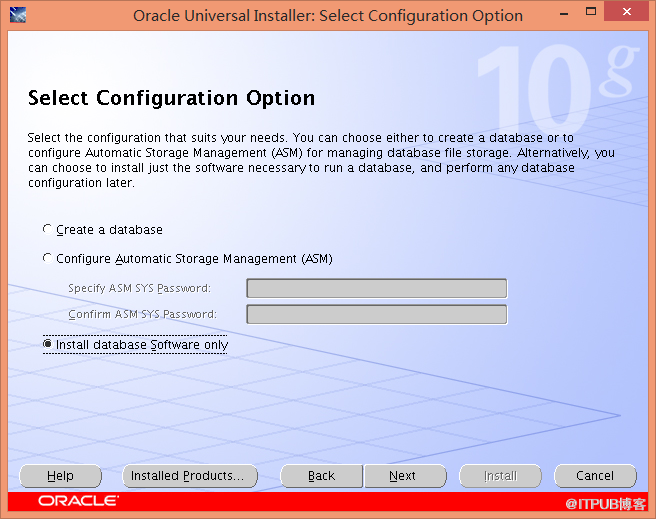
一、开始db app的安装
[oracle@rac1 ~]$ /hsw_media/database/runInstaller
二、执行db app安装后脚本
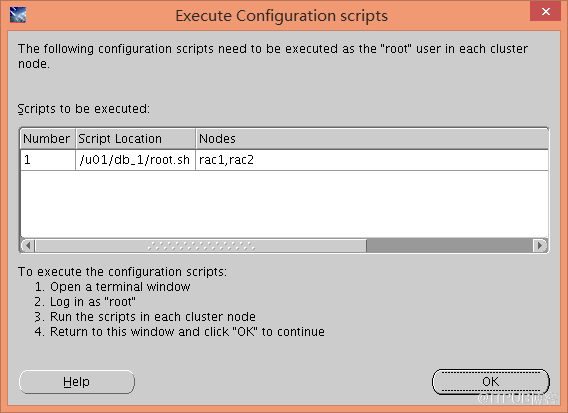
[root@rac1 ~]# /u01/db_1/root.sh
…
[root@rac2 ~]# /u01/db_1/root.sh
Running Oracle10 root.sh script...
The following environment variables are set as:
ORACLE_OWNER= oracle
ORACLE_HOME= /u01/db_1
Enter the full pathname of the local bin directory: [/usr/local/bin]:
Copying dbhome to /usr/local/bin ...
Copying oraenv to /usr/local/bin ...
Copying coraenv to /usr/local/bin ...
Creating /etc/oratab file...
Entries will be added to the /etc/oratab file as needed by
Database Configuration Assistant when a database is created
Finished running generic part of root.sh script.
Now product-specific root actions will be performed.
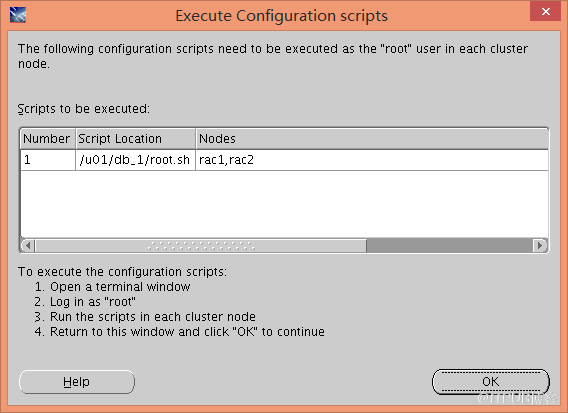
3、点击OK
10-09-重新添加listener
[oracle@rac1 ~]$ netca
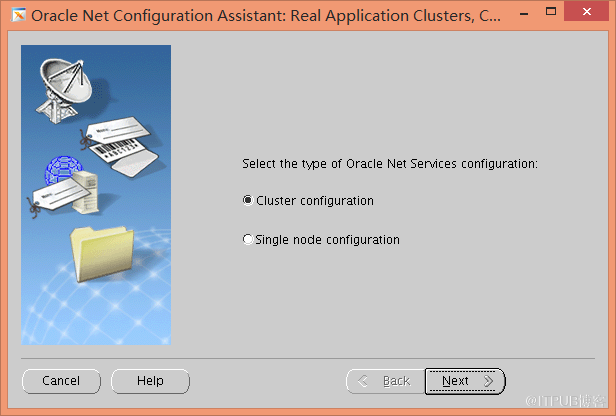
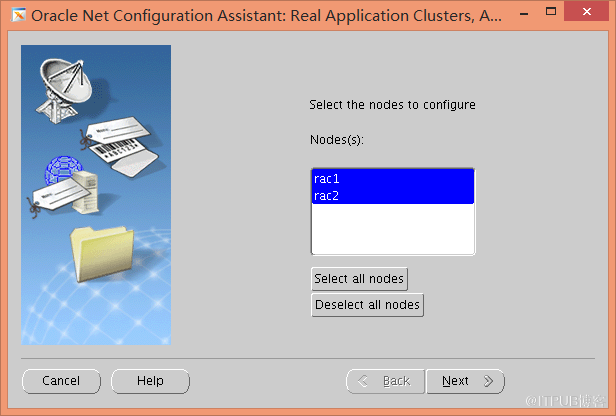
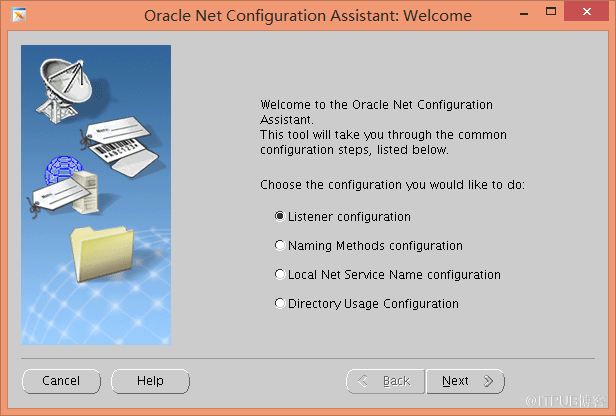
Oracle Net Services Configuration:
Configuring Listener:LISTENER
Default local naming configuration complete.
rac1...
rac2...
Listener configuration complete.
Oracle Net Services configuration successful. The exit code is 0
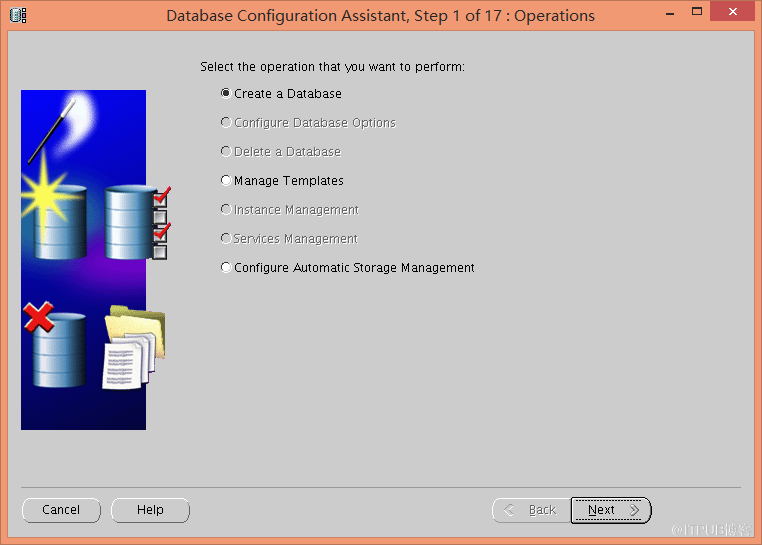
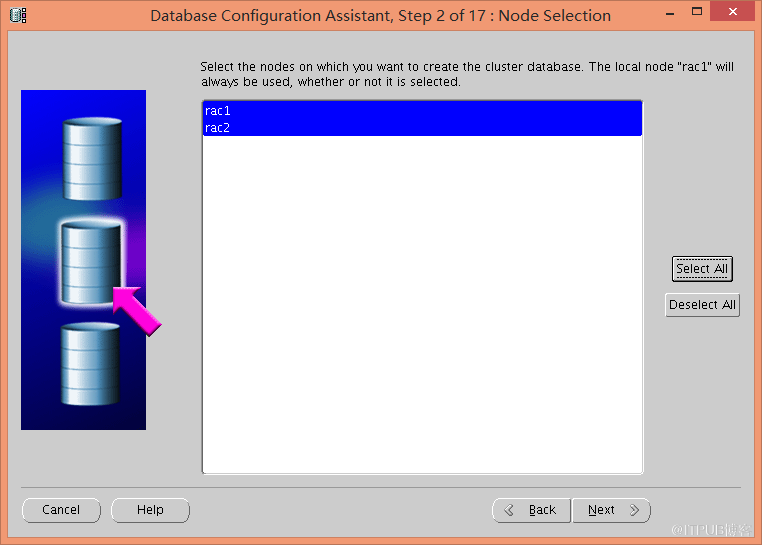
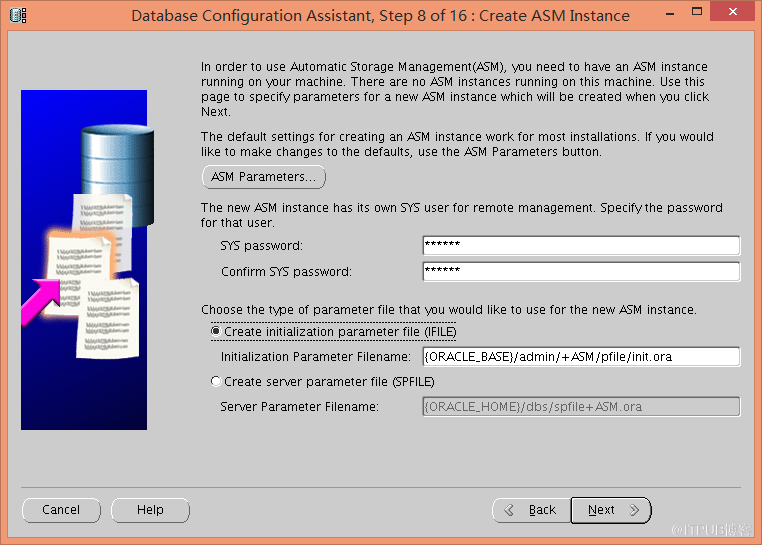
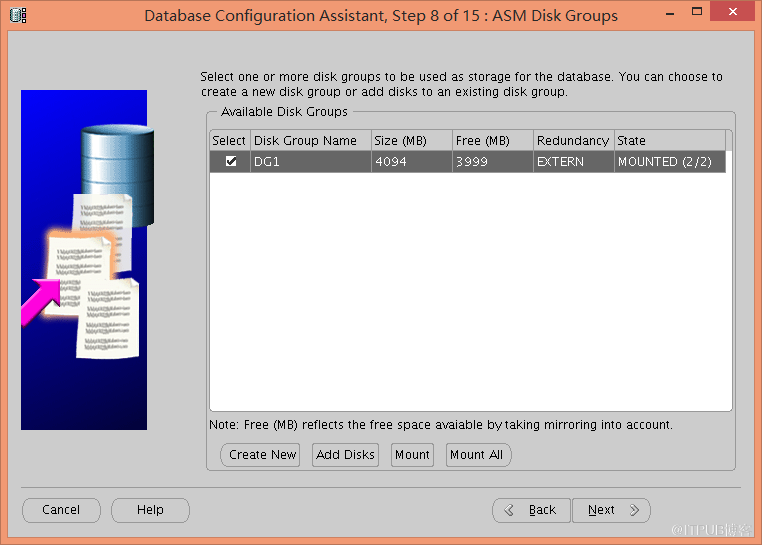
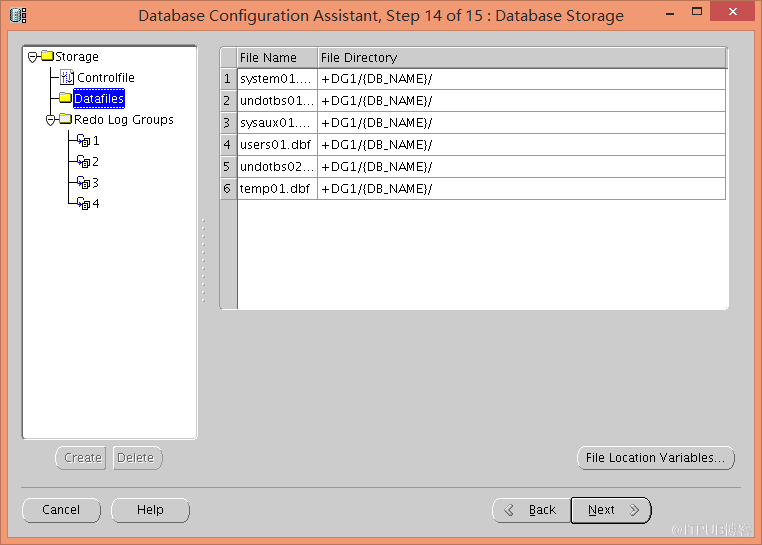
10-10-重建ASM+建DB(数据库名称不变)
[oracle@rac1 ~]$ dbca
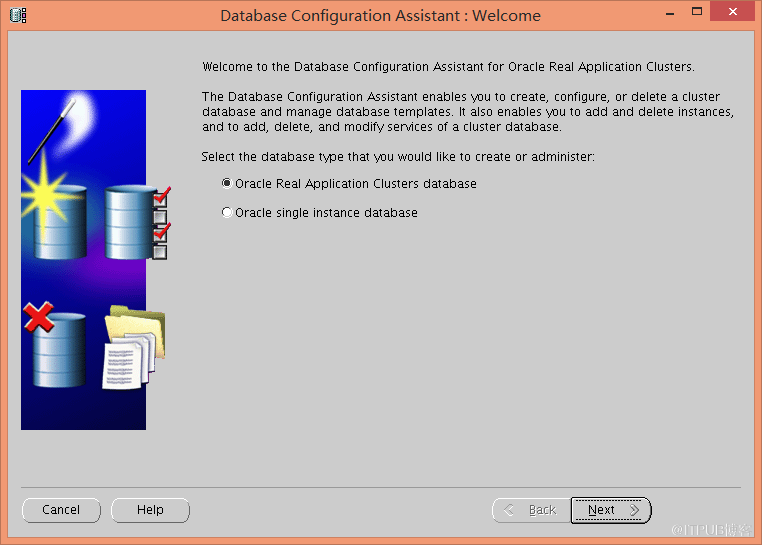
[oracle@rac1 ~]$ crs_stat -t
Name Type Target State Host
------------------------------------------------------------
ora....B1.inst application ONLINE ONLINE rac1
ora....B2.inst application ONLINE ONLINE rac2
ora.RACDB.db application ONLINE ONLINE rac1
ora....SM1.asm application ONLINE ONLINE rac1
ora....C1.lsnr application ONLINE ONLINE rac1
ora.rac1.gsd application ONLINE ONLINE rac1
ora.rac1.ons application ONLINE ONLINE rac1
ora.rac1.vip application ONLINE ONLINE rac1
ora....SM2.asm application ONLINE ONLINE rac2
ora....C2.lsnr application ONLINE ONLINE rac2
ora.rac2.gsd application ONLINE ONLINE rac2
ora.rac2.ons application ONLINE ONLINE rac2
ora.rac2.vip application ONLINE ONLINE rac2
10-11-恢复原数据库信息
一、恢复参数文件
1、恢复参数文件
SYS@RACDB1> show parameter spfile
spfile string +DG1/racdb/spfileracdb.ora
SYS@RACDB1> create spfile from pfile='/rac_arch/pfile.bak';
2、重启数据库
$ srvctl stop database -d RACDB ;#第一次竟然报错
PRKP-1002 : Error stopping instance RACDB1 on node rac1
CRS-0216: Could not stop resource 'ora.RACDB.RACDB1.inst'.
PRKP-1002 : Error stopping instance RACDB2 on node rac2
CRS-0216: Could not stop resource 'ora.RACDB.RACDB2.inst'.
$ srvctl stop database -d RACDB ;#第二次成功
3、使用恢复好的参数启动
$ srvctl start database -d RACDB #竟然失败reboot两个节点的OS后成功
[oracle@rac2 ~]$ crs_stat -t
Name Type Target State Host
------------------------------------------------------------
ora....B1.inst application ONLINE ONLINE rac1
ora....B2.inst application ONLINE ONLINE rac2
ora.RACDB.db application ONLINE ONLINE rac2
ora....SM1.asm application ONLINE ONLINE rac1
ora....C1.lsnr application ONLINE ONLINE rac1
ora.rac1.gsd application ONLINE ONLINE rac1
ora.rac1.ons application ONLINE ONLINE rac1
ora.rac1.vip application ONLINE ONLINE rac1
ora....SM2.asm application ONLINE ONLINE rac2
ora....C2.lsnr application ONLINE ONLINE rac2
ora.rac2.gsd application ONLINE ONLINE rac2
ora.rac2.ons application ONLINE ONLINE rac2
ora.rac2.vip application ONLINE ONLINE rac2
二、恢复控制文件
1、关闭所有实例及数据库
$ srvctl stop database -d RACDB
2、设置原来的DBID
[oracle@rac2 ~]$ rman target /
connected to target database (not started)
RMAN> set DBID=850267053
3、加载恢复好的spfile进入nomount状态
RMAN> startup nomount
4、恢复控制文件
RMAN> restore controlfile from '/rac_arch/full_RACDB_20140721_7';
output filename=+DG1/racdb/control01.ctl
output filename=+DG1/racdb/control02.ctl
output filename=+DG1/racdb/control03.ctl
三、从全备中恢复数据库
1、使用恢复好的控制文件启动到mount状态
RMAN> alter database mount;
2、查看备份信息
RMAN> list backup of database;
BS Key Type LV Size Device Type Elapsed Time Completion Time
------- ---- -- ---------- ----------- ------------ ---------------
3 Full 95.02M DISK 00:00:15 21-JUL-14
BP Key: 3 Status: AVAILABLE Compressed: YES Tag: FULL
Piece Name: /rac_arch/full_RACDB_20140721_6
List of Datafiles in backup set 3
File LV Type Ckp SCN Ckp Time Name
---- -- ---- ---------- --------- ----
1 Full 571080 21-JUL-14 +DG1/racdb/system01.dbf
2 Full 571080 21-JUL-14 +DG1/racdb/undotbs01.dbf
3 Full 571080 21-JUL-14 +DG1/racdb/sysaux01.dbf
4 Full 571080 21-JUL-14 +DG1/racdb/users01.dbf
5 Full 571080 21-JUL-14 +DG1/racdb/undotbs02.dbf
四、restore/recover数据库(没有变更数据文件的位置)
1、物理还原
RMAN> restore database;
channel ORA_DISK_1: specifying datafile(s) to restore from backup set
restoring datafile 00001 to +DG1/racdb/system01.dbf
restoring datafile 00002 to +DG1/racdb/undotbs01.dbf
restoring datafile 00003 to +DG1/racdb/sysaux01.dbf
restoring datafile 00004 to +DG1/racdb/users01.dbf
restoring datafile 00005 to +DG1/racdb/undotbs02.dbf
channel ORA_DISK_1: reading from backup piece /rac_arch/full_RACDB_20140721_6
2、逻辑恢复
RMAN> recover database;
starting media recovery
archive log thread 1 sequence 9 is already on disk as file /rac_arch/redo06.rd
archive log thread 1 sequence 10 is already on disk as file /rac_arch/redo05.rd
archive log thread 2 sequence 10 is already on disk as file /rac_arch/redo08.rd
archive log thread 2 sequence 11 is already on disk as file /rac_arch/redo07.rd
archive log filename=/rac_arch/redo08.rd thread=2 sequence=10
archive log filename=/rac_arch/redo06.rd thread=1 sequence=9
archive log filename=/rac_arch/redo07.rd thread=2 sequence=11
archive log filename=/rac_arch/redo05.rd thread=1 sequence=10
media recovery complete, elapsed time: 00:00:10
Finished recover at 22-JUL-14
五、打开数据库
SYS@RACDB2> select status from v$instance;
--MOUNTED
SYS@RACDB2> alter database open noresetlogs;
--ORA-01589: must use RESETLOGS or NORESETLOGS option for database open
SYS@RACDB2> alter database open NORESETLOGS;
ORA-01588: must use RESETLOGS option for database open
SYS@RACDB2> shutdown immediate
SYS@RACDB2> startup mount
SYS@RACDB2> alter database open RESETLOGS;
SYS@RACDB2> select username from dba_users where username='ZCS';
--ZCS #原库中的账号已恢复
zcs0237
2014.07.22
More cleaner and more efficient!
双节点RAC1坏掉,只有RAC2能正常运行,恢复双节点RAC有两种方法:
方法1——可以将坏掉把RAC1从集群中清除,然后再添加,担心这样不稳定。
方法2——rman比导入导出快,所以用RMAN全备接着重搭集群后用RMAN恢复
本文采用方法2。
续:
双节点RAC坏掉一节点:rman全备+重搭RAC(1-2)
http://blog.itpub.net/210154/viewspace-1224742/
10-07-重新安装10.2.0.0.1 classware on rhel54
一、安装classware
[oracle@rac1 ~]$ /hsw_media/clusterware/runInstaller

二、安装后脚本本的处理
1、出现如下窗口,先不要执行其中的脚本
2、在RAC1、RAC2上分别修改两个文件
[oracle@rac1 ~]$ vim `which vipca` 让118~123行失效
117 #Remove this workaround when the bug 3937317 is fixed
118 #arch=`uname -m`
119 #if [ "$arch" = "i686" -o "$arch" = "ia64" ]
120 #then
121 #LD_ASSUME_KERNEL=2.4.19
122 #export LD_ASSUME_KERNEL
123 #fi
[oracle@rac1 ~]$ vim `which srvctl` 让165~166行失效
165 #Remove this workaround when the bug 3937317 is fixed
166 #LD_ASSUME_KERNEL=2.4.19
167 #export LD_ASSUME_KERNEL
3、顺序在各个节点上顺序执行orainstRoot.sh
[root@rac1 ~]# /u01/oraInventory/orainstRoot.sh
Changing permissions of /u01/oraInventory to 770.
Changing groupname of /u01/oraInventory to oinstall.
The execution of the script is complete
[root@rac2 ~]# /u01/oraInventory/orainstRoot.sh
Changing permissions of /u01/oraInventory to 770.
Changing groupname of /u01/oraInventory to oinstall.
The execution of the script is complete
[root@rac1 ~]# /u01/oraInventory/orainstRoot.sh
Changing permissions of /u01/oraInventory to 770.
Changing groupname of /u01/oraInventory to oinstall.
The execution of the script is complete
5、顺序在各个节点上顺序执行root.sh
(1)第一个节点完全成功
[root@rac1 ~]# /u01/crs_1/root.sh
… …
Local node checking complete.
Run root.sh on remaining nodes to start CRS daemons.
(2)第二个节点执行到vipca时出错
[root@rac2 ~]# /u01/crs_1/root.sh
…
Running vipca(silent) for configuring nodeapps
Error 0(Native: listNetInterfaces:[3])
[Error 0(Native: listNetInterfaces:[3])]
(3)第二个节点执行到vipca时出错解决办法如下:
# oifcfg setif -global eth0/192.168.1.0:public
# oifcfg setif -global eth1/192.168.2.0:cluster_interconnect
# oifcfg getif
eth0 192.168.1.0 global public
eth1 192.168.2.0 global cluster_interconnect
# 先vipca在vipca成功后点击[root@rac2 ~]# /u01/crs_1/root.sh的OK
[root@rac2 ~]# vipca

自动填充
(6)占击/u01/crs_1/root.sh的OK
10-08-重新安装db app
一、开始db app的安装
[oracle@rac1 ~]$ /hsw_media/database/runInstaller
二、执行db app安装后脚本
[root@rac1 ~]# /u01/db_1/root.sh
…
[root@rac2 ~]# /u01/db_1/root.sh
Running Oracle10 root.sh script...
The following environment variables are set as:
ORACLE_OWNER= oracle
ORACLE_HOME= /u01/db_1
Enter the full pathname of the local bin directory: [/usr/local/bin]:
Copying dbhome to /usr/local/bin ...
Copying oraenv to /usr/local/bin ...
Copying coraenv to /usr/local/bin ...
Creating /etc/oratab file...
Entries will be added to the /etc/oratab file as needed by
Database Configuration Assistant when a database is created
Finished running generic part of root.sh script.
Now product-specific root actions will be performed.
3、点击OK
10-09-重新添加listener
[oracle@rac1 ~]$ netca
Oracle Net Services Configuration:
Configuring Listener:LISTENER
Default local naming configuration complete.
rac1...
rac2...
Listener configuration complete.
Oracle Net Services configuration successful. The exit code is 0
10-10-重建ASM+建DB(数据库名称不变)
[oracle@rac1 ~]$ dbca
[oracle@rac1 ~]$ crs_stat -t
Name Type Target State Host
------------------------------------------------------------
ora....B1.inst application ONLINE ONLINE rac1
ora....B2.inst application ONLINE ONLINE rac2
ora.RACDB.db application ONLINE ONLINE rac1
ora....SM1.asm application ONLINE ONLINE rac1
ora....C1.lsnr application ONLINE ONLINE rac1
ora.rac1.gsd application ONLINE ONLINE rac1
ora.rac1.ons application ONLINE ONLINE rac1
ora.rac1.vip application ONLINE ONLINE rac1
ora....SM2.asm application ONLINE ONLINE rac2
ora....C2.lsnr application ONLINE ONLINE rac2
ora.rac2.gsd application ONLINE ONLINE rac2
ora.rac2.ons application ONLINE ONLINE rac2
ora.rac2.vip application ONLINE ONLINE rac2
10-11-恢复原数据库信息
一、恢复参数文件
1、恢复参数文件
SYS@RACDB1> show parameter spfile
spfile string +DG1/racdb/spfileracdb.ora
SYS@RACDB1> create spfile from pfile='/rac_arch/pfile.bak';
2、重启数据库
$ srvctl stop database -d RACDB ;#第一次竟然报错
PRKP-1002 : Error stopping instance RACDB1 on node rac1
CRS-0216: Could not stop resource 'ora.RACDB.RACDB1.inst'.
PRKP-1002 : Error stopping instance RACDB2 on node rac2
CRS-0216: Could not stop resource 'ora.RACDB.RACDB2.inst'.
$ srvctl stop database -d RACDB ;#第二次成功
3、使用恢复好的参数启动
$ srvctl start database -d RACDB #竟然失败reboot两个节点的OS后成功
[oracle@rac2 ~]$ crs_stat -t
Name Type Target State Host
------------------------------------------------------------
ora....B1.inst application ONLINE ONLINE rac1
ora....B2.inst application ONLINE ONLINE rac2
ora.RACDB.db application ONLINE ONLINE rac2
ora....SM1.asm application ONLINE ONLINE rac1
ora....C1.lsnr application ONLINE ONLINE rac1
ora.rac1.gsd application ONLINE ONLINE rac1
ora.rac1.ons application ONLINE ONLINE rac1
ora.rac1.vip application ONLINE ONLINE rac1
ora....SM2.asm application ONLINE ONLINE rac2
ora....C2.lsnr application ONLINE ONLINE rac2
ora.rac2.gsd application ONLINE ONLINE rac2
ora.rac2.ons application ONLINE ONLINE rac2
ora.rac2.vip application ONLINE ONLINE rac2
二、恢复控制文件
1、关闭所有实例及数据库
$ srvctl stop database -d RACDB
2、设置原来的DBID
[oracle@rac2 ~]$ rman target /
connected to target database (not started)
RMAN> set DBID=850267053
3、加载恢复好的spfile进入nomount状态
RMAN> startup nomount
4、恢复控制文件
RMAN> restore controlfile from '/rac_arch/full_RACDB_20140721_7';
output filename=+DG1/racdb/control01.ctl
output filename=+DG1/racdb/control02.ctl
output filename=+DG1/racdb/control03.ctl
三、从全备中恢复数据库
1、使用恢复好的控制文件启动到mount状态
RMAN> alter database mount;
2、查看备份信息
RMAN> list backup of database;
BS Key Type LV Size Device Type Elapsed Time Completion Time
------- ---- -- ---------- ----------- ------------ ---------------
3 Full 95.02M DISK 00:00:15 21-JUL-14
BP Key: 3 Status: AVAILABLE Compressed: YES Tag: FULL
Piece Name: /rac_arch/full_RACDB_20140721_6
List of Datafiles in backup set 3
File LV Type Ckp SCN Ckp Time Name
---- -- ---- ---------- --------- ----
1 Full 571080 21-JUL-14 +DG1/racdb/system01.dbf
2 Full 571080 21-JUL-14 +DG1/racdb/undotbs01.dbf
3 Full 571080 21-JUL-14 +DG1/racdb/sysaux01.dbf
4 Full 571080 21-JUL-14 +DG1/racdb/users01.dbf
5 Full 571080 21-JUL-14 +DG1/racdb/undotbs02.dbf
四、restore/recover数据库(没有变更数据文件的位置)
1、物理还原
RMAN> restore database;
channel ORA_DISK_1: specifying datafile(s) to restore from backup set
restoring datafile 00001 to +DG1/racdb/system01.dbf
restoring datafile 00002 to +DG1/racdb/undotbs01.dbf
restoring datafile 00003 to +DG1/racdb/sysaux01.dbf
restoring datafile 00004 to +DG1/racdb/users01.dbf
restoring datafile 00005 to +DG1/racdb/undotbs02.dbf
channel ORA_DISK_1: reading from backup piece /rac_arch/full_RACDB_20140721_6
2、逻辑恢复
RMAN> recover database;
starting media recovery
archive log thread 1 sequence 9 is already on disk as file /rac_arch/redo06.rd
archive log thread 1 sequence 10 is already on disk as file /rac_arch/redo05.rd
archive log thread 2 sequence 10 is already on disk as file /rac_arch/redo08.rd
archive log thread 2 sequence 11 is already on disk as file /rac_arch/redo07.rd
archive log filename=/rac_arch/redo08.rd thread=2 sequence=10
archive log filename=/rac_arch/redo06.rd thread=1 sequence=9
archive log filename=/rac_arch/redo07.rd thread=2 sequence=11
archive log filename=/rac_arch/redo05.rd thread=1 sequence=10
media recovery complete, elapsed time: 00:00:10
Finished recover at 22-JUL-14
五、打开数据库
SYS@RACDB2> select status from v$instance;
--MOUNTED
SYS@RACDB2> alter database open noresetlogs;
--ORA-01589: must use RESETLOGS or NORESETLOGS option for database open
SYS@RACDB2> alter database open NORESETLOGS;
ORA-01588: must use RESETLOGS option for database open
SYS@RACDB2> shutdown immediate
SYS@RACDB2> startup mount
SYS@RACDB2> alter database open RESETLOGS;
SYS@RACDB2> select username from dba_users where username='ZCS';
--ZCS #原库中的账号已恢复
zcs0237
2014.07.22
More cleaner and more efficient!
来自 “ ITPUB博客 ” ,链接:https://blog.itpub.net/210154/viewspace-1224749/ ,如需转载,请注明出处,否则将追究法律责任。

请登录后发表评论
登录
全部评论
