NOTE:OMS
12c(12.1)只能和12.1的agent代理配合工作,而不能使用之前的任何版agent. “Enterprise Manager Cloud Control can communicate
only with Oracle Management Agent 12c and not with any other earlier release of
the Management Agent. You can not configure your exising Agents to communicate
with Enterprise Manager 12c OMS.”
1.准备工作:
12c部署agent要求创建必要的credentail profile,该credential profile将包含能够从OMS server ssh到目标端target node的用户身份认证,且要求该用户能够在target node上以sudo执行用户的权限。
这里我们以oracle用户为例,我们将以目标节点上的oracle用户身份创建credential profile,首先我们要确保oracle用户能够以sudo执行root用户的权限,这需要用到/etc/sudoers配置文件:
确保/usr/local/bin/sudo这个符号链接存在
[root@orc2 ~]# ln -s /usr/bin/sudo /usr/local/bin/sudo
[root@orc2 ~]# ls -l /etc/sudoers
-r--r----- 1 root root 3381 Nov 12 2010 /etc/sudoers
[root@orc2 ~]# cp /etc/sudoers /etc/sudoers.bak
打开/etc/sudoers 将以下三处修改
修改前:
Defaults requiretty
修改后:
Defaults:oracle !requiretty
修改前:
Defaults !visiblepw
修改后:
Defaults visiblepw
修改前:
##
## Allow root to run any commands anywhere
root ALL=(ALL) ALL
修改后
##
## Allow root to run any commands anywhere
root ALL=(ALL) ALL
oracle ALL=(ALL) ALL --这里加一行
以上三处修改完成后,save 文件
测试oracle 能否正常sudo
[root@orc2 ~]# su – oracle
[oracle@orc2 ~]$ sudo ls -l /root/
We trust you have received the usual lecture from the local System
Administrator. It usually boils down to these three things:
#1) Respect the privacy of others.
#2) Think before you type.
#3) With great power comes great responsibility.
[sudo] password for oracle:
total 60
-rw------- 1 root root 1296 May 16 2014 anaconda-ks.cfg
drwxr-xr-x 2 root root 4096 May 16 2014 Desktop
-rw-r--r-- 1 root root 38879 May 16 2014 install.log
-rw-r--r-- 1 root root 0 May 16 2014 install.log.syslog
这里我们以oracle用户为例,我们将以目标节点上的oracle用户身份创建credential profile,首先我们要确保oracle用户能够以sudo执行root用户的权限,这需要用到/etc/sudoers配置文件:
确保/usr/local/bin/sudo这个符号链接存在
[root@orc2 ~]# ln -s /usr/bin/sudo /usr/local/bin/sudo
[root@orc2 ~]# ls -l /etc/sudoers
-r--r----- 1 root root 3381 Nov 12 2010 /etc/sudoers
[root@orc2 ~]# cp /etc/sudoers /etc/sudoers.bak
打开/etc/sudoers 将以下三处修改
修改前:
Defaults requiretty
修改后:
Defaults:oracle !requiretty
修改前:
Defaults !visiblepw
修改后:
Defaults visiblepw
修改前:
##
## Allow root to run any commands anywhere
root ALL=(ALL) ALL
修改后
##
## Allow root to run any commands anywhere
root ALL=(ALL) ALL
oracle ALL=(ALL) ALL --这里加一行
以上三处修改完成后,save 文件
测试oracle 能否正常sudo
[root@orc2 ~]# su – oracle
[oracle@orc2 ~]$ sudo ls -l /root/
We trust you have received the usual lecture from the local System
Administrator. It usually boils down to these three things:
#1) Respect the privacy of others.
#2) Think before you type.
#3) With great power comes great responsibility.
[sudo] password for oracle:
total 60
-rw------- 1 root root 1296 May 16 2014 anaconda-ks.cfg
drwxr-xr-x 2 root root 4096 May 16 2014 Desktop
-rw-r--r-- 1 root root 38879 May 16 2014 install.log
-rw-r--r-- 1 root root 0 May 16 2014 install.log.syslog
确保oms server和target
server之间的通信。
2.正式安装
以sysman身份登陆OEM,点击右上角的设置->添加目标->手动添加目标

进入手动添加目标界面,选择“添加主机目标”,并点击“添加主机”按钮:

点击“添加”输入目标端的主机名和对应的平台,点击下一步:

在“代理安装详细信息”输入安装基目录即可,实例目录会自动输入,然后点击”命名的身份证明”右边的蓝色的+号:

输入用户名和密码,这里以oracle为例:

点击确定
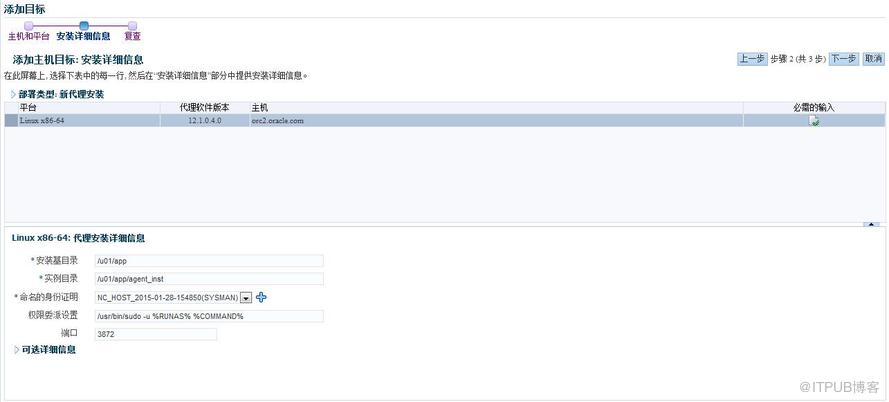
点击下一步进入复查界面:
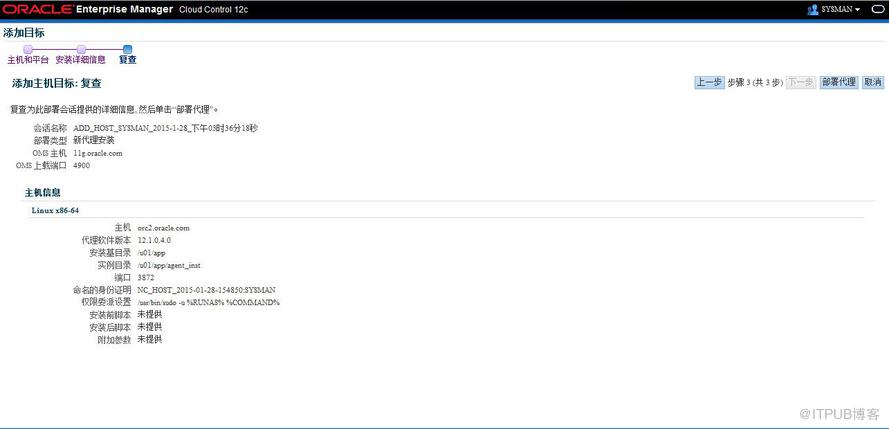
点击部署代理:


部署成功:

点击”目标->主机”,就可以看到新加入的主机了:


点击”目标->数据库”添加数据库配置信息,输入主机名,然后下一步,下一步就OK了:

最终可以看到新增的两套数据库实例:

2.正式安装
以sysman身份登陆OEM,点击右上角的设置->添加目标->手动添加目标

进入手动添加目标界面,选择“添加主机目标”,并点击“添加主机”按钮:

点击“添加”输入目标端的主机名和对应的平台,点击下一步:

在“代理安装详细信息”输入安装基目录即可,实例目录会自动输入,然后点击”命名的身份证明”右边的蓝色的+号:

输入用户名和密码,这里以oracle为例:

点击确定
点击下一步进入复查界面:
点击部署代理:

完成后会进入“代理部署概要”页面 ,这里存在三个阶段:
初始化详细信息 — 拷贝agent介质到目标服务器
远程先决条件检查详细信息 — 检测目标服务器的安装先决条件
代理部署详细信息 –具体的Installation Agent 、Secure Agent 和 执行root.sh
部署成功:

点击”目标->主机”,就可以看到新加入的主机了:


点击”目标->数据库”添加数据库配置信息,输入主机名,然后下一步,下一步就OK了:

最终可以看到新增的两套数据库实例:

来自 “ ITPUB博客 ” ,链接:https://blog.itpub.net/10271187/viewspace-1421579/ ,如需转载,请注明出处,否则将追究法律责任。

请登录后发表评论
登录
全部评论
最新文章
- 12.2新特性之ADG多节点启动MRP进程
- ORA-01511 error in renaming log/data files ORA-00261 log 4 of thread 1 is being
- Warning: ORA-16714: the value of property ArchiveLagTarget is inconsistent
- 恢复数据库hang住/parallel recovery read buffer free
- ORA-00600: 内部错误代码,参数: [6002], [6], [28], [1], [52], [], [], []
- ORA-13639: The CURRENT operation was interrupted because it timed OUT
- 表空间小写导致ORA-31655错误
- ORA-12154:TNS:无法解析指定的连接标识符
- 测试将表缓存到keep池
- ASM file metadata operation
