一、cobbler简介
Cobbler是实现自动化安装操作系统的工具。它解决了PXE安装时的弊端(只能实现单一操作系统的安装)。实际上,cobbler是对PXE二次封装可实现多版本,多环境操作系统安装的高级抽象工具。
工作原理大致如下:
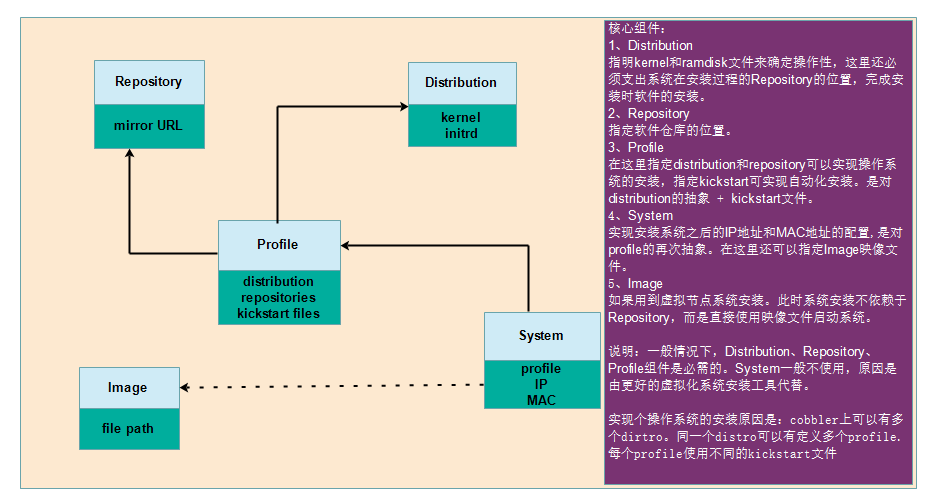
实际上,cobbler是对PXE的二次封装。cobbler可以自动的实现PXE配置中的某些手动过程。PXE的工作原理大致如下:

关于PXE具体配置,可参考http://guoting.blog.51cto.com/8886857/1533029
二、cobbler安装配置
说明:
目标主机:172.16.10.9
操作系统:CentOS 6.5
安装、初步配置cobbler
## 1、安装cobbler
# 说明,cobbler 的 rpm 安装包,是由epel源提供
yum install cobbler -y
2、安装并启动httpd
yum -y install httpd
service httpd start
3、启动cobblerd服务
service cobblerd start
4、配置cobbler
## 使用cobbler chenck 命令,可以检查cobbler配置文件是否配置正确
## cobbler check 首次会出现以下提示:
The following are potential configuration items that you may want to fix:
1 : The 'server' field in /etc/cobbler/settings must be set to something other than \
localhost, or kickstarting features will not work. This should be a resolvable\
hostname or IP for the boot server as reachable by all machines that will use it.
2 : For PXE to be functional, the 'next_server' field in /etc/cobbler/settings must\
be set to something other than 127.0.0.1, and should match the IP of the boot \
server on the PXE network.
3 : some network boot-loaders are missing from /var/lib/cobbler/loaders, you may run \
'cobbler get-loaders' to download them, or, if you only want to handle x86/x86_64\
netbooting, you may ensure that you have installed a *recent* version of the \
syslinux package installed and can ignore this message entirely. Files in \
this directory, should you want to support all architectures, should include\
pxelinux.0, menu.c32, elilo.efi, and yaboot. The 'cobbler get-loaders' \
command is the easiest way to resolve these requirements.
4 : change 'disable' to 'no' in /etc/xinetd.d/rsync
5 : debmirror package is not installed, it will be required to manage debian \
deployments and repositories
6 : ksvalidator was not found, install pykickstart
7 : The default password used by the sample templates for newly installed machines \
(default_password_crypted in /etc/cobbler/settings) is still set to 'cobbler' and \
should be changed, try: "openssl passwd -1 -salt 'random-phrase-here' '\
your-password-here'" to generate new one
8 : fencing tools were not found, and are required to use the (optional) power \
management features. install cman or fence-agents to use them
Restart cobblerd and then run 'cobbler sync' to apply changes.
## 解决办法:
1、修改/etc/cobbler/settings文件中的server参数的值为提供cobbler服务的主机相应的IP\
地址或主机名,如172.16.10.9;
2、修改/etc/cobbler/settings文件中的next_server参数的值为提供PXE服务的主机相应的\
IP地址,如172.16.10.9;
3、如果当前节点可以访问互联网,执行“cobbler get-loaders”命令即可;否则,需要\
安装syslinux程序包,而后复制/usr/share/syslinux/{pxelinux.0,memu.c32}等文件至\
/var/lib/cobbler/loaders/目录中;
4、执行“chkconfig rsync on”命令即可;
5、注释/etc/debmirror.conf文件中的“@dists="sid";”一行;
6、注释/etc/debmirror.conf文件中的“@arches="i386";”一行;
7、执行“openssl passwd -1 -salt $(openssl rand -hex 4)”生成密码,并用其替换\
/etc/cobbler/settings文件中default_password_crypted参数的值;
8、执行“yum install cman fence-agents”命令安装相应的程序包即可;
## 说明 5,6,8 步骤不是必需的。
接着重启cobblerd,而后执行“cobbler sync”同步新的配置至cobbler。
结果如下:

下面需要配置dhcp,tftp服务。说明:cobbler 的运行依赖于dhcp、tftp、rsync及dns服务。其中dhcp可由dhcpd(isc)提供,也可由dnsmasq提供;tftp可由 tftp-server程序包提供,也可由cobbler自带的tftp功能提供;rsync由rsync程序包提供;dns可由bind提供,也可由 dnsmasq提供。
cobbler可自行管理这些服务中的 部分甚至是全部,但需要配置/etc/cobbler/settings文件中的“manage_dhcp”、“manage_tftpd”、 “manage_rsync”和“manage_dns”分别进行定义。另外,由于每种服务都有着不同的实现方式,如若需要进行自定义,需要通过修改 /etc/cobbler/modules.conf配置文件中各服务的模块参数的值来实现。
下面采用了独立管理的方式,即不通过cobbler来管理这些服务。(常用方式)
配置DHCP服务
yum install dhcp -y# 编辑 /etc/dhcp/dhcpd.conf 配置文件,内容如下:
option domain-name "example.com";
option domain-name-servers 172.16.0.1;
default-lease-time 600;
max-lease-time 7200;
log-facility local7;
subnet 172.16.0.0 netmask 255.255.0.0 {
range 172.16.10.14 172.16.10.99;
option routers 172.16.0.1;
next-server 172.16.10.9;
filename "pxelinux.0";
}
####################################
service dhcpd start
配置rsync和tftp服务
yum install rsync tftp-server -ychkconfig rsync on ## 当然这一步在前面cobbler check时,已经完成,非必需的
chkconfig rsync on
service xinted start
配置cobbler
配置 cobbler 时,需要用到cobbler命令,对cobbler命令简单说明:(常用)cobbler命令的子命令:
import:从光盘中导入 Install Tree。会自动定义到Repository。
reposync: 从互联网中同步的Install Tree。
buildiso:主要用于安装的机器不支持网卡引导,此时就需要制作ISO镜像完成安装。
distro:定义Distribution
sync:完成配置文件的同步
profile:定义Profile
check: 检查cobbler的配置文件
其中每个子命令都有 [add|edit|copy|getks*|list|remove|rename|report] 等子命令。\
具体使用可使用帮助信息。例如: cobbler import add --help查看帮助。
###################################################################################################
使cobbler变得可用的第一步为定义distro,其可以通过为其指定外部的安装引导内核及ramdisk\
文件的方式实现。
而如果已经有完整的系统安装树(如CentOS6的安装镜像)则推荐使用import直接导入的方式进行。
cobbler使用profile来为特定的需求类别提供所需要安装配置,即在distro的基础上通过提供\
kickstart文件来生成一个特定的系统安装配置。
distro的profile可以出现在PXE的引导菜单中作为安装的选择之一。
##################################################################################################
## 当然 kickstart 文件事先完成。具体可参考http://guoting.blog.51cto.com/8886857/1533029
cobbler import --name=centos-6.5-x86_64 --path=/media/cdrom
cobbler profile add --name=centos6.5 --distro=centos-6.5-x86_64 --kickstart=/root/centos-6.5-x86_64.cfg
cobbler sync
## 详细安装过程可参照官网:http://www.cobblerd.org/manuals/quickstart/
结果示例:

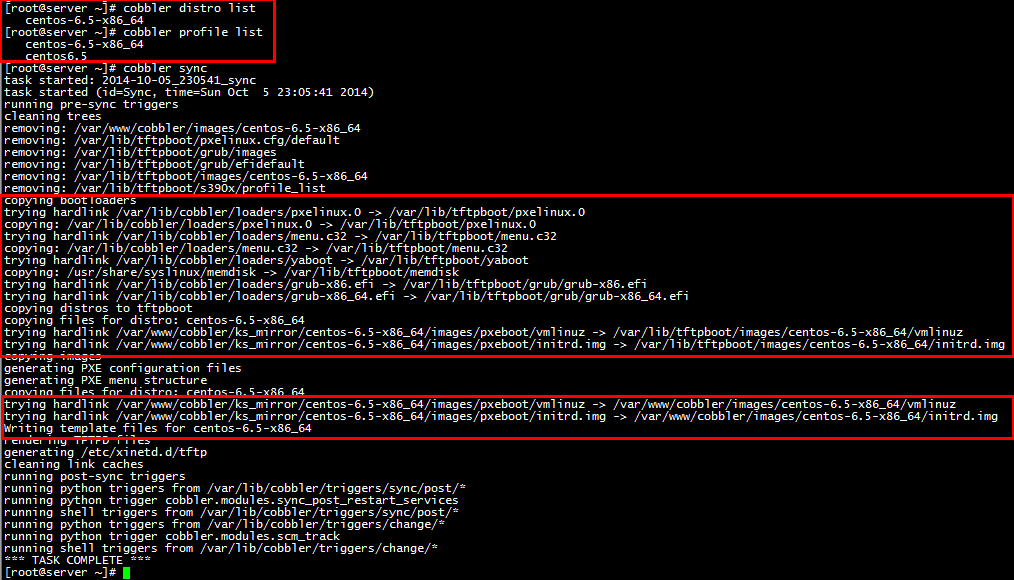
此时,配置就完成了,可以实现自动化安装了。
此时就可以实现自动化了。
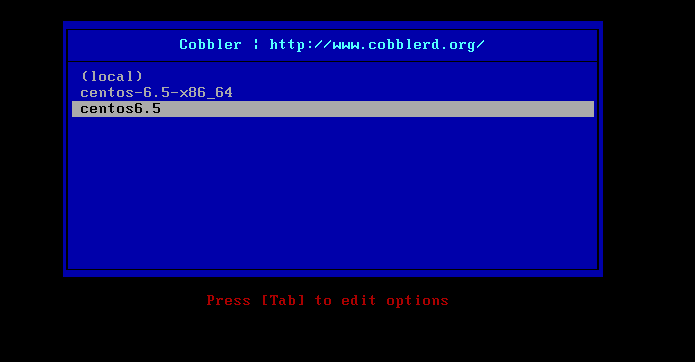

注意:kickstart文件中的url位置,--url=http://172.16.10.9/cobbler/ks_mirror/centos-6.5-x86_64/指明Repository的位置,不同的系统对于不同的路径。要实现多系统的安装,可以check import不同的操作系统。系统版本的操作系统,也可使用不同的kickstart文件来定义。
cobbler的web配置
上面的操作也可以通过web接口来设置,具体步骤如下:###### 配置cobbler_web的认证功能
###安装软件
yum install cobbler_web
## cobbler_web支持多种认证方式,如authn_configfile、authn_ldap或authn_pam等,\
默认为authn_denyall,即拒绝所有用户登录。
### 这里 使用authn_pam模块认证cobbler_web用户
## 首先修改 /etc/cobbler/modules中[authentication]段的module参数的值为authn_pam。
## 接着添加系统用户,用户名和密码按需设定即可,例如下面的命令所示。
useradd cobbler
echo 'cblrpass' | passwd --stdin cobbler
# 而后将cblradmin用户添加至cobbler_web的admin组中。修改/etc/cobbler/users.conf文件,
将cblradmin用户名添加为admin参数的值即可,如下所示。
[admins]
admin = "cobbler"
##最后重启cobblerd服务,通过http://YOUR_COBBLERD_IP/cobbler_web访问即可。
下面是配置界面:

具体配置过程,这里不再演示。
# cat kickstart.cfg
******************************************************************************************************
#platform=x86, AMD64, or Intel EM64T
#version=DEVEL
# Firewall configuration
firewall --disabled
# Install OS instead of upgrade
install
# Use network installation
url --url="http://172.16.10.9/cobbler/ks_mirror/centos-6.5-x86_64/"
# Root password
rootpw --iscrypted $1$iRHppr42$VMesh73wBqhUTjKp6OYOD.
# System authorization information
auth --useshadow --passalgo=sha512
# Use text mode install
text
firstboot --disable
# System keyboard
keyboard us
# System language
lang en_US
# SELinux configuration
selinux --disabled
# Installation logging level
logging --level=info --host=172.16.0.1
# Reboot after installation
reboot
# System timezone
timezone Asia/Shanghai
# System bootloader configuration
bootloader --append="rhgb crashkernel=auto quiet" --location=mbr --driveorder="sda"
# Clear the Master Boot Record
zerombr
# Partition clearing information
clearpart --all
# Disk partitioning information
part /boot --fstype="ext4" --size=200
part pv.008 --size=61440
volgroup vg0 --pesize=8192 pv.008
logvol / --fstype=ext4 --name=root --vgname=vg0 --size=20480
logvol swap --name=swap --vgname=vg0 --size=2048
logvol /usr --fstype=ext4 --name=usr --vgname=vg0 --size=10240
logvol /var --fstype=ext4 --name=var --vgname=vg0 --size=20480
#repo --name="Fedora EPEL" --baseurl=http://172.16.10.9/cobbler/ks_mirror/centos-6.5-x86_64/
%post
echo -e 'Mage Education Learning Services\nhttp://www.magedu.com\n' >> /etc/issue
sed -i '1,$s@id:[0-9]:initdefault:@id:3:initdefault:@g' /etc/inittab
%end
%packages
@base
@basic-desktop
@chinese-support
@client-mgmt-tools
@core
@desktop-platform
@fonts
@general-desktop
@graphical-admin-tools
@legacy-x
@network-file-system-client
@perl-runtime
@remote-desktop-clients
@x11
lftp
ibus-table-cangjie
ibus-table-erbi
ibus-table-wubi
%end
******************************************************************************************************
来自 “ ITPUB博客 ” ,链接:https://blog.itpub.net/9034054/viewspace-2052650/ ,如需转载,请注明出处,否则将追究法律责任。

