"认证", 是建立一个他声明的主题的过程(一个"主体"一般是指用户, 设备或一些可以在你的应用程序中执行动作的其他系统); "授权"指确定一个主体是否允许在你的应用程序执行一个动作的过程; 为了抵达需要授权的店, 主体的身份已经有认证过程建立; 这个概念是通用的而不只在Spring Security中;
Spring 3.X MVC + Security
copy of xxx 的一些jar包的版本
spring core = 3.0.5
spring security core = 3.0.5
spring web = 3.0.5
For maven
Maven项目 如果tomcat不加载maven lib, 右键项目
Web Deployment Assembly加进去
完整配置.
 <?xml version="1.0" encoding="UTF-8"?><project xmlns="http://maven.apache.org/POM/4.0.0" xmlns:xsi="http://www.w3.org/2001/XMLSchema-instance" xsi:schemaLocation="http://maven.apache.org/POM/4.0.0 http://maven.apache.org/xsd/maven-4.0.0.xsd"><modelVersion>4.0.0</modelVersion><groupId>myproject</groupId><artifactId>springsecurity</artifactId><version>0.0.1-SNAPSHOT</version><packaging>war</packaging><name>springsecurity</name><dependencies>
    <!-- https://mvnrepository.com/artifact/org.springframework/spring-web -->
    <dependency>
        <groupId>org.springframework</groupId>
        <artifactId>spring-web</artifactId>
        <version>3.0.5.RELEASE</version>
    </dependency>
    <!-- https://mvnrepository.com/artifact/org.springframework/spring-webmvc -->
    <dependency>
        <groupId>org.springframework</groupId>
        <artifactId>spring-webmvc</artifactId>
        <version>3.0.5.RELEASE</version>
    </dependency>
    <!-- spring security -->
   <dependency>
         <groupId>org.springframework.security</groupId>
         <artifactId>spring-security-core</artifactId>
         <version>3.0.5.RELEASE</version>
     </dependency>
     <dependency>
         <groupId>org.springframework.security</groupId>
         <artifactId>spring-security-web</artifactId>
         <version>3.0.5.RELEASE</version>
     </dependency>
     <dependency>
         <groupId>org.springframework.security</groupId>
         <artifactId>spring-security-config</artifactId>
         <version>3.0.5.RELEASE</version>
     </dependency>
     <dependency>
         <groupId>org.springframework.security</groupId>
         <artifactId>spring-security-taglibs</artifactId>
         <version>3.0.5.RELEASE</version>
     </dependency></dependencies><build>
    <plugins>
        <plugin>
            <artifactId>maven-compiler-plugin</artifactId>
            <version>3.1</version>
            <configuration>
                <source>1.7</source>
                <target>1.7</target>
            </configuration>
        </plugin>
        <plugin>
            <artifactId>maven-war-plugin</artifactId>
            <version>2.4</version>
            <configuration>
                <warSourceDirectory>webapp</warSourceDirectory>
            </configuration>
        </plugin>
    </plugins></build></project>
- 写一个控制器
@Controller@RequestMapping("/user")public class UserController {

    @RequestMapping(value = "/login")
    public ModelAndView login() {
        System.out.println("login");        ModelAndView model = new ModelAndView();
        model.addObject("title", "login");
        model.addObject("message", "This is hello page!");
        model.setViewName("login");
        return model;
    }

    @RequestMapping(value = { "/", "/welcome" }, method = RequestMethod.GET)
    public ModelAndView welcomePage() {
        System.out.println("welcomePage");        ModelAndView model = new ModelAndView();
        model.addObject("title", "Spring  Hello World");
        model.addObject("message", "This is welcome page!");
        model.setViewName("hello");
        return model;
    }    @RequestMapping(value = "/admin", method = RequestMethod.GET)
    public ModelAndView adminPage() {
        System.out.println("adminPage");        ModelAndView model = new ModelAndView();
        model.addObject("title", "Spring  Hello World");
        model.addObject("message", "This is protected page!");
        model.setViewName("admin");
        return model;
    }
}
两个公开页面hello 不需要限制, 而admin 需要限制访问
- 在web.xml增加spring Security过滤器
<filter>
    <filter-name>springSecurityFilterChain</filter-name>
    <filter-class>org.springframework.web.filter.DelegatingFilterProxy</filter-class></filter><filter-mapping>
    <filter-name>springSecurityFilterChain</filter-name>
    <url-pattern>/*</url-pattern></filter-mapping>
- spring Security配置
在spring-mvc.xml引入命名空间(xmlns:security), 一般而言都是单独一个applicationContext-security.xml文件, 在初始spring ioc的时候引入
<listener>
    <listener-class>org.springframework.web.context.ContextLoaderListener</listener-class></listener><context-param>
    <param-name>contextConfigLocation</param-name>
    <param-value>classpath:applicationContext.xml,classpath:applicationContext-security.xml</param-value></context-param>
- spring Security的简单配置
省略..头部.<security:http auto-config="true">
    <security:form-login login-page="/login.jsp" default-target-url="/springsecurity/user/admin.htm" />
    <!-- 表示匿名用户可以访问 -->
    <security:intercept-url pattern="/login.jsp" access="IS_AUTHENTICATED_ANONYMOUSLY"/>
    <security:intercept-url pattern="/user/welcome*" access="IS_AUTHENTICATED_ANONYMOUSLY"/>
    <!-- 访问下面URL需要 ROLE_USER 权限 -->
    <security:intercept-url pattern="/**" access="ROLE_USER" /></security:http><security:authentication-manager>
    <security:authentication-provider>
        <security:user-service>
            <security:user name="user" password="user" authorities="ROLE_USER"/>
            <security:user name="admin" password="admin" authorities="ROLE_USER, ROLE_ADMIN"/>
        </security:user-service>
    </security:authentication-provider></security:authentication-manager></beans>
测试
- 访问任何一个能被springSecurityFilterChain拦截的url 即可看到登陆页面
使用上
<security:user-service>元素配置的用户名跟密码即可登陆
登陆后 访问<a href="../j_spring_security_logout" /> Logout</a>退出
认证过程
Spring Security, 这是一种基于 Spring AOP 和 Servlet 过滤器的安全框架;
Spring Security的核心类主要包括以下几个:
SecurityContextHolder: 存放身份信息的容器
Authentication: 身份信息的抽象接口
AuthenticationManager : 身份认证器,认证的核心接口
UserDetailsService : 一般用于从数据库中加载身份信息
UserDetails : 相比 Authentication,有更详细的身份信息
- 用户使用用户名和密码进行登录;
- Spring Security 将获取到的用户名和密码封装成一个实现了 Authentication 接口的
UsernamePasswordAuthenticationToken; - 将上述产生的 token 对象传递给
AuthenticationManager进行登录认证; -
AuthenticationManager认证成功后将会返回一个封装了用户权限等信息的 Authentication 对象; - 通过调用
SecurityContextHolder.getContext().setAuthentication(...)将AuthenticationManager返回的Authentication对象赋予给当前的 SecurityContext;
成功与失败的额外处理
-
form-login 元素的 authentication-success-handler-ref 对应一个
AuthencticationSuccessHandler实现类的引用;- 如果指定了 authentication-success-handler-ref, 登录认证成功后会调用指定
AuthenticationSuccessHandler的onAuthenticationSuccess方法; 我们需要在该方法体内对认证成功做一个处理, 然后返回对应的认证成功页面; 使用了 之前的那些 default-target-url 之类的就都不起作用了
- 如果指定了 authentication-success-handler-ref, 登录认证成功后会调用指定
-
同样通过 form-login 元素的 authentication-failure-url 来指定登录失败后的页面(对应
AuthenticationFailureHandler接口)- 需要注意的是登录失败后的页面跟登录页面一样也是需要配置成在未登录的情况下可以访问, 否则登录失败后请求失败页面时又会被 Spring Security 重定向到登录页面;
..掐头..      <!-- ...handler-ref 认证 成功 失败的处理器 -->
      <security:form-login login-page="/login.jsp" default-target-url="/springsecurity/user/admin.htm"
        authentication-success-handler-ref="authSuccessHandler"
       authentication-failure-handler-ref ="authFailureHandler" />
      <!-- 表示匿名用户可以访问 -->
      <security:intercept-url pattern="/login.jsp" access="IS_AUTHENTICATED_ANONYMOUSLY"/>
      <security:intercept-url pattern="/user/welcome*" access="IS_AUTHENTICATED_ANONYMOUSLY"/>
       <!-- 访问下面URL需要 ROLE_USER 权限 -->
      <security:intercept-url pattern="/**" access="ROLE_USER" />
      <!-- 指定退出登陆后的重定向url-->
      <security:logout logout-success-url="/login.jsp" />
   </security:http>

    <!-- 认证成功的 处理bean -->
   <bean id="authSuccessHandler" class="net.bean.AuthenticationSuccessHandlerImpl" />
   <!-- 认证失败的 处理bean -->
   <bean id="authFailureHandler" class="net.bean.AuthenticationFailureHandlerImpl" />..去尾..
退出登录 logout
-
在 http 元素下定义 logout 元素
- 这样 Spring Security 将自动为我们添加用于处理退出登录的过滤器
LogoutFilter到 FilterChain; - 当我们指定了 http 元素的 auto-config 属性为 true 时 logout 定义是会自动配置的, 此时我们默认退出登录的 URL 为 "/j_spring_security_logout", 可以通过 logout 元素的 logout-url 属性来改变退出登录的默认地址;
- 这样 Spring Security 将自动为我们添加用于处理退出登录的过滤器
细谈认证过程
完整过程图
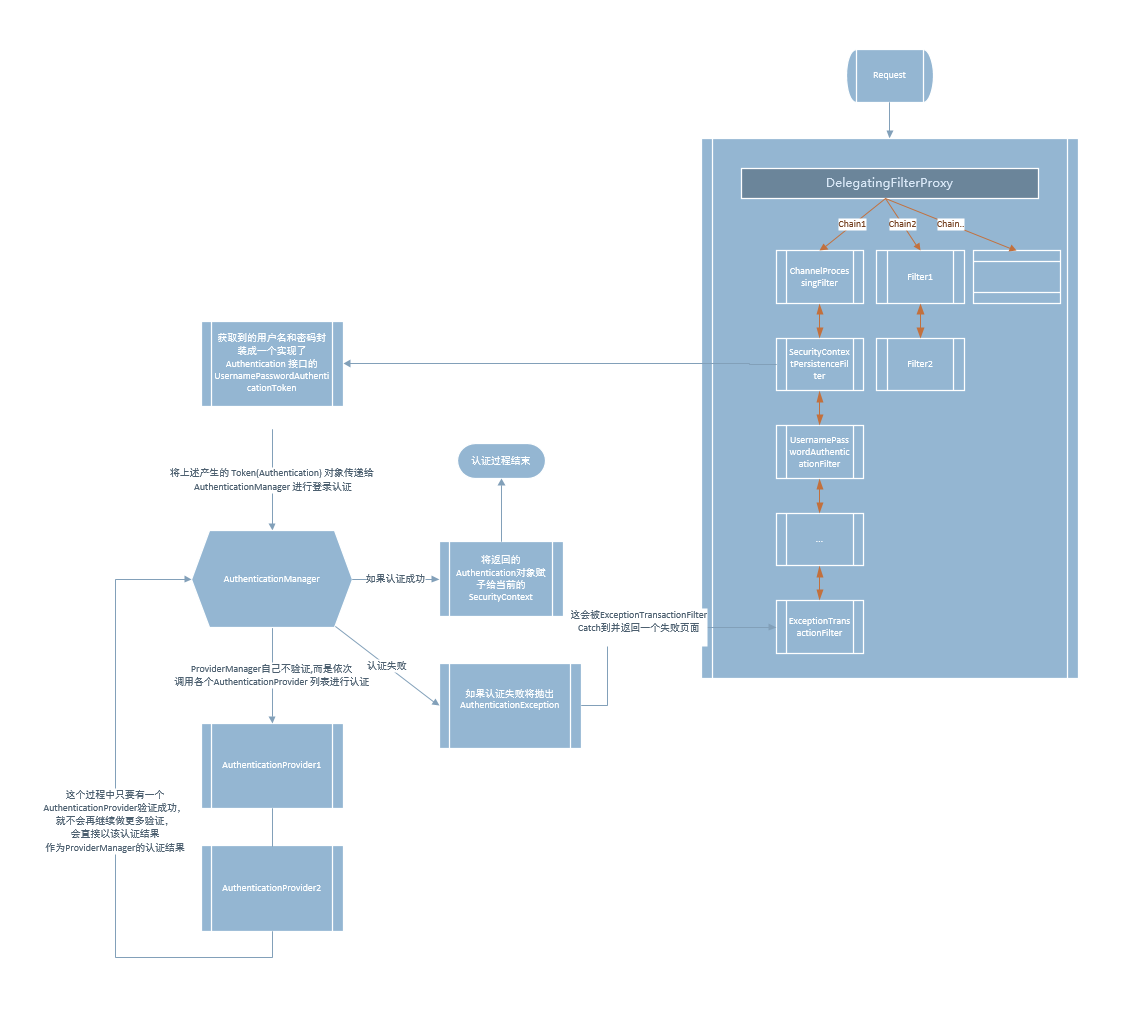
1.SpringSecurityFilterChain
首先客户端一个请求到达 Spring Security 的入口过滤器是: SecurityContextPersistenceFilter (默认实现是:
org.springframework.security.web.DefaultSecurityFilterChain)
它其实是一个代理维持着多个
FilterChain, 这些过滤器, 过滤链都是被spring容器管理着,可以非常方便热插拔.
关于FilterChain 见: DelegatingFilterProxy 简介
2.UsernamePasswordAuthenticationFilter
如果未登陆,如
UsernamePasswordAuthenticationFilter, CasAuthenticationFilter..过滤器负责获取到的用户名和密码封装成一个实现了
Authentication接口的 UsernamePasswordAuthenticationToken;
见
org.springframework.security.web.authentication.UsernamePasswordAuthenticationFilter源码, 85行
public Authentication attemptAuthentication(HttpServletRequest request,
        HttpServletResponse response) throws AuthenticationException {    if (postOnly && !request.getMethod().equals("POST")) {        throw new AuthenticationServiceException(                "Authentication method not supported: " + request.getMethod());
    }    //获取用户名密码
    String username =soccer.so.zuq8.info obtainUsername(request);    String password = obtainPassword(request);    if (username == null) {
        username = "";
    }    if (password == null) {
        password = "";
    }
    username = username.trim();    //封装 UsernamePasswordAuthenticationToken;
    UsernamePasswordAuthenticationToken authRequest = new UsernamePasswordAuthenticationToken(
            username, password);    // Allow subclasses to set the "details" property
    setDetails(request, authRequest);    //使用 AuthenticationManager 认证
    return this.getAuthenticationManager().authenticate(authRequest);
}
3.Authentication
将上述产生的 token 对象传递给 AuthenticationManager 进行登录认证;
4.AuthenticationManager
AuthenticationManager并不认证,而是调用AuthenticationProvider的列表认证
见
org.springframework.security.authentication.ProviderManager::doAuthentication源码
5.AuthenticationProvider
AuthenticationProvider 接口的
public abstract Authentication authenticate(Authentication paramAuthentication) throws AuthenticationException;方法是真正在处理认证逻辑的地方
它持有一个
UserDetailsService,用于加载用户信息, 简而言之,改变认证,实现 AuthenticationProvider, 改变信息来源, 实现UserDetailsService即可
认证成功: 后会补充 Authentication详细的角色权限等 返回给AuthenticationManager
认证失败: 抛出
AuthenticationException
未知: 返回
null,这将交给下一个Provider认证
还有一点 xml 配置
<authentication-provider>会默认实例化一个DaoAuthenticationProvider加入到认证流程中,它持有PasswordEncoder加密是在这一步. xml配置 在authentication-provider的节点下password-encoder
<authentication-provider user-service-ref="userDetailsService" >
    <password-encoder hash="md5">
        <!-- <salt-source user-property="username"/>  无盐-->
    </password-encoder></authentication-provider>
见
org.springframework.security.authentication.ProviderManager::doAuthentication源码
- 在
AuthenticationManager中, 只要有一个Provider认证成功, 就不会再继续做更多验证, 将返回的 Authentication对象赋予给当前的SecurityContext;
- 如果全部认证失败, 抛出
AuthenticationException异常, 这会被ExceptionTransactionFilterCatch 到并返回一个失败页面
见
org.springframework.security.authentication.ProviderManager::doAuthentication源码
6.ExceptionTranslationFilter
认证异常处理
org.springframework.security.web.access.ExceptionTranslationFilter
public void doFilter(ServletRequest req, ServletResponse res, FilterChain chain)
			throws IOException, ServletException {    HttpServletRequest request = (HttpServletRequest) req;    HttpServletResponse response = (HttpServletResponse) res;    try {
        chain.doFilter(request, response);
        logger.debug("Chain processed normally");
    }    catch (IOException ex) {        throw ex;
    }    catch (Exception ex) {        //catch 所有异常
        // Try to extract a SpringSecurityException from the stacktrace
        Throwable[] causeChain = throwableAnalyzer.determineCauseChain(ex);        // 拿到异常类型
        RuntimeException ase =gov.mbp.zuzb.info (AuthenticationException) throwableAnalyzer
                .getFirstThrowableOfType(AuthenticationException.class, causeChain);        if (ase == null) {
            ase = (AccessDeniedException) throwableAnalyzer.getFirstThrowableOfType(
                    AccessDeniedException.class, causeChain);
        }        if (ase != null) {            if (response.isCommitted()) {                throw new ServletException("Unable to handle the Spring Security Exception because the response is already committed.", ex);
            }            //处理 security 类型异常/ 即: org.springframework.security.access.AccessDeniedException 和 org.springframework.security.core.AuthenticationException;
            handleSpringSecurityException(request, response, chain, ase);
        }        else {            // Rethrow ServletExceptions and RuntimeExceptions as-is
            if (ex instanceof ServletException) {                throw (ServletException) ex;
            }            else if (ex instanceof RuntimeException) {                throw (RuntimeException) ex;
            }            // Wrap other Exceptions. This shouldn't actually happen
            // as we've already covered all the possibilities for doFilter
            throw new RuntimeException(ex);
        }
    }
}private void handleSpringSecurityException(HttpServletRequest request,
        HttpServletResponse response, FilterChain chain, RuntimeException exception)
        throws IOException, ServletException {    if (exception instanceof AuthenticationException) {
        logger.debug(                "Authentication exception occurred; redirecting to authentication entry point",
                exception);
        sendStartAuthentication(request, response, chain,
                (AuthenticationException) exception);
    }    else if (exception instanceof AccessDeniedException) {        Authentication authentication = SecurityContextHolder.getContext().getAuthentication();        if (authenticationTrustResolver.isAnonymous(authentication) || authenticationTrustResolver.isRememberMe(authentication)) {
            logger.debug(                    "Access is denied (user is " + (authenticationTrustResolver.isAnonymous(authentication) ? "anonymous": "not fully authenticated") + "); redirecting to authentication entry point",
                    exception);
            sendStartAuthentication(
                    request,
                    response,
                    chain,                    new InsufficientAuthenticationException(
                        messages.getMessage(                            "ExceptionTranslationFilter.insufficientAuthentication",                            "Full authentication is required to access this resource")));
        }        else {
            logger.debug(                    "Access is denied (user is not anonymous); delegating to AccessDeniedHandler",
                    exception);
            accessDeniedHandler.handle(request, response,
                    (AccessDeniedException) exception);
        }
    }
}
Tomcat 过滤链的生成
在tomcat 源码
org.apache.catalina.core.StandardWrapperValve
 @Overridepublic final void invoke(Request request, Response response)
    throws IOException, ServletException {
    ....    MessageBytes requestPathMB = request.getRequestPathMB();    DispatcherType dispatcherType = DispatcherType.REQUEST;    if (request.getDispatcherType()==DispatcherType.ASYNC) dispatcherType = DispatcherType.ASYNC;
    request.setAttribute(Globals.DISPATCHER_TYPE_ATTR,dispatcherType);
    request.setAttribute(Globals.DISPATCHER_REQUEST_PATH_ATTR,
            requestPathMB);    // Create the filter chain for this request// 这个ApplicationFilterChain 实现了 FilterChain
    ApplicationFilterChain filterChain =
            ApplicationFilterFactory.createFilterChain(request, wrapper, servlet);
关键在:
org.apache.catalina.core.ApplicationFilterFactory::createFilterChain
public static ApplicationFilterChain createFilterChain(ServletRequest request,
            Wrapper wrapper, Servlet servlet) {        // If there is no servlet to execute, return null
        if (servlet =gov.)            return null;        // Create and initialize a filter chain object
        ApplicationFilterChain filterChain = null;        if (request instanceof Request) {            Request req = (Request) request;            if (Globals.IS_SECURITY_ENABLED) {                // Security: Do not recycle
                filterChain = new ApplicationFilterChain();
            } else {
                filterChain = (ApplicationFilterChain) req.getFilterChain();                if (filterChain == null) {
                    filterChain = new ApplicationFilterChain();
                    req.setFilterChain(filterChain);
                }
            }
        } else {            // Request dispatcher in use
            filterChain = new ApplicationFilterChain();
        }
        filterChain.setServlet(servlet);
        filterChain.setServletSupportsAsync(wrapper.isAsyncSupported());        // Acquire the filter mappings for this Context
        StandardContext context = (StandardContext) wrapper.getParent();
        FilterMap filterMaps[] = context.findFilterMaps();        // If there are no filter mappings, we are done
        if ((filterMaps == null) || (filterMaps.length == 0))            return filterChain;        // Acquire the information we will need to match filter mappings
        DispatcherType dispatcher =
                (DispatcherType) request.getAttribute(Globals.DISPATCHER_TYPE_ATTR);        String requestPath = null;        Object attribute = request.getAttribute(Globals.DISPATCHER_REQUEST_PATH_ATTR);        if (attribute != null){
            requestPath = attribute.toString(gov.zuqiu.xj.jrzb1.info);
        }        String servletName = wrapper.getName();        // Add the relevant path-mapped filters to this filter chain //关键是这个Map , 其中就有 springSecurityFilterChain
        for (FilterMap filterMap: filterMaps) {            if (!matchDispatcher(filterMap, dispatcher)) {                continue;
            }            if (!matchFiltersURL(filterMap, requestPath))                continue;            ApplicationFilterConfig filterConfig = (ApplicationFilterConfig)
                    context.findFilterConfig(filterMap.getFilterName());            if (filterConfig == null) {                // FIXME - log configuration problem
                continue;
            }
            filterChain.addFilter(filterConfig);
        }        // Add filters that match on servlet name second
        for (FilterMap filterMap: filterMaps){            if (!matchDispatcher(filterMap, dispatcher)) {                continue;
            }            if (!matchFiltersServlet(filterMap, servletName))                continue;            ApplicationFilterConfig filterConfig = (ApplicationFilterConfig)
                    context.findFilterConfig(filterMap.getFilterName());            if (filterConfig == null) {                // FIXME - log configuration problem
                continue;
            }
            filterChain.addFilter(filterConfig);
        }        // Return the completed filter chain
        return filterChain;
来自 “ ITPUB博客 ” ,链接:https://blog.itpub.net/70048957/viewspace-3107285/ ,如需转载,请注明出处,否则将追究法律责任。

