VUE 使用中踩过的坑及问题,你遇到了哪几个?

记录Vue中的一些问题
在学习和使用中难免会遇到一些问题,很多次,有些问题当时查资料解决了,下次又遇到的时候就忘了,所以这里对日常遇到的关于Vue.js相关的问题做一下记录,以备日后查阅。
(.gitkeep:如果是一个空的文件夹,这个文件夹会被git忽略,但是在文件夹下面创建一个.gitkeep文件,就不会出现文件夹被忽略的问题…)
问题一:Do not use built-in or reserved HTML elements as component id: xxx
不要使用内置或者保留的HTML元素作为组件(component)id:xxx,意思就是,我有一个组件的name属性值为xxx,但是这个值式html定义的元素。举个例子:
这个组件中,我们定义的这个组件的***name***属性为***header***
<template><header></header></template><script>export default {// 这里得而header是html元素name: "header"}</script><style scoped></style>
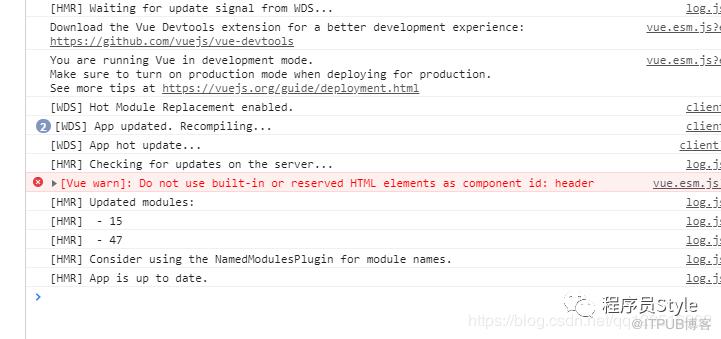
原因是那么值header是html标签存在的元素。只要改成别的名字就没有这个警告了。
<template><header></header></template><script>export default {name: "Header"}</script><style scoped></style>
问题二:Vue中处理跨域请求
vue遇到跨域接口,可以通过配置proxyTable属性来解决。
<script>export default {name: 'App',created() {// 调用接口,出现跨fetch("http://192.168.1.35:8083/user", {method: "GET"}).then(result => {console.log(result);})}}</script>
我们可以看到浏览器访问时出现了跨域: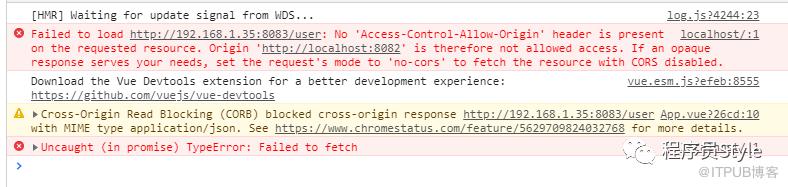
出现这种情况,我们可以修改conifg/index.js中的proxyTable属性来解决跨域问题:
proxyTable: {// 定义一个标识"/apis": {// target地址跨域接口地址 ip+端口或者域名target: "http://192.168.1.35:8083",// 配置是否跨域changeOrigin: true,// 重写以/api开头的请求pathRewrite: {'^/apis': ''}}},
export default {name: 'App',created() {// 原来请求地址中的http://192.168.1.35:8083变成我们定义的标识/apis,以api开头的请求都会被重写fetch("/apis/user", {method: "GET"}).then(result => {console.log(result);})}}
以上就是vue中解决跨域的具体方式。
问题三:在axios中使用请求头
方式一:全局配置
导入axios:
import axios from 'axios'配置请求头:
// 全局配置,所有请求都能使用axios.defaults.headers.common["token"] = "12344";// post请求头配置,所有post都能使用axios.defaults.headers.post["Content-Type"] = "application/json";
配置好后,配置vue使用axios
Vue.prototype.$axios = axios;
方式二:在单独请求中设置请求头(get):
this.$axios.get("/apis/user",{// 设置请求头headers: {token: "12334"},params: {name: "zs"}}).then(data => {console.log(data)})
方式三:在单独请求中设置请求头(post):
// 第三个参数中设置请求头this.$axios.post("/apis/user", "", {headers: {token: "12345"}}).then(data => console.log(data));
问题四:使用axios传递表单参数
方式一:URLSearchParams对象
var param = new URLSearchParams();param.append("username", "zhangsan");param.append("age", "18");param.append("password", "12323");this.$axios.post("/apis/user", param).then(data => console.log(data));
方式二:qs模块
安装qs
npm install qs --saveimport Qs from 'qs'Vue.prototype.$qs = Qs;
this.$axios.post("/apis/user",// 参数通过qs处理this.$qs.stringify({username: "zhangsan", age: "22"})).then(data => console.log(data));
方式三:拼接字符串
this.$axios.post("/apis/user",// 这里使用拼接字符串的方式传值,每个参数间使用&符连接,key1=value1&key2=value2&..."username=zhangsan&password=12345&age=10").then(data => console.log(data));
vue-cli 3.0自定义脚手架
在搭建脚手架之前,我们先看看系统用户家目录的一个隐藏文件***.vuerc***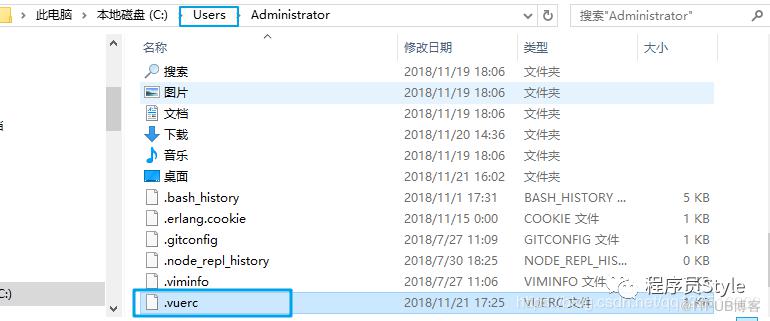
.vuerc文件中的内容是:
{"useTaobaoRegistry": true}
vue create vue_demoVue CLI v3.1.3? Please pick a preset: (Use arrow keys)> default (babel, eslint)Manually select features
我们通过方向键移动箭头>到Manually select features并回车来手动选择要安装的功能:
(*) Babel( ) TypeScript( ) Progressive Web App (PWA) Support( ) Router( ) Vuex( ) CSS Pre-processors(*) Linter / Formatter( ) Unit Testing( ) E2E Testing
选择Manually select features后出现如上内容,我们同样的方式移动>到要使用的功能上,并按下空格来确定安装的功能,选择完所有你需要的功能后按回车确定:
? Check the features needed for your project: Babel, PWA, Router, Linter? Use history mode for router? (Requires proper server setup for index fallback in production) (Y/n)
? Check the features needed for your project: Babel, PWA, Router, Linter? Use history mode for router? (Requires proper server setup for index fallback in production) Yes? Pick a linter / formatter config: (Use arrow keys)> ESLint with error prevention onlyESLint + Airbnb configESLint + Standard configESLint + Prettier
? Check the features needed for your project: Babel, PWA, Router, Linter? Use history mode for router? (Requires proper server setup for index fallback in production) Yes? Pick a linter / formatter config: Standard? Pick additional lint features: (Press <space> to select, <a> to toggle all, <i> to invert selection)>(*) Lint on save( ) Lint and fix on commit (requires Git)
完成ESLint配置选择后,会显示如上页面,提示选择Lint功能,同样移动>到想要的功能上回车以选择。
? Check the features needed for your project: Babel, PWA, Router, Linter? Use history mode for router? (Requires proper server setup for index fallback in production) Yes? Pick a linter / formatter config: Standard? Pick additional lint features: Lint on save? Where do you prefer placing config for Babel, PostCSS, ESLint, etc.? (Use arrow keys)> In dedicated config filesIn package.json
? Check the features needed for your project: Babel, PWA, Router, Linter? Use history mode for router? (Requires proper server setup for index fallback in production) Yes? Pick a linter / formatter config: Standard? Pick additional lint features: Lint on save? Where do you prefer placing config for Babel, PostCSS, ESLint, etc.? In package.json? Save this as a preset for future projects? (y/N)
? Check the features needed for your project: Babel, PWA, Router, Linter? Use history mode for router? (Requires proper server setup for index fallback in production) Yes? Pick a linter / formatter config: Standard? Pick additional lint features: Lint on save? Where do you prefer placing config for Babel, PostCSS, ESLint, etc.? In package.json? Save this as a preset for future projects? Yes? Save preset as:
? Check the features needed for your project: Babel, PWA, Router, Linter? Use history mode for router? (Requires proper server setup for index fallback in production) Yes? Pick a linter / formatter config: Standard? Pick additional lint features: Lint on save? Where do you prefer placing config for Babel, PostCSS, ESLint, etc.? In package.json? Save this as a preset for future projects? Yes? Save preset as:MyVueCli
Vue CLI v3.1.3✨ Creating project in E:\vscode\vue_demo.⚙ Installing CLI plugins. This might take a while...> yorkie@2.0.0 install E:\vscode\vue_demo\node_modules\yorkienode bin/install.jssetting up Git hookscan't find .git directory, skipping Git hooks installationadded 1145 packages from 748 contributors in 78.759s? Invoking generators...? Installing additional dependencies...added 55 packages from 31 contributors, updated 2 packages and moved 5 packages in 20.711s⚓ Running completion hooks...? Generating README.md...? Successfully created project vue_demo.? Get started with the following commands:$ cd vue_demonpm run serve
根据上面的提示,我们cd进入刚才创建的项目,然后运行npm run serve就可以运行当前项目了。
此时我们在看看我们自定义的脚手架的情况,我们在创建一个项目:
vue create vue_demo01Vue CLI v3.1.3? Please pick a preset: (Use arrow keys)> MyVueCli (vue-router, babel, pwa, eslint)default (babel, eslint)Manually select features
> MyVueCli (vue-router, babel, pwa, eslint) 这就是我们创建的脚手架内容。选择这个,直接回车就开始根据这个模板设定的内容开始创建工程了。
此时在看看系统用户家目录下的隐藏文件**.vuerc**文件中的内容:
{"useTaobaoRegistry": true,"presets": {"MyVueCli": {"useConfigFiles": false,"plugins": {"@vue/cli-plugin-babel": {},"@vue/cli-plugin-pwa": {},"@vue/cli-plugin-eslint": {"config": "standard","lintOn": ["save"]}},"router": true,"routerHistoryMode": true}}}
这就是脚手架配置内容,如果要删除这个模板,就删除这个文件中MyVueCli对应的json数据就好了。
这样一个自定义脚手架就完成了,自定义脚手架的删除也完成了!
六、设置环境变量
在项目根目录下新建一个.env文件,并键入一下内容(VUE_APP_是固定的后面的值是自定义的):
VUE_APP_URL=http://dev.api.comexport default {name: 'App',data () {return {url: process.env.VUE_APP_URL}}}
为不同的开发环境设置不同的变量
在项目根路径下新建两个文件,分别是:.env.development和env.production
两个文件中都引入以下内容:
VUE_APP_URL=http://dev.api.comexport default {name: 'App',data () {return {url: process.env.VUE_APP_URL}}}
此时,如果运行npm run serve 就会使用.env.development(开发环境)中设置的值,如果运行的是npm run build就会使用.env.production(正式环境)中设置的值。(.env/.env.production/.env.development三个文件可以同时存在)
七、运行单独的vue文件
进入要运行的vue文件所在目录,执行vue serve 文件名:
$ vue serve Test.vueCommand vue serve requires a global addon to be installed.Please run npm install -g @vue/cli-service-global and try again.
npm install -g @vue/cli-service-globalnpm ERR! Unexpected end of JSON input while parsing near '....0"},"_hasShrinkwrap"'npm cache clean --force安装好后,在执行命令vue serve vue文件 运行单vue文件
vue serve Test.vue

更多精彩请点击


原文作者:程序员Style;如有侵权,请联系管理员删除。

