linux内核参数几个优化点(阿里云ECS)
1:关掉或卸载iptables防火墙,并阻止kernel加载iptables模块。
2:修改单进程最大打开文件数限制
其中’*'号表示修改所有用户的限制; soft或hard指定要修改软限制还是硬限制 2)修改/etc/pam.d/login文件,在文件中添加如下行: cat /proc/sys/fs/file-max 查看系统级的最大限制
ulimit -n 查看用户级的限制(一般是1024,向阿里云华为云这种云主机一般是65535) 临时修改:
ulimit -HSn 2048永久修改 1)修改限制数据
nano /etc/security/limits.conf内容:
* softnofile 65536
* hard nofile65536
sessionrequired /lib/security/pam_limits.so3:内核TCP参数调整(了解一下计算机网络方面的基础知识点,根据具体来修改)
相关参数解释和意义,参考:https://www.cnblogs.com/alchemystar/p/13175276.html
et.ipv4.tcp_syncookies= 1#表示开启SYNCookies。当出现SYN等待队列溢出时,启用cookies来处理,可防范少量SYN攻击,默认为0,表示关闭;
net.ipv4.tcp_tw_reuse= 1#表示开启重用。允许将TIME-WAITsockets重新用于新的TCP连接,默认为0,表示关闭;
net.ipv4.tcp_tw_recycle= 1#表示开启TCP连接中TIME-WAITsockets的快速回收,默认为0,表示关闭;
net.ipv4.tcp_fin_timeout= 30#修改系統默认的TIMEOUT 时间。

net.ipv4.tcp_syncookies=1 表示开启SYN Cookies。当出现SYN等待队列溢出时,启用cookie来处理,可防范少量的SYN攻击。默认为0,表示关闭。

net.ipv4.tcp_tw_reuse=1 表示开启重用。允许将TIME-WAIT套接字重新用于新的TCP连接。默认为0,表示关闭。

net.ipv4.tcp_tw_recycle=1 表示开启TCP连接中TIME-WAIT套接字的快速回收。默认为0,表示关闭。

net.ipv4.tcp_fin_timeout=30 表示如果套接字由本端要求关闭,这个参数决定了它保持在FIN-WAIT-2状态的时间。

net.ipv4.tcp_keepalive_time=1200 表示当keepalive启用时,TCP发送keepalive消息的频度。默认是2小时,这里改为20分钟。

net.ipv4.ip_local_port_range=1024 65000 表示向外连接的端口范围。默认值很小:32768~61000,改为1024~65000。

net.ipv4.tcp_max_syn_backlog=8192 表示SYN队列的长度,默认为1024,加大队列长度为8192,可以容纳更多等待连接的网络连接数。

net.ipv4.tcp_max_tw_buckets=5000 表示系统同时保持TIME_WAIT套接字的最大数量,如果超过这个数 字,TIME_WAIT套接字将立刻被清除并打印警告信息。默认为180000,改为5000。sysctl-p重启: 修改:/etc/sysctl.conf 4:如果没有额外的需求,可以吧IPV6的禁用!
代码部署自动化篇-SVN安装(自动化):
1:输入安装命令:yum install -y subversion
2:查看svn安装的版本:svnserve --version
3:创建svn管理目录:mkdir /data/svn
4:启动svn服务:/usr/bin/svnserve -d -r /data/svn
其中 -d 表示守护进程, -r 表示在后台执行
5.创建svn项:svnadmin create test
6.配置信息修改和钩子文件(配置用户信息和密码还有对应的仓库读写权限)
7:服务器上本地检测(验证钩子文件)
PS:钩子文件主要是用于同步SVN仓库的代码到项目运行的目录,并重启项目进程。
svn checkout svn://localhost/test /data/www/test
其他命令补充:
1. 关闭所有svn服务,killall svnserve 命令。
2.  查看svn状态,  service svnserve status 命令。
8:配置钩子文件(给与执行权限)
9:如果需跨服务器多态服务器,可以配合ansible来进行多态的服务器的相关命令同步
补充:
问题1: linux上SVN出现 "Unable to connect to a repository at URL 'svn://xx.xx.xx.xx/xxx' 和 No repository ...
主要问题是启动的时候,不是使用SVN所在的仓库的目录启动SVN服务
进程管理篇:supervisor安装:
1-安装supervisor(需要有python环境)
pip install supervisor
2-创建配置目录,获取配置文件 (可能默认已经存在了supervisord.conf,则不需要)
mkdir /etc/supervisor
echo_supervisord_conf > /etc/supervisord.conf
3-supervisord启动服务端
supervisord -c supervisord.conf
4:supervisorctl 启动客户端
supervisorctl
5-添加需要管理的程序
[group:iread]
programs=iread21100,iread21102,iread21103

[program:iread21100]
command=pipenv run python iread_run.py --port 21100    ; supervisord将要执行的运行python服务的命令
directory=/data/www/iread_activity_api
stdout_logfile=/data/logs/supervisord/iread_activity_api_21100.log    ; supervisord当前这个test服务运行产生的日志存储路径,方便我们查看运行情况
socket-timeout=3
autostart=true
autorestart=true
redirect_stderr=true
stopsignal=QUIT

[program:iread21102]
command=pipenv run python iread_run.py --port 21102   ; supervisord将要执行的运行python服务的命令
directory=/data/www/iread_activity_api
stdout_logfile=/data/logs/supervisord/iread_activity_api_21102.log    ; supervisord当前这个test服务运行产生的日志存储路径,方便我们查看运行情况
socket-timeout=3
autostart=true
autorestart=true
redirect_stderr=true
stopsignal=QUIT


[program:iread21103]
command=pipenv run python iread_run.py --port 21103    ; supervisord将要执行的运行python服务的命令
directory=/data/www/iread_activity_api
stdout_logfile=/data/logs/supervisord/iread_activity_api_21103.log    ; supervisord当前这个test服务运行产生的日志存储路径,方便我们查看运行情况
socket-timeout=3
autostart=true
autorestart=true
redirect_stderr=true
stopsignal=QUIT
配置参数的一些辅助备注说明:
[program:theprogramname]
command=/bin/cat              ; 程序运行命令,建议使用绝对路径。
process_name=%(program_name)s ; 程序名称,可用的变量有 `group_name`, `host_node_name`, `process_num`, `program_name`, `here`(配置文件目录)。 一般程序需要运行多个副本的情况会使用。后面会有例子。
numprocs=1                    ; 程序运行的副本个数,默认为1,如果值大于1,则`process_name` 必须包含 `%(process_num)s`
numprocs_start=0              ; `%(process_num)s`起始数字,默认为0
00=/tmp                ; 程序运行的所在目录,相当于先cd到指定目录,然后运行程序。
umask=022                     ; umask for process (default None)
priority=999                  ; 程序操作的的优先级,例如在start all/stop all,高优先级的程序会先关闭和重启。
autostart=true                ; 在supervisord启动时自动启动,默认为true
startsecs=1                   ; 程序启动前等待时间等待时间。默认为1。
startretries=3                ; 尝试重启最大次数。默认为3。
autorestart=unexpected        ; 是否自动重启,可选参数为 false, unexpected, true。如果为false则不自动重启,如果为unexpected表示如果程序退出信号不在 `exitcodes` 中,则自动重启。默认为unexpected
exitcodes=0,2                 ; 程序退出码。配合`autorestart`使用。默认为 0,2
stopsignal=QUIT               ; 杀死进程是发送的信号,默认为TREM。
stopwaitsecs=10               ; 发送SIGKILL信号前最大等待时间。默认为10。
user=root                          ; 以指定用户身份启动程序。默认为当前用户。
stopasgroup=false             ; 是否向子进程发送停止信号,这对于Flask的debug模式很有用处,如果设置为true,则不向子进程发送停止信号。默认为false
killasgroup=false             ; 是否向子进程发送kill信号,默认为false
redirect_stderr=false         ; 将错误输出定向到标准输出,默认为false
stdout_logfile=/a/path        ; 标准输出日志路径,可选参数为 `自定义` `AUTO` `NONE`,`自定义`将日志写到自定义路径,可用的变量有`group_name`, `host_node_name`, `process_num`, `program_name`, `here`(配置文件目录);`NONE`不创建日志;`AUTO` 又supervisord自动选择路径,并且当supervisord服务重新启动时原来自动创建的日志以及日志的备份文件会被删除。默认为AUTO
stdout_logfile_maxbytes=1MB   ; 标准输出日志单个文件最大大小,如果超过指定大小会将日志文件备份,可用的单位 KB MB GB。如果设置为0则表示不限制文件大小。默认为50MB
stdout_logfile_backups=10     ; 标准输出日志文件最大备份数。默认为10
stdout_capture_maxbytes=1MB   ; 当进程处于“stdout capture mode”模式下写入到FIFO队列最大字节数,可用单位 KB MB GB。默认为0,详细说明见[capture-mode](http://supervisord.org/logging.html#capture-mode)
stdout_events_enabled=false   ;

;以下配置项配置错误输出的日志参数。和上面标准输出配置相同。
stderr_logfile=/a/path        ;
stderr_logfile_maxbytes=1MB   ;
stderr_logfile_backups=10     ;
stderr_capture_maxbytes=1MB   ;
stderr_events_enabled=false   ;
environment=A="1",B="2"       ; 环境变量设置,可用的变量有 `group_name`, `host_node_name`, `process_num`, `program_name`, `here`。 默认为空。
serverurl=AUTO                ; override serverurl computation (childutils)
6:非必须的 启动web端查看
修改配置文件:
nano /etc/supervisord.conf
修改web登录页面信息,IP,端口,用户,密码
[inet_http_server]         ; inet (TCP) server disabled by default
port=192.168.0.125:9001        ; ip_address:port specifier, *:port for all iface
username=user              ; default is no username (open server)
password=123               ; default is no password (open server)
python环境管理篇:CentOS 下 pyenv的安装(python版本管理)
前置依赖库的安装:
yum install gcc zlib-devel bzip2 bzip2-devel readline-devel sqlite sqlite-devel openssl-devel tk-devel libffi-devel xz-devel
PS:默认的系统如果安装了ipython解析器的话(有可能我们的pyenv设置全局和本地之后,在运行的python是无法切换的,此时通常我们的可以忽略,进入下一步的pipenv的安装)
pyenv全家桶的方式:
PS:建议把github上相关的pyenv仓库同步一份到码云上,使用码云来进行安装,不然你会等很久.
1获取安装脚本内容
https://github.com/pyenv/pyenv/wiki
从:$ curl -L https://github.com/pyenv/pyenv-installer/raw/master/bin/pyenv-installer | bash

提取地址:
https://github.com/pyenv/pyenv-installer/raw/master/bin/pyenv-installer
然后浏览改地址:
把网页内容另存为一份:
原来的内容为:
#!/usr/bin/env bash

set -e
[ -n "$PYENV_DEBUG" ] && set -x

if [ -z "$PYENV_ROOT" ]; then
  export PYENV_ROOT="${HOME}/.pyenv"
fi

colorize() {
  if [ -t 1 ]; then printf "\e[%sm%s\e[m" "$1" "$2"
  else echo -n "$2"
  fi
}

# Checks for `.pyenv` file, and suggests to remove it for installing
if [ -d "${PYENV_ROOT}" ]; then
  { echo
    colorize 1 "WARNING"
    echo ": Can not proceed with installation. Kindly remove the '${PYENV_ROOT}' directory first."
    echo
  } >&2
    exit 1
fi

failed_checkout() {
  echo "Failed to git clone $1"
  exit -1
}

checkout() {
  [ -d "$2" ] || git clone --depth 1 "$1" "$2" || failed_checkout "$1"
}

if ! command -v git 1>/dev/null 2>&1; then
  echo "pyenv: Git is not installed, can't continue." >&2
  exit 1
fi

if [ -n "${USE_GIT_URI}" ]; then
  GITHUB="git://github.com"
else
  GITHUB="https://github.com"
fi

checkout "${GITHUB}/pyenv/pyenv.git"            "${PYENV_ROOT}"
checkout "${GITHUB}/pyenv/pyenv-doctor.git"     "${PYENV_ROOT}/plugins/pyenv-doctor"
checkout "${GITHUB}/pyenv/pyenv-installer.git"  "${PYENV_ROOT}/plugins/pyenv-installer"
checkout "${GITHUB}/pyenv/pyenv-update.git"     "${PYENV_ROOT}/plugins/pyenv-update"
checkout "${GITHUB}/pyenv/pyenv-virtualenv.git" "${PYENV_ROOT}/plugins/pyenv-virtualenv"
checkout "${GITHUB}/pyenv/pyenv-which-ext.git"  "${PYENV_ROOT}/plugins/pyenv-which-ext"

if ! command -v pyenv 1>/dev/null; then
  { echo
    colorize 1 "WARNING"
    echo ": seems you still have not added 'pyenv' to the load path."
    echo
  } >&2

  { # Without args, `init` commands print installation help
    "${PYENV_ROOT}/bin/pyenv" init || true
    "${PYENV_ROOT}/bin/pyenv" virtualenv-init || true
  } >&2
fi
然后修改:
#!/usr/bin/env bash

set -e
[ -n "$PYENV_DEBUG" ] && set -x

if [ -z "$PYENV_ROOT" ]; then
  export PYENV_ROOT="${HOME}/.pyenv"
fi

colorize() {
  if [ -t 1 ]; then printf "\e[%sm%s\e[m" "$1" "$2"
  else echo -n "$2"
  fi
}

# Checks for `.pyenv` file, and suggests to remove it for installing
if [ -d "${PYENV_ROOT}" ]; then
  { echo
    colorize 1 "WARNING"
    echo ": Can not proceed with installation. Kindly remove the '${PYENV_ROOT}' directory first."
    echo
  } >&2
    exit 1
fi

failed_checkout() {
  echo "Failed to git clone $1"
  exit -1
}

checkout() {
  [ -d "$2" ] || git clone --depth 1 "$1" "$2" || failed_checkout "$1"
}

if ! command -v git 1>/dev/null 2>&1; then
  echo "pyenv: Git is not installed, can't continue." >&2
  exit 1
fi

if [ -n "${USE_GIT_URI}" ]; then
  GITHUB="git://gitee.com"
else
  GITHUB="https://gitee.com"
fi

checkout "${GITHUB}/zyxgame/pyenv.git"            "${PYENV_ROOT}"
checkout "${GITHUB}/zyxgame/pyenv-doctor.git"     "${PYENV_ROOT}/plugins/pyenv-doctor"
checkout "${GITHUB}/zyxgame/pyenv-installer.git"  "${PYENV_ROOT}/plugins/pyenv-installer"
checkout "${GITHUB}/zyxgame/pyenv-update.git"     "${PYENV_ROOT}/plugins/pyenv-update"
checkout "${GITHUB}/zyxgame/pyenv-virtualenv.git" "${PYENV_ROOT}/plugins/pyenv-virtualenv"
checkout "${GITHUB}/zyxgame/pyenv-which-ext.git"  "${PYENV_ROOT}/plugins/pyenv-which-ext"

if ! command -v pyenv 1>/dev/null; then
  { echo
    colorize 1 "WARNING"
    echo ": seems you still have not added 'pyenv' to the load path."
    echo
  } >&2

  { # Without args, `init` commands print installation help
    "${PYENV_ROOT}/bin/pyenv" init || true
    "${PYENV_ROOT}/bin/pyenv" virtualenv-init || true
  } >&2
fi
主要修改地方是:
把相关的替换为码云同步的仓库
码云同步github的方式:
2 执行脚本(注意需要给权限chmod +x )
1:保持脚本为pyenv-installer_gitt.sh
2:给权限:chmod +x pyenv-installer_gitt.sh
3:执行脚本:./pyenv-installer_gitt.sh bash
4:配置环境变量:把下面的信息写入到 ~
配置启动信息:
nano ~/.bashrc
写入内容:
#############
export PATH=$HOME/.pyenv/bin:$PATH
eval "$(pyenv init -)"
eval "$(pyenv virtualenv-init -)"

export PIPENV_VENV_IN_PROJECT=1
安装pyevn(非一键安装)
获取安装包
git clone https://github.com/yyuu/pyenv.git ~/.pyenv
2 配置环境变量
echo 'export PYENV_ROOT="$HOME/.pyenv"' >> ~/.bash_profile
echo 'export PATH="$PYENV_ROOT/bin:$PATH"' >> ~/.bash_profile
3 添加pyenv初始化到shell
echo 'eval "$(pyenv init -)"' >> ~/.bash_profile
4重新启动shell使更改生效
 exec $SHELL
 source ~/.bash_profile
5检测安装情况和版本(如果安装checkout "${GITHUB}/xxxx/pyenv-doctor.git"才有效 )
[root@localhost ~]# pyenv doctor
Cloning /root/.pyenv/plugins/pyenv-doctor/bin/.....

BUILD FAILED (CentOS Linux 7 using python-build 1.2.13)

Problem(s) detected while checking system.

See https://github.com/pyenv/pyenv/wiki/Common-build-problems for known solutions.
[root@localhost ~]#
6:查看pyenv版本:
[root@localhost ~]#  pyenv -v
pyenv 1.2.13
[root@localhost ~]#
7:安装不同的python版本(为后续的pipevn提供基础):
[root@localhost ~]# pyenv install 3.6.6

或:
[root@localhost ~]# v=3.7.3;wget http://npm.taobao.org/mirrors/python/$v/Python-$v.tar.xz -P ~/.pyenv/cache/;pyenv install $v

如果安装出现问题ModuleNotFoundError: No module named '_ctypes':

yum install libffi-devel
8:查看当前系统中所有可用的Python版本:
[root@localhost ~]# pyenv versions
* system (set by /root/.pyenv/version)  #系统当前的版本
  3.6. 6 # 新安装的版本
  3.7.3  # 新安装的班
[root@localhost ~]#
9:切换Python版本切换Python版本 (1)切换全局系统版本,即直接再shell下输入python的时候看到的系统版本
[root@localhost ~]# pyenv global 3.6.6
具体演示:
[root@localhost ~]# pyenv global 3.6. 6
pyenv: version `3.6.' not installed
[root@localhost ~]# pyenv global 3.6.6
[root@localhost ~]# python
Python 3.6.6 (default, Jul 25 2019, 05:52:01)
[GCC 4.8.5 20150623 (Red Hat 4.8.5-36)] on linux
Type "help", "copyright", "credits" or "license" for more information.
>>> exit()
[root@localhost ~]# pyenv global 3.7.3
[root@localhost ~]# python
Python 3.7.3 (default, Jul 25 2019, 05:48:21)
[GCC 4.8.5 20150623 (Red Hat 4.8.5-36)] on linux
Type "help", "copyright", "credits" or "license" for more information.
>>> exit()
[root@localhost ~]#
(2)指定的项目下目录下设置指定的python版本
root@localhost ~]# cd /data/www/ceshi/

#指定全局系统版本
[root@localhost ceshi]# pyenv global 3.6.6

#设置当前data/www/ceshi、目录下的版本
[root@localhost ceshi]# pyenv local 3.7.3

#查看设置后的版本情况
[root@localhost ceshi]# python
Python 3.7.3 (default, Jul 25 2019, 05:48:21)
[GCC 4.8.5 20150623 (Red Hat 4.8.5-36)] on linux
Type "help", "copyright", "credits" or "license" for more information.
>>> exit
Use exit() or Ctrl-D (i.e. EOF) to exit
>>> exit()


\[root@localhost ceshi]# cd ~
#退出目录,查看全局的版本情况
[root@localhost ~]# python
Python 3.6.6 (default, Jul 25 2019, 05:52:01)
[GCC 4.8.5 20150623 (Red Hat 4.8.5-36)] on linux
Type "help", "copyright", "credits" or "license" for more information.
>>> exit()
[root@localhost ~]#
(3)取消指定的项目下目录下设置指定的python版本
pyenv local --unset
更多用法
更新数据库
pyenv rehash

 查看当前激活的是那个版本的Python
pyenv version

# 查看所有已安装的版本
pyenv versions

# 查看所有可安装的版本
pyenv install --list

# 安装指定版本
pyenv install 3.6.5
# 安装完成后必须rehash
pyenv rehash

# 删除指定版本
pyenv uninstall 3.5.2

# 指定局部版本,当前目录生效
pyenv local 3.6.5
pyenv local --unset

# 指定全局版本,整个系统生效
pyenv global 3.6.5

# 指定多个全局版本, 3版本优先
pyenv global 3.6.5 2.7.14

# 取消设置
pyenv local --unset

#PS: 切换版本后, 相应的pip和包仓库都是会自动切换过去的
参考:https://www.jianshu.com/p/1c8b942d0afc
python 虚拟解释器环境管理篇:CentOS 下 基于pyenv下的pipenv 的安装
1-使用pip 安装pipenv(需要有python环境),需要全局的安装,避免supervisor找不到
有必要的情况下升级一下当前pip 如果是没有的主要看自己的版本是不是pip3
pip install --upgrade pip
安装:
pip install pipenv
2-如果没有配置对应的虚拟环境目录,建议设置一下:
nano ~/.bashrc
写入内容:
export PIPENV_VENV_IN_PROJECT=1
3-(如果修改了配置)重新启动shell使更改生效
 exec $SHELL
 source ~/.bash_profile
4-ce 到你的项目下,设置当前的项目使用的py版本(可以忽略设置本地)
设置当前的项目使用的py版本
# pyenv local 3.6.6
5-ce 到你的项目下,设置当前使用什么的python版本建立基础的虚拟环境
ce 到你的项目下
pipenv --python 3.6.6 创建基于3.6.6虚拟环境
6-基于你的项目下,进入到虚拟环境里面
pipenv shell
7-基于你的项目下,使用pipenv安装项目依赖库
pipenv install  gunicorn
或
项目生成requirements.txt
pip freeze > requirements.txt
安装
pipenv install -r path/to/requirements.txt

---------------------------------建议1
使用pipevn安装相关依赖时候回遇到非常慢的问题可以更喜欢一下源:
pipenv换镜像源

python -c "s='https://mirrors.aliyun.com/pypi/simple';fn='Pipfile';pat=r'(\[\[source\]\]\s*url\s*=\s*\")(.+?)(\")';import re;fp=open(fn, 'r+');ss=fp.read();fp.seek(0);fp.truncate();fp.write(re.sub(pat, r'\1{}\3'.format(s), ss));fp.close();print('Done! Pipfile source switch to:\n'+s)"
替换方法:
在当前的目录下:

sed -i 's|pypi.org|mirrors.aliyun.com/pypi|g' Pipfile

---------------------------------建议2
如果你不想每次运行Python时都输入这么多,你可以在shell中设置一个别名,例如,

alias prp="pipenv run python"
8-使用pipenv运行项目
pipenv run gunicorn -w 4 -b 0.0.0.0:5003 starter:app
或
pipenv run python xxxx.py
9-可以查看项目进程情况
pstree -ap|grep gunicorn
pipenv得其他操作备注
pipenv --three 会使用当前系统的Python3创建环境

pipenv --python 3.6 指定某一Python版本创建环境

pipenv shell 激活虚拟环境

pipenv --where 显示目录信息
/home/jiahuan/pipenvtest

pipenv --venv 显示虚拟环境信息
/home/jiahuan/.local/share/virtualenvs/pipenvtest-9KKRH3OW

pipenv --py 显示Python解释器信息(到对应得虚拟目录下执行可以找到对应得虚拟机得解析器路径)
/home/jiahuan/.local/share/virtualenvs/pipenvtest-9KKRH3OW/bin/python

pipenv install requests 安装相关模块并加入到Pipfile

pipenv install django==1.11 安装固定版本模块并加入到Pipfile

pipenv graph 查看目前安装的库及其依赖

pipenv uninstall --all  卸载当前环境下所有包

pipenv  update  --更新当前环境下所有包,升级到最新版本

pipenv --rm                    删除虚拟环境

pipenv --py                    列出虚拟环境的Python可执行文件

pipenv run python [pyfile]     运行py文件

pipenv --where                 列出本地工程路径
pipenv --venv                  列出虚拟环境路径
pipenv --py                    列出虚拟环境的Python可执行文件
pipenv install                 创建虚拟环境
pipenv isntall [moduel]        安装包
pipenv install [moduel] --dev  安装包到开发环境
pipenv uninstall[module]       卸载包
pipenv uninstall --all         卸载所有包
pipenv graph                   查看包依赖
pipenv lock                    生成lockfile
pipenv run python [pyfile]     运行py文件
pipenv --rm                    删除虚拟环境
Gunicorn 部署的几个方式
理解Gunicorn的并发:
Gunicorn 启动了一个主线程,根据对应配置的参数worker的数量启动子线程。
进行子线程worker的性格检测,主线程都可以通过分发它自身而另行启动。
每个worker 主任的任务是:处理 HTTP 请求
第1种:workers并发方式(别名UNIX 进程模式)-多进程
worker 之间没有共享内存 worker 并发数量建议(2*CPU)+1。
gunicorn --workers=((2*CPU核数)+1) main:app
第2种:workers并发方式-多线程
每个 worker 都会加载一次,同一个 worker 生成的每个线程共享相同的内存空间。 worker 的类就会是 gthread 多线程 并发数量建议(2*CPU)+1。
gunicorn --workers=5 --threads=2 main:app
#
gunicorn --workers=5 --threads=2 --worker-class=gthread main:app
第3种:gevent并发方式-协程
gunicorn --worker-class=gevent --worker-connections=6000 --workers=3 main:app
实现wsgi协议(flask,bottle,web.py等)的框架常规几个线上部署的方式
1)单纯使用gevent进行单纯的【单进程单线程的协程】方式部署:
from gevent import monkey, spawn

monkey.patch_all()

from flask import Flask, request, url_for, current_app, jsonify, g

app = Flask(__name__)


@app.route('/whhy', methods=['POST', 'GET'])
def returl():
    # 记录下所有的请提交的数据信息
    return jsonify({
        "code": 0,
        "message": "success"
    })


@app.route('/whhy/bakurl/callback', methods=['POST', 'GET'])
def bakurl():
    return jsonify({
        "code": 0,
        "message": "success"
    })

if __name__ == '__main__':
    print(app.url_map)
      # -------flask系统启动配置 ---------
    WSGIServer(('0.0.0.0', 7790),app).serve_forever()  # 配置gevent后的启动方式
    from gevent import pywsgi
    server = pywsgi.WSGIServer(('0.0.0.0', 20012), app)
    server.serve_forever()
2)gevent+多进程(自己写代码创建多进程(不建议)):
from gevent import monkey
monkey.patch_all()

from gevent.pywsgi import WSGIServer
from multiprocessing import cpu_count, Process
from flask import Flask

app = Flask(__name__)


@app.route("/")
def index():
    return {"hello": "world"}

server = WSGIServer(('', 8000), app, log=None)
server.start()

def serve_forever():
    server.start_accepting()
    server._stop_event.wait()

if __name__ == "__main__":
    # server.serve_forever()
    # 启动的进程数为cpu个数
    for i in range(cpu_count()):
        p = Process(target=serve_forever)
        p.start()
3)gevent+gunicorn(多进程+协程):
方式1:
gunicorn --debug --worker-class=gevent -t 99999 app:app
#
gunicorn -w 8 --bind 0.0.0.0:8000 -k 'gevent' 运行文件名称:Flask程序实例名
方式2(单纯的使用多进程):
pipenv run gunicorn -w 2 -b 0.0.0.0:21103 iread_run:app ; supervisord将要执行的运行python服务的命令
方式3:
gunicorn.py 配置文件
import gevent.monkey
gevent.monkey.patch_all()

# 多进程
import multiprocessing

"""gunicorn+gevent 的配置文件"""


# 预加载资源
preload_app = True
# 绑定 ip + 端口
bind = "0.0.0.0:9000"
# 进程数 = cup数量 * 2 + 1
workers = multiprocessing.cpu_count() * 2 + 1

# 线程数 = cup数量 * 2
threads = multiprocessing.cpu_count() * 2

# 等待队列最大长度,超过这个长度的链接将被拒绝连接
backlog = 2048

# 工作模式--协程
worker_class = "gevent"

# 最大客户客户端并发数量,对使用线程和协程的worker的工作有影响
# 服务器配置设置的值  1200:中小型项目  上万并发: 中大型
# 服务器硬件:宽带+数据库+内存
# 服务器的架构:集群 主从
worker_connections = 6000

# 进程名称
proc_name = 'gunicorn.pid'
# 进程pid记录文件
pidfile = 'app_run.log'
# 日志等级
loglevel = 'debug'
# 日志文件名
logfile = 'debug.log'
# 访问记录
accesslog = 'access.log'
# 访问记录格式
access_log_format = '%(h)s %(t)s %(U)s %(q)s'

# 代码发生变化是否自动重启
reload = True
gunicorn.py 配置文件(另一种定义路径的)
import os
import gevent.monkey
gevent.monkey.patch_all()

import multiprocessing
current_dir = os.path.abspath(os.path.dirname(__file__))
debug = True
loglevel = 'info'
bind = '0.0.0.0:5001'
threads = 2
timeout = 30
backlog = 512
pidfile = current_dir+'/logs/gunicorn.pid'
accesslog=current_dir+'/logs/access.log'
errorlog=current_dir+'/logs/error.log'

#启动的进程数
workers = multiprocessing.cpu_count() * 2 + 1
worker_class = 'gevent'
access_log_format = '%(t)s %(p)s %(h)s "%(r)s" %(s)s %(L)s %(b)s %(f)s" "%(a)s"'
启动:
pipenv run gunicorn -c gunicorn.py iread_run:app
4)meinheld + gunicorn + flask 开启高并发(未尝试)
gunicorn.py -工作模式为meinheld-
worker_class = "egg:meinheld#gunicorn_worker"
import multiprocessing

# 监听本机的5000端口
bind = '0.0.0.0:5000'

preload_app = True

# 开启进程
# workers=4
workers = multiprocessing.cpu_count() * 2 + 1

# 每个进程的开启线程
threads = multiprocessing.cpu_count() * 2

backlog = 2048

#工作模式为meinheld
worker_class = "egg:meinheld#gunicorn_worker"

# debug=True

# 如果不使用supervisord之类的进程管理工具可以是进程成为守护进程,否则会出问题
daemon = True

# 进程名称
proc_name = 'gunicorn.pid'

# 进程pid记录文件
pidfile = 'app_pid.log'

loglevel = 'debug'
logfile = 'debug.log'
accesslog = 'access.log'
access_log_format = '%(h)s %(t)s %(U)s %(q)s'
启动:
pipenv run gunicorn -c gunicorn.py iread_run:app
5) 使用Tornado部署
Tornado的强大之处在于它是非阻塞式异步IO及Epoll模型,采用Tornado的可以支持数以万计的并发连接,对于高并发的应用有着很好的性能
from tornado.wsgi import WSGIContainer
from tornado.httpserver import HTTPServer
from tornado.ioloop import IOLoop

from run import app #其中run.py中的app是flask的应用对象。

http_server = HTTPServer(WSGIContainer(app))
http_server.listen(5000) #flask默认的端口
IOLoop.instance().start()
postgresql数据库安装篇
按官网文档操作 https://www.postgresql.org/download/linux/redhat/
sudo yum install -y https://download.postgresql.org/pub/repos/yum/reporpms/EL-7-x86_64/pgdg-redhat-repo-latest.noarch.rpm
sudo yum install -y postgresql96-server
sudo /usr/pgsql-9.6/bin/postgresql96-setup initdb
sudo systemctl enable postgresql-9.6
sudo systemctl start postgresql-9.6
1:检测是否安装完成
rpm -aq| grep postgres
2:创建数据库存放路径位置 为方便进行统一管理,可以建立统一的路径进行存放
mkdir -p /data/pg/data #存放数据库的文件夹
chown -R postgres:postgres /data/pg #为新创建的pg文件夹分配数据库服务的操作权限
chown -R postgres:postgres /data/pg/data #为存放数据库的文件夹分配权限
chmod 750 /data/pg/data
3:设置环境变量 编辑/etc/profile文件,
nano /etc/profile
在末尾添加如下的信息配置(PATH注意路径):
PGDATA=/data/pg/data
PGHOST=127.0.0.1
PGDATABASE=postgres
PGUSER=postgres
PGPORT=5432
PATH=/usr/pgsql-9.6/bin:$PATH
export PATH
export PGDATA PGHOST PGDATABASE PGUSER PGPORT
export TMOUT=1000
然后为了让刚才修改生效
source /etc/profile
查看是否已添加成功:
export
补充设置环境变量的其他办法:
设置环境变量(其他办法):
export PATH=/usr/pgsql-9.6/bin:$PATH
export LD_LIBRARY_PATH=/usr/pgsql-9.6/lib
export PGDATA=/data/pg/data
4:初始化数据库 进入到postgres用户下:
su postgres #切换到postgres用户

initdb -D /data/pg/data #初始化数据库
#或
/usr/pgsql-9.6/bin/postgresql96-setup initdb -D /data/pg/data

exit #退出当前postgres用户
5:查看相关的安装
cd /data/pg/data
6:配置远程可访问 修改文件1 :/data/pg/data/pg_hba.conf,添加可远程进行密码访问方式
nano /data/pg/data/pg_hba.conf
找到# IPv4 local connections: 在它的下面添加一行
host all all 0.0.0.0/0 md5
修改文件2 :/data/pg/data/postgresql.conf配置文件
#listen_addresses = 'localhost'
将前面的#删掉,参数localhost表示只允许当前服务器能链接数据库,如果想指定地址可以访问,可以输入ip地址,多个地址时用逗号分隔,如果开放所有地址可以访问,由使用
listen_addresses = '*'
找到
#port = 5432
将前面的#删掉,这里可以指定访问数据库的端口
或直接使用sed司改(注意按自己的环境来修改):
sed -i "s|#listen_addresses = 'localhost'|listen_addresses = '*'|g" /var/lib/pgsql/9.6/data/postgresql.conf
7:修改配置开机启动前准备 修改文件:/usr/lib/systemd/system/postgresql-9.6.service
nano /usr/lib/systemd/system/postgresql-9.6.service
#把aLocation of database direcotry配置节里面没有指定正确的PGDATA。所以我们需要将下面的PGDATA设置成正确值
Environment=PGDATA=/data/pg/data/
PS:修改远程信息之后:
重启postgresql-9.6服务,使配置文件重效
service postgresql-9.6 restart
8:设置开机启动处理
systemctl enable postgresql-9.6.service
9:启动postgresql数据库
su postgres -c "/usr/pgsql-9.6/bin/pg_ctl start -D /data/pg/data"

ps -ef|grep postgres #查看相关进程
10:修改密码:使用postgres用户登录:
su postgres
连接数据库:使用postgres用户登录:
PS“#PostgreSQL在数据库用户同名的系统账号下登录免密;”

psql -U postgres
建议直接的:
sudo -u postgres psql
则出现:
psql (9.6.18)
Type "help" for help.

postgres=#
修改postgres用户密码:
Alter user postgres with password '123456';
11:(非必须)防火墙处理(关闭或添加端口)(阿里云ECS的安全组需要开放对应的端口权限):
systemctl stop firewalld #关闭防火墙
systemctl enable firewalld #开机启用防火墙
systemctl start firewalld #开启防火墙
firewall-cmd --add-service=postgresql --permanent   #开放postgresql服务
firewall-cmd --zone=public --add-port=5432/tcp --permanent #或者可以直接添加端口
firewall-cmd --reload # 重载防火墙
firewall-cmd --list-ports #查看占用端口
12 :使用Navicat Premium进行远程连接:
其他的补充:PS:因为PG数据库版本的问题,或导致出现错误
错误信息如下:
navicat premium出现PostgreSQL: column “rolcatupdate” does not exist error
会导致在连接成功后,操作建表或建立数据库的时候都会出现提示错误
尝试寻找问题:
 原因:
原因:
最终解决:更换navicat premium的版本到navicat premium12即可
======================================================== 补充:
systemctl enable postgresql-9.5.service
su postgres
bash-4.2ps -ef|grep postgres bash-4.2 kill -9 5439 #先停止所有的进程
bash-4.2ps -ef|grep postgres # 无运行的进程 bash-4.2 systemctl enable postgresql-9.6.service
然后输入密码:
bash-4.2service postgresql-9.6 restart bash-4.2 ps -ef|grep postgres #已经重新运行了
bash-4.2systemctl status postgresql-9.6.service # 有绿色出现,说明顺利启动了!bash-4.2 systemctl stop postgresql-9.6.service #先停止
bash-4.2$ systemctl start postgresql-9.6.service
PS:修改远程信息之后:
重启postgresql-9.6服务,使配置文件重效
service postgresql-9.6 restart
----------------------------------2018年3月8日 16:48:43修改添加------------------------------------------------------------------ PS:云服务器 ECS Linux CentOS 7 下重启服务不再通过 service 操作,而是通过 systemctl 操作。
查看:systemctl status sshd.service

启动:systemctl start sshd.service

重启:systemctl restart sshd.service

自启:systemctl enable sshd.service

systemctl restart postgresql-9.6.service
----------------------------------2018年4月3日 09:25:18修改添加------------------------------------------------------------------ 卸载PostgreSQL
yum erase postgresql96
reids缓存安装篇
参考地址:http://www.cnblogs.com/EmptyFS/p/6595968.html 多数文字来源:http://www.cnblogs.com/EmptyFS/p/6595968.html 准备工作:
首先升级或安装一下pip(新安装的系统还没有pip需要安装或升级,默认一般是是使用pip2进行) #####前提:
curl https://bootstrap.pypa.io/get-pip.py | python
yum intsall wget
#####第1步:定位对应下载安装包目录
mkdir -p /data/bak
cd /data/bak/
#####第2步:下载安装包 登录http://download.redis.io/releases/ 选择需要安装的版本并下载
wget http://download.redis.io/releases/redis-3.2.8.tar.gz
#####第3步:编译安装 创建redis安装文件夹:
mkdir /usr/local/redis
解压缩安装包:
tar -zxvf redis-3.2.8.tar.gz
进入安装包文件夹:
cd redis-3.2.8
执行安装命令:
make PREFIX=/usr/local/redis/ install
(1)提示make[1]: Entering directory `/root/redis-2.8.17/src‘ CC adlist.o,
原因是:未安装gcc,使用命令安装gcc:yum install gcc
(2)提示make
解决:将make改为make MALLOC=libc,推测是因为编译库的问题。命令:make MALLOC=libc PREFIX=/usr/local/redis/ install
PS:上面安装命令执行完成,/usr/local/redis/目录下就有个bin目录,里面放的是redis服务相关的可执行命令
复制redis配置文件到指定目录(这一步也很关键,需要有配置文件):
cp redis.conf /usr/local/redis
其他补充:
cd /usr/local/src
wget http://download.redis.io/releases/redis-3.0.5.tar.gz
tar xf redis-3.0.5.tar.gz
cd redis-3.0.5
make
make install
#(可用make PREFIX=/usr/local/redis install 安装到指定的路径下面 )
cp utils/redis_init_script /etc/init.d/redis
chmod a+x /etc/init.d/redis
mkdir /etc/redis
cp redis.conf /etc/redis/
#####第4步:配置远程访问 修改配置文件:/usr/local/redis/redis.conf
bind 127.0.0.1 ---->bind 0.0.0.0
注:redis服务访问限制设置。使用127.0.0.1表示只能本机访问;如果用的是服务器在局域网里的ip:192.168.1.128,即表示局域网内的ip都可以访问;如果使用0.0.0.0由表示所有地址都可以访问。需要绑定多个时,可以添加多个bind xxx.xxx.xxx.xxx
daemonize no ----->daemonize yes
注:PS:daemonize no 这个修改为daemonize yes 开启守护进程
logfile ''----->logfile /data/log/redis.log
注:logfile ''' .修改日志保存路径
dir ./ ----->dir /usr/local/redis/data #配置持久化文件存放位置
注:dir ./ 这里需要修改为dir /usr/local/redis/data 不然redis数据会存储到root文件夹下面
requirepass xxxxx ----->requirepass 你设置的远程连接的密码信息
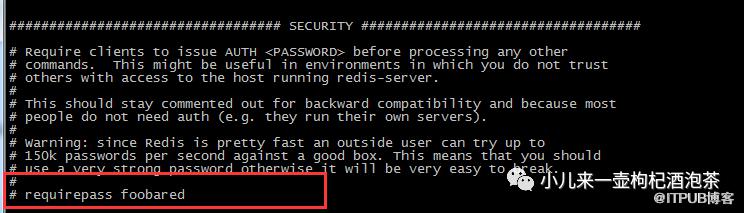
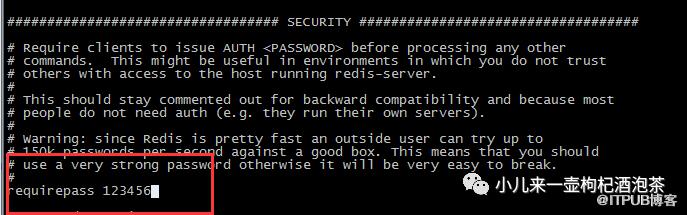
注:随便找个位置增加requirepass xxxxx,可以增加访问redis访问密码,如果你的redis对外网开放,这个密码一样要足够长足够复制,不然以redis的访问速度,比较容易被人破解
maxmemory 1024M
注:可以增加maxmemory 1024M来限制redis占用内容大小,也可以不限制
第4步:修改完成后,创建redis数据存储文件夹
mkdir /usr/local/redis/data
#####第5步:启动redis服务端(启动时指定配置文件)
/usr/local/redis/bin/redis-server /usr/local/redis/redis.conf
ps -ef |grep redis # 查看启动情况
#####第6步:处理防火墙或开启端口6379 PS:生产环境上一般不建议直接的关闭防火墙
systemctl stop firewalld #关闭防火墙
systemctl enable firewalld #开机启用防火墙
systemctl start firewalld #开启防火墙
firewall-cmd --add-service=redis --permanent   #开放redis 服务
firewall-cmd --zone=public --add-port=6379/tcp --permanent #或者可以直接添加端口
firewall-cmd --reload # 重载防火墙
firewall-cmd --list-ports #查看占用端口
#####第7步:使用客户端进行远程连接
#注意事项:线上环境一般不会开启redis的远程,不然容易被别人拿来挖矿!详情可查看:https://www.jianshu.com/p/8c8f1b059a22
#####======================================================== #####补充:生成软连接:
ln -s /usr/local/redis/bin/redis-server /usr/bin/redis-server
ln -s /usr/local/redis/bin/redis-cli /usr/bin/redis-cli
启动服务
redis-server /usr/bin/redis-server
关闭服务
redis-cli shutdown
客户端启动
redis-cli
#####======================================================== #####其他配置修改:
######Redis默认不是以守护进程的方式运行,可以通过该配置项修改,使用yes启用守护进程
daemonize yes
PS:如果Redis以守护进程方式运行时,Redis默认会把pid写入/var/run/redis.pid文件,可以通过pidfile指定
pidfile /var/run/redis.pid
######开启aof持久化
appendonly yes
appendfsync everysec
######绑定的主机地址或开启远程访问
bind 0.0.0.0
######把redis安装为服务,设置开机启动
vim /lib/systemd/system/redis.service
加入以下内容:
[Unit]
Description=redis service
Wants=network.target
[Service]
Type=forking
ExecStart=/usr/local/bin/redis-server /etc/redis/redis.conf
[Install]
WantedBy=multi-user.target
######重新载入
systemctl daemon-reload
######设置开机启动
systemctl enable redis
######启动redis
systemctl start redis
######开启防火墙的3306端口
firewall-cmd --add-port=3306/tcp --permanent
firewall-cmd --reload
######当客户端闲置多长时间后关闭连接,如果指定为0,表示关闭该功能
timeout 300
######指定日志记录级别,Redis总共支持四个级别:debug、verbose、notice、warning,默认为verbose
loglevel verbose
修改数据库的数量,reidis默认数据库为0,可以使用SELECT
databases 16
######指定在多长时间内,有多少次更新操作,就将数据同步到数据文件,可以多个条件配合
save
个人其他博客地址
简书:https://www.jianshu.com/u/d6960089b087
掘金:https://juejin.cn/user/2963939079225608
小钟同学 | 文 【原创】| QQ:308711822
1:本文相关描述主要是个人的认知和见解,如有不当之处,还望各位大佬指正。 2:关于文章内容,有部分内容参考自互联网整理,如有链接会声明标注;如没有及时标注备注的链接的,如有侵权请联系,我会立即删除处理哟。
原文作者:程序员小钟同学;如有侵权,请联系管理员删除。

最新文章
- 深入FastAPI异步编程-之并发编程(15)-定义全局的支持全局上下文变量和局部上下文的对象可以任意传递了!
- 深入FastAPI异步编程-之并发编程(13)-纠错-修改基于aiojobs库结合aiojobs的和FastAPI框架的示例
- 深入FastAPI异步编程-之并发编程(13)-基于aiojobs库实现类似Background Tasks的效果
- 深入FastAPI异步编程-之并发编程(12)-基于pyee异步事件驱动通知
- 深入FastAPI异步编程-之并发编程(11)-异步中的?同步原语
- 深入FastAPI异步编程-之并发编程(10)-?asyncio.wait 更精细化并发补充说明
- 深入FastAPI异步编程-之并发编程(9)-asyncio.as_completed的补充说明
- 深入FastAPI异步编程-之并发编程(8)-asyncio.gather的补充说明
- 深入FastAPI异步编程-之并发编程(7)番外篇~Windows系统下事件循环插曲
- 深入FastAPI异步编程-之并发编程(6)~事件循环
