
Tekton 是 Google 开源的 Kubernetes 原生CI/CD 系统, 功能强大扩展性强. 前身是 Knavite 里的 build-pipeline 项目, 后期孵化成独立的项目. 并成为 CDF 下的四个项目之一, 其他三个分别是 Jenkins, Jenkins X, Spinnaker.
为什么说 Tekton 是 Kubernetes 原生的, 以内其基于 Kubernetes 的 CRD 定义了 Pipeline 流水线.
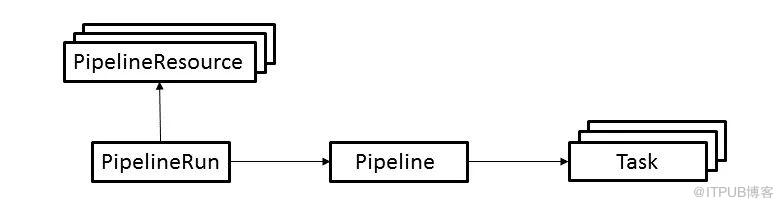
CRD 及说明:
Task: 构建任务, 可以定义一些列的 steps. 每个 step 由一个 container 执行.
TaskRun: task 实际的执行, 并提供执行所需的参数. 这个对象创建后, 就会有 pod 被创建.
Pipeline: 定义一个或者多个 task 的执行, 以及 PipelineResource 和各种定义参数的集合
PipelineRun: 类似 task 和 taskrun 的关系: 一个定义一个执行. PipelineRun 则是 pipeline 的实际执行. 创建后也会创建 pod 来执行各个 task.
PipelineResource: 流水线的输入资源, 比如 github/gitlab 的源码, 某种存储服务的文件, 或者镜像等. 执行时, 也会作为 pod 的其中一个 container 来运行(比如拉取代码).
Condition: 在 pipeline 的 task 执行时通过添加 condition 来对条件进行评估, 进而判断是否执行 task. 目前是WIP的状态, 待#1137的完成.
组件:
tekton-pipelines-controller: 监控 CRD 对象(TaskRun, PipelineRun)的创建, 为该次执行创建 pod.tekton-pipelines-webhook: 对 apiserver 提供 http 接口做 CRD 对象的校验.
安装
kubectl apply --filename https://storage.googleapis.com/tekton-releases/pipeline/latest/release.yaml检查安装的tekton相关的CRD:
kubectl api-resources | grep tekton
clustertasks                                   tekton.dev                     false        ClusterTask
conditions                                     tekton.dev                     true         Condition
pipelineresources                              tekton.dev                     true         PipelineResource
pipelineruns                      pr,prs       tekton.dev                     true         PipelineRun
pipelines                                      tekton.dev                     true         Pipeline
taskruns                          tr,trs       tekton.dev                     true         TaskRun
tasks                                          tekton.dev                     true         Task
tekton的两个pod:
kubectl get pods --namespace tekton-pipelines
NAME                                           READY   STATUS    RESTARTS   AGE
tekton-pipelines-controller-556d8f4494-2qthv   1/1     Running   0          11m
tekton-pipelines-webhook-849cff5cf-8m5qq       1/1     Running   0          11m
实践
到了这里相信已经安装好了 Tekton. 我们使用Spring Initializer生成的项目为例, 演示如何使用 Tekton 实现 CICD.
开始之前简单整理下这个项目的 CICD 流程:
拉取代码
maven 打包
构建镜像并推送
部署
注: 所有的操作都是在 tekton-pipelines namespace 下操作
0x00 添加 dockerfile 和部署用的 yaml
用于构建镜像的Dockerfile
FROM openjdk:8-jdk-alpine

RUN mkdir /app
WORKDIR /app
COPY target/*.jar /app/app.jar
ENTRYPOINT ["sh", "-c", "java -Xmx128m -Xms64m -jar app.jar"]
用于部署 K8s Deployment 的deployment.yml
apiVersion: "apps/v1"
kind: "Deployment"
metadata:
  labels:
    app: "tekton-test"
  name: "tekton-test"
spec:
  replicas: 1
  selector:
    matchLabels:
      app: "tekton-test"
  template:
    metadata:
      labels:
        app: "tekton-test"
    spec:
      containers:
        - image: "addozhang/tekton-test:latest"
          imagePullPolicy: "Always"
          livenessProbe:
            failureThreshold: 3
            httpGet:
              path: "/actuator/info"
              port: 8080
              scheme: "HTTP"
            initialDelaySeconds: 60
            periodSeconds: 10
            successThreshold: 1
            timeoutSeconds: 10
          name: "tekton-test"
          ports:
            - containerPort: 8080
              name: "http"
              protocol: "TCP"
          readinessProbe:
            failureThreshold: 3
            httpGet:
              path: "/actuator/info"
              port: 8080
              scheme: "HTTP"
            initialDelaySeconds: 30
            periodSeconds: 10
            successThreshold: 1
            timeoutSeconds: 10
0x01 拉取代码
代码作为构建的输入, 需要提供一个 Pipeline CRD 对象来表示输入是从 git 仓库来获取代码
apiVersion: tekton.dev/v1alpha1
kind: PipelineResource
metadata:
  name: git-source
spec:
  type: git
  params:
    - name: revision
      value: master
    - name: url
      value: https://github.com/addozhang/tekton-test.git
说明:
type: 表示资源类型为 git
revision: 表示从仓库的 master 分支拉取代码
url: 表示仓库的位置
由于测试的代码放在 github 上作为public 仓库, 所以这里不需要 ssh key. 如果是私有仓库, 请参考官方文档
执行:
添加资源对象kubectl apply -f resource/git-resource.yaml
运行tkn res list检查资源
NAME         TYPE   DETAILS
git-source   git    url: https://github.com/addozhang/tekton-test.git
0x02 maven 打包
Task source-to-image.yaml: step maven
spec:
  inputs:
    resources:
      - name: git-source
        type: git
  steps:
    - name: maven
      image: maven:3.5.0-jdk-8-alpine
      workingDir: /workspace/git-source
      command:
        - mvn
      args:
        - clean
        - install
        - -DskipTests
      volumeMounts:
        - name: m2
          mountPath: /root/.m2
  volumes:
    - name: m2
      hostPath:
        path: /home/docker/.m2
说明:
有了代码下一步就是执行 maven 的编译打包, 在maven:3.5.0-jdk-8-alpine镜像中执行mvn的相关命令.
这里挂在了一个本地的volume, 避免每次构建重复下载依赖包, 同时里面还有settings.xml
注意: 对于 minikube, hostPath 请使用/data/.m2, 否则minikube重启后无法持久化
0x03 构建镜像并推送
Task source-to-image.yaml: step build-and-push
spec:
  inputs:
    resources:
      - name: git-source
        type: git
    params:
      - name: pathToContext
        description: The path to the build context, used by Kaniko - within the workspace
        default: .
      - name: pathToDockerFile
        description: The path to the dockerfile to build (relative to the context)
        default: Dockerfile
      - name: imageUrl
        description: Url of image repository
      - name: imageTag
        description: Tag to apply to the built image
        default: latest
  steps:
    - name: build-and-push
      image: gcr.io/kaniko-project/executor
      command:
        - /kaniko/executor
      args:
        - --dockerfile=$(inputs.params.pathToDockerFile)
        - --destination=$(inputs.params.imageUrl):$(inputs.params.imageTag)
        - --context=/workspace/git-source/$(inputs.params.pathToContext)
说明:
镜像的构建, 我们采用了 kaniko.
镜像仓库我们选择了Docker Hub, 推送的时候需要使用 credentials.
先添加docker-registry类型的 secret:
kubectl create secret docker-registry dockerhub --docker-server=https://index.docker.io/v1/ --docker-username=<USERNAME> --docker-password=<PASSWORD>创建 ServiceAccount, 并指定上面创建的 secret
apiVersion: v1
kind: ServiceAccount
metadata:
  name: tekton-test
secrets:
  - name: dockerhub
执行 pipeline 的时候需要该ServiceAccount. (后面会提到)
执行:
kubectl apply -f tasks/source-to-image.yaml0x04 部署
deploy-to-k8s.yaml:
apiVersion: tekton.dev/v1alpha1
kind: Task
metadata:
  name: deploy-to-k8s
spec:
  inputs:
    resources:
      - name: git-source
        type: git
    params:
      - name: pathToYamlFile
        description: The path to the yaml file to deploy within the git source
        default: deployment.yaml
  steps:
    - name: run-kubectl
      image: lachlanevenson/k8s-kubectl
      command: ["kubectl"]
      args:
        - "apply"
        - "-f"
        - "/workspace/git-source/$(inputs.params.pathToYamlFile)"
说明:
pathToYamlFile: 指定部署应用的 yaml.
需要为上面创建的 ServiceAccount 添加分配权限用于对象的操作: 这里直接给了 admin clusterrole, 实际不需要对权限进行细分控制.
kubectl create clusterrolebinding pipeline-admin-binding --clusterrole=cluster-admin --serviceaccount=tekton-pipelines:tekton-test执行:
kubectl apply -f tasks/deploy-to-k8s.yaml0x05 组装流水线
build-pipeline.yaml
apiVersion: tekton.dev/v1alpha1
kind: Pipeline
metadata:
  name: build-pipeline
spec:
  resources:
    - name: git-source
      type: git
  params:
    - name: pathToContext
      description: The path to the build context, used by Kaniko - within the workspace
      default: .
    - name: imageUrl
      description: Url of image repository
    - name: imageTag
      description: Tag to apply to the built image
  tasks:
  - name: source-to-image
    taskRef:
      name: source-to-image
    params:
      - name: pathToContext
        value: "$(params.pathToContext)"
      - name: imageUrl
        value: "$(params.imageUrl)"
      - name: imageTag
        value: "$(params.imageTag)"
    resources:
      inputs:
        - name: git-source
          resource: git-source
  - name: deploy-to-k8s
    runAfter:
      - source-to-image
    taskRef:
      name: deploy-to-k8s
    params:
      - name: pathToYamlFile
        value: deployment.yaml
    resources:
      inputs:
        - name: git-source
          resource: git-source
执行:
kubectl apply -f tasks/deploy-to-k8s.yaml0x06 执行流水线
apiVersion: tekton.dev/v1alpha1
kind: PipelineRun
metadata:
  generateName: generic-pr-
  name: generic-pipeline-run
spec:
  pipelineRef:
    name: build-pipeline
  resources:
    - name: git-source
      resourceRef:
        name: git-source
  params:
    - name: imageUrl
      value: addozhang/tekton-test
    - name: imageTag
      value: latest
  serviceAccountName: tekton-test
执行:
kubectl apply -f run/run.yaml0x07结果
执行流水线后, 可以看到分别创建了下面的几个 pod:
generic-pipeline-run-source-to-image-ltcnh-pod-xxxxxgeneric-pipeline-run-deploy-to-k8s-lxmnh-pod-xxxxxtekton-test-xxxx-xxxx
就此我们完成了使用 Tekton 部署 Java 应用
做个端口转发:
kubectl port-forward <POD_NAME> 8080访问应用的/hi接口: curl http://localhost:8080/hi, 成功返回hello world
总结
目前 Tekton 还只是处于 alpha 阶段, 最新的版本是0.9.0. 提供的 Dashboard 也是比较简陋的, 后期会提供可视化的界面.
基于 CRD 的实现让 Tekton 在实际使用中可以灵活的设计自己的 CICD 流程.
接下来准备再写下Dashboard的安装, 及Triggers的入门.
文中的 Java 项目以及 tekton 的相关 yaml 都已经提交到了 tekton-test.
原文作者:云原生指北;如有侵权,请联系管理员删除。

最新文章
- 在 Cilium CNI 集群上运行 vCluster 虚拟集群
- 极空间 Z4 Pro 两个月使用体验分享
- K8sGPT+Ollama:免费的 Kubernetes 自动化诊断方案
- 使用 ZTM 增强极空间 NAS 的远程访问能力
- 使用 Cert Manager 自动管理 Kubernetes Gateway 证书
- Kubernetes Gateway API v1.1 解读
- 曲线救国:通过 OrbStack 在 Apple Silicon 平台搭建 K3s x86 集群
- 持续交付基金会发布最新的 CICD 趋势报告
- 抽丝剥茧:从 Linux 源码探索 eBPF 的实现
- 自定义 OpenTelemetry Collector 容器镜像
