前言
Smart-Doc 是一款强大的文档生成工具,可以帮助开发者轻松地为
Java 项目生成清晰、详细的 API 文档。随着
WebSocket 技术的普及,
Smart-Doc 在
3.0.7 版本开始也增加了对
WebSocket 接口的支持。本文将详细介绍如何使用
Smart-Doc 生成
Java WebSocket 接口的文档,并提供一个完整的
WebSocket 服务端示例。
WebSocket 技术概览
首先,让我们简单了解一下
WebSocket 技术。
WebSocket 协议提供了一个全双工通信通道,使得客户端和服务器之间的数据交换变得更加简单高效。在
Java 中,通过使用
JSR 356: Java API for WebSocket,开发者可以方便地实现
WebSocket 服务端和客户端。
WebSocket 注解简介
在
Java WebSocket 中,
@ServerEndpoint 注解用于将一个
POJO 类定义为
WebSocket 服务器端点。这个注解标记的方法可以在
WebSocket 事件(如连接建立、消息接收等)发生时被自动调用。除了
@ServerEndpoint 之外,还有其他几个与
WebSocket 相关的注解:
-
@OnOpen:当客户端与服务器建立 WebSocket 连接时,会触发带有此注解的方法。这个方法通常用于初始化资源或发送欢迎消息。 -
@OnMessage:当服务器收到来自客户端的消息时,会触发带有此注解的方法。这个方法负责处理接收到的消息并执行相应的操作。 -
@OnClose:当客户端关闭 WebSocket 连接时,会触发带有此注解的方法。这个方法通常用于释放资源或清理工作。 -
@OnError:如果在 WebSocket 通信过程中发生错误,会触发带有此注解的方法。这个方法负责处理错误情况,例如记录日志或通知用户。
Smart-Doc 简介
Smart-Doc 是一个基于
Java 的、轻量级的接口文档生成工具。它支持从源代码及注释中提取接口信息,自动生成
Markdown 格式的文档。对于
WebSocket 项目而言,这意味着你可以直接从你的
ServerEndpoint 类中提取文档,无需手动编写繁琐的文档说明。
配置 Smart-Doc 生成 WebSocket 接口文档
准备环境
确保您的开发环境中已经安装了以下组件:
- Java 17 或更高版本
- Maven 或 Gradle 作为构建工具
- Smart-Doc 最新版插件
- WebSocket 服务器实现库,如 jakarta.websocket
创建 WebSocket 服务端
添加插件依赖
在
pom.xml 文件中添加 Smart-Doc 依赖:
<plugins>
    <plugin>
        <groupId>com.ly.smart-doc</groupId>
        <artifactId>smart-doc-maven-plugin</artifactId>
        <version>[Latest version]</version>
        <configuration>
            <!--smart-doc-->
            <configFile>./src/main/resources/smart-doc.json</configFile>
            <!--Exclude jars that fail to load third-party dependent source code-->
        </configuration>
    </plugin></plugins>
创建 WebSocket 服务器端点
定义消息类型 (Message),Message 是一个简单的 POJO,用于表示从客户端接收到的消息。
public class Message { private String content; // getter and setter methods}
定义响应类型 (SampleResponse),SampleResponse 是一个简单的 POJO,用于表示要发送回客户端的响应消息。
public class SampleResponse { private String responseContent; // getter and setter methods}
实现消息解码器 (MessageDecoder),解码器负责将客户端发送的消息从 JSON 格式转换为 Message 对象。
public class MessageDecoder implements Decoder.Text<Message> {    private static final ObjectMapper objectMapper = new ObjectMapper();    @Override
    public Message decode(String s) throws DecodeException {        try {            return objectMapper.readValue(s, Message.class);
        } catch (Exception e) {            throw new DecodeException(s, "Unable to decode text to Message", e);
        }
    }    @Override
    public boolean willDecode(String s) {        return (s != null);
    }    @Override
    public void init(EndpointConfig endpointConfig) {
    }    @Override
    public void destroy() {
    }
}
实现响应编码器 (MessageResponseEncoder)
public class MessageResponseEncoder implements Encoder.Text<SampleResponse> {    private static final ObjectMapper objectMapper = new ObjectMapper();    @Override
    public String encode(SampleResponse response) {        try {            return objectMapper.writeValueAsString(response);
        } catch (Exception e) {            throw new RuntimeException("Unable to encode SampleResponse", e);
        }
    }    @Override
    public void init(EndpointConfig endpointConfig) {
    }    @Override
    public void destroy() {
    }
}
使用
ServerEndpoint 注解来创建一个简单的 WebSocket 服务器。
/**
 * WebSocket server endpoint example.
 */@Component@ServerEndpoint(value = "/ws/chat/{userId}",
        decoders = {MessageDecoder.class},
        encoders = {MessageResponseEncoder.class})
public class ChatEndpoint {    /**
     * Called when a new connection is established.
     *
     * @param session the client session
     * @param userId  the user ID
     */
    @OnOpen
    public void onOpen(Session session, @PathParam("userId") String userId) {        System.out.println("Connected: " + session.getId() + ", User ID: " + userId);
    }    /**
     * Called when a message is received from the client.
     *
     * @param message the message sent by the client
     * @param session the client session
     * @return the response message
     */
    @OnMessage
    public SampleResponse receiveMessage(Message message, Session session) {        System.out.println("Received message: " + message);        return new SampleResponse(message.getContent());
    }    /**
     * Called when the connection is closed.
     *
     * @param session the client session
     */
    @OnClose
    public void onClose(Session session) {        System.out.println("Disconnected: " + session.getId());
    }    /**
     * Called when an error occurs.
     *
     * @param session   the client session
     * @param throwable the error
     */
    @OnError
    public void onError(Session session, Throwable throwable) {        throwable.printStackTrace();
    }
}
配置 Smart-Doc
创建一个
smart-doc.json 配置文件,以便 Smart-Doc 知道如何生成文档。
{  "serverUrl": "http://smart-doc-demo:8080", // Set the server address, not required
  "outPath": "src/main/resources/static/doc" // Specify the output path of the document}
生成文档
在命令行中运行以下命令来生成文档:
mvn smart-doc:websocket-html
查看文档
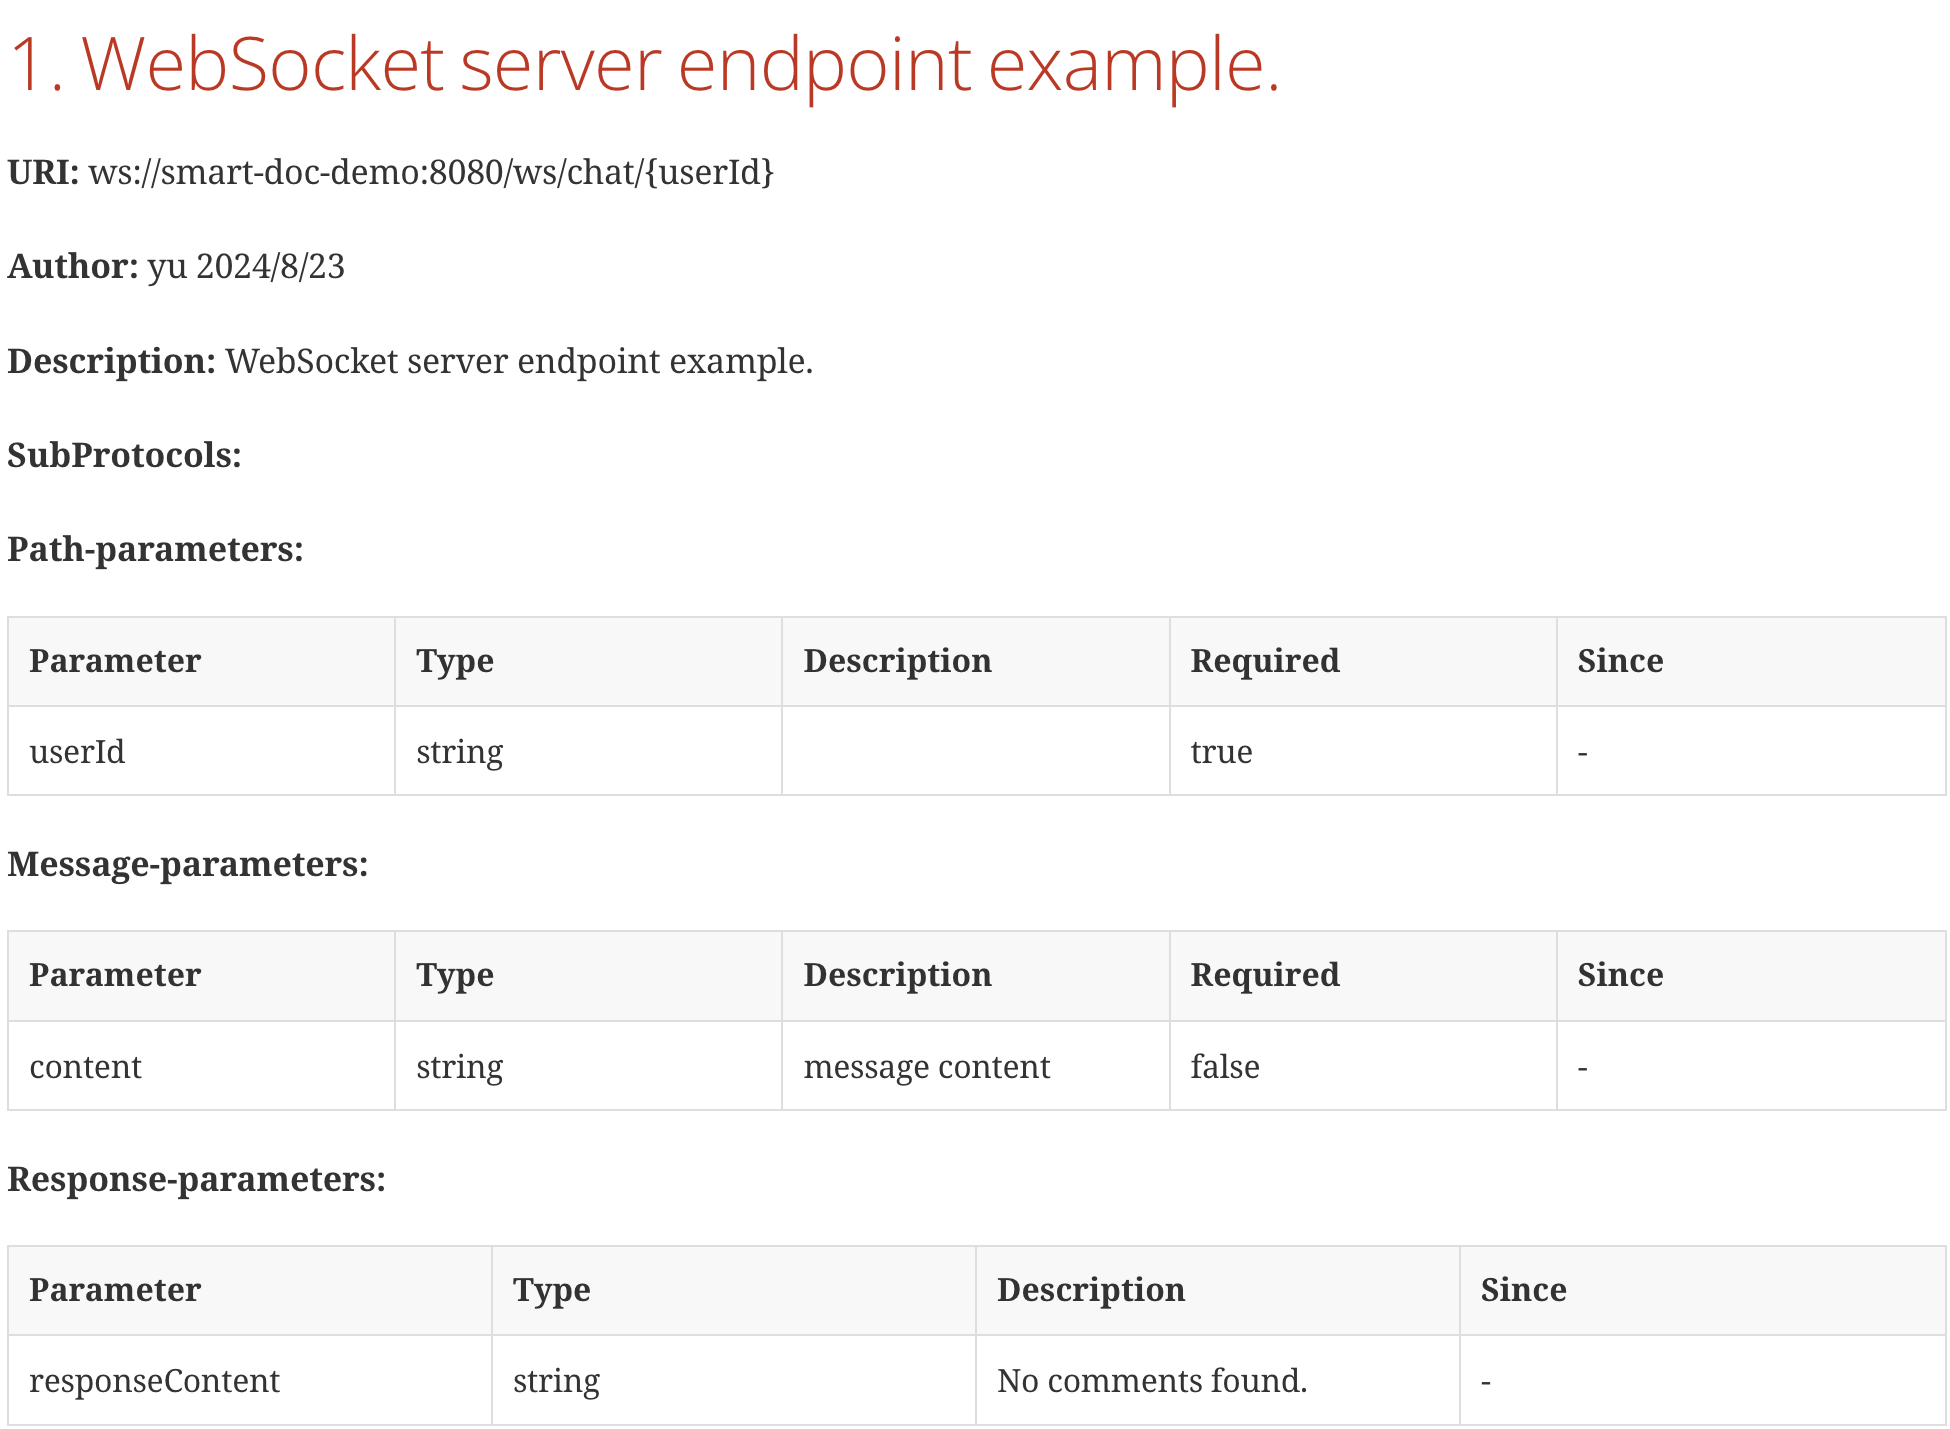
文档生成后,您可以在
src/main/resources/static/doc/websocket 目录中找到它。在浏览器中打开
websocket-index.html 文件即可查看 WebSocket API 文档。
总结
通过 Smart-Doc 自动生成 Java WebSocket 接口文档,不仅能节省大量的手工编写文档时间,还能保证文档的准确性和及时更新。实践证明,良好的文档管理策略能显著提升开发效率和代码质量。借助 Smart-Doc 这样的工具,你可以更加专注于 WebSocket 应用的开发,而不必担心文档的维护问题。
来自 “ ITPUB博客 ” ,链接:https://blog.itpub.net/70038450/viewspace-3026125/ ,如需转载,请注明出处,否则将追究法律责任。

