点击上方蓝字关注我们
前言
在上一章节中,壹哥 给大家讲解了如何在SpringBoot实现单个文件和多个文件上传,但是那种方式现在挺多项目中都不再采用了,而是会把文件上传到云存储服务器中,比如阿里云、腾讯云、华为云等。所以今天 壹哥 利用阿里云的OSS存储,讲解如何把本地文件存储到云存储服务器中,本文会教给你如何购买配置阿里云OSS,并且教你如何实现文件上传到云空间,干货满满哦。
一. 阿里云OSS简介
1. 存储服务简介
我们进行项目开发,很多时候都需要进行文件、图片等的上传,对于很多项目来说,虽然有FastDFS等文件存储服务器技术,但其实我们完全没有必要搭建自己的图片等文件服务器。对一个小型非专业的应用来说,搭建自己的专属文件存储服务器,完全就是浪费,而且也不一定有那样的实力。
但是我们项目中经常需要进行头像等其他文件的上传等操作,那么如何实现呢?
我推荐首选阿里云存储,便宜又靠谱。
阿里云提供了一个对象存储 OSS服务,可以实现海量、安全、低成本、高可靠的云存储服务,提供99.9999999999%的数据可靠性。并且使用RESTful API 可以在互联网任何位置存储和访问,容量和处理能力弹性扩展,多种存储类型供选择全面优化存储成本。
2. 购买阿里云OSS服务
首选搜索阿里云,选择第一个就是了。
然后选择云计算基础里的对象存储OSS产品。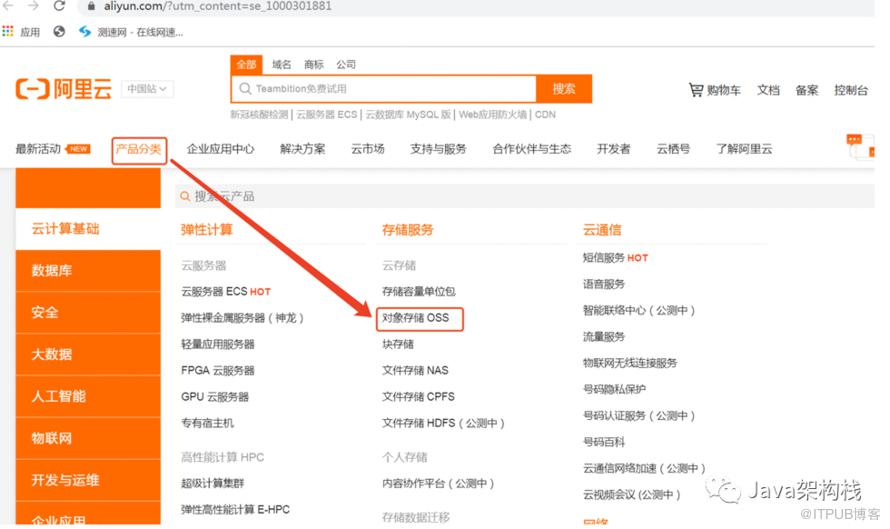
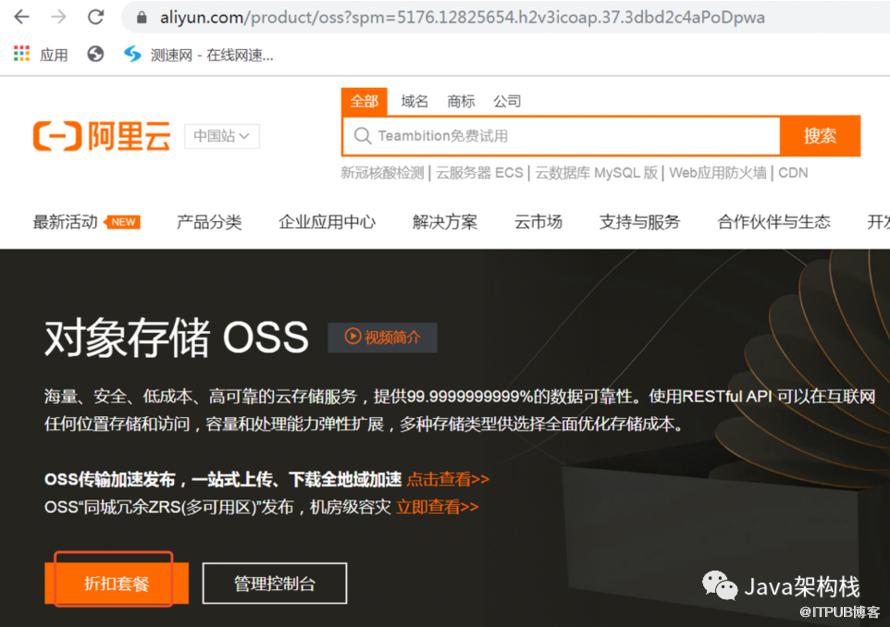
可以看到,40G的一年存储服务才9块钱,很便宜了,对于学习来说足够了。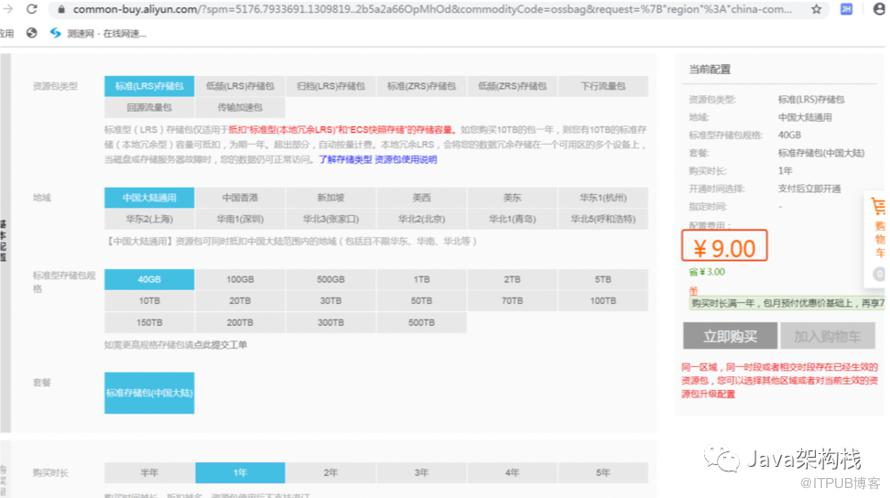
3. 阿里云OSS控制台简介
点击首页的控制台链接就可以进入后台。
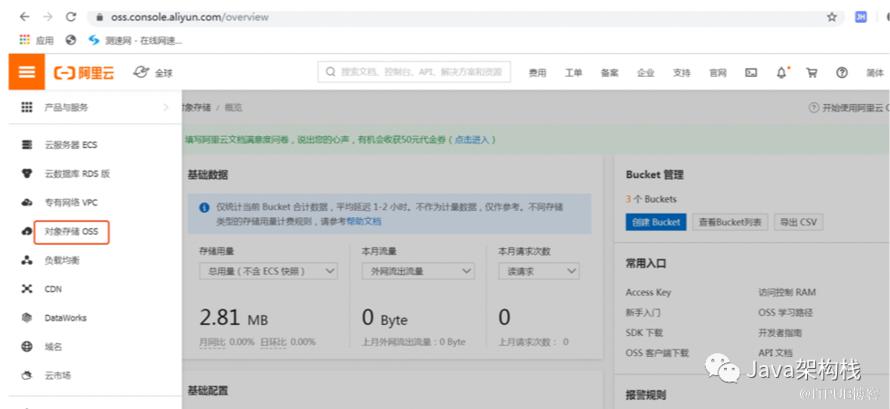
4. 创建Bucket桶空间
在这里创建一个Bucket桶,作为存储文件的空间。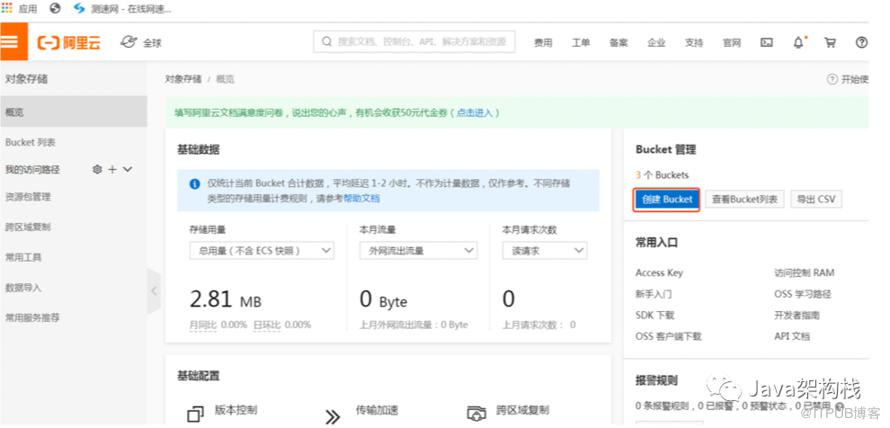
桶名不能重复。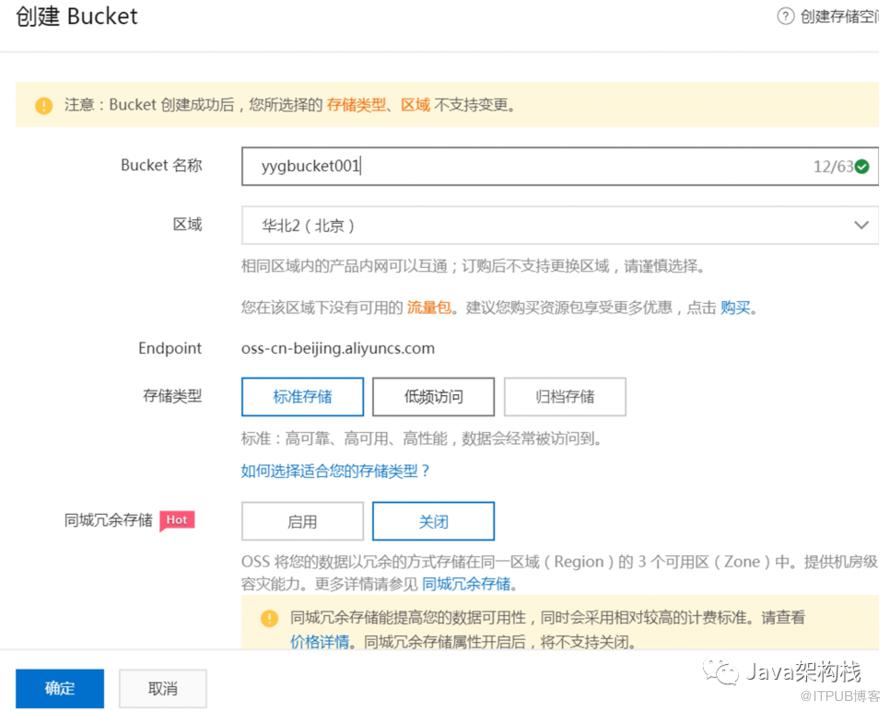
可以在自己的桶空间中创建子目录,用来存储不同项目或模块下的文件。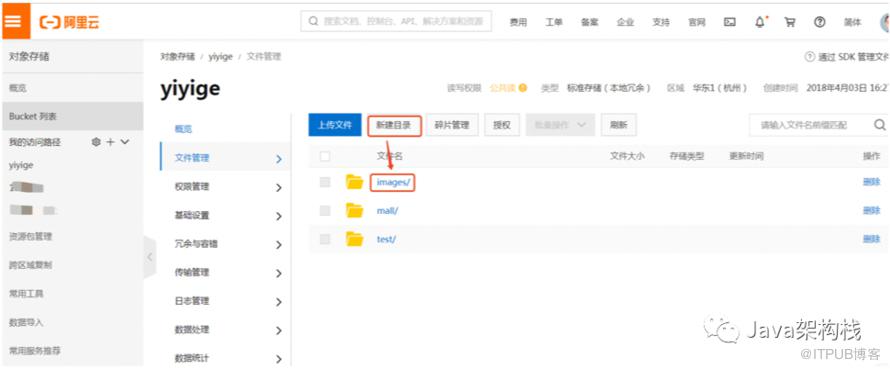
5. 设置桶空间访问权限
接下来要设置该目录的访问权限,可以设置为公共读。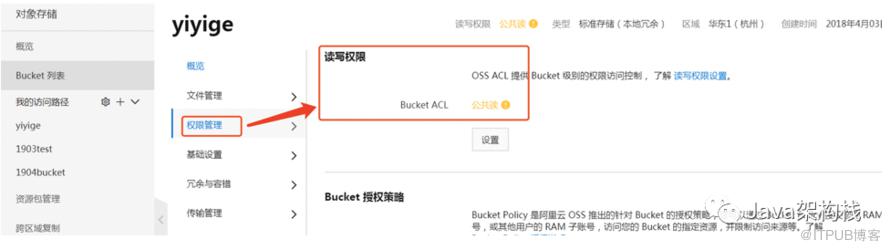
再设置一下该桶的授权策略。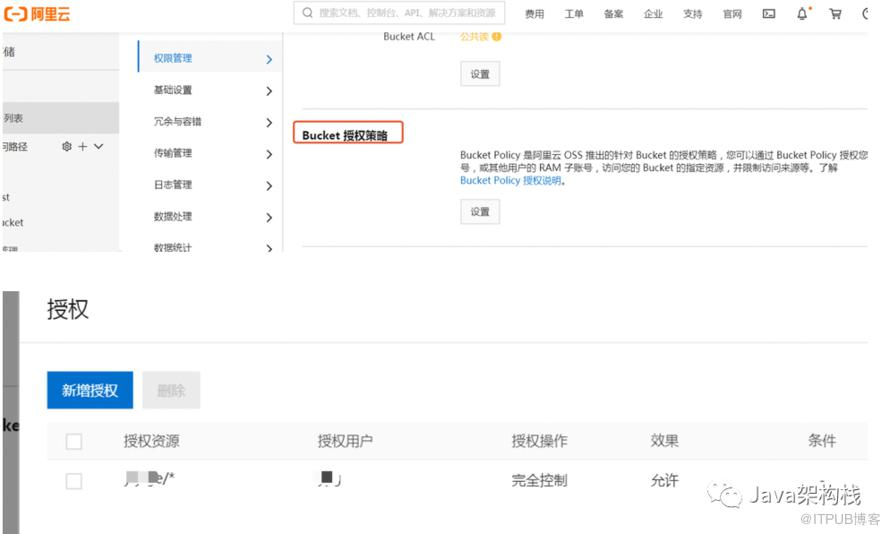
二. SpringBoot中实现OSS云存储
1. 创建Web项目
我们按照之前的经验,创建一个Web程序,并将之改造成Spring Boot项目,具体过程略。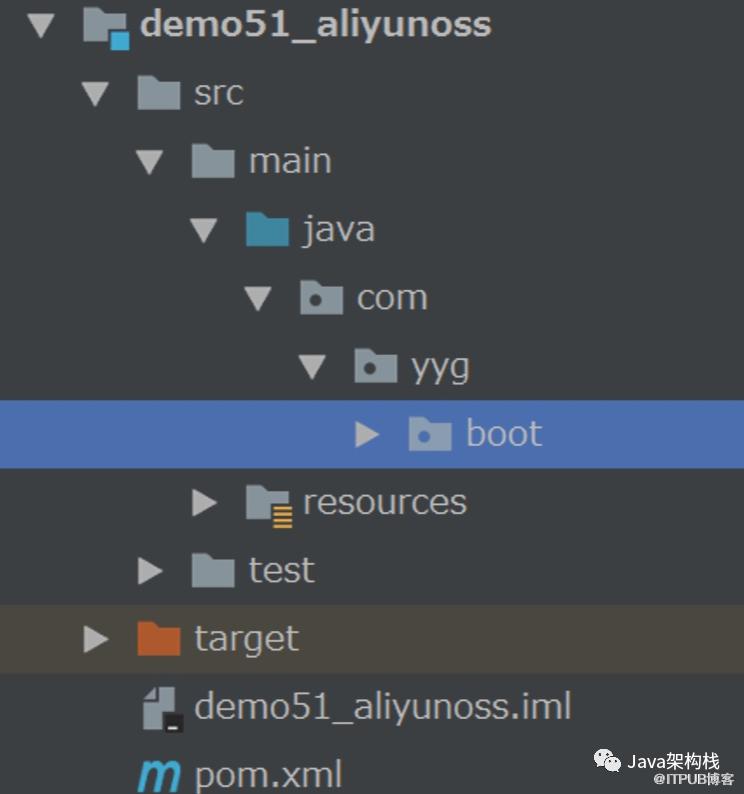
2. 添加依赖包
在项目中添加如下核心依赖包,比较重要的是web依赖和aliyun的依赖包。
			 <dependency>
            <groupId>org.springframework.boot</groupId>
            <artifactId>spring-boot-starter-web</artifactId>
        </dependency>

        <dependency>
            <groupId>org.springframework.boot</groupId>
            <artifactId>spring-boot-starter-test</artifactId>
            <scope>test</scope>
        </dependency>


        <dependency>
            <groupId>org.projectlombok</groupId>
            <artifactId>lombok</artifactId>
        </dependency>


        <dependency>
            <groupId>org.springframework.boot</groupId>
            <artifactId>spring-boot-starter-thymeleaf</artifactId>
        </dependency>


        <dependency>
            <groupId>com.aliyun.oss</groupId>
            <artifactId>aliyun-sdk-oss</artifactId>
            <version>2.8.3</version>
        </dependency>

        <dependency>
            <groupId>commons-fileupload</groupId>
            <artifactId>commons-fileupload</artifactId>
            <version>1.3.1</version>
			 </dependency>
3. 添加配置信息
我们可以在阿里云后台的如下位置,查看自己阿里云账号的AccessKey信息。
在这里复制自己的AccessKey ID与Secret信息,然后粘贴到自己的配置文件中。
请在application.properties或application.yml文件中添加如下格式的配置信息,重要的是把自己的AccessKey ID与Secret信息粘贴进来。
bucketName: "yiyige"
accessKeyId: "自己阿里云的accessKey"
accessKeySecret: "自己阿里云的accessKey"
#OSS对应的区域
endpoint: "http://oss-cn-hangzhou.aliyuncs.com"
filehost: "images"
4. 创建配置信息类
为了方便调用,我们封装一个配置信息类,后面就可以直接通过Get/Set方法来调用这些配置信息了。
package com.yyg.boot.config;

import lombok.Data;
import lombok.Getter;
import lombok.Setter;
import org.springframework.beans.factory.annotation.Value;
import org.springframework.context.annotation.Configuration;
import org.springframework.stereotype.Component;

/**
 * 把配置文件中的配置信息读取到该类中.
 */
@Data
@Configuration
public class OssConfiguration {

    @Value("${endpoint}")
    private String endPoint;

    @Value("${accessKeyId}")
    private String accessKeyId;

    @Value("${accessKeySecret}")
    private String accessKeySecret;

    @Value("${filehost}")
    private String fileHost;

    @Value("${bucketName}")
    private String bucketName;

}
5. 封装阿里云文件上传工具类
然后我这里封装了一个文件上传工具类,用于实现文件上传功能。
package com.yyg.boot.util;

import com.aliyun.oss.OSSClient;
import com.aliyun.oss.model.CannedAccessControlList;
import com.aliyun.oss.model.CreateBucketRequest;
import com.aliyun.oss.model.PutObjectRequest;
import com.aliyun.oss.model.PutObjectResult;
import com.yyg.boot.config.OssConfiguration;
import org.springframework.beans.factory.annotation.Autowired;
import org.springframework.stereotype.Component;

import java.io.File;
import java.text.SimpleDateFormat;
import java.util.Date;
import java.util.UUID;

/**
 * 封装文件上传方法
 */
@Component
public class AliyunOssUtil {

    @Autowired
    private OssConfiguration config;

    public String upload(File file) {
        if (file == null) {
            return null;
        }

        String endPoint = config.getEndPoint();
        String keyId = config.getAccessKeyId();
        String keySecret = config.getAccessKeySecret();
        String bucketName = config.getBucketName();
        String fileHost = config.getFileHost();

        //定义子文件的格式
        SimpleDateFormat format = new SimpleDateFormat("yyyy-MM-dd");
        String dateStr = format.format(new Date());

        //阿里云文件上传客户端
        OSSClient client = new OSSClient(endPoint, keyId, keySecret);

        try {
            //判断桶是否存在
            if (!client.doesBucketExist(bucketName)) {
                //创建桶
                client.createBucket(bucketName);
                CreateBucketRequest createBucketRequest = new CreateBucketRequest(bucketName);
                //设置访问权限为公共读
                createBucketRequest.setCannedACL(CannedAccessControlList.PublicRead);
                //发起创建桶的请求
                client.createBucket(createBucketRequest);
            }

            //当桶存在时,进行文件上传
            //设置文件路径和名称
            String fileUrl = fileHost + "/" + (dateStr + "/" + UUID.randomUUID().toString().replace("-", "") + "-" + file.getName());
            PutObjectResult result = client.putObject(new PutObjectRequest(bucketName, fileUrl, file));
            client.setBucketAcl(bucketName, CannedAccessControlList.PublicRead);

            //文件上传成功后,返回当前文件的路径
            if (result != null) {
                return fileUrl;
            }
        } catch (Exception e) {
            e.printStackTrace();
        } finally {
            if (client != null) {
                client.shutdown();
            }
        }

        return null;
    }

}
6. 编写Controller接口
接着再创建一个Controller文件上传接口,上传我们的文件到阿里云中。
package com.yyg.boot.web;

import com.yyg.boot.util.AliyunOssUtil;
import lombok.extern.slf4j.Slf4j;
import org.springframework.beans.factory.annotation.Autowired;
import org.springframework.stereotype.Controller;
import org.springframework.web.bind.annotation.GetMapping;
import org.springframework.web.bind.annotation.PostMapping;
import org.springframework.web.bind.annotation.RequestParam;
import org.springframework.web.multipart.MultipartFile;

import java.io.File;
import java.io.FileOutputStream;

@Controller
public class OssController {

    @Autowired
    private AliyunOssUtil ossUtil;

    @GetMapping("/")
    public String showUploadFile() {
        return "upLoad";
    }

    @PostMapping("/uploadFile")
    public String upload(@RequestParam("file") MultipartFile file) {
        try {
            if (file != null) {
                String fileName = file.getOriginalFilename();
                if (!"".equals(fileName.trim())) {
                    File newFile = new File(fileName);

                    FileOutputStream os = new FileOutputStream(newFile);
                    os.write(file.getBytes());
                    os.close();

                    //把file里的内容复制到奥newFile中
                    file.transferTo(newFile);
                    String upload = ossUtil.upload(newFile);

                    //图片回显地址:
                    //http://yiyige.oss-cn-hangzhou.aliyuncs.com/images/2019-10-21/6c964702b67d4eeb920e7f1f4358189b-dishu.jpg
                    System.out.println("path=" + upload);
                }
            }
        } catch (Exception e) {
            e.printStackTrace();
        }

        return "success";
    }

}
7. 编写文件上传页面
编写一个文件上传页面,请参考之前的章节实现。
<!DOCTYPE html>
<html xmlns="http://www.w3.org/1999/xhtml" xmlns:th="http://www.thymeleaf.org" >
<head>
    <meta charset="UTF-8"/>
    <title>【基于OSS的上传文件页面】</title>
    <link rel="stylesheet" th:href="@{/css/bootstrap.min.css}"  media="all"/>
    <style type="text/css">
        *{
            margin:0;
            padding:0;
        }
        #group{
            position: absolute;
            left:580px;
        }
        #submit{
            position: absolute;
            top:140px;
            left:580px;
        }
    </style>
</head>
<body>
<div align="center">
    <h2 style="color:orangered;">基于OSS的上传文件页面</h2>
</div>
<br/>
<form action="/uploadFile" enctype="multipart/form-data" method="post">
    <div class="form-group" id="group">
        <label for="exampleInputFile">File input</label>
        <input type="file" id="exampleInputFile" name="file"/>
    </div>
    <button type="submit" class="btn btn-default" id="submit">上传</button>
</form>
</body>
</html>
8. 文件上传成功界面
为了看得文件上传的结果,我这里编写了一个文件上传成功后要跳转到的界面。
<!DOCTYPE html>
<html xmlns="http://www.w3.org/1999/xhtml" xmlns:th="http://www.thymeleaf.org" >
<head>
    <meta charset="UTF-8"/>
    <title>【文件上传成功页面】</title>
</head>
<body>
<div align="center">
    <h5>上传成功</h5>
</div>
</body>
</html>
9. 编写入口类
最后我们编写一个项目的入口类,启动项目。
package com.yyg.boot;

import org.springframework.boot.SpringApplication;
import org.springframework.boot.autoconfigure.SpringBootApplication;

@SpringBootApplication
public class OssApplication {

    public static void main(String[] args) {
        SpringApplication.run(OssApplication.class, args);
    }

}
10. 进行测试
把项目启动起来进行测试,这里我们首先进入到文件上传界面,选择一个文件进行上传,正常情况下会发现文件上传成功的提示。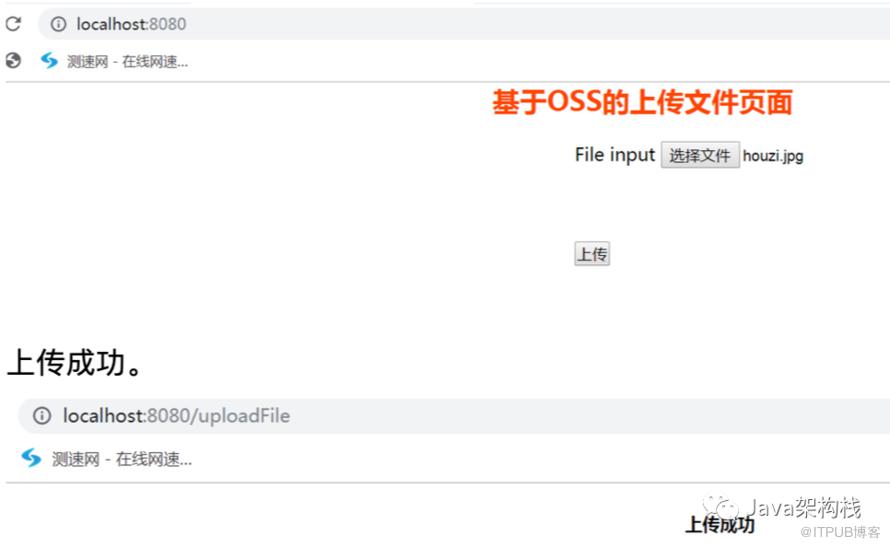
打开控制台,可以看到阿里云OSS服务器端返回的图片存储路径。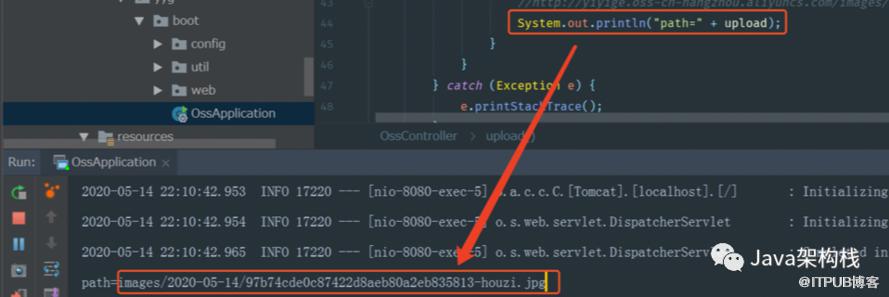
然后我们可以在阿里云服务器上,看到会自动以当天的日期创建的一个文件夹,这里存放的就是刚才上传的文件。
在这个文件夹里我们可以看到刚才上传的图片文件。
结语
至此,壹哥 就把阿里云OSS的使用给大家介绍完了,以后你可以把你的私密文件上传到自己的云服务器哦,这样就不用担心会被人盗走了,当然请一定要记得权限配置好,😋。
今天的内容你学会了吗?评论区告诉我吧!
今日小作业
在自己的学生信息管理系统中,把自己的靓照上传存储的阿里云OSS里。

点击【阅读全文】,锋迷商城项目免费学
原文作者:Java架构栈;如有侵权,请联系管理员删除。

