模板是 Walrus 的核心功能之一,模板创建完成后用户可以重复使用,并在使用过程中逐渐沉淀研发和运维团队的实践,进一步简化服务及资源的部署。用户可以使用 HCL 语言自定义创建模板,也可以一键复用 Terraform 社区中上万个成熟的 Module。在本文中,我们将以阿里云 EC2 为例,介绍如何创建 Walrus 阿里云 EC2 模板并使用它在阿里云上创建 ECS 实例服务。
前提条件
- 一个用于存储模板的 GitHub 仓库。
- 部署 Walrus(
https://seal-io.github.io/docs/zh/deploy/standalone)。
在 GitHub 上创建仓库
-
在 GitHub 上创建你自己的新仓库,这里我们使用仓库 demo( https://github.com/walrus-catalog-demo/demo)
-
将仓库克隆到你的本机。
git clone git@github.com:walrus-catalog-demo/demo.git
创建模板文件
- 进入克隆的仓库目录。
cd demo
在目录中创建如下文件:
- demo - main.tf - outputs.tf - variables.tf - README.md
main.tf文件定义了要创建的资源,这里我们为模板定义了一个阿里云 ECS 实例的资源。
resource "alicloud_instance" "example" {
  instance_name        = "demo-instance"
  instance_type        = var.instance_type
  image_id             = var.image_id
  system_disk_category = var.system_disk_category
  system_disk_size     = var.system_disk_size
  internet_charge_type = var.internet_charge_type
  internet_max_bandwidth_out = var.internet_max_bandwidth_out
  vswitch_id = data.alicloud_vswitches.default.vswitches.0.id
  host_name = var.hostname
  key_name = "seal-demo"
  security_groups = [
    data.alicloud_security_groups.default.groups.0.id
  ]
}
data "alicloud_vpcs" "default" {
  name_regex = "default"}
data "alicloud_vswitches" "default" {
  vpc_id = data.alicloud_vpcs.default.vpcs.0.id
}
data "alicloud_security_groups" "default" {
  name_regex = "default"}
resource "null_resource" "health_check" {
  depends_on = [
    alicloud_instance.example,
  ]
}
variables.tf文件定义了模板中使用的变量,Walrus 将使用这些变量为用户生成模板填写表单。
Walrus 通过
@label和
@group注释来定义变量的标签和组。可选的
@options 注释用于定义变量的下拉选项, 如果没有定义
@options注释,则该变量将在表单中显示为文本框。关于模板变量注释的更多详细信息可以在此链接(
https://seal-io.github.io/docs/zh/operation/template#variable-style-extension)查看。
在这个例子中,我们定义了两个组:
基础和
较好
,它们将在创建服务的模板表单中以两个选项卡的形式显示。
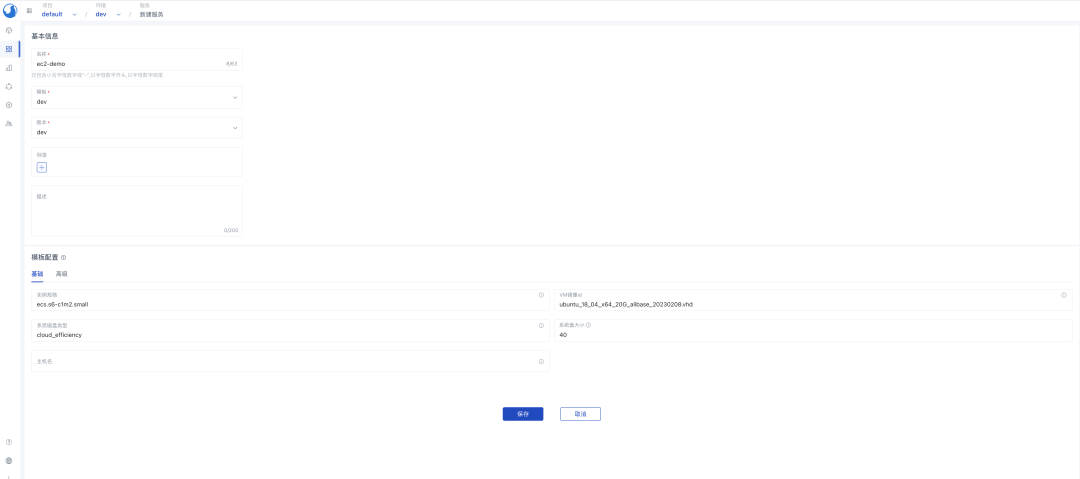
# @label "实例规格"# @group "基础"variable "instance_type" {
  description = "The instance type of the ECS instance"
  default     = "ecs.s6-c1m2.small"}
# @label "VM镜像id"# @group "基础"variable "image_id" {
  description = "The ID of the image used to launch the ECS instance"
  default     = "ubuntu_18_04_x64_20G_alibase_20230208.vhd"}
# @label "系统磁盘类型"# @group "基础"# @options ["ephemeral_ssd", "cloud_efficiency", "cloud_ssd", "cloud_essd", "cloud", "cloud_auto"]
variable "system_disk_category" {
  description = "The category of the system disk"
  default     = "cloud_efficiency"}
# @label "系统盘大小"# @group "基础"variable "system_disk_size" {
  description = "The size of the system disk, value range: [20, 500]"
  default     = 40}
# @label "主机名"# @group "基础"variable "hostname" {  type        = string
  description = "The hostname of the ECS instance"
  default     = ""}
# @label "网络计费类型"# @group "较好"# @options ["PayByTraffic", "PayByBandwidth"]
variable "internet_charge_type" {
  description = "The billing method of the public network bandwidth"
  default     = "PayByTraffic"}
# @label "最大出口带宽(MB)"# @group "较好"variable "internet_max_bandwidth_out" {
  description = "The maximum outbound bandwidth of the public network"
  default     = 5}
outputs.tf文件定义了模板的输出,它们将在服务创建后作为服务的输出参数查看,并且可以被其他服务引用。
output "public_ip" {
  value = alicloud_instance.example.public_ip
}output "primary_ip_address" {
  value = alicloud_instance.example.primary_ip_address
}
README.md文件是模板的描述。在使用此模板创建服务时,我们可以在模板详情页面查看该模板的具体功能参数及定义。这里我们可以使用工具 terraform-docs来生成模板的描述。
terraform-docs markdown . > README.md
生成的
README.md文件如下:
## RequirementsNo requirements.## Providers| Name | Version |
|------|---------|
| <a name="provider_alicloud"></a> [alicloud](#provider\_alicloud) | n/a || <a name="provider_null"></a> [null](#provider\_null) | n/a |## ModulesNo modules.## Resources| Name | Type |
|------|------|
| [alicloud_instance.example](https://registry.terraform.io/providers/hashicorp/alicloud/latest/docs/resources/instance) | resource |
| [null_resource.health_check](https://registry.terraform.io/providers/hashicorp/null/latest/docs/resources/resource) | resource |
| [alicloud_security_groups.default](https://registry.terraform.io/providers/hashicorp/alicloud/latest/docs/data-sources/security_groups) | data source |
| [alicloud_vpcs.default](https://registry.terraform.io/providers/hashicorp/alicloud/latest/docs/data-sources/vpcs) | data source |
| [alicloud_vswitches.default](https://registry.terraform.io/providers/hashicorp/alicloud/latest/docs/data-sources/vswitches) | data source |## Inputs| Name | Description | Type | Default | Required |
|------|-------------|------|---------|:--------:|
| <a name="input_hostname"></a> [hostname](#input\_hostname) | The hostname of the ECS instance | `string` | `""` | no || <a name="input_image_id"></a> [image\_id](#input\_image\_id) | The ID of the image used to launch the ECS instance | `string` | `"ubuntu_18_04_x64_20G_alibase_20230208.vhd"` | no || <a name="input_instance_type"></a> [instance\_type](#input\_instance\_type) | The instance type of the ECS instance | `string` | `"ecs.s6-c1m2.small"` | no || <a name="input_internet_charge_type"></a> [internet\_charge\_type](#input\_internet\_charge\_type) | The billing method of the public network bandwidth | `string` | `"PayByTraffic"` | no || <a name="input_internet_max_bandwidth_out"></a> [internet\_max\_bandwidth\_out](#input\_internet\_max\_bandwidth\_out) | The maximum outbound bandwidth of the public network | `number` | `5` | no || <a name="input_system_disk_category"></a> [system\_disk\_category](#input\_system\_disk\_category) | The category of the system disk | `string` | `"cloud_efficiency"` | no || <a name="input_system_disk_size"></a> [system\_disk\_size](#input\_system\_disk\_size) | The size of the system disk, value range: [20, 500] | `number` | `40` | no |## Outputs| Name | Description |
|------|-------------|
| <a name="output_primary_ip_address"></a> [primary\_ip\_address](#output\_primary\_ip\_address) | n/a || <a name="output_public_ip"></a> [public\_ip](#output\_public\_ip) | n/a |
提交模板版本
git add .
git commit -m "add template files"
git push -u origin main
为模板创建一个标签作为版本。
git tag v0.0.1git push --tags
在 Walrus 上创建模板
-
在浏览器中打开 Walrus 并登录。
-
转到
运维中心下的模板管理,使用我们刚刚创建的模板新建一个模板,这里我们将模板命名为aliyun-ec2。

导入任务完成后,模板将显示在模板列表中,我们可以看到模板版本为刚刚创建的版本
v0.0.1。

-
在
运维中心的连接器下添加阿里云连接器。 -
配置阿里云连接器到环境.
-
使用模板
aliyun-ec2创建一个服务, 表单组和标签的渲染是根据上述模板中定义的变量注释自动生成的。
服务创建后,我们可以看到服务的详情和模板的输出
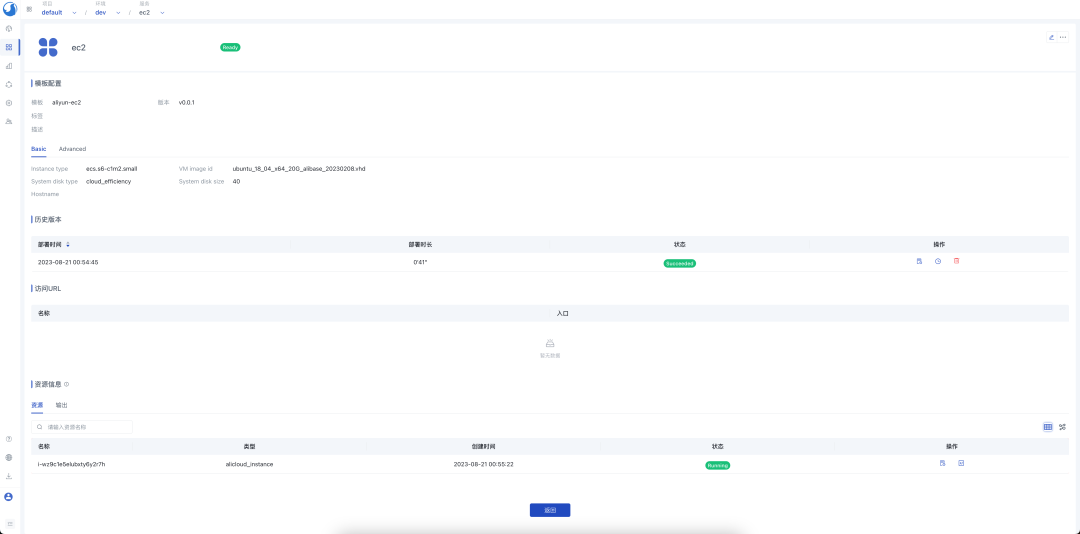
在阿里云控制台检查 ECS 实例,我们可以看到 ECS 实例已成功创建。

来自 “ ITPUB博客 ” ,链接:https://blog.itpub.net/70026925/viewspace-2996480/ ,如需转载,请注明出处,否则将追究法律责任。

