帐户标识EOSIO区块链中的参与者,要使用EOSIO区块链,首先需要创建一个帐户。然后可以将智能合约部署到该帐户,并使用其他帐户权限来授权智能合约交易。本教程详细介绍了eosio.system智能合约中的账户和权限模块,适用于EOS智能合约的初级开发人员,熟悉如何进行账户的创建、短账户的竞标,以及自定义权限的创建、链接、取消链接、删除等。
01 概述
(一)账户简介
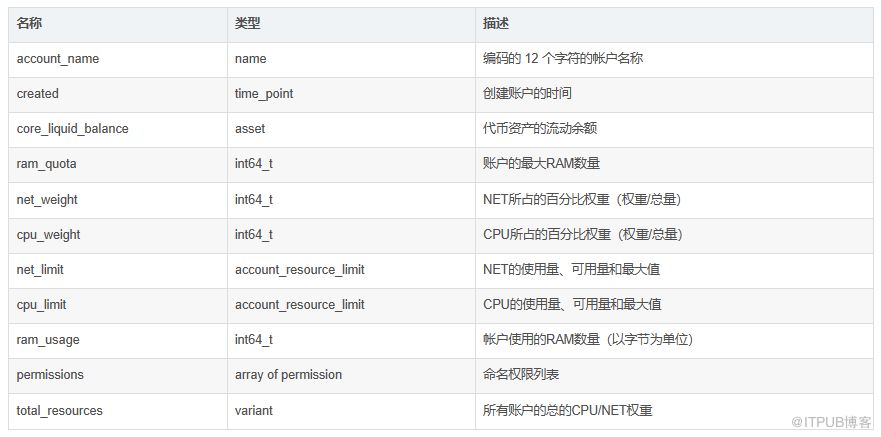
EOSIO帐户是由12个字符组成,仅包含小写字母a-z和数字1-5。每个账户的所有权仅由账户名称决定,因此一个帐户可以更新其密钥,而不必将它们重新分发给其他方。除了账户名,账户实例还与其他字段相关联,例如创建时间、ram配额/使用、cpu/net限制/权重等(如下图)。与此同时,每个帐户都拥有独立的命名权限列表,通过灵活的权限结构使单用户或多用户授权成为可能。
(二)短账户竞拍
通常情况下,EOSIO帐户是由12个字符组成,仅包含小写字母a-z和数字1-5。我们在各大钱包注册账户的时候,也只能注册12位的账户地址。不过,EOSIO系统中是有短账户存在的。根据EOSIO账户名的格式限制,小于12位的账户必须启用竞拍机制。我们可以在EOSIO系统中进行【账户竞拍】,例如:a/com/cn/eos/1等短账户。假如我们竞拍到账户【a】,就可以创建任何以【.a】为后缀的所有账户,如:a.a/bb.a/111.a等。
(三)权限简介
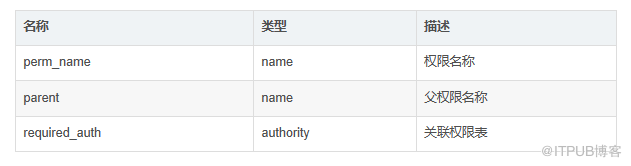
通过权限可以控制EOSIO帐户允许做什么,以及如何进行授权操作。这是由一个灵活的权限结构来实现的,该结构将每个帐户链接到一个分层命名权限列表,并将每个命名权限链接到一个权限表(如下图)。EOSIO中允许分层权限级别,例如图中parent字段将命名权限级别链接到其父权限。
(四)权限级别
命名权限可以在另一个权限下创建,从而允许分层的父子权限结构。每个账户在创建时,默认会生成两个命名权限:owner和active,其中owner是acive的父权限。当然,这也可以通过添加其他权限级别和层次结构来自定义。
1、Owner权限
owner权限位于每个帐户权限层次结构的根部,是帐户在其权限结构中可以拥有的最高相对权限。尽管owner权限可以执行较低级别权限可以执行的任何操作,但它通常用于在较低级别权限遭到破坏时进行恢复。因此,与owner权限关联的密钥通常保存在冷藏库中,不用于签署常规操作。
2、Active权限
active权限位于层次结构中owner权限的下一级,在当前的EOSIO实现中,是链接到所有操作的隐式默认权限。因此,除了更改与owner关联的密钥外,active权限可以执行owner权限可以执行的任何操作。一般情况下,active权限可以用于投票、转账等账户操作。
3、自定义权限
自定义权限是EOSIO帐户自行创建的任意命名权限,通常作为owner,active或其他自定义权限的子权限。自定义权限需要指定公私钥对,可以链接到智能合约操作,同时指定执行该操作所需的权限。通过EOSIO账户和权限结构,可以对智能合约操作进行灵活且精细的控制。
02 账户的操作
(一)准备工作
1、一条正在运行且可访问的区块链
中移链(基于EOS)测试环境搭建 :
https://mp.weixin.qq.com/s/NBNFk9Xk9FCukMVgl0tfHA
2、确保本地钱包已打开并解锁
如何创建钱包 :
https://developers.eos.io/manuals/eos/latest/cleos/how-to-guides/how-to-create-a-wallet
3、已完成eosio.contracts的构建和部署
如何构建eosio.contracts :
https://developers.eos.io/manuals/eosio.contracts/latest/build-and-deploy
(二)创建账户
1、创建密钥对
第一种方式: 创建公钥/私钥对并将它们打印到控制台,其中--to-console=将密钥对打印到控制台的选项参数。
cleos create key --to-console
# 示例输出:
Private key: 5JX5oYkHjLBqdQLy7ofDfz4MFzYkMzvLwnJYaFpKbcsuiTQiPjv
Public key: EOS66tp9fQ6kYGQ6kJzt8goLmvvMY7Xmb2u1HFer3PScPahbSjqpt
第二种方式: 创建公钥/私钥对并将其保存到文件中,其中--file=将密钥对保存到文件的选项参数。
cleos create key --file pw.txt
cat pw.txt
# 示例输出:
Private key: 5JW1NqFovGTo9wX3MLJAWWFP7PhMH82jcr2c5DKcky64ZgV6LQJ
Public key: EOS5sbzsWwmDPcW64nmYiGpjAhQj4i7XCz6bznr5TZ73VAKWFg6C2
2、创建一个账户
初始化系统合约之前: 运行以下命令创建新帐户bob,其中eosio=授权创建新账户的系统账户,bob=符合账户命名规范的新账户名称,EOS87TQ...AoLGNN=新帐户的owner公钥,此时不需要初始化NET、CPU、RAM等资源。
cleos create account eosio bob EOS87TQktA5RVse2EguhztfQVEh6XXxBmgkU8b4Y5YnGvtYAoLGNN
# 示例输出:
executed transaction: 4d65a274de9f809f9926b74c3c54aadc0947020bcfb6dd96043d1bcd9c46604c  200 bytes  166 us
#         eosio <= eosio::newaccount            {"creator":"eosio","name":"bob","owner":{"threshold":1,"keys":[{"key":"EOS87TQktA5RVse2EguhztfQVEh6X...
warning: transaction executed locally, but may not be confirmed by the network yet ]初始化系统合约之后:运行以下命令创建新帐户testaccount1,eosio=授权创建新账户的系统账户,testaccount1=符合账户命名规范的新账户名称,EOS7TBG...wsq6kT=新帐户的owner公钥,EOS5sbz...WFg6C2=新帐户的active公钥,--stake-net=质押的NET资源(单位:SYS),--stake-cpu=质押的CPU资源(单位:SYS),--buy-ram-kbytes=购买的RAM资源(单位:KB)。
cleos system newaccount eosio testaccount1 EOS7TBGFys7sqAEWjvsHnUS8KKymCVmYAKq4NMAFPZMyEV2wsq6kT EOS5sbzsWwmDPcW64nmYiGpjAhQj4i7XCz6bznr5TZ73VAKWFg6C2 --stake-net '1.00 SYS' --stake-cpu '1.00 SYS' --buy-ram-kbytes 1024
# 示例输出:
executed transaction: 1dec3d4ea7203ef0d9d29fb8734aa78770848c0867b1d331382922b0c2534e9a  336 bytes  1795 us
#         eosio <= eosio::newaccount            {"creator":"eosio","name":"testaccount1","owner":{"threshold":1,"keys":[{"key":"EOS7TBGFys7sqAEWjvsH...
#         eosio <= eosio::buyrambytes           {"payer":"eosio","receiver":"testaccount1","bytes":1048576}
#         eosio <= eosio::delegatebw            {"from":"eosio","receiver":"testaccount1","stake_net_quantity":"1.0000 SYS","stake_cpu_quantity":"1....
#   eosio.token <= eosio.token::transfer        {"from":"eosio","to":"eosio.ram","quantity":"15.3005 SYS","memo":"buy ram"}
#   eosio.token <= eosio.token::transfer        {"from":"eosio","to":"eosio.ramfee","quantity":"0.0769 SYS","memo":"ram fee"}
#         eosio <= eosio.token::transfer        {"from":"eosio","to":"eosio.ram","quantity":"15.3005 SYS","memo":"buy ram"}
#     eosio.ram <= eosio.token::transfer        {"from":"eosio","to":"eosio.ram","quantity":"15.3005 SYS","memo":"buy ram"}
#         eosio <= eosio.token::transfer        {"from":"eosio","to":"eosio.ramfee","quantity":"0.0769 SYS","memo":"ram fee"}
#  eosio.ramfee <= eosio.token::transfer        {"from":"eosio","to":"eosio.ramfee","quantity":"0.0769 SYS","memo":"ram fee"}
#   eosio.token <= eosio.token::transfer        {"from":"eosio","to":"eosio.stake","quantity":"2.0000 SYS","memo":"stake bandwidth"}
#         eosio <= eosio.token::transfer        {"from":"eosio","to":"eosio.stake","quantity":"2.0000 SYS","memo":"stake bandwidth"}
#   eosio.stake <= eosio.token::transfer        {"from":"eosio","to":"eosio.stake","quantity":"2.0000 SYS","memo":"stake bandwidth"}
warning: transaction executed locally, but may not be confirmed by the network yet         ]
03 权限的操作
(一)准备工作
1、一个名为testaccount2的帐户,以及控制此帐户的密钥存储在本地钱包中。
2、一个名为testscholder的帐户,以及控制此帐户的密钥存储在本地钱包中。
3、一个名为hello的智能合约已部署到testscholder帐户。
// 这个智能合约有三个动作:what(eosio::name user)、why(eosio::name user)、how(eosio::name user)。
#include <eosio/eosio.hpp>
class [[eosio::contract]] hello :
public eosio::contract {  public:
    using eosio::contract::contract;
    [[eosio::action]] void what( eosio::name user ) {
         print( "hi, what do you want ", user);
    }
    [[eosio::action]] void why( eosio::name user ) {
      print( "why not ", user);
    }
    [[eosio::action]] void how( eosio::name user ) {
      print( "how are you ", user);
    }
};
(二)创建自定义权限
1、使用命令cleos set account permission在testaccount2账户上创建自定义权限customp1,父级是active权限。
cleos set account permission testaccount2 customp1 EOS5DQMoqswknpe5qXsMt3M4su1wK38Mj7Rzc5jxs1Ak5jq7BF623 active -p testaccount2@active
# 示例输出:
executed transaction: 6eda9c3cde793064eea900800f892d55891ddf6f2427d97f41943666c40219b9  160 bytes  184 us
#         eosio <= eosio::updateauth            {"account":"testaccount2","permission":"customp1","parent":"active","auth":{"threshold":1,"keys":[{"...
warning: transaction executed locally, but may not be confirmed by the network yet         ]
2、使用同样命令在testaccount2账户上创建自定义权限customp2,父级是customp1权限。
cleos set account permission testaccount2 customp2 EOS5DQMoqswknpe5qXsMt3M4su1wK38Mj7Rzc5jxs1Ak5jq7BF623 customp1 -p testaccount2@active# 示例输出:executed transaction: 4d65bbbf6a3e5711be413994c59ad1744bf3ca5ff4b678a98a7e002556564188 160 bytes 221 us# eosio <= eosio::updateauth {"account":"testaccount2","permission":"customp2","parent":"customp1","auth":{"threshold":1,"keys":[...warning: transaction executed locally, but may not be confirmed by the network yet3、您可以在不指定父级的情况下创建自定义权限,这将默认以active权限为父级。
cleos set account permission testaccount2 customp3 EOS5DQMoqswknpe5qXsMt3M4su1wK38Mj7Rzc5jxs1Ak5jq7BF623 -p testaccount2@active
# 示例输出:
executed transaction: aa1bcef2a8db09111160b5d393797b4252ac5909c4dbb1881af846f44b887491  160 bytes  208 us
#         eosio <= eosio::updateauth            {"account":"testaccount2","permission":"customp3","parent":"active","auth":{"threshold":1,"keys":[{"...
warning: transaction executed locally, but may not be confirmed by the network yet         ]
(三)链接自定义权限
拥有自定义权限后,您可以将此自定义权限链接到智能合约操作,需要该权限级别或更高 级别的授权才能执行操作。下面将两个自定义权限customp1和customp2链接到两个操作what和how。customp1能够调用what以及how 。权限customp1是customp2的父级,因此能够调用customp2可以调用的任何内容。customp2能够调用how。下面通过使用权限去调用智能合约操作来测试这一点。
1、使用命令cleos set action permission将自定义权限customp1链接到what操作。
cleos set action permission testaccount2 testscholder what customp1 -p testaccount2@active
# 示例输出:
executed transaction: 975d6d88f1324e431db49a9ec86e86b70ea733bdf4a7415266dac4de1614e7c9  128 bytes  19436 us
#         eosio <= eosio::linkauth              {"account":"testaccount2","code":"testscholder","type":"what","requirement":"customp1"}
warning: transaction executed locally, but may not be confirmed by the network yet         ]
2、使用命令cleos set action permission将自定义权限customp2链接到how操作。
cleos set action permission testaccount2 testscholder how customp2 -p testaccount2@active
# 示例输出:
executed transaction: 74b7f0da804413fe6200d1501f82bf4804a973e89395084ec529dbe8463c115e  128 bytes  227 us
#         eosio <= eosio::linkauth              {"account":"testaccount2","code":"testscholder","type":"how","requirement":"customp2"}
warning: transaction executed locally, but may not be confirmed by the network yet         ]
3、使用customp1权限分别调用操作why、what、how,可以成功调用what和how动作,但无法调用why动作。
cleos push action testscholder why '["name"]' -p testaccount2@customp1
# 示例输出:
Error 3090005: Irrelevant authority included
Please remove the unnecessary authority from your action!
Error Details:
action declares irrelevant authority '{"actor":"testaccount2","permission":"customp1"}'; minimum authority is {"actor":"testaccount2","permission":"active"}
cleos push action testscholder what '["name"]' -p testaccount2@customp1
# 示例输出:
executed transaction: 2e4d6008abb95441bbb4e2458d09e697a87d6d4e31deede86b445d8f9e7b6c26  104 bytes  228 us
#  testscholder <= testscholder::what           {"user":"name"}
>> hi, what do you want name
warning: transaction executed locally, but may not be confirmed by the network yet         ]
cleos push action testscholder how '["name"]' -p testaccount2@customp1
# 示例输出:
executed transaction: b3d0c8d381952c28df4bca6a9f4bd39439abc0f28ce9c0fc8a3e0621f6aa8ce6  104 bytes  173 us
#  testscholder <= testscholder::how            {"user":"name"}
>> how are you name
warning: transaction executed locally, but may not be confirmed by the network yet         ]
4、使用customp2权限分别调用操作why、what、how,可以成功调用how动作,但无法调用why和what动作。
cleos push action testscholder why '["name"]' -p testaccount2@customp2
# 示例输出:
Error 3090005: Irrelevant authority included
Please remove the unnecessary authority from your action!
Error Details:
action declares irrelevant authority '{"actor":"testaccount2","permission":"customp2"}'; minimum authority is {"actor":"testaccount2","permission":"active"}
cleos push action testscholder what '["name"]' -p testaccount2@customp2
# 示例输出:
Error 3090005: Irrelevant authority included
Please remove the unnecessary authority from your action!
Error Details:
action declares irrelevant authority '{"actor":"testaccount2","permission":"customp2"}'; minimum authority is {"actor":"testaccount2","permission":"customp1"}
cleos push action testscholder how '["name"]' -p testaccount2@customp2
# 示例输出:
executed transaction: 46b3cfc82741a5d9bce283dd7d46f63575411f6fd8c77c6df7a6991667aa3d6a  104 bytes  208 us
#  testscholder <= testscholder::how            {"user":"name"}
>> how are you name
warning: transaction executed locally, but may not be confirmed by the network yet         ]
(四)取消链接自定义权限
取消customp2权限的链接,只保留customp1权限的链接。这样customp1权限可以调用what,但是customp2权限已取消链接,因此应该无法调用任何内容。下面通过使用权限去调用智能合约操作来测试这一点。
1、使用命令cleos set action permission取消customp2权限与how操作的链接。
cleos set action permission testaccount2 testscholder how NULL -p testaccount2@customp2
# 示例输出:
executed transaction: b7f091b92a13e1c7d6688f06c440dd9b6a7c12a2bf7fbc4ed4d891b3921113b0  120 bytes  212 us
#         eosio <= eosio::unlinkauth            {"account":"testaccount2","code":"testscholder","type":"how"}
warning: transaction executed locally, but may not be confirmed by the network yet         ]
2、使用customp1权限和customp2权限分别调用操作how,应该都无法调用how动作。
cleos push action testscholder how '["name"]' -p testaccount2@customp1
# 示例输出:
Please remove the unnecessary authority from your action!
Error Details:
action declares irrelevant authority '{"actor":"testaccount2","permission":"customp1"}'; minimum authority is {"actor":"testaccount2","permission":"active"}
cleos push action testscholder how '["name"]' -p testaccount2@customp2
# 示例输出:
Error 3090005: Irrelevant authority included
Please remove the unnecessary authority from your action!
Error Details:
action declares irrelevant authority '{"actor":"testaccount2","permission":"customp2"}'; minimum authority is {"actor":"testaccount2","permission":"active"}
(五)删除自定义权限
1、customp2权限已经取消链接,可以使用命令cleos set account permission删除此权限。
cleos set account permission testaccount2 customp2 NULL active -p testaccount2@active
# 示例输出:
executed transaction: 95392e8442b9aa82fedf4e757f7962cb5d208ca99228f8901bcac20d22d4ac7d  112 bytes  15996 us
#         eosio <= eosio::deleteauth            {"account":"testaccount2","permission":"customp2"}
warning: transaction executed locally, but may not be confirmed by the network yet ]来自 “ ITPUB博客 ” ,链接:https://blog.itpub.net/70012206/viewspace-2958075/ ,如需转载,请注明出处,否则将追究法律责任。

