Kubernetes资源编排系列之一: Pod YAML篇
作者:周虚(应金挺)
SREWorks的开源吸引了大量用户来尝试部署和使用我们的产品,其中不乏一些初次接触Kubernetes的朋友。随着SREWorks云原生运维平台使用的持续深入,部分用户对于其中的原理和概念还存在一些困惑。因此,我们特推出 《Kubernetes资源编排系列》 ,从底层的Pod YAML开始,逐步递进地讲解相关内容,希望能够解答大家对于Kubernetes的一些疑问,让用户对于云原生相关技术有更深入的了解。
1.Pod整体结构
Pod YAML的整体结构,可以初步分为 Resource(资源)、Object(元数据)、Spec(规范)、Status(状态)。 本文将会围绕这四部分一一展开。
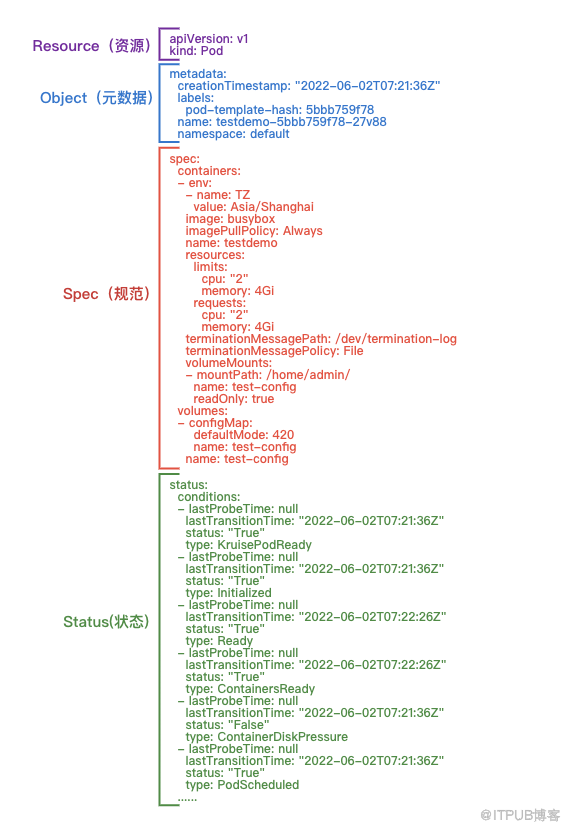
- Resource:定义资源类型与版本, 作为从Rest API中获取资源必带的属性。
- Object:资源的元数据属性,明确资源的基本标识。
- Spec / Status:
-
-
Spec:定义资源的期望状态,包括用户提供的配置、系统扩展的默认值,以及周边系统初始化或者更改值(scheduler、hpa等)。
-
Status:定义资源的当前状态,从而基于Spec定义的申明式配置,使pod不断朝期望状态靠近。
-
2.Resource(资源)-Rest API
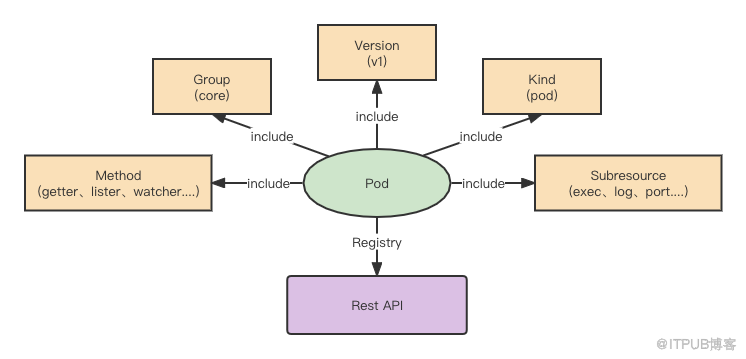
k8s资源按照Scope可以分为Namespace资源、Cluster资源,Namespace在k8s可以认为是软租户的效果,实现资源层面的隔离,Pod资源就是属于Namespace资源,而Namespace不光体现在YAML参数中,也表现在k8s Rest API中。
Rest API的整体结构,以Pod举例
apiVersion: v1
kind: Pod
metadata:
  name: test-pod
  namespace: default
基于上述YAML,可以明确出namespace为default, name为test-pod的Pod资源对象,也就是明确出Pod为Namespace资源,该Pod资源对象对应的apiVersion为v1,后续k8s自内联相关的Group为/api,自然而然,我们就将该对象的数据分离出来了:
- group:api
- apiVersion:v1
- kind:Pod
- name:test-pod
- namespace:default
基于上述的数据展示,apiserver自然而然会相应的注册出下列rest api,
-
/api/{apiVersion}/{kind}:该kind下的所有资源列表 -
/api/{apiVersion}/namespace/{namespace}/{kind}/:该kind下当前namespace的所有资源列表 -
/api/{apiVersion}/namespace/{namespace}/{kind}/{name}:该kind下当前namespace且名为name的资源 -
/api/{apiVersion}/namespace/{namespace}/{kind}/{name}/{subresource}:该kind下当前namespace且名为name的资源下子资源操作
后续基于扩展,我们就需要明确出method,这样一个真正完整的Rest API就诞生了。
3.Object(元数据)
在rest api中明确了Resource的kind、apiVersion, 也确定了Object的namespace、name,作为凡是k8s资源对象都会引用的公共结构,自然也存在很多公共机制供使用。
metadata:
  annotations:
    alibabacloud.com/owner: testdemo
    k8s.aliyun.com/pod-eni: "true"
  creationTimestamp: "2022-06-02T07:21:36Z"
  deleteTimestamp: "2022-06-02T07:22:51Z"
  labels:
    app: taihao-app-cn-shanghai-pre-cloud-resource
    pod-template-hash: 5bbb759f78
  name: testdemo-5bbb759f78-27v88
  namespace: default
  ownerReferences:
  - apiVersion: apps/v1
    blockOwnerDeletion: true
    controller: true
    kind: ReplicaSet
    name: testdemo-5bbb759f78
    uid: 9c3f268a-c0d1-4038-bb2b-b92928f45e3d
  resourceVersion: "60166035"
  uid: e4236960-8be2-41bf-ac44-e7460378afbb
观察上述YAML,我们将其整理一下,有这样一些字段:
- namespace:常规来说,Namespace资源才会使用该资源对象
- name:代表资源实例名称
- uid:是资源的唯一标识,可以区别已删除与重新创建的同名资源实例
- resourceVersion:是k8s的内部版本,具备时间属性,基于此就能明确该资源对是什么时候发生改变的,也是保证k8s list-watch核心机制
- creationTimestamp: 资源实例创建时间
- deleteTimestamp: 资源实例删除时间,后续会在pod的生命周期内讲到对该字段应用
- ownerReferences: 资源从属对象,从上面yaml可知,该Pod资源从属于名为testdemo-5bb759f78, ownerReferences内部是没有namespace参数,也就是ownerReferences不允许跨namespace, 将资源由下到上能够建立起来
- labels :标签, k8s内的服务发现以及相应的软关联,都是围绕label运作的,比如testdemo-5bb759f78 replicaset 的labelselector(标签筛选器)能够筛选到当前Pod的label,保证两者关联由上到下的建立
-
annotations: 注释,通常来说会是作为额外字段供应给周边系统使用,比如当前
k8s.aliyun.com/pod-eni="true"是提供网络系统使用
label & labelSelector
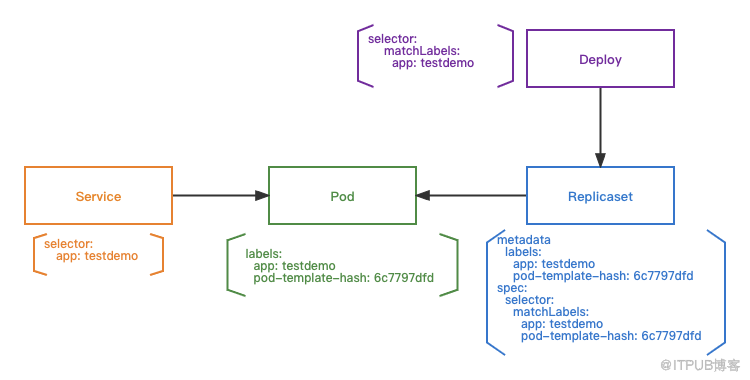
Deployment 会根据自己的labelseletor:app=taihao-app-cluster 以及计算出podtemplate的hash lable:pod-template-hash: 5b8b879786 , 筛选出出符合的replicaset, replicaset再根据自己的labelselector 去筛选出符合的pods, 相应的服务发现service,也是通过labelselector去筛选出符合的Pod
Owner & GC(垃圾回收)
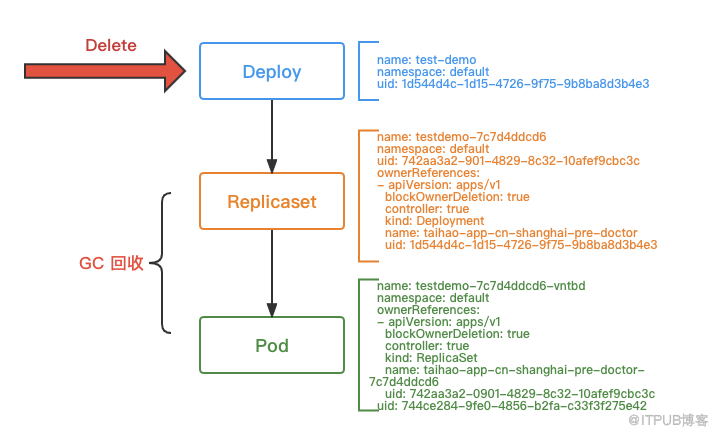
基于Pod的metadata.ownerReferences找寻到对应的replicaset,replicaset基于自身的metadata.ownerReferences 找寻到deploy;当deployment被删除后,基于原有owner构建的树状,回收原有的rs与pod。
Deploy & Replicaset
基于label&labelselector,明确了从上到下的筛选归纳;基于owner&GC,明确了关联资源的回收流程。
apiVersion: apps/v1
kind: ReplicaSet
metadata:
  generation: 1
  labels:
    app: testdemo
    pod-template-hash: bcd889947
  name: testdemo-bcd889947
  namespace: taihao
  ownerReferences:
  - apiVersion: apps/v1
    blockOwnerDeletion: true
    controller: true
    kind: Deployment
    name: testdemo
    uid: 1dddc849-c254-4cf5-aec8-9e1c2b5e65af
spec:
  replicas: 1
  selector:
    matchLabels:
      app: testdemo
      pod-template-hash: bcd889947
  template:
    metadata:
      creationTimestamp: null
      labels:
        app: testdemo
        pod-template-hash: bcd889947
    spec:
      containers:
      - args:
        - -c
        - sleep 1000000
        command:
        - sh
        image: centos:7
        imagePullPolicy: IfNotPresent
				name: testdemo
status:
  fullyLabeledReplicas: 1
  observedGeneration: 1
  replicas: 1
replicaset.spec.replicas: 实例数,rs控制下的Pod个数
replicaset.spec.selector:基于label 筛选出对应的Pod
replicaset.spec.template:replicaset创建的Pod会基于podtemplate
replicaset.status:replicaset 当前管理Pod的状态
apiVersion: apps/v1
kind: Deployment
metadata:
  labels:
    app: testdemo
  name: testdemo
spec:
  replicas: 1
  revisionHistoryLimit: 10
  selector:
    matchLabels:
      app: testdemo
  strategy:
    rollingUpdate:
      maxSurge: 25%
      maxUnavailable: 25%
    type: RollingUpdate
  template:
    metadata:
      creationTimestamp: null
      labels:
        app: testdemo
    spec:
      containers:
      - args:
        - -c
        - sleep 1000000
        command:
        - sh
        image: centos:7
        imagePullPolicy: IfNotPresent
        name: testdemo
status:
  availableReplicas: 1
  observedGeneration: 2
  readyReplicas: 1
  replicas: 2
  unavailableReplicas: 1
  updatedReplicas: 1
deploy.spec.replicas: deploy期望的pod实例格式
deploy.spec.revisionHistoryLimit:deploy 管理replicaset的保留三个月
deploy.spec.selector:deploy 筛选符合标签
deploy.spec.strategy:deploy的升级策略
deploy.template:deploy基于此模版要创建的pod格式
4.Spec(规范)
Spec作为Pod的期望状态,一定程度上也覆盖了Pod完整生命周期的逻辑,Pod的生命周期分为以下阶段
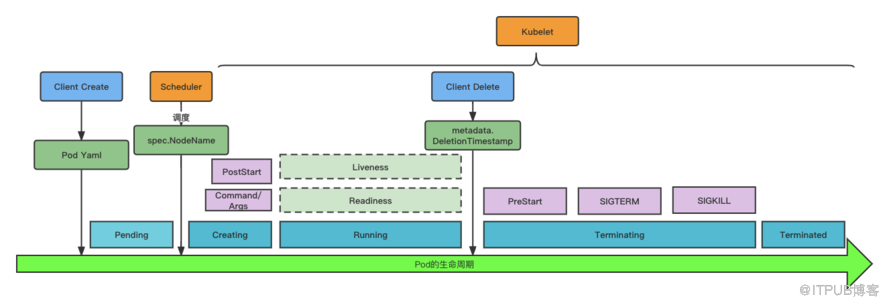
- Pending:代表Pod处于未调度阶段
- Creating:节点上的kubelet已经发现了Pod,处于创建阶段
- Running:至少一个容器运行完毕,kubelet这会发起健康监测
- Terminating:Pod处于删除状态,kubelet开始回收容器
- Terminated: Pod 销毁完成
Pod生命周期: Pending
Pod资源创建完毕后,处于还未调度阶段,这个时候scheduler(调度器)基于pod yaml本身的配置与节点资源状态情况,来进行调度。
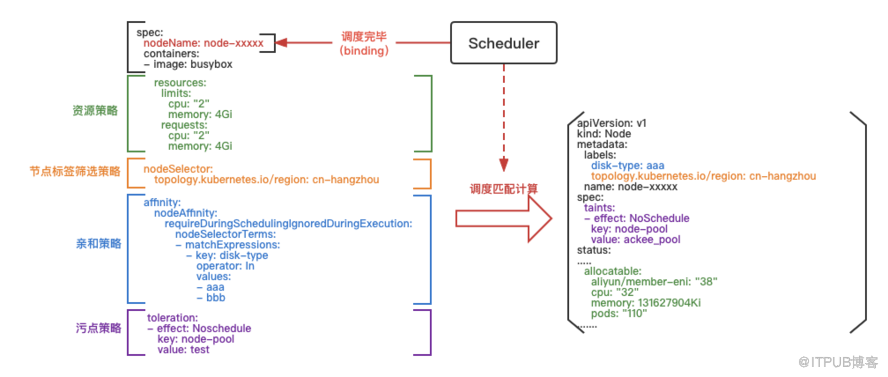
scheduler会去分析podyaml,将其中的策略提取出来,与节点组中的节点配置进行匹配,若匹配成功后,会选出最佳节点,重新修改pod yaml,将spec.nodeName更新掉,完成整个调度环节
资源策略
资源策略表明Pod运行需要的资源情况,以demo为例,Pod需要2核4G的资源,那么调度过去的节点也需要有2核4G的资源剩余,Pod才能运行在该节点上
节点标签筛选策略
节点标签筛选策略,筛选节点是否存在
topology.kubernetes.io/region: cn-hangzhou
亲和策略
亲和策略,有节点亲和与Pod亲和(Pod所在节点优先调度),常规来说可以优先满足亲和的节点上,当前例子就是节点亲和,满足标签
disk-type=aaa 或者
disk-type=bbb
污点策略
污点策略,当节点上配置了污点,若Pod没有容忍该污点的策略,则Pod不允许调度到该节点上
Pod生命周期: Creating
当Pod调度完毕后,开始创建阶段,kubelet会基于pod.spec 期望状态来创建出Pod
kubelet 在创建Pod阶段,总共大致经历以下过程
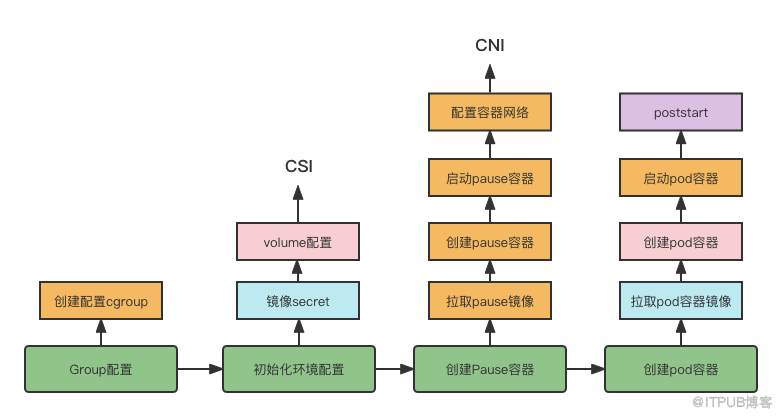
- Group配置:主要是为了容器配置cgroup,里面涉及了对容器资源限制,比如不允许超过cpu、memory配置,这里涉及到Pod的qos级别判定
- 初始化环境配置:主要是对相关Pod数据存储目录进行配置,涉及到volume,则会去引用CSI协议,也会去获取镜像secret,为了后续拉取镜像进行准备工作
- 创建pause容器:创建pause容器,该容器主要是为了后续配置容器网络,配置容器网络会去调用CNI
- 创建Pod容器:基于imagesecret拉取业务镜像,在创建Pod容器阶段,也会将相应的Pod YAML配置传输进去,在启动Pod容器完毕后,会基于poststart进行相关的回调
上述阶段,会选择部分关键概念进行详细说明
image
spec:
  containers:
  - image: testdemo:v1
    imagePullPolicy: Always
    name: test-config
  imagePullSecrets:
  - name: image-regsecret
imagePullSecrets: 拉取镜像的密钥,保证能够拉取image:testdemo:v1,尤其在镜像库是私有库的阶段
imagePullPolicy:镜像拉取策略
- Always:总是拉取镜像
- IfNotPresent:本地若有则使用本地镜像,不进行拉取
- Never:只使用本地镜像,不拉取
containers
注意这个containers用的是复数,可以填多个容器镜像: 比如可以放 nginx 和 业务容器。这样做的好处是可以尽量减少业务容器中与业务无关的代码或进程。
container涉及很多配置,其中有涉及到volume、env、dnsconfig、host等基础配置
spec:
  containers:
  - env:
    - name: TZ
      value: Asia/Shanghai
    image: testdemo:v1
    name: taihao-app-cn-shanghai-pre-share
    volumeMounts:
    - mountPath: /home/admin
      name: test-config
      readOnly: true
  dnsConfig:
    nameservers:
    - 100.100.1.1
    - 100.100.2.1
    options:
    - name: ndots
      value: "3"
    - name: timeout
      value: "3"
    - name: attempts
      value: "3"
    searches:
    - default.svc.cluster.local
    - svc.cluster.local
    - cluster.local
  hostAliases:
  - hostnames:
    - kubernetes
    - kubernetes.default
    - kubernetes.default.svc
    - kubernetes.default.svc.cluster.local
    ip: 1.1.1.1
  volumes:
  - configMap:
      defaultMode: 420
      name: test-config
    name: test-config
env:配置Pod的环境变量
dnsConfig:配置Pod的域名解析
hostALiases:配置/etc/hosts文件内容
volume/volumeMount: 配置文件挂载到容器内,也可以配置文件存储系统挂载到容器内
postStart
containers:
  - image: testdemo:v1
    imagePullPolicy: Always
    lifecycle:
      postStart:
        exec:
          command:
          - /bin/sh
          - -c
          - sleep 5
当前poststart demo 是发起command命令,也可以发起http请求,主要作用可以作为资源部署以及环境准备。
Pod生命周期: Running
在Pod running阶段的时候,Pod就迎来对其健康的检查,当前kubelet 提供三种方式判定
- readiness:检查Pod是否为健康
- liveness:件看Pod是否正常,若检查失败,则重启容器
- readinessGate:提供给第三方组件健康验证,第三方组件验证不过,则Pod不为健康
spec:
  readinessGates:
  - conditionType: TestPodReady
  containers:
  - image: testdemo:v1
    imagePullPolicy: Always
    livenessProbe:
      failureThreshold: 3
      initialDelaySeconds: 45
      periodSeconds: 5
      successThreshold: 1
      tcpSocket:
        port: 8080
      timeoutSeconds: 1
    readinessProbe:
      failureThreshold: 3
      httpGet:
        path: /actuator/health
        port: 8989
        scheme: HTTP
      initialDelaySeconds: 25
      periodSeconds: 3
      successThreshold: 1
      timeoutSeconds: 1
readiness与liveness检查参数都是一致的
- httpGet / tcpSocket:都是检查方式,一种是http请求验证,一种是tcpSocket,其中也有exec执行命令,以及grpc形式验证
- initialDelaySeconds:延迟多久开始检查,原因在于容器启动的时候,通常需要过段时间进行验证
- periodSeconds:检验时间周期
- failureThreshold:连续几次失败,则代表这轮检验失败
- successThreshold:连续几次成功,则代表这轮检验成功
- timeoutSeconds:代表检验超时时间,若检验在该配置时间内没有返回,则认为检验失败
readiness、liveness虽然参数不一样,但对检验的结果行为不一致。
- readiness默认状态下为false,也就是Pod为不健康,直到检查通过,才将Pod变为健康
- liveness默认状态下为true,不会在刚开始就将Pod重启,只有等检查不通过后,才会进行容器重启操作
readinessGate 是Pod健康的扩展,kubelet会基于此,默认在pod.status.conditions上配置对应的condition, 比如当前例子readinessGate为
conditionType: TestPodReady , 则相应就会有conditions
status:
  conditions:
  - lastProbeTime: null
    lastTransitionTime: "2022-07-05T09:16:07Z"
    status: "false"
    type: TestPodReady
当该condition.status为false时,则Pod就会一直是不健康,哪怕readiness检查通过,直到第三方系统去操作更新Pod该condition.status为true,才可以将Pod变为健康,这样就可以接入更多的Pod健康指标。
Pod生命周期: Terminating
client 在发起请求删除Pod的时候,实际上是配置
pod.metadata.deletionTimestamp,kubelet感知到后,开始进行Pod回收流程
整个Pod的回收周期,常规来说preStop—>SIGTERM—>SIGKILL
lifecycle:
  preStop:
    exec:
      command:
      - /bin/sh
      - -c
      - sleep 5
当kubelet进行preStop后,开始发起SIGTERM给容器内进程,若超过总默认耗时30S(metadata.DeletionGracePeriodSeconds),则强制发起SIGKILL给容器,也就是prestop+SIGTERM总耗时不允许超过30s。
5.Status(状态)
status:
  conditions:
  - lastProbeTime: null
    lastTransitionTime: "2022-07-05T09:16:07Z"
    status: "True"
    type: TestPodReady
  - lastProbeTime: null
    lastTransitionTime: "2022-07-05T09:16:07Z"
    status: "True"
    type: Initialized
  - lastProbeTime: null
    lastTransitionTime: "2022-07-05T09:16:14Z"
    status: "True"
    type: Ready
  - lastProbeTime: null
    lastTransitionTime: "2022-07-05T09:16:14Z"
    status: "True"
    type: ContainersReady
  - lastProbeTime: null
    lastTransitionTime: "2022-07-05T09:16:07Z"
    status: "False"
    type: ContainerDiskPressure
  - lastProbeTime: null
    lastTransitionTime: "2022-07-05T09:16:07Z"
    status: "True"
    type: PodScheduled
  containerStatuses:
  - containerID: containerd://xxxxx
    image: docker.io/library/testdemo:v1
    imageID: docker.io/library/centos@sha256:xxxx
    lastState: {}
    name: zxtest
    ready: true
    restartCount: 0
    started: true
    state:
      running:
        startedAt: "2022-07-05T09:16:13Z"
  hostIP: 21.1.96.23
  phase: Running
  podIP: 10.11.17.172
  podIPs:
  - ip: 10.11.17.172
  qosClass: Guaranteed
  startTime: "2022-07-05T09:16:07Z"
基于上述YAML样例,将Pod status状态拆建出来分析一下:
-
conditions: conditions是作为一种更详尽的状态报告,其本身也是一种扩展机制,其他的扩展字段也可以放入其中,比如可以表明网络状况,其中readinessGate就是这种扩展机制的表现,但决定Pod是否ready,永远只看type: Ready是否为true
-
containerStatuses: Pod内各容器的状态
-
hostIP: Pod所在节点ip地址
-
phase: Pod的生命周期状态
- Pending:代表Pod有一个容器或者多个容器还未运行,其中包括Pod调度到节点之前以及拉取镜像
- Running:代表Pod已绑定到节点上,至少有一个容器运行或在重启
- Successed:代表Pod所有容器已终止
- Failed:代表Pod内至少有一个容器终止失败
- Unknown:代表无法获取Pod状态
-
podIP / podIPs:Pod的IP地址,假如有ipv4、ipv6,则可以在podIPs上配置
-
qosClass:代表kubernetes服务等级
- Guaranteed:resource.requests与resource.limits一致
- Burstable:resource.requests与resource.limits 不一致
- BestEffort:没有配置resource.requests与resource.limits
- startTime:启动时间
通过以上Pod四个部分拆解,我们基本搞清了一个Pod在k8s下“ 从哪里来”的这个问题。本系列的后续的文章会对“ 到哪里去”这个问题继续展开:Kubernetes的魅力在于不仅仅是拉起一个工作负载,而是能够召之即来挥之即去地编排海量工作负载。
后续文章均会发布在我们的公众号“ 阿里智能运维”上,请大家持续关注~也欢迎大家在公众号后台留言想了解的内容和感兴趣的相关话题,与 SREWorks团队进行交流。
来自 “ ITPUB博客 ” ,链接:https://blog.itpub.net/70004426/viewspace-2904834/ ,如需转载,请注明出处,否则将追究法律责任。

最新文章
- 阿里云 Hologres 登顶 VectorDBBench 性价比榜单四项第一
- 活动火热报名中 | Data+AI 融合趋势下的智能数仓平台建设
- 阿里云技术公开课:基于阿里云 Elasticsearch 构建 AI 搜索和可观测 Chatbot
- 超值选择:阿里云Elasticsearch Serverless在企业数据检索与分析中的高性能与灵活性
- 阿里云技术公开课直播预告:基于阿里云 Elasticsearch 构建 AI 搜索和可观测 Chatbot
- 重磅发布 | OpenSearch 推出向量检索 GPU 图算法方案并支持 GPU 规格售卖
- 有奖实践,基于 EMR StarRocks 实现游戏玩家画像和行为分析
- 加速 AI 应用落地!DataWorks 数据治理中心全新升级为数据资产治理
- 阿里云 Elastic Enterprise 正式上线!
- 阿里重磅开源 Fluss: Flink Unified Streaming Storage
