在【Azure Services Platform Step by Step-第9篇】Windows Azure Storage概览中,我们已经讨论过Table Storage的作用和特点。本篇将以搭建简单的聊天室为例,演示如果使用最简单的代码,将C#实体类(Entity)直接存入Table Storage中,彻底告别SQL Server 200x和ORM工具。
最终效果: (已部署到云端的Demo :http://ibm.cloudapp.net/ChatMain.aspx)

首先让我们一起回顾一下Table Storage的结构。
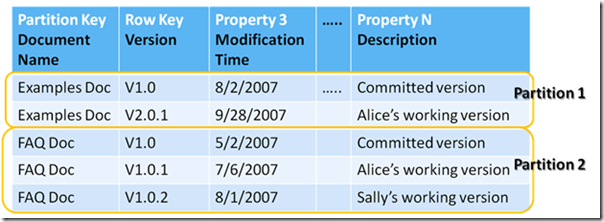

每行都是一个独立的Entity。
Partition Key和RowKey起到了类似于主键的作用,它们用来标识Entity,同时也可以在实际使用中作为分类查询条件。
TimeStamp属性(上图没画出)是每行都默认有的,它自动记录该行数据最后更新的时间。
接下来我们来看看StorageClient中是怎样使用TableStorage的

看着这图,单看文件名,觉得很奇怪吧? Blob和Queue都使用了Rest来实现,唯独Table没有一个对应REST的类。那它是怎么做的呢?
查看源代码可以发现,原来,它使用的是System.Data.Services.Client里的DataServiceQuery和DataServiceContext这两个ADO.NET 数据服务的关键类来实现的。拿TableStorageDataServiceContext类来说,它继承自DataServiceContext,或者说,它把DataServiceContext封装成了Azure版!
(对ADO.NET数据服务Client不了解的朋友请查阅http://msdn.microsoft.com/zh-cn/library/system.data.services.client.dataservicecontext.aspx)
呵呵,不管怎么样,我们使用方便就好了。
了解完了原理,我们来进入正题吧。
第一步:
在VS008中新建Web Cloud Service、配置ServiceConfiguration.cscfg、ServiceDefinition.csdef ,添加对StorageClient项目的引用。这里不再重复了,请直接参考上一篇的内容或者本文篇末附件源代码。
直接使用上一节里的ServiceConfiguration.cscfg和ServiceDefinition.csdef也行,因为账户信息是一样的。


第二步:
拖入控件,制作简单的登录界面和主聊天界面。这不是重点也不是难点,请大家直接参看本文篇末附件源代码。其实聊天室和留言吧的区别不大,使用ASP.NET Ajax的Timer和UpdatePanel让它每两秒刷新一次就行。


第三步:
建立一个Message实体类。
与传统代码或由ORM工具生成的实体代码不同,它需要继承自TableStorageEntity.

 public class Message : Microsoft.Samples.ServiceHosting.StorageClient.TableStorageEntity
 {
{ public Message()
 { PartitionKey = "ChatRoom001"; //取实体时,默认排序是根据RowKey增序列 RowKey = (DateTime.MaxValue.Ticks - DateTime.Now.Ticks).ToString();
 } public string Name { get; set; } public string Body { get; set; } //不用定义“消息发布时间”这种字段了, //因为Table Storage有一个自动时间戳属性TimeStamp可以自动记录数据更新时间。
 }
}第四步:
建立一个MessageDataServiceContext实体类。该类继承自TableStorageDataServiceContext,也就是间接继承自DataServiceContext。它的作用是获得一个对数据服务上下文的引用。此外,定义一个公共属性Messages:可返回所有Message类型实体; 增加AddMessage方法:将Message实体存入Table Storage。
public class MessageDataServiceContext : TableStorageDataServiceContext { public MessageDataServiceContext(StorageAccountInfo accountInfo) : base(accountInfo) { } //定义公共属性Messages,返回所有数据服务上下文中的Message类实体。 public IQueryable<Message> Messages { get { return this.CreateQuery<Message>("Messages"); } } public void AddMessage(string name, string body) { //使用DataServiceContext类提供的AddObject方法来存入实体 this.AddObject("Messages", new Message { Name = name, Body = body }); //DataServiceContext类提供的SaveChanges()方法来保存修改 this.SaveChanges(); } }第五步:
取实体:
//初始化账户信息 StorageAccountInfo accountInfo = StorageAccountInfo.GetAccountInfoFromConfiguration("TableStorageEndpoint"); // 自动根据实体类的结构生成Table TableStorage.CreateTablesFromModel(typeof(MessageDataServiceContext), accountInfo); // 获取数据服务上下文的引用 MessageDataServiceContext context = new MessageDataServiceContext(accountInfo); // 取前150条Message实体,作为数据源绑定到messageList中。 IQueryable<Message> data = context.Messages.Take(150); this.messageList.DataSource = data; this.messageList.DataBind();存入实体:
protected void SubmitButton_Click(object sender, EventArgs e) { StorageAccountInfo accountInfo = StorageAccountInfo.GetAccountInfoFromConfiguration("TableStorageEndpoint"); MessageDataServiceContext context = new MessageDataServiceContext(accountInfo); //调用刚才我们定义的AddMessage方法。其实如果你想看上去更爽的话, //可以把这个方法的入参改为实体 :) context.AddMessage(this.nameBox.Text, this.messageBox.Text); }OK,搞定了!
F5一下看看运行效果吧!
______————————____忐忑不安的分割线______————————______
通过REST方法获得实体的真实相貌:

可以清楚地看到,这个实体有5个属性。其中有3个是默认必须有的属性,只有Body和Name是我们在实体类里自己定义的。
来自 “ ITPUB博客 ” ,链接:https://blog.itpub.net/70000523/viewspace-3155534/ ,如需转载,请注明出处,否则将追究法律责任。

