Mobile apps need a backend. They store settings & data, high scores, check licenses and generate statistics. All these use cases have one thing in common: they use a central database.
Coding a full-blown backend takes a lot of time. Think about end-to-end security, communication interfaces and database structure. When you then get to details like concurrent access, it gets tricky.
Luckily, Google Firebase takes care of all these issues for you. It’s a ready-to-use cloud-hosted database with full authentication support. In contrast to a traditional SQL database, Google Firebase stores JSON data sets (-> NoSQL). This gives you more flexibility in your data structure.
幸运的是, Google Firebase会为您解决所有这些问题。 这是一个具有完整身份验证支持的即用型云托管数据库。 与传统SQL数据库相比,Google Firebase存储JSON数据集(-> NoSQL )。 这为您的数据结构提供了更大的灵活性。
On top of that, you can subscribe to real-time data changes. You’ll get notified about updates made to the data, for example by other users. The service does offer a simple REST API. But the most efficient communication is a publish & subscribe model via websockets.
最重要的是,您可以订阅实时数据更改。 您将收到有关数据更新的通知,例如其他用户。 该服务确实提供了简单的REST API 。 但是最有效的通信是通过websockets的发布和订阅模型。
That sounds complicated? Google offers a separate SDK for each platform. With Felgo & Qt, you don’t need to worry about platform differences. Felgo includes a cross-platform Google Firebase Realtime Database plugin. The same QML / JavaScript-based API works for both Android & iOS.
In this Firebase tutorial, you’ll complete the full journey from start to end. You start with a project template of Qt Creator. Next, you’ll set up the Firebase service in the cloud. Another important task is user authentication. Most impressive: live database updates from & to your cross-platform app.
The scenario is a simple shopping list. It’s a generic app that includes everything most apps need. Authentication, plus adding, updating and deleting items. Once you understand the concepts, it’s easy to adapt them to your own scenario.
You can also watch the video version of this tutorial on YouTube. It is very much in-depth and covers every single step of the process.
您也可以在YouTube上观看本教程的视频版本。 它非常深入,涵盖了过程的每个步骤。
您的Cloud Backend的主从UI (Master-Detail UI for your Cloud Backend)
Curious to dive right into the cloud database? Well, you will need your “app package name” for Android and the “iOS bundle ID” when setting up Firebase.
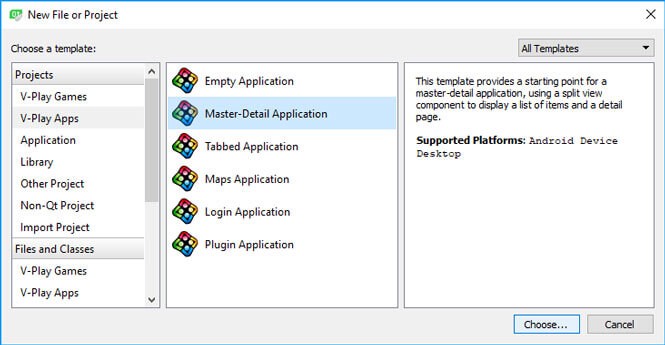
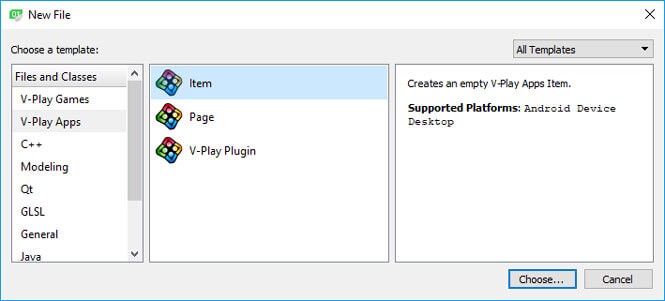
Thus, start with the app and make your life easier. Open Qt Creator and create a new project. Use the “Felgo Apps” > “Master-Detail Application”. This gives you great boilerplate code for any list-type app.
In step 2, choose the kits for the target platforms: Android and/or iOS.
在步骤2中,选择目标平台的工具包:Android和/或iOS。
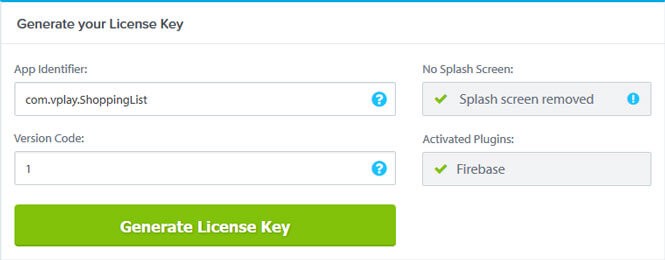
Take special note of the “Felgo Project Properties” page (step 3). Here, you define the app identifier, which you will also need for the Firebase setup. In this case, choose com.vplay.ShoppingList.
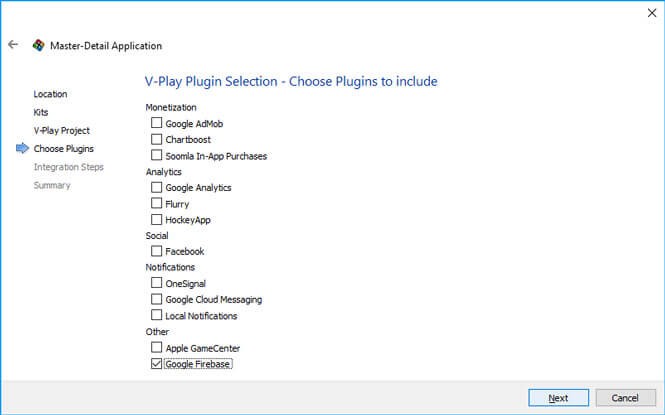
Google offers different Firebase samples for individual platforms & tools. With Felgo, you run the same code across Android & iOS. Activate the “Google Firebase” plugin. It includes ready-made cross-platform code to interact with the Google cloud!
Google针对各个平台和工具提供了不同的Firebase示例。 使用Felgo,您可以在Android和iOS上运行相同的代码。 激活“ Google Firebase”插件。 它包括现成的跨平台代码,可与Google云进行交互!
在Android和iOS上进行实时测试 (Live Testing on Android & iOS)
If you target both Android and iOS, you’ll want to test your app on both platforms. Felgo Live immediately deploys and executes any code changes on any connected phone. You can even connect and test on iOS phones while developing on Windows. You save an incredible amount of time: no more re-building, deploying and testing.
To get started, download the Felgo Live app from the app store: Android / iOS. Next, make sure your development computer and the phone are on the same local network. Start the Felgo Live app on your phone and connect it to your Live Server. If your Live Server is not running yet, click on “Live Run” in Qt Creator, to start developing with live code reloading!
Your app currently shows a watermark that you’re running a trial of the Firebase plugin. That’s fine for your first testing steps! To get rid of the trial watermark and the license reminders, you need the Felgo Indie license. If you do not have an Indie license, you can continue using the Firebase plugin in trial mode, without generating a license key.
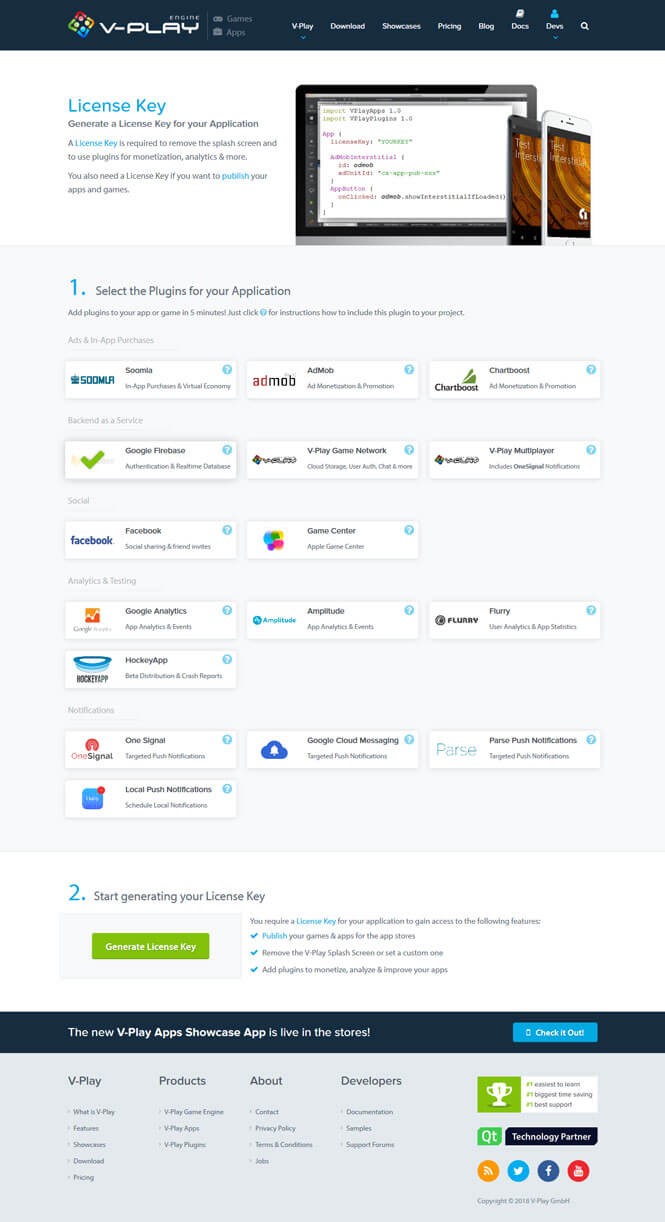
Authorization works through a license key for your app. Go to https://felgo.com/upgradeLicense. Select the “Google Firebase” plugin. Next, click the green “Generate License Key” button at the bottom of the page.
Copy the new license key to your code, add it to the licenseKey property in your Main.qml file. The watermark disappears. This video shows the original Master-Detail sample app. When inserting the license key to the code, the app instantly reloads — without the watermark. Afterwards, you see a brief demo of the initial app functionality.
Congratulations, your master-detail app is running on the phone! Now, it’s time to create the Google Firebase Realtime database. This serves as complete lightweight backend for the shopping list example app.
To create a Firebase account, go to the Firebase homepage. Login with your Google Account to see the empty console. The project you create runs great with the free account. You don’t need to worry about payments.
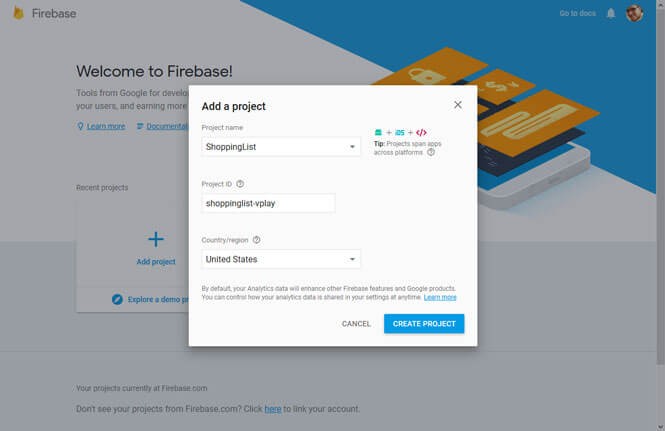
Give your project a name to recognize it in your console: “ShoppingList”. The “Project ID” is auto-generated with a number, as it needs to be globally unique. You can customize the ID if you like. Note that your users will never see this ID, though — so don’t spend too much time here.
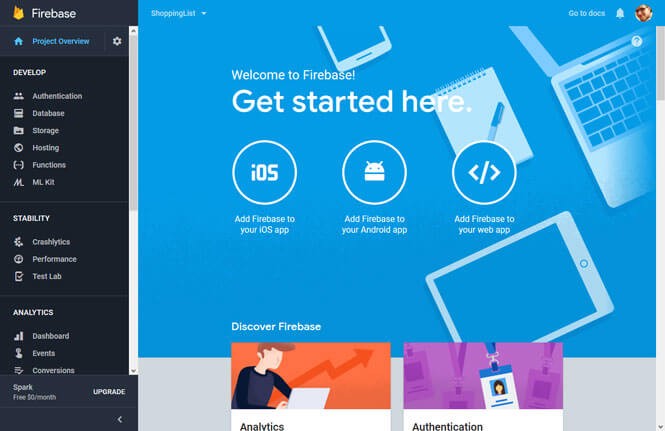
Click on “CREATE PROJECT”. In a few seconds, the project dashboard greets you with the overview:
点击“创建项目”。 几秒钟后,项目仪表板将向您介绍概述:
将您的应用程序连接到Firebase (Connect Your App to Firebase)
Your shopping list app stores the items in the cloud. Grant your app access to the Firebase project. Click on the big circle for your target platform: iOS or Android.
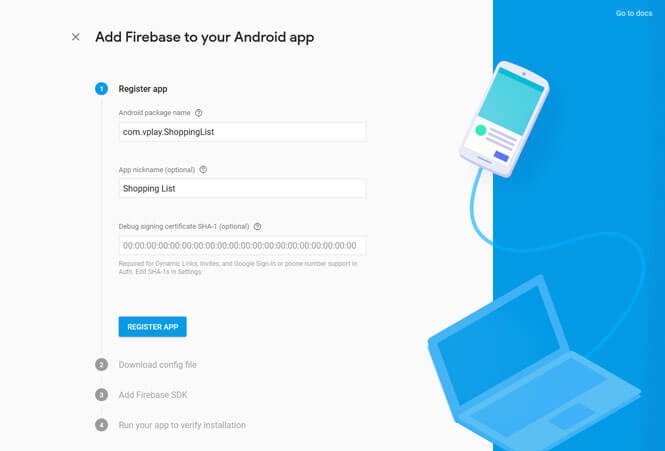
Enter the package name again. The optional “app nickname” is only for internal use inside your dashboard.
再次输入软件包名称。 可选的“应用程序昵称”仅在仪表板内部仅供内部使用。
The Firebase wizard now prompts to download the config file. Download this file and store it somewhere on your computer.
Firebase向导现在提示下载配置文件。 下载此文件并将其存储在计算机上的某个位置。
The major parts of the config file look like this. They contain all the information you need to connect your app to Firebase.
配置文件的主要部分如下所示。 它们包含将应用程序连接到Firebase所需的所有信息。
Run this codeon your iOS or Android device now, with Live Code Reloading立即通过实时代码重新加载在您的iOS或Android设备上运行此代码
For your Felgo project, you could use this config file. But it’s easier to copy the API keys to the plugin config, as you will see below. So, skip steps 3 + 4 of the Firebase wizard.
Path: create a new sub-folder in your project’s qml folder, called “model”
路径:在项目的qml文件夹中创建一个新的子文件夹,称为“模型”
The generated file is almost empty. Change the default generated ID from “item” to “dataModel”. As you are using the Firebase plugin, add the following line to the import section at the beginning of the file:
Run this codeon your iOS or Android device now, with Live Code Reloading立即通过实时代码重新加载在您的iOS或Android设备上运行此代码
The FirebaseConfig QML element encapsulates all connection settings — for both Android and iOS. Add it to your item. Your data model now looks like this:
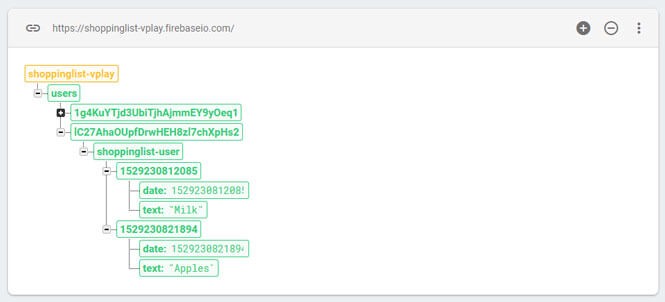
The database is a tree of items. Each can have children and any structure. That makes the database much more flexible than tables in traditional SQL.
数据库是一棵项目树。 每个人都可以有孩子和任何结构。 这使得数据库比传统SQL中的表更加灵活。
Some of the structure is pre-defined by Firebase; some is coming from your app. A quick overview, before you dive in:
一些结构是由Firebase预先定义的; 有些来自您的应用。 在您深入之前,请快速浏览一下:
shoppinglist-vplay: the root node of the entire database (shown in yellow).
shoppinglist-vplay:整个数据库的根节点 (以黄色显示)。
users: each user is going to have a private shopping list. After all, you don’t want to buy items that a stranger added, right? Thus, the next node is “users”. It contains a list of user UIDs. The database itself doesn’t store any further information about the user’s identity. You can look this up in the “Authentication” section of your Firebase project dashboard:
shoppinglist-user: the root node of the individual shopping list. This is what a logged-in user sees. It contains several items, one for each item to buy. Here, it’s currently milk and apples.
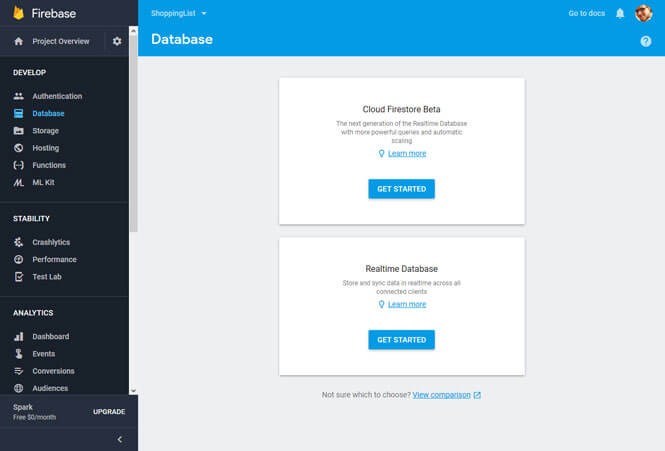
In your browser, return to the Firebase dashboard. Select “Database” on the left. Next, click on “Get Started” in the “Realtime Database” block. The Cloud Firestore is currently still in beta. That’s why it’s not recommended for production use yet. We will take a closer look in a future tutorial.
Next up is the “Security rules for Realtime Database” dialog. It’s a good idea to start with proper authentication right away, instead of plugging it in later.
接下来是“实时数据库的安全规则”对话框。 最好立即进行正确的身份验证,而不是稍后再插入。
Firebase身份验证 (Firebase Authentication)
Your app needs to recognize, differentiate and securely authorize users. The Firebase Authentication service makes this easy. It supports multiple authorization providers: Facebook, Google Account, Twitter, GitHub and even a phone-based user authentication per SMS.
Firebase even lets you use “anonymous” authentication. This means the user does not have to do any authentication step in order to use the Firebase Database.
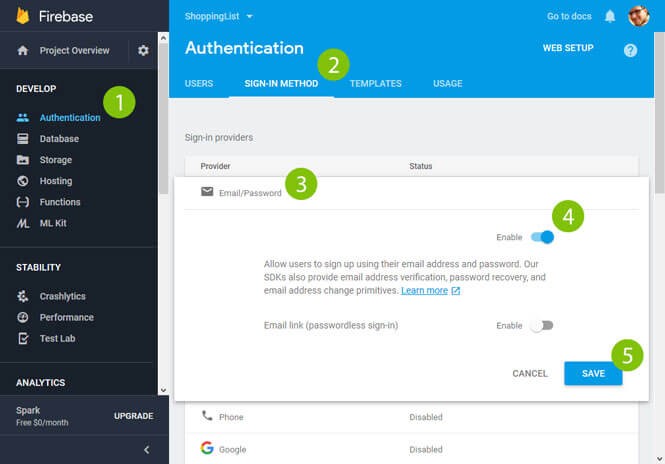
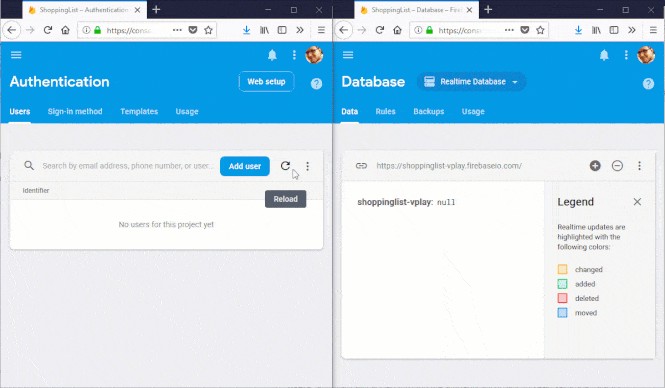
To activate it, go to the Authentication section (1) of your Firebase dashboard.
要激活它,请转到Firebase仪表板的“身份验证”部分(1)。
Next, choose “Sign-In Method” (2). Click on “Email/Password” (3) to expand this section. Enable it (4) and save the changes (5). In the “Templates” section, you could further customize the behavior. E.g., a custom confirmation email text when a user signs up.
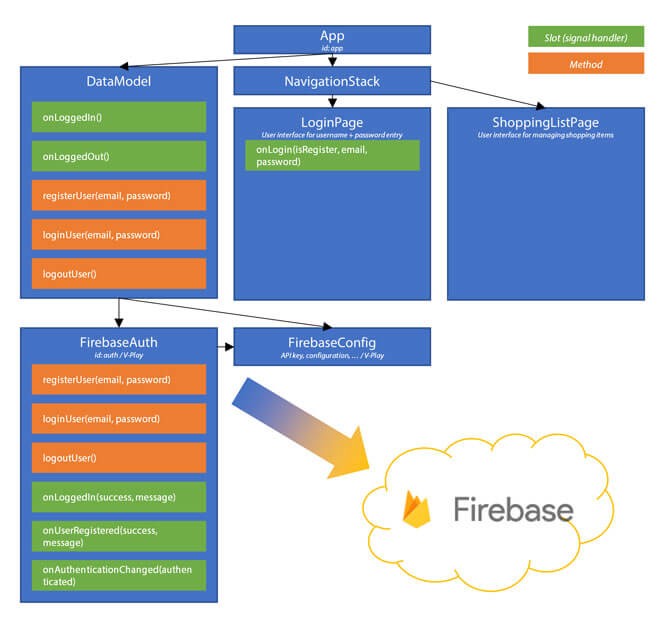
The App is the main QML item that owns all the other items and ensures they communicate with each other
该应用程序是拥有所有其他项目并确保它们彼此通信的主要QML项目
DataModel is a direct child of the App. It is a layer that handles the authentication and shopping items (your data). It abstracts the Google Firebase. The rest of your application does not need to worry about the backend or any cloud communication.
onLoggedIn slot triggers navigating from the LoginPage to the ShoppingListPage.
onLoggedIn插槽触发从LoginPage导航到ShoppingListPage 。
FirebaseAuth is an item provided by Felgo. It communicates with the Firebase cloud. It provides convenient signals and slots. These integrate the relevant events into your app.
FirebaseConfig is what we’ve already created. It contains basic settings, like the API key, configuration, …
FirebaseConfig是我们已经创建的。 它包含基本设置,例如API密钥,配置等。
NavigationStack handles all the visible pages.
NavigationStack处理所有可见页面。
LoginPage is initially visible. It contains the user interface to enter username and password. Plus, you can trigger new user registrations for the Firebase backend.
Firebase身份验证:来自云的回调 (Firebase Authentication: Callbacks from the Cloud)
You start by adding the FirebaseAuth item to your DataModel. It is simple to use: assign an ID and give it a reference to the config item you created before. Also, add two signals (“loggedIn”, “loggedOut”) to your DataModel. They inform the app about the user’s login status.
onAuthenticationChanged: the most important status change: is the user logged in? With this generic slot, your app is flexible no matter how the user logged in. All that matters is if he is logged in at the end. In that case, our DataModel emits the loggedIn signal to let the app switch to the main data model page.
Firebase:触发登录,用户注册和注销 (Firebase: Triggering Login, User Registration and Logout)
Now, your app already handles the status change responses coming from Firebase. But, you still need to trigger the login! The FirebaseAuth item includes convenient methods for triggering authentication tasks.
Run this codeon your iOS or Android device now, with Live Code Reloading立即通过实时代码重新加载在您的iOS或Android设备上运行此代码
You might wonder why you should do this. After all, the new methods are an exact replica of the existing. Once you expand your app, you might want to surround these calls with extra checks. E.g., you could test if the email address is valid. So, it’s a good idea to think of a good architecture right from the start.
The example app already includes two sample pages for Firebase, which we will not use however. They are a concise essence of what you can do with Firebase. In our sample, we use Firebase as part of the complete app architecture.
Create a new page: LoginPage.qml. It’s will be a simple page with 2 text boxes and a button. A checkbox switches between login and new user registration. Copy the source code from the GitHub sample into your new page.
Important for the concept is that the page emits a signal once the user taps the button: “login(bool isRegister, string email, string password)”. The parameters include everything Firebase needs to perform the login.
Main.qml wires this signal to your DataModel. This connection establishes the link from the UI to the Firebase cloud. Replace the current contents of Main.qml with:
Run this code on your iOS or Android device now, with Live Code Reloading立即通过实时代码重新加载在您的iOS或Android设备上运行此代码
In the code snippet above, you see that the App also owns the DataModel item with id “dataModel”. The “App” item connects your app’s components. Here, you establish a direct connection: LoginPage’s “onLogin”-slot -> methods of the DataModel (registerUser / loginUser).
Once the login process completes, the “onLoggedIn” slot within the DataModel pushes the “shoppingListPage” to the navigation stack. Remember: that’s the ID of the MasterPage from the template.
With this approach, navigating back in the Android / iPhone-UI pops the page. This automatically triggers the logout process in Firebase. Your app also returns to the previous page on the navigation stack — the LoginPage.
The Firebase Realtime Database is a NoSQL DB. It’s efficient and low-latency, and especially targeted towards mobile clients.
Firebase实时数据库是NoSQL数据库。 它高效且低延迟,特别针对移动客户端。
The Realtime Database stores all data in a JSON tree. Unlike a SQL database, there are no tables and rows. That makes Firebase efficient for simple and rather flat data. It’s the ideal target for many apps, like our shopping list example.
What about pricing? You get charged for bandwidth and storage. The free “Spark Plan” already grants you 100 simultaneous connections, 1 GB of data storage and 10 GB / month data transfer. Upgrades to the “Flame Plan” and the “Blaze Plan” give you even more data allowance. Google has a good comparison table, highlighting the differences between different Firebase plans.
users: added through the authentication part. Keeps data separate for each registered user. The key is the UID of the user. The database itself doesn’t contain the email-address of the user.
shoppinglist-user: root database key, accessible by the individual logged in user. The name is set by the application, as you will do in the next step.
连接到Firebase实时数据库 (Connect to the Firebase Realtime Database)
The interface to Firebase is powerful. All connected clients get real-time updates. Plus, it offers full offline-support. When the user goes online again, the changes sync to the cloud.
Felgo includes a single item that works across Android and iOS. Especially for multi-platform scenarios, you’ll love this.
Felgo包含可在Android和iOS上使用的单个项目。 特别是对于多平台方案,您会喜欢上它。
The FirebaseDatabase QML type offers methods to retrieve and update the JSON tree in the Firebase cloud. Callbacks inform you whenever the items changed and when operations complete.
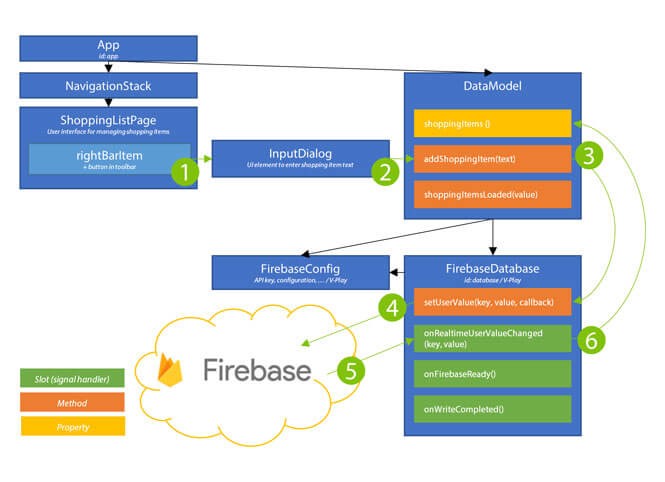
In your app architecture, you set up a data flow from the user interface to the Firebase database in the cloud:
在您的应用程序体系结构中,您设置了从用户界面到云中Firebase数据库的数据流:
A “+” button in the navigation bar (1) triggers an input dialog (2). It sends the new shopping item name to the DataModel. The DataModel abstracts the Firebase Realtime database (3). The FirebaseDatabase item from Felgo performs the cloud interaction (4).
The realtimeUserValueChanged signal fires every time the monitored keys change. E.g., by another family member sharing your shopping list account. The signal is also emitted when the connection to the database is ready after a successful login. So, it’s the only method we need to retrieve & update the shopping list items!
The shoppingItemsLoaded(value) function then assigns the items to a public property of the DataModel. It also ensures the list never gets null by using an empty array “{}” in case no shopping items have been created so far.
For debugging, you can print the raw JSON data to the console. During development, this helps to see what Firebase transmits to your app. In the video example above, this would be:
Run this codeon your iOS or Android device now, with Live Code Reloading立即通过实时代码重新加载在您的iOS或Android设备上运行此代码
准备购物清单页面(MasterPage) (Prepare the Shopping List Page (MasterPage))
The Felgo wizard already created the basic structure of a master list / detail app. You can use this as a base for customizing it to the shopping list scenario.
Run this codeon your iOS or Android device now, with Live Code Reloading立即通过实时代码重新加载在您的iOS或Android设备上运行此代码
You start with adding shopping items to your Firebase Realtime Database. The “+” button appears in the navigation bar. You achieve this through the rightBarItem, provided by the base Page QML type. Make your life even easier by using the predefined IconType.plus symbol. Thanks to Felgo’s multi-platform support, the button is always placed in the correct screen area for Android and iOS.
To enjoy even more pre-built functionality, use the ListPage QML type as base item of this QML file. “ListPage” derives from the more generic Page type. On top of the generic Page, it includes a full-screen AppListView item. It’ll contain all your shopping items. Plus, it even offers advanced features like fully-animated pull-to-refresh.
将购物商品存储在Firebase实时数据库中 (Store Shopping Items in the Firebase Realtime Database)
For a good architecture, you send the user’s new shopping item via a signal to the DataModel. So, define a signal addNewShoppingItem(string text) in the ListPage (with id masterPage). The callback function of the InputDialog then emits the signal. It sends the text entered by the user as parameter.
Now, connect the MasterPage’s signal to the DataModel’s slot. Like before for the login, define it in Main.qml. Extend your previous MasterPage definition in Main.qml:
Run this codeon your iOS or Android device now, with Live Code Reloading立即通过实时代码重新加载在您的iOS或Android设备上运行此代码
Again, the most interesting code is in DataModel. It stores the new shopping item in the Firebase Realtime Database. Add this method to your DataModel:
Run this codeon your iOS or Android device now, with Live Code Reloading立即通过实时代码重新加载在您的iOS或Android设备上运行此代码
The addShoppingItem function constructs an object “shoppingItem”. The method database.setUserValue() serializes it to JSON. Next, it’s sent to the Firebase database in the cloud. The setUserValue() method has three parameters:
The root node in the user’s JSON tree is “shoppinglist-user”. As the key, you can re-use the time stamp; you can be certain that it’s a unique identifier.用户的JSON树中的根节点是“ shoppinglist-user”。 作为密钥,您可以重新使用时间戳; 您可以确定它是唯一标识符。
Contains the key/value pairs to store in the database.包含要存储在数据库中的键/值对。
Your simple shopping list app doesn’t show that an operation is in progress. You could activate an animation when you send the data. Stop it again when you receive the loadingFinished callback. To get started, log the info to the console.
Run this codeon your iOS or Android device now, with Live Code Reloading立即通过实时代码重新加载在您的iOS或Android设备上运行此代码
The SwipeOptionsContainer QML item supports swipeable list rows in Android and iOS apps. In the next step, you will add the feature to delete the item through the swipe gesture.
Usually, list items have a very simple structure: one or two lines of text, plus an optional image. The Felgo item SimpleRow provides a ready-made layout. The three corresponding properties are: text, detailText and icon.
通常,列表项的结构非常简单:一两行文字以及可选的图片。 Felgo项目SimpleRow提供了现成的布局。 对应的三个属性是: text , detailText和icon 。
There’s one simple trick you need to be aware of. How to access the entire individual properties of the currently shown item? The model you assigned to the ListPage only contained the keys. But, the line needs to access the full data of the shopping item! This includes the name and the date.
Where can you get the complete data? It’s stored in the DataModel. Thus, you access it based on the key stored in the list view model. The relevant item data is then available through the readonly property shoppingItem. Its declaration is part of the delegate you inserted a moment ago. This is the relevant line, for reference:
Run this codeon your iOS or Android device now, with Live Code Reloading立即通过实时代码重新加载在您的iOS或Android设备上运行此代码
Here, you see your app in action:
在这里,您可以看到正在运行的应用程序:
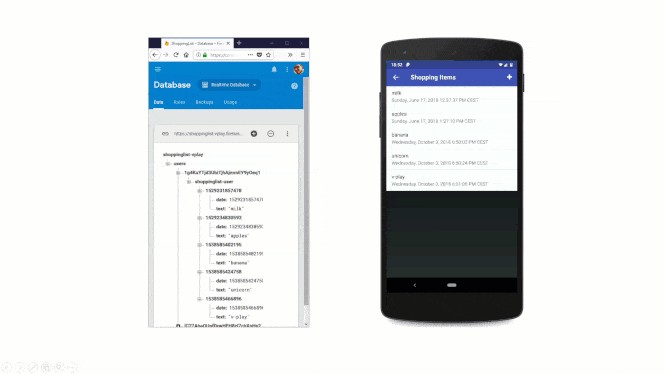
After the user logs in to the app on the phone, he adds an item with the text “Felgo” to the shopping items list. Thanks to the real-time database features, the item immediately appears in the web view. Google highlights it in green to make you aware of the change.
Even more amazing: real-time changes also work in the other direction. Try deleting a shopping item in the database view on the web. It’ll immediately disappear on the smartphone. No extra code was necessary. In DataModel, Felgo’s FirebaseDatabase item emits a signal every time the remote database changes. In your app, you reload the data based on its new contents.
从NoSQL Firebase数据库中删除项目 (Delete Items from the NoSQL Firebase Database)
Your app already handles real-time updates from the web. Now, the final extension for you to write: let the user delete the shopping items from the phone!
The SwipeOptionsContainer for the ListPage items contains useful out-of-the-box functionality. Like many other advanced apps, users can swipe the item to a side. In your QML, you specify the item to appear. In this case, choose a SwipeButton with red background color and an “X” icon. Now, whenever the user swipes and clicks on the delete button, its onClicked slot executes.
Run this codeon your iOS or Android device now, with Live Code Reloading立即通过实时代码重新加载在您的iOS或Android设备上运行此代码
In the onClicked slot, you must inform the real-time database about the deleted item. For this, add a second new signal for the ListPage item in the MasterPage:
Run this codeon your iOS or Android device now, with Live Code Reloading立即通过实时代码重新加载在您的iOS或Android设备上运行此代码
As parameter, your code sends the ID of the item to delete. Remember — we used the creation date as unique ID!
作为参数,您的代码发送要删除的项目的ID。 请记住-我们使用创建日期作为唯一ID!
The app must forward the signal to the data model. This architecture keeps the view separated from the model. So, extend the MasterPage component in Main.qml to forward the signal. For reference, this is what the complete component definition looks like now:
Run this codeon your iOS or Android device now, with Live Code Reloading立即通过实时代码重新加载在您的iOS或Android设备上运行此代码
Like adding a shopping item, the signal triggers a JavaScript function in the data model. To stick to the naming scheme, call it deleteShoppingItem(id).
As a final step, jump into DataModel.qml and add the function implementation. It’s only one line and resembles the call to add an item. The only difference: instead of setting the item data as value in the database, you now send null. The result: the item is deleted.
Run this codeon your iOS or Android device now, with Live Code Reloading立即通过实时代码重新加载在您的iOS或Android设备上运行此代码
The animation below shows how deleting item on the phone works. Again, the left side shows the real-time database view of Firebase on the web. Items instantly disappear in the web view when the user has deleted them on the phone.
Your cross-platform shopping list app is powerful:
您的跨平台购物清单应用程序功能强大:
It features an efficient UI to create new items.它具有有效的UI来创建新项目。
Delete items through an intuitive swipe gesture.通过直观的滑动手势删除项目。
All changes immediately sync to & from the cloud database.所有更改都会立即与云数据库同步并从云数据库同步。
Share the login with your family. Everyone will be up-to-date.与家人分享登录信息。 每个人都是最新的。
For shopping lists, it’s not needed too often. But, for other use cases you might also want to include functionality to edit items. As a bonus, we’ve added the necessary code to the full example on GitHub. Check it out to see how modifying existing items works! Also, the open source example is a great reference, as it includes extra code comments.