前言
上一篇介绍了一些理解和概念,本篇结合代码谈谈,本篇适合小白
代码在 github 仓库
IoC - 第一个 Spring 程序
先来个 Demo 感受一下,代码是基于 Maven 构建的,如果不熟悉 maven 可以查看公众号 JavaPub 目录学习。
-
创建项目
在 Idea 新建 Maven 项目,目录结构如图
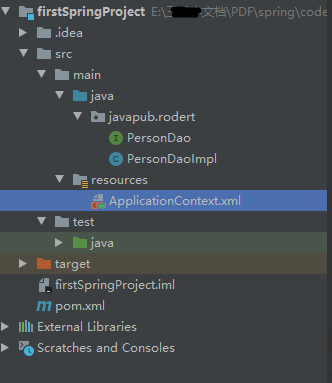
-
导入依赖 pom.xml
<?xml version="1.0" encoding="UTF-8"?>


<
project
xmlns=
"http://maven.apache.org/POM/4.0.0"


xmlns:xsi=
"http://www.w3.org/2001/XMLSchema-instance"


xsi:schemaLocation=
"http://maven.apache.org/POM/4.0.0 http://maven.apache.org/xsd/maven-4.0.0.xsd">


<
modelVersion>4.0.0
</
modelVersion>


<
groupId>javapub.rodert
</
groupId>


<
artifactId>firstSpringProject
</
artifactId>


<
version>1.0-SNAPSHOT
</
version>


<
dependencies>


<
dependency>


<
groupId>junit
</
groupId>


<
artifactId>junit
</
artifactId>


<
version>4.13
</
version>


<
scope>test
</
scope>


</
dependency>


<
dependency>


<
groupId>org.springframework
</
groupId>


<
artifactId>spring-context
</
artifactId>


<
version>5.2.7.RELEASE
</
version>


</
dependency>


<
dependency>


<
groupId>org.springframework
</
groupId>


<
artifactId>spring-core
</
artifactId>


<
version>5.2.7.RELEASE
</
version>


</
dependency>


<
dependency>


<
groupId>org.springframework
</
groupId>


<
artifactId>spring-beans
</
artifactId>


<
version>5.2.7.RELEASE
</
version>


</
dependency>


</
dependencies>


</
project>
-
在项目的 src目录下创建一个名为javapub.rodert的包,然后在该包中创建一个名为PersonDao的接口,并在接口中添加一个add()方法
package javapub.rodert;


/**

 *
@author wangshiyu rodert

 *
@date 2020/7/2 20:13

 *
@description

 */


public

interface
PersonDao {


public
void
add
();

}
-
创建接口实现类 PersonDaoImpl
在
javapub.rodert 包下创建
PersonDao 的实现类
PersonDaoImpl
package javapub.rodert;


/**

 *
@author wangshiyu rodert

 *
@date 2020/7/2 20:14

 *
@description

 */


public

class
PersonDaoImpl
implements
PersonDao {


public
void
add
() {

        System.out.println(
"执行成功!!!");

    }

}
-
创建 Spring 配置文件
Spring 配置文件是整合 Spring 的核心
<?xml version="1.0" encoding="UTF-8"?>


<
beans
xmlns=
"http://www.springframework.org/schema/beans"


xmlns:xsi=
"http://www.w3.org/2001/XMLSchema-instance"


xsi:schemaLocation=
"http://www.springframework.org/schema/beans http://www.springframework.org/schema/beans/spring-beans.xsd">


<
bean
id=
"personDao"
class=
"javapub.rodert.PersonDaoImpl"/>


</
beans>
-
到现在一个 Spring 程序已经搭建完成,测试一下
新建测试类
package javapub.rodert;


import org.junit.Test;


import org.springframework.context.ApplicationContext;


import org.springframework.context.support.ClassPathXmlApplicationContext;


/**

 *
@author wangshiyu rodert

 *
@date 2020/7/2 20:15

 *
@description

 */


public

class
PersonDaoTest {


@Test


public
void
test1
(){

        ApplicationContext applicationContext =
new ClassPathXmlApplicationContext(
"ApplicationContext.xml");

        PersonDao personDao = (PersonDao) applicationContext.getBean(
"personDao");

        personDao.add();

    }


}
返回结果:
执行成功!!!
使用 JUnit 测试运行测试方法,运行成功。在程序执行时,对象的创建并不是通过
new 一个类完成的,而是通过 Spring 容器管理实现的。这就是
Spring IoC(控制反转) 容器思想的工作机制。
Spring 依赖注入的三种方式
依赖注入(Dependency Injection,DI)和控制反转含义相同,它们是从两个角度描述的同一个概念。
当某个 Java 实例需要另一个 Java 实例时,传统的方法是由调用者创建被调用者的实例(例如,使用
new 关键字获得被调用者实例),而使用 Spring 框架后,被调用者的实例不再由调用者创建,而是由 Spring 容器创建,这称为控制反转。
属性 setter 注入
指 IoC 容器使用 setter 方法注入被依赖的实例。通过调用无参构造器或无参 static 工厂方法实例化 bean 后,调用该 bean 的 setter 方法,即可实现基于 setter 的 DI。
构造方法注入
指 IoC 容器使用构造方法注入被依赖的实例。基于构造器的 DI 通过调用带参数的构造方法实现,每个参数代表一个依赖。
根据注解注入
@Autowired
声明:参考来源互联网,有任何争议可以留言。站在前人的肩上,我们才能看的更远。
本教程纯手打,致力于最实用教程,希望多多转发支持,对我真的很重要。 欢迎来我公众号,希望可以结识你,更多原创PDF,微信搜索:JavaPub,回复:【666】,也可以催更。
有任何问题都可以来谈谈 !
下篇SSM整合
来自 “ ITPUB博客 ” ,链接:https://blog.itpub.net/69977829/viewspace-2702471/ ,如需转载,请注明出处,否则将追究法律责任。

