1. ActiveOhos功能介绍
1.1. 组件介绍
基于HarmonyOS据库进行sqlite数据库操作,创建连接时比较繁琐,本组件简化了sqlite数据库的连接,并且对HarmonyOS原生的API进行封装加强,使sqlite数据库的读写更加方便。
1.2. 手机模拟器上运行效果
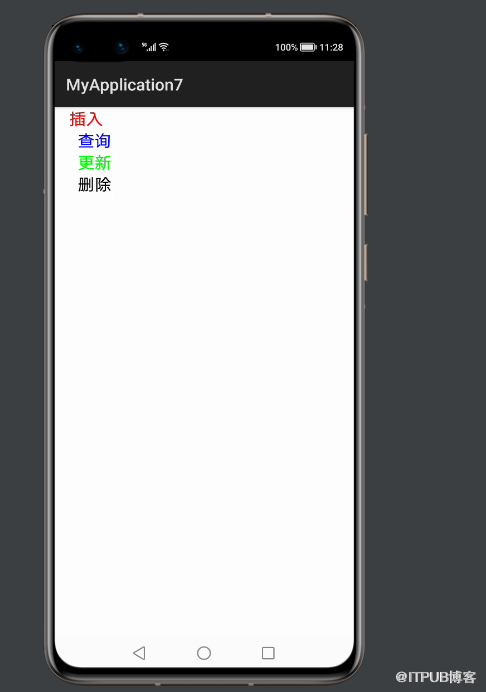
插入数据成功
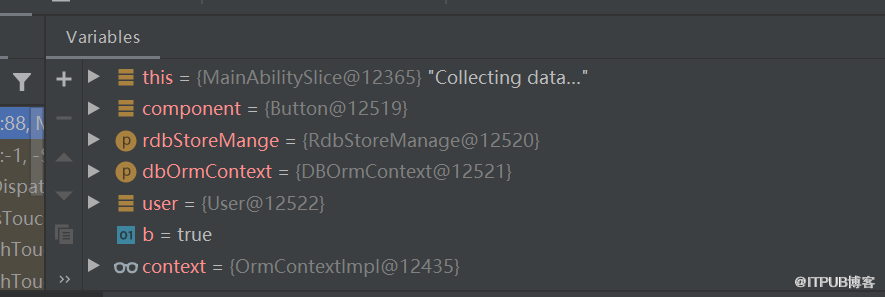
2. ActiveOhos使用方法
2.1. 为应用添加sqlitelibrary-debug.har包依赖
在应用模块中调用HAR,常用的添加依赖为:依赖本地HAR
第一步:将sqlitelibrary-debug.har复制到entry\libs目录下即可(由于build.gradle中已经依赖的libs目录下的*.har,因此不需要再做修改)。
查看工程目录中build.gradle下的*.har是否存在


第二步:除了依赖har之外还需要添加外部依赖用来实现类的引入,引入方式如下,引入完之后同步即可使用。
-
如果使用注解处理器的模块为“com.huawei.ohos.hap”,则需要在模块 “build.gradle”文件的“ohos”节点中添加以下配置:
compileOptions{
  annotationEnabled true
}
-
如果使用注解处理器的模块为“com.huawei.ohos.library”,则需要在模块“build.gradle”文件的“dependencies”节点中配置注解处理器。查看“orm_annotations_java.jar”、“orm_annotations_processor_java.jar” 、“javapoet_java.jar” 3个jar包在HUAWEI SDK中的对应目录,并将这三个jar包导入项目中。
dependencies { compile files("orm_annotations_java.jar的路径
,orm_annotations_processor_java.jar的路径,javapoet_java.jar的路径)
annotationProcessor files("orm_annotations_java.jar的路径
,orm_annotations_processor_java.jar的路径,javapoet_java.jar的路径)}
-
如果使用注解处理器的模块为“java-library”,则需要在模块 “build.gradle”文件的“dependencies”节点中配置注解处理器,并导入“ohos.jar”。
-
dependencies { compile files("ohos.jar的路径","orm_annotations_java.jar的路径
-
","orm_annotations_processor_java.jar的路径","javapoet_java.jar的路径")
-
annotationProcessor files("orm_annotations_java.jar的路径
-
","orm_annotations_processor_java.jar的路径","javapoet_java.jar的路径")}
-
比如:
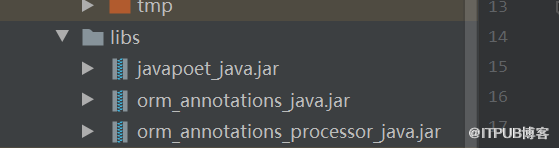
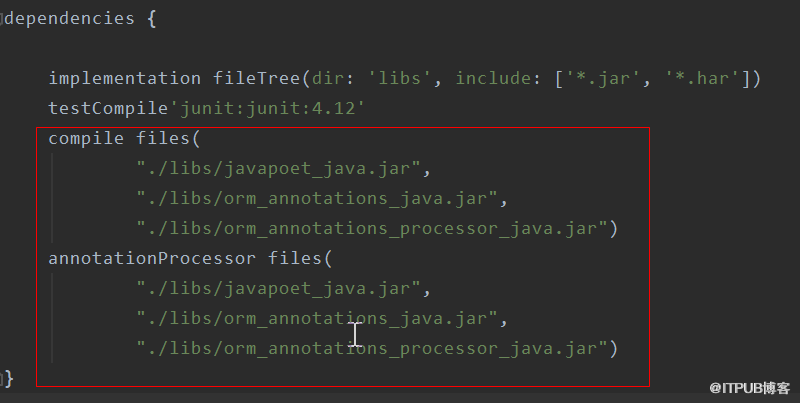
-
以上操作无误 之后就可以进行编码了!
-
3. ActiveOhos开发实现
-
3.1. 主页面的布局文件
-
定义四个按钮分别实现增删改查,定义四个Button实现请求点击事件
<?xml version="1.0" encoding="utf-8"?>
<DirectionalLayout
    xmlns:ohos="http://schemas.huawei.com/res/ohos"
    ohos:height="match_parent"
    ohos:width="match_parent"
    ohos:orientation="vertical">
    <Button
        ohos:id="$+id:btn_insert"
        ohos:height="match_content"
        ohos:width="80fp"
        ohos:text_color="red"
        ohos:text="插入"
        ohos:text_size="20fp"
        ohos:weight="100fp"/>
    <Button
        ohos:id="$+id:btn_query"
        ohos:height="match_content"
        ohos:width="100fp"
        ohos:text_color="blue"
        ohos:text="查询"
        ohos:text_size="20fp"
        ohos:weight="100fp"/>
    <Button
        ohos:id="$+id:btn_update"
        ohos:height="match_content"
        ohos:width="100fp"
        ohos:text_color="green"
        ohos:text="更新"
        ohos:text_size="20fp"
        ohos:weight="100fp"/>
    <Button
        ohos:id="$+id:btn_delete"
        ohos:height="match_content"
        ohos:width="100fp"
        ohos:text_color="black"
        ohos:text="删除"
        ohos:text_size="20fp"
        ohos:weight="100fp"/>
    <ListContainer
        ohos:id="$+id:listText"
        ohos:height="match_parent"
        ohos:width="match_parent"/>
</DirectionalLayout>
        ohos:width="match_content"
        ohos:background_element="$graphic:background_ability_main"
        ohos:layout_alignment="horizontal_center"
        ohos:text="get请求"
        ohos:text_size="50"
        ohos:top_margin="80vp"
        />
</DirectionalLayout>
-
3.2. 例子代码如下
组件中有两种连接数据的方式,分别是OrmContext,RdbStore ,其中使用OrmContext连接方式时,需要定义一个实体类(User)来和数据库对应表名及字段,一个数据库类 BookStore 来配合开发,代码如下:
MainAbilitySlice
import com.example.myapplication.BookStore;
import com.example.myapplication.ResourceTable;
import com.example.myapplication.User;
import com.example.sqlitelibrary.DBManage;
import com.example.sqlitelibrary.DBOrmContext;
import com.example.sqlitelibrary.utils.Log;
import ohos.aafwk.ability.AbilitySlice;
import ohos.aafwk.content.Intent;
import ohos.agp.components.Button;
import ohos.agp.components.Component;
import ohos.data.DatabaseHelper;
import ohos.data.orm.OrmContext;
import ohos.data.orm.OrmPredicates;
import ohos.data.rdb.RdbStore;
import ohos.data.rdb.ValuesBucket;
import java.util.ArrayList;
import java.util.List;
public class MainAbilitySlice extends AbilitySlice implements Component.ClickedListener {

    private DatabaseHelper helper;
    private RdbStore store;
    private  OrmContext context;
    @Override
    public void onStart(Intent intent) {
        super.onStart(intent);
        super.setUIContent(ResourceTable.Layout_ability_main);
        helper = new DatabaseHelper(this);
        DBManage dbManger = new DBManage("user.db","user");
        context = dbManger.getConnectionContext(helper, BookStore.class);
//         DBManage dbManger = new DBManage("user.db");
//         store = dbManger.getConnectionStore(helper,"user");
        Button btnInsert = (Button) findComponentById(ResourceTable.Id_btn_insert);
        Button btnQuery = (Button) findComponentById(ResourceTable.Id_btn_query);
        Button btnDelete = (Button) findComponentById(ResourceTable.Id_btn_delete);
        Button btnUpdate = (Button) findComponentById(ResourceTable.Id_btn_update);
        btnInsert.setClickedListener(this::onClick);
        btnQuery.setClickedListener(this::onClick);
        btnDelete.setClickedListener(this::onClick);
        btnUpdate.setClickedListener(this::onClick);
    }
    @Override
    public void onActive() {
        super.onActive();
    }
    @Override
    public void onForeground(Intent intent) {
        super.onForeground(intent);
    }
    @Override
    public void onClick(Component component) {
//        RdbStoreManage rdbStoreMange = new RdbStoreManage();
//        ValuesBucket values = new ValuesBucket();
//        values.putInteger("id", 1);
//        values.putString("name", "zhangsan");
//        values.putInteger("age", 18);
//        values.putDouble("salary", 100.5);
//        values.putByteArray("blobType", new byte[] {1, 2, 3});
//        rdbStoreMange.setSql(store, "insert into user values(zhangsan, 18, 100.5, byte[1,2,3])");
//        long id = rdbStoreMange.insert(store,"user", values);
//        System.out.println(id);
        DBOrmContext dbOrmContext = new DBOrmContext();
        switch (component.getId()) {
            case ResourceTable.Id_btn_insert: //插入数据
                //第一次使用user对应的表的时候,如果有这张表就直接使用,没有就创建表
                User user = new User();
                user.setFirstName("Zhang");
                user.setLastName("San");
                user.setAge(29);
                user.setBalance(100.51);
                boolean b = dbOrmContext.insert(context, user);
                Log.i("插入成功");
                System.out.println(b);
                break;
            case ResourceTable.Id_btn_query: //条件查询
                List<User> users = new ArrayList<>();
                OrmPredicates query = context.where(User.class).equalTo("lastName", "San");
                users = dbOrmContext.query(context, query);
                break;
            case ResourceTable.Id_btn_delete: //条件删除
                OrmPredicates delete = context.where(User.class).equalTo("lastName", "San");
                int delete1 = dbOrmContext.delete(context, delete);
                System.out.println(delete1);
                break;
            case ResourceTable.Id_btn_update: //条件更新
                ValuesBucket valuesBucket = new ValuesBucket();
                valuesBucket.putInteger("age", 31);
                valuesBucket.putString("firstName", "Zhang");
                valuesBucket.putString("lastName", "San");
                valuesBucket.putDouble("balance", 300.51);
                OrmPredicates update = context.where(User.class).equalTo("userId", 1);
                int update1 = dbOrmContext.update(context, valuesBucket, update);
                System.out.println(update1);
                break;
        }
        dbOrmContext.flush(context);
    }
}
user.java
@Entity(tableName = "user", ignoredColumns = {"ignoreColumn1", "ignoreColumn2"},
        indices = {@Index(value = {"firstName", "lastName"}, name = "name_index", unique = true)})
public class User extends OrmObject {
    // 此处将userId设为了自增的主键。注意只有在数据类型为包装类型时,自增主键才能生效。
    @PrimaryKey(autoGenerate = true)
    private Integer userId;
    private String firstName;
    private String lastName;
    private int age;
    private double balance;
    private int ignoreColumn1;
    private int ignoreColumn2;
-
// 开发者自行添加字段的getter和setter 方法
-
项目源代码地址:https://github.com/isoftstone-dev/Active_HarmonyOS
-
欢迎交流:HWIS-HOS@isoftstone.com
原文链接: https://developer.huawei.com/consumer/cn/forum/topic/0202558662106980609?fid=0101303901040230869
原作者: 软通动力HOS
来自 “ ITPUB博客 ” ,链接:https://blog.itpub.net/69970551/viewspace-2773902/ ,如需转载,请注明出处,否则将追究法律责任。

