本文大纲
攻防演练的概念
敏感信息一般存放地点
个人保护敏感信息的主要方式
需求分析
设计与实现
对比结果
总结
攻防演练是什么?
敏感信息一般存放在哪?
1. Excel文件:主要保存了一些敏感数据及各系统的密码管理。
2. 文本文件:包括txt、sh、sql文件,这些文件类型主要用于写实施方案和代码脚本。
这两类文件格式对于一个IT技术人员来说,是最常用于保存敏感信息和密码的。这些文件往往包含着重要信息,需要得到合理的保护,特别是在面临安全风险时。
个人保护敏感信息的主要方式?
3. 资料存放某个软件中:如将文件存放于OneNote,再进行加密。
4. 非系统盘压缩加密:杀敌一千,自损八百。攻击者想要访问都难,防御者自身使用受限。
5. 关机:把机器了。相当于同归于尽,攻击者想要访问,那是不可能,防御者也无法使用。(测试环境可以这么玩,生产环境还是得踏踏实实做好安全防护措施!)
需求分析

2. 扫描D盘文件:查找整盘中存在关键字的文件,并将绝对路径保存到一个`find_result_D.txt`文件里。
3. 加密Excel文件:扫描`find_result_D.txt`,查找Excel格式的文件并加密。密码要求:设置3个密码,随机选取加密。
4. 压缩并加密文本:扫描`find_result_D.txt`,查找txt、sh、sql格式的文件,对这些文件进行压缩并加密。
设计与实现
0. 查找文件
小路提及他是使用同事提供的bat文件,执行时间比较长,且占用资源多,执行完毕后也没有及时反馈。因此,我了解到敏感信息的检索关键字后,通过Python完善了整个搜索过程,包含输出结果文件、文件个数、执行用时等。
但这里bat也是有优势的,因为不需要安装Python环境,可以直接开跑。
敏感信息的关键字一般有:报告, 账, 口令, 部署, 数据, 人事, 运维, 安全等等
import os
import datetime
def search_files_by_keywords(keywords, drive_path):

    # 创建一个集合,不需要重复的元素
    files_found = set()

    for root, dirs, files in os.walk(drive_path):
        for file in files:

            # 获取该文件的绝对路径
            file_path = os.path.join(root, file)
            for keyword in keywords:

                # 将路径填写进入集合中
                if keyword.lower() in file_path.lower():
                    files_found.add(file_path)
    # 将集合转换为列表
    return list(files_found)
if __name__ == '__main__':
    #提供的关键词列表
    #keywords = [" .sql bak" ]
    keywords = ["报告", "账", "口令", "部署", "数据", "人事", "运维", "安全"]
    #keywords = ["密码", "Password", "CMDB"]

    # 搜索的磁盘路径
    drive_path = r"D:\\"

    # 开始时间
    start_time = datetime.datetime.now()

    # 查找包含关键词的文件并去重
    found_files = search_files_by_keywords(keywords, drive_path)

    # 查找的结束时间
    end_time = datetime.datetime.now()

    # 总共用时
    elapsed_time = end_time - start_time

    print(f"找到符合关键词的文件总数:{len(found_files)}")

    print(f"开始时间: {start_time}")
    print(f"结束时间: {end_time}")
    print(f"总共用时: {elapsed_time}")

    # 查找出来的文件,需要进行排序,阅读方便
    found_files.sort()

    # 将找到的文件列表写入到文件found_file_result.txt
    file_result = 'find_result_20240605.txt'
    with open(file_result, "w", encoding='utf-8') as output_file:
        for file_path in found_files:
            output_file.write(file_path + " \n")

    print(f"文件路径 : {os.path.abspath(file_result)}")
查找5000个符合关键字的文件,需要5s左右,比bat文件查找几十分钟快太多了。

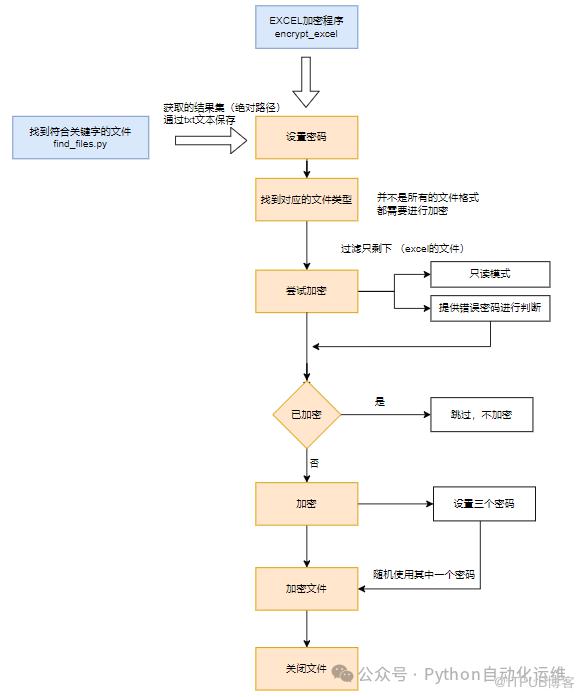
1. Python对Excel加密
利用EXCEL自带的文件加密功能进行加密。这里的Python代码没有使用随机三个密码进行加密,但是后文的文本类型加密有涉及,实现方法类似。
1.1 设计流程图
1.2. Python对Excel加密
import os
# pip install pywin32
import win32com.client as win32
import datetime

"""
在 `excel.Workbooks.Open` 方法中,参数的含义如下:
1. `FileName` (必需):要打开的工作簿的完整路径。
2. `UpdateLinks` (可选):默认值为 `0`,表示不更新链接。设置为 `0` 或 `False` 将不更新链接,设置为 `1` 或 `True` 将更新链接。
3. `ReadOnly` (可选):默认值为 `None`,表示工作簿以可编辑方式打开。设置为 `True` 将以只读方式打开工作簿。
4. `Format` (可选):默认值为 `None`,表示打开文件的类型。对于 Excel 文件,通常使用默认值。
5. `Password` (可选):要求密码以保护工作簿。如果工作簿需要密码才能打开,此参数应设置为正确的密码;否则,将引发错误。
'incorrect_password' 就是错误的密码,如果尝试使用这个错误的密码来打开工作簿,会触发密码错误的异常。
"""

def is_encrypted(file_path):
    excel = win32.gencache.EnsureDispatch('Excel.Application')
    #excel.DisplayAlerts = False
    #excel.visible = False
    try:
        # 只读方式打开EXCEL,使用错误的密码检查EXCEL是否有被加密过?
        workbook = excel.Workbooks.Open(file_path, ReadOnly=True, Password='invalid_password')
        encrypted = workbook.HasPassword
        workbook.Close(False)

    except Exception as e:
        encrypted = True
    excel.Quit()
    return encrypted

def encrypt_excel(file_path, password):
    excel = win32.gencache.EnsureDispatch('Excel.Application')
    excel.DisplayAlerts = False
    excel.Visible = False
    try:
        # 若 文件已经被加密过,则跳过!
        if is_encrypted(file_path):
            print(f"已经加密,跳过: {file_path} \n")
            return False
        else:
            workbook = excel.Workbooks.Open(file_path)
            workbook.SaveAs(
                file_path,
                FileFormat=51,  # 对应于xlsX格式
                Password=password
            )
            workbook.Close(SaveChanges=True)
            print(f"成功加密:{file_path}\n")
        return True
    except Exception as e:
        print(f"处理EXCEL文件时发生错误:{file_path} : {e}\n")
        return False
    finally:
        excel.Visible = False
        excel.DisplayAlerts = False
        excel.Quit()

def process_files(file_list_path, password):
    processed_files = 0
    encrypted_files = 0

    # 确认 待加密的清单文件是否存在
    if not os.path.exists(file_list_path):
        raise FileNotFoundError(f"未找到待加密的清单文件: {file_list_path}")
    try:
        with open(file_list_path, 'r', encoding='utf-8') as file:  # 可能是GBK,也可能是utf-8
            # with open(file_list_path, 'r',encoding= 'GBK') as file:
            file_paths = file.readlines()

    # 编码错误,抛出异常
    except UnicodeDecodeError as e:
        raise UnicodeDecodeError(f"读取待加密的清单文件时,发生编码错误:{e}")

    # 逐行寻找后缀为".xlsx"的EXCEL文件
    for file_path in file_paths:
        file_path = file_path.strip()
        if file_path.endswith('.xlsx'):
            processed_files += 1
            print(f"处理文件第{processed_files} 个: {file_path}")
        try:
            if encrypt_excel(file_path, password):
                encrypted_files += 1
        except Exception as e:
            print(f"加密失败: {file_path} : {e} \n")
    print(f"总共处理文件数量:{processed_files}")
    print(f"总共成功加密文件数量: {encrypted_files}")

if __name__ == '__main__':
    # 待加密的清单,根据 Find_Files.py获取
    file_list_path = r'D:\find_result_20240605.txt'  #替换为的文件清单路径

    # 自定义密码
    password = 'Hq_41a!lo'

    # 开始时间
    start_time = datetime.datetime.now()

    # 开始处理
    process_files(file_list_path, password)

    # 结束时间
    end_time = datetime.datetime.now()

    # 每个文件的执行时间
    elapsed_time = end_time - start_time
    print(f"开始时间:{start_time}")
    print(f"结束时间 : {end_time}")
    print(f"总共用时: {elapsed_time}")
无论是office还是WPS,都可以使用该代码进行加密。
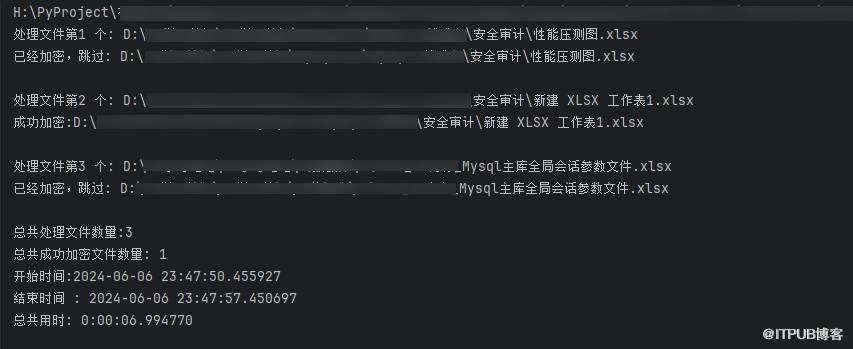
注:需要python对Excel或者office加密可能会遇到各种问题,使用该代码都可以进行加密,如果遇到这类报错,请尝试执行以下命令,自动会打开EXCEL,然后关闭。
主要目的是尝试使用以下PowerShell命令来修复Office的COM组件注册,确保Excel的COM组件正确注册,这对于能够成功调用win32com.client是至关重要的。
$officePath = "C:\Program Files\Microsoft Office\root\Office16"
$excelExe = Join-Path $officePath "EXCEL.EXE"
Start-Process -FilePath $excelExe -ArgumentList "/regserver" -Wait
2. Python对文本加密
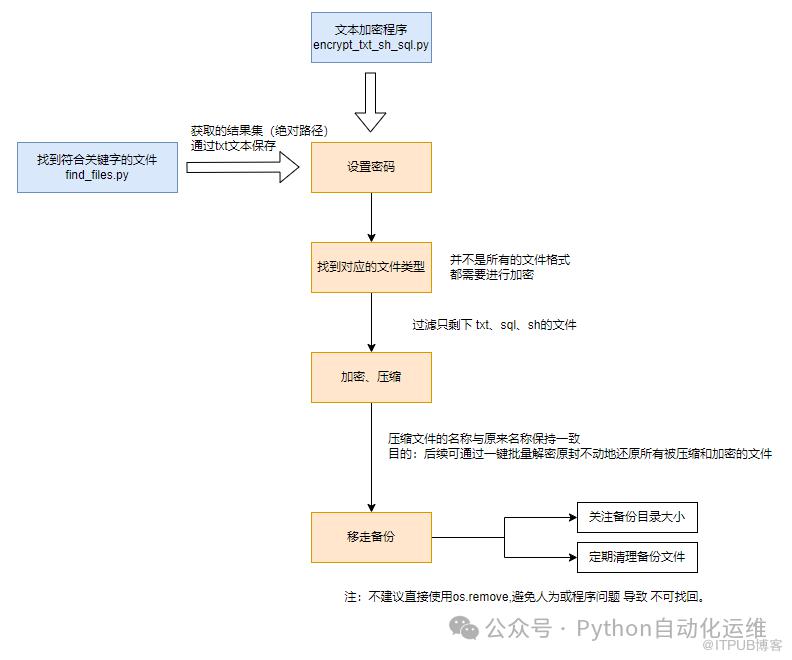
2.1 设计流程图
根据已经获取的结果集文件,从中筛选符合的文本类型文件,通过既定的随机密码为这些文本文件进行加密。后续解密时,也会随机使用这些密码进行暴力解密,除了暴力解密,还有一些相对效率较高的方式。比如,写一个密码文件,里面包含文件ID号(可省),密码ID号等。
2.2 Python对文本加密代码
import os
import random
import pyzipper
import datetime
import shutil


def read_file_list(file_list_path):
    """
    读取包含文件绝对路径的清单文件
    Args:
        file_list_path (str):清单文件路径
    Returns:
        list:所有文件绝对路径的列表
    """
    with open(file_list_path, 'r', encoding='UTF-8') as file:
        #with open(file_list_path, 'r', encoding='gbk') as file:
        file_paths = file.readlines()

    #去除每行末尾的换行符并返回
    return [file_path.strip() for file_path in file_paths]

def filter_files(files, extensions):
    """
    筛选出指定后缀的文件
    Args:
        files (list):文件绝对路径列表
        extensions (tuple):要筛选的文件后缀
    Returns:
        list:筛选后的文件绝对路径列表
    """
    return [file for file in files if file.endswith(extensions)]

def compress_and_encrypt_files(files, password):
    """
    压缩并加密指定的文件
    Args:
        files (list):要压缩的文件列表
        password (str):压缩包密码
    """
    # 处理文件个数
    processed_files = 0
    # 完成压缩和加密的文件个数
    com_encrypted_files = 0
    for file in files:
        processed_files += 1
        print(f"处理文件第{processed_files} 个: {file}")

        file_dir = os.path.dirname(file)
        file_name = os.path.basename(file)
        zip_filename = os.path.join(file_dir, file_name + '.zip')
        try:
            #随机选择―个密码进行加密。
            chosen_password = random.choice(password)
            with pyzipper.AESZipFile(zip_filename, 'w', compression=pyzipper.ZIP_DEFLATED,
                                     encryption=pyzipper.WZ_AES) as zipf:
                zipf.setpassword(chosen_password.encode())
                zipf.write(file,file_name)  # file 是文件的绝对路径,file_name 是当前文件,zip_filename是要生成的zip文件
                com_encrypted_files += 1
                print(f"成功加密: {file} ")
                #os.remove(file)
            move_file(file, file_target_path)
        except Exception as e:
            # 加密失败,需要移除无效的zip文件
            os.remove(zip_filename)
            print(f"加密失败 且 移除无效zip文件:{file}: {e} \n")

    print(f"总共处理文件数里:{processed_files}")
    print(f"总共加密文件数里: {com_encrypted_files}")

def move_file(source_path, target_path):
    shutil.move(source_path, target_path)
    print(f"该文件成功移动至备份点:{source_path} \n")

if __name__ == '__main__':
    #指定清单文件的路径
    file_list_path = r'D:\find_result_20240605.txt'  #替换为的文件清单路径

    # 备份站点
    file_target_path = r'D:\Backup_Storage'

    #指定要筛选的文件后缀
    extensions_to_filter = ('.txt', '.sh', '.sql')

    #指定压缩包密码,使用三个随机密码
    zip_password = ['20o^d9@!', '7jx_a9+1', '5?_a6.)l3']

    start_time = datetime.datetime.now()

    #读取清单文件并获取所有文件路径
    all_files = read_file_list(file_list_path)

    #筛选出指定后缀的文件
    files_to_compress = filter_files(all_files, extensions_to_filter)

    #压缩并加密文件
    compress_and_encrypt_files(files_to_compress, zip_password)

    end_time = datetime.datetime.now()
    elapsed_time = end_time - start_time

    print(f"开始时间: {start_time}")
    print(f"结束时间: {end_time}")
    print(f"总共用时: {elapsed_time}")
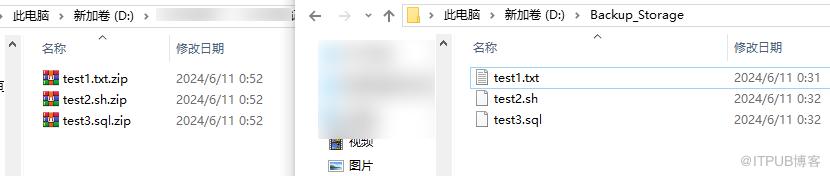
执行效果如下:
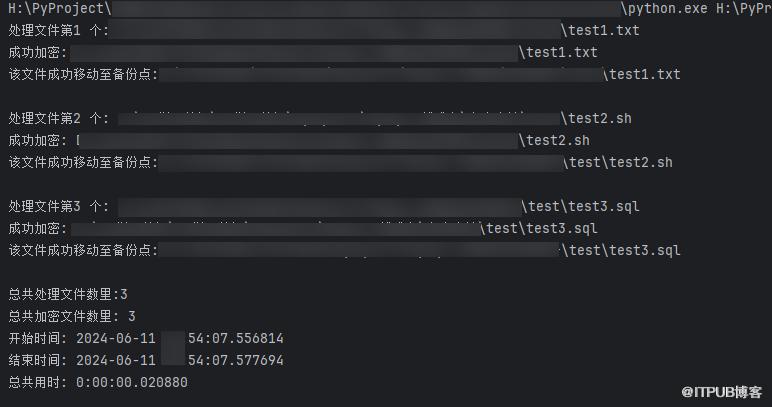
原文件目录已经压缩文件,存储目录已经保留备份文件。
对比结果(效率分析)

总结
那Python又该如何对这些不同格式的文件进行解密呢?关注我,下篇文章讲到。
自动化运维实战四 | 【实现】Mysql一键部署的前后端交互

点个“在看”再走吧 ▼
原文作者:Python自动化运维;如有侵权,请联系管理员删除。

