OBD简介
obd 全称为 OceanBase Deployer,是 OceanBase 数据库的 安装部署工具,可以通过 命令行部署或白屏界面部署 , 已成为集群与单机环境安装的 “标配利器”。按是否支持配置文件方式有可细分三种灵活部署模式: 可视化界面(obd web)配置操作、交互式命令(obd cluster deploy -i)向导式配置、配置文件(config.yaml) 批量部署, 将复杂配置流程标准化,降低集群部署难度。
其中,命令行支持编辑配置文件,可以更加灵活的进行配置调整,适用于需要深度了解 OceanBase 的用户,有一定的使用门槛;白屏界面配置简单,通过页面的引导配置即可完成集群部署,适用于需要快速体验,构建标准环境的用户。
在集群部署之外,obd 还提供了包管理器、压测软件、集群管理等常用的运维能力,更好地支持用户体验使用 OceanBase 分布式数据库。
补充:
配置文件(config.yaml) 本质也是属于命令行部署的一种。 obd cluster deploy -i 属于命令行形式,本质属于定制化部署的一种,相比obd demo/obd perf
RPM方式安装OBD
安装 obd 的方法有3种,分别是通过 OceanBase All in One 安装、使用 RPM 安装以及使用源码安装 ,其中RPM 安装方式部署,需要考虑所用机器是否可以连接外部网络,分为 在线安装 和 离线安装 两种 安装方法。需要注意的是,通过 RPM 包安装时仅安装 obd,当机器可以连接外部网络时,obd 会访问远程镜像源获取部署集群所需安装包;当机器无法连接网络时,成功安装 obd 后,您还需手动配置 obd 的本地镜像库。
本文是基于RPM 方式离线部署OBD。
下载安装介质
官方下载地址: https://www.oceanbase.com/softwarecenter
在“安装工具”模块中单机右上角向下的箭头,选择V3.5.0,根据部署环境选择对应的安装介质,本文环境是Centos7.6 2C6GB。
注意:选择对应的版本,OBD V3.5.0版本支持el7和el8
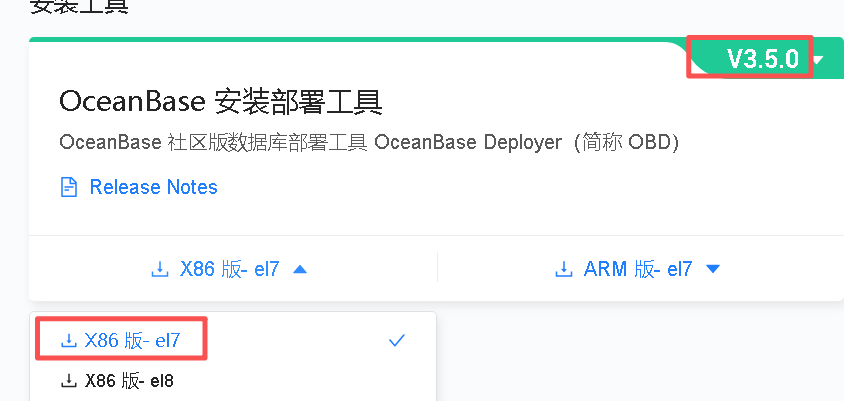
将下载文件 ob-deploy-3.5.0-5.el7.x86_64.rpm 上传至/opt目录下
安装OBD
obd 提供了部署集群所需的配置文件示例,可根据自身机器资源情况进行修改。
yum install -y ob-deploy-3.5.0-5.el7.x86_64.rpm
返回如下:
[root@localhost opt]# yum install -y ob-deploy-3.5.0-5.el7.x86_64.rpm
Loaded plugins: fastestmirror
Examining ob-deploy-3.5.0-5.el7.x86_64.rpm: ob-deploy-3.5.0-5.el7.x86_64
Marking ob-deploy-3.5.0-5.el7.x86_64.rpm to be installed
Resolving Dependencies
--> Running transaction check
---> Package ob-deploy.x86_64 0:3.5.0-5.el7 will be installed
--> Finished Dependency Resolution
Dependencies Resolved
==============================================================================================================================================================================================================
 Package                                      Arch                                      Version                                        Repository                                                        Size
==============================================================================================================================================================================================================
Installing:
 ob-deploy                                    x86_64                                    3.5.0-5.el7                                    /ob-deploy-3.5.0-5.el7.x86_64                                    177 M
Transaction Summary
==============================================================================================================================================================================================================
Install  1 Package
Total size: 177 M
Installed size: 177 M
Downloading packages:
Running transaction check
Running transaction test
Transaction test succeeded
Running transaction
Warning: RPMDB altered outside of yum.
  Installing : ob-deploy-3.5.0-5.el7.x86_64                                                                                                                                                               1/1
Installation of obd finished successfully
Please source /etc/profile.d/obd.sh to enable it
  Verifying  : ob-deploy-3.5.0-5.el7.x86_64                                                                                                                                                               1/1
Installed:
  ob-deploy.x86_64 0:3.5.0-5.el7
Complete!
启动OBD
sh /etc/profile.d/obd.sh
查看是否安装成功
obd --version
输出如下:
[root@localhost opt]# obd --version
OceanBase Deploy: 3.5.0
REVISION: 44567bd3badf6bd36a6b73f5ddcd66682da47574
BUILD_BRANCH: HEAD
BUILD_TIME: Aug 19 2025 17:18:14OURCE
Copyright (C) 2025 OceanBase
License Apache 2.0: Apache version 2 or later <https://www.apache.org/licenses/LICENSE-2.0>.
This is free software: you are free to change and redistribute it.
There is NO WARRANTY, to the extent permitted by law.
查看obc配置文件
obd 提供了部署集群所需的配置文件示例,可根据自身机器资源情况进行修改。
-
若机器中的 obd 是通过直接下载的方式安装,则可在
/usr/obd/example目录下查看 obd 提供的配置文件示例。 -
若机器中的 obd 是通过解压 all-in-one 安装包的方式安装,则可在
~/.oceanbase-all-in-one/obd/usr/obd/example目录下查看 obd 提供的配置文件示例。 - 也可在 obd 的 GitHub 仓库 中查看配置文件示例。
[root@localhost opt]# ls -l /usr/obd/example/
total 120
-rw-r--r--. 1 root root 16030 Aug 19 17:22 all-components-min.yaml
-rw-r--r--. 1 root root 16623 Aug 19 17:22 all-components.yaml
drwxr-xr-x. 2 root root   262 Sep  8 09:26 autodeploy
-rw-r--r--. 1 root root  7660 Aug 19 17:22 default-components-min.yaml
-rw-r--r--. 1 root root  7863 Aug 19 17:22 default-components.yaml
-rw-r--r--. 1 root root  4707 Aug 19 17:22 distributed-example.yaml
-rw-r--r--. 1 root root  6232 Aug 19 17:22 distributed-with-obproxy-example.yaml
drwxr-xr-x. 2 root root   129 Sep  8 09:26 grafana
-rw-r--r--. 1 root root  2376 Aug 19 17:22 local-example.yaml
-rw-r--r--. 1 root root  4693 Aug 19 17:22 mini-distributed-example.yaml
-rw-r--r--. 1 root root  6203 Aug 19 17:22 mini-distributed-with-obproxy-example.yaml
-rw-r--r--. 1 root root  2540 Aug 19 17:22 mini-local-example.yaml
-rw-r--r--. 1 root root  2808 Aug 19 17:22 mini-single-example.yaml
-rw-r--r--. 1 root root  4284 Aug 19 17:22 mini-single-with-obproxy-example.yaml
drwxr-xr-x. 2 root root   135 Sep  8 09:26 obagent
drwxr-xr-x. 2 root root   104 Sep  8 09:26 obbinlog-ce
drwxr-xr-x. 2 root root   109 Sep  8 09:26 ob-configserver
drwxr-xr-x. 2 root root   102 Sep  8 09:26 oblogproxy
drwxr-xr-x. 2 root root    84 Sep  8 09:26 obproxy
drwxr-xr-x. 2 root root  4096 Sep  8 09:26 oceanbase-3.x
drwxr-xr-x. 2 root root    88 Sep  8 09:26 ocp
drwxr-xr-x. 2 root root    35 Sep  8 09:26 ocp-express
drwxr-xr-x. 2 root root   102 Sep  8 09:26 prometheus
drwxr-xr-x. 2 root root   179 Sep  8 09:26 scale-out
-rw-r--r--. 1 root root  2644 Aug 19 17:22 single-example.yaml
-rw-r--r--. 1 root root  4155 Aug 19 17:22 single-with-obproxy-example.yaml
将安装包添加到 obd 的本地镜像库
在部署运行 obd 的操作系统用户下操作
禁用远程仓库
obd mirror disable remote
输出如下:
[root@localhost opt]# obd  mirror disable remote
Disable remote ok
Trace ID: de5b9a72-8c53-11f0-aabf-000c29e13c26
If you want to view detailed obd logs, please run: obd display-trace de5b9a72-8c53-11f0-aabf-000c29e13c26
禁用后可通过
obd mirror list
命令进行确认,查看 Type=remote 对应行的
Enabled
列展示为
False
,说明已关闭远程镜像源。
[root@localhost opt]# obd mirror list
+-----------------------------------------------------------------------------+
|                            Mirror Repository List                           |
+----------------------------+--------+---------+----------+------------------+
| SectionName                | Type   | Enabled | Avaiable | Update Time      |
+----------------------------+--------+---------+----------+------------------+
| local                      | local  | -       | True     | 2025-09-08 09:35 |
| oceanbase.community.stable | remote | False   | False    | 1970-01-01 08:00 |
| oceanbase.development-kit  | remote | False   | False    | 1970-01-01 08:00 |
+----------------------------+--------+---------+----------+------------------+
Use `obd mirror list <section name>` for more details
Trace ID: 0be40484-8c54-11f0-b554-000c29e13c26
If you want to view detailed obd logs, please run: obd display-trace 0be40484-8c54-11f0-b554-000c29e13c26
将下载好的安装包上传到本地仓库
obd mirror clone ob-deploy-3.5.0-5.el7.x86_64.rpm
输出如下:
[root@localhost opt]# obd mirror clone ob-deploy-3.5.0-5.el7.x86_64.rpm
name: ob-deploy
version: 3.5.0
release:5.el7
arch: x86_64
md5: 9f0daac3c324e745d860048bbca55f0bc77bb055
size: 185869137
add ob-deploy-3.5.0-5.el7.x86_64.rpm to local mirror
Trace ID: 932d60f2-8c54-11f0-ae0e-000c29e13c26
If you want to view detailed obd logs, please run: obd display-trace 932d60f2-8c54-11f0-ae0e-000c29e13c26
查看本地仓库的安装包列表
obd mirror list local
输出如下:
[root@localhost opt]# obd mirror list local
+-----------------------------------------------------------------------------------+
|                                 local Package List                                |
+-----------+---------+---------+--------+------------------------------------------+
| name      | version | release | arch   | md5                                      |
+-----------+---------+---------+--------+------------------------------------------+
| ob-deploy | 3.5.0   | 5.el7   | x86_64 | 9f0daac3c324e745d860048bbca55f0bc77bb055 |
+-----------+---------+---------+--------+------------------------------------------+
Trace ID: b52d7af2-8c54-11f0-bda5-000c29e13c26
If you want to view detailed obd logs, please run: obd display-trace b52d7af2-8c54-11f0-bda5-000c29e13c26
说明:
将安装包添加到 obd 的本地镜像库的主要目的是为了确保在离线环境中可以顺利地进行后续的组件升级或部署操作。当obd处于离线环境时,它无法从外部网络下载所需的RPM包来完成升级或其他操作,因此需要预先将这些RPM包添加到obd的本地镜像库中。这样,当执行如升级、部署等命令时,obd可以直接从本地镜像库中获取所需的RPM包,而不需要依赖于外部网络连接。此外,这样做也有助于提高操作的安全性和可控性,因为所有使用的软件包都可以事先经过审查和测试。
部署本地单节点 OceanBase 数据库
安装 obd 后,可执行
obd demo
或
obd pref
命令快速部署本地单节点 OceanBase 数据库。
部署前环境检查
服务器配置检查
查看CPU是否支持 AVX 指令集
服务器为 x86 架构,服务器需支持 AVX 指令集,可执行
lscpu | grep Flags | grep avx
命令查看是否支持 AVX 指令集。
仅在所用服务器为 x86 架构时有此限制,若您使用其他架构服务器,可忽略本小节内容。
返回结果如下所示,若输出中存在
avx
字段,说明该服务器支持 AVX 指令;若输出中不存在
avx
字段,则说明该服务器不支持 AVX 指令,您需更换为支持 AVX 的服务器。
[root@localhost opt]# lscpu | grep Flags | grep avx
Flags:                 fpu vme de pse tsc msr pae mce cx8 apic sep mtrr pge mca cmov pat pse36 clflush mmx fxsr sse sse2 ss syscall nx pdpe1gb rdtscp lm constant_tsc arch_perfmon nopl xtopology tsc_reliable nonstop_tsc eagerfpu pni pclmulqdq ssse3 fma cx16 pcid sse4_1 sse4_2 x2apic movbe popcnt tsc_deadline_timer aes xsave avx f16c rdrand hypervisor lahf_lm abm 3dnowprefetch invpcid_single ssbd ibrs ibpb stibp ibrs_enhanced fsgsbase tsc_adjust bmi1 avx2 smep bmi2 invpcid rdseed adx smap clflushopt xsaveopt xsavec arat md_clear spec_ctrl intel_stibp flush_l1d arch_capabilities
返回结果如下所示,若输出中存在
avx
字段,说明该服务器支持 AVX 指令;若输出中不存在
avx
字段,则说明该服务器不支持 AVX 指令,您需更换为支持 AVX 的服务器。
查看内存
查看服务器的可用内存是否满足官网《OceanBase 数据库》文档 软硬件要求 中的可用内存要求。
[root@localhost opt]# free -g
返回结果如下所示,
available
列所对应的
Mem
值为 5,满足可用内存要求。
[root@localhost opt]# free -g
              total        used        free      shared  buff/cache   available
Mem:              5           0           4           0           0           5
Swap:             1           0           1
若查看结果显示的内存不满足部署 OceanBase 数据库的内存要求,可以考虑执行如下命令清空 Linux 缓存:PageCache、dentries 和 inodes。
sudo sysctl -w vm.drop_caches=3
#或
sudo echo 3 > /proc/sys/vm/drop_caches
服务器环境检查
查看操作系统
运行以下命令,查看操作系统信息。操作系统需要满足官网《OceanBase 数据库》文档 软硬件要求 中要求。
[root@localhost opt]# cat /etc/os-release
返回结果如下所示,可以看出所用操作系统为
CentOS Linux
(
NAME
字段),版本为
7
(
VERSION
字段)。
[root@localhost opt]#  cat /etc/os-release
NAME="CentOS Linux"
VERSION="7 (Core)"
ID="centos"
ID_LIKE="rhel fedora"
VERSION_ID="7"
PRETTY_NAME="CentOS Linux 7 (Core)"
ANSI_COLOR="0;31"
CPE_NAME="cpe:/o:centos:centos:7"
HOME_URL="https://www.centos.org/"
BUG_REPORT_URL="https://bugs.centos.org/"
CENTOS_MANTISBT_PROJECT="CentOS-7"
CENTOS_MANTISBT_PROJECT_VERSION="7"
REDHAT_SUPPORT_PRODUCT="centos"
REDHAT_SUPPORT_PRODUCT_VERSION="7"
查看内核
OceanBase 数据库目前有提供 X86 版(el7 和 el8)和 ARM 版(el7 和 el8)的安装包。部署之前,请查看服务器的内核以便获取正确的安装包。
运行以下命令,查看内核信息:
[root@localhost opt]# uname -a
返回结果如下所示,机器的内核为
3.10.0-1160
,其操作系统版本为
el7
,CPU 架构为
x86_64
,因此,需要使用后缀为
el7.x86_64
的安装包,例如
oceanbase-ce-4.3.5.3-103000092025080818.el7.x86_64.rpm
。
[root@localhost opt]# uname -a
Linux localhost.localdomain 3.10.0-1160.el7.x86_64 #1 SMP Mon Oct 19 16:18:59 UTC 2020 x86_64 x86_64 x86_64 GNU/Linux
安装依赖包
配置本地yum仓库
cd /etc/yum.repos.d/
mkdir -p bak
mv *.repo bak/
mount /dev/sr0 /mnt
cat /etc/yum.repos.d/my.repo
[vcdrom]
name = vcdrom
baseurl = file:///mnt/cdrom
gpgcheck = 0
enabled = 1
安装依赖包
yum install net-tools
将下载好的安装包上传到本地仓库
下载地址: https://www.oceanbase.com/softwarecenter-standalone
obd mirror clone oceanbase-ce-4.3.5.3-103000092025080818.el7.x86_64.rpm
obd mirror clone obagent-4.2.3-200000032025071420.el7.x86_64.rpm
输出如下:
[root@localhost opt]# obd mirror clone ob-deploy-3.5.0-5.el7.x86_64.rpm
name: ob-deploy
version: 3.5.0
release:5.el7
arch: x86_64
md5: 9f0daac3c324e745d860048bbca55f0bc77bb055
size: 185869137
add ob-deploy-3.5.0-5.el7.x86_64.rpm to local mirror
Trace ID: 932d60f2-8c54-11f0-ae0e-000c29e13c26
If you want to view detailed obd logs, please run: obd display-trace 932d60f2-8c54-11f0-ae0e-000c29e13c26
查看本地仓库的安装包列表
obd mirror list local
输出如下:
[admin@localhost ~]$ obd mirror list local
+-----------------------------------------------------------------------------------------------------+
|                                          local Package List                                         |
+--------------+---------+------------------------+--------+------------------------------------------+
| name         | version | release                | arch   | md5                                      |
+--------------+---------+------------------------+--------+------------------------------------------+
| ob-deploy    | 3.5.0   | 5.el7                  | x86_64 | 9f0daac3c324e745d860048bbca55f0bc77bb055 |
| oceanbase-ce | 4.3.5.3 | 103000092025080818.el7 | x86_64 | 8120a146d35cd47a9289d91990c8b44a8c21675d |
+--------------+---------+------------------------+--------+------------------------------------------+
Trace ID: d293ea90-8d3f-11f0-97ca-000c29e13c26
If you want to view detailed obd logs, please run: obd display-trace d293ea90-8d3f-11f0-97ca-000c29e13c26
目录规划
部署 OceanBase 数据库社区版需要规划以下三个目录,同时要求文件系统类型为 XFS 或 EXT4。
- 安装目录:用于存放 OceanBase 数据库运行软件以及运行过程中系统日志的目录 ,为保证性能,空间要求 25G 以上。
- 日志保存目录:用于存放 OceanBase 数据库日志,空间要求最小为内存大小的两倍 , 推荐配置为内存大小的三倍以上 。注意是可用空间不然会报错
- 数据保存目录:用于存储数据,空间要求 最小为内存大小的两倍以上 ,取决于所需存储的数据大小。注意是可用空间不然会报错
--安装目录为 /data/base,日志保存目录为 /data/log1 ,数据保存目录为 /data/1
mkdir -p /data/{base,log1,1}
用户及参数配置
创建用户
不推荐在 root 用户下部署 OceanBase 数据库,建议创建其他用户用于部署,推荐使用 admin 用户。用户需为数据库相关目录的所有者。
- 配置 limits.conf
- 配置 sysctl.conf
- 关闭防火墙和 SELinux
obd 支持 通过主机命令组对主机和对应用户执行初始化操作 ,可选择 通过 obd 命令进行上述配置 配置,也可选择 手动配置。推荐通过 obd 命令配置 。
obd host user init -u admin --host=192.168.40.110 -p admin
--参数说明
--host=192.168.40.110:待创建用户的主机 IP(--host)
-u:待创建并初始化的用户
-p:用户密码
--赋予安装目录权限
chown -R admin:admin /data/base
chmod -R 775 /data/base
初始化主机
初始化主机
使用
admin
用户登录
192.168.40.110
机器并执行初始化操作。
使用该命令会自动修改部署 OceanBase 数据库时建议修改的
内核参数、关闭防火墙和 SELinux 功能、修改
/data/1
和
/data/log1
目录属主(如存在对应目录),并安装 network 组件
。
obd host init admin 192.168.40.110 -p admin
--参数说明
admin:配置登录用户
待初始化主机 IP:192.168.40.110
-p:登录用户密码
输出如下:
[root@localhost ~]# obd host init admin 192.168.40.110 -p admin
get system config ok
+-------------------------------------------------------------------------------------------+
|                                System Parameter Change List                               |
+----------------+------------------------------------+---------------+---------------------+
| ip             | name                               | current_value | expected_value      |
+----------------+------------------------------------+---------------+---------------------+
| 192.168.40.110 | fs.aio-max-nr                      | 65536         | 1048576             |
| 192.168.40.110 | net.core.somaxconn                 | 128           | 2048                |
| 192.168.40.110 | net.core.netdev_max_backlog        | 1000          | 10000               |
| 192.168.40.110 | net.core.rmem_default              | 212992        | 16777216            |
| 192.168.40.110 | net.core.wmem_default              | 212992        | 16777216            |
| 192.168.40.110 | net.core.rmem_max                  | 212992        | 16777216            |
| 192.168.40.110 | net.core.wmem_max                  | 212992        | 16777216            |
| 192.168.40.110 | net.ipv4.tcp_rmem                  | 6291456       | 4096 87380 16777216 |
| 192.168.40.110 | net.ipv4.tcp_wmem                  | 16384         | 4096 65536 16777216 |
| 192.168.40.110 | net.ipv4.tcp_max_syn_backlog       | 256           | 16384               |
| 192.168.40.110 | net.ipv4.tcp_fin_timeout           | 60            | 15                  |
| 192.168.40.110 | net.ipv4.tcp_slow_start_after_idle | 1             | 0                   |
| 192.168.40.110 | vm.swappiness                      | 30            | 0                   |
| 192.168.40.110 | vm.min_free_kbytes                 | 67584         | 2097152             |
| 192.168.40.110 | fs.file-max                        | 579342        | 6573688             |
| 192.168.40.110 | fs.pipe-user-pages-soft            | 16384         | 0                   |
| 192.168.40.110 | vm.max_map_count                   | 65530         | 655360              |
+----------------+------------------------------------+---------------+---------------------+
disabling selinux ok
modify system parameters
192.168.40.110: ( fs.aio-max-nr,net.core.somaxconn,net.core.netdev_max_backlog,net.core.rmem_default,net.core.wmem_default... ) have been successfully modified!
Trace ID: 498f0664-8c84-11f0-b757-000c29e13c26
If you want to view detailed obd logs, please run: obd display-trace 498f0664-8c84-11f0-b757-000c29e13c26
查看目录权限:
--未初始化前
[root@localhost ~]# ls -l /data
total 0
drwxr-xr-x 2 root root 6 Sep  9 11:31 1
drwxr-xr-x 2 root root 6 Sep  9 11:31 base
drwxr-xr-x 2 root root 6 Sep  9 11:31 log1
--初始化后
[root@localhost ~]# ls -l /data
total 0
drwxr-xr-x 2 admin root 6 Sep  9 11:31 1
drwxr-xr-x 2 root  root 6 Sep  9 11:31 base
drwxr-xr-x 2 admin root 6 Sep  9 11:31 log1
查看 admin 用户情况
[root@localhost ~]# sudo -l -U admin
输出如下:
[root@localhost ~]# sudo -l -U admin
Matching Defaults entries for admin on localhost:
    !visiblepw, always_set_home, match_group_by_gid, always_query_group_plugin, env_reset, env_keep="COLORS DISPLAY HOSTNAME HISTSIZE KDEDIR LS_COLORS", env_keep+="MAIL PS1 PS2 QTDIR USERNAME LANG
    LC_ADDRESS LC_CTYPE", env_keep+="LC_COLLATE LC_IDENTIFICATION LC_MEASUREMENT LC_MESSAGES", env_keep+="LC_MONETARY LC_NAME LC_NUMERIC LC_PAPER LC_TELEPHONE", env_keep+="LC_TIME LC_ALL LANGUAGE LINGUAS
    _XKB_CHARSET XAUTHORITY", secure_path=/sbin\:/bin\:/usr/sbin\:/usr/bin
User admin may run the following commands on localhost:
    (ALL) NOPASSWD: ALL  #表示 admin 用户拥有了免密 sudo 的权限。
验证 ulimit 配置是否生效
切换到 admin 用户下执行如下命令,查看配置是否生效。
su - admin
ulimit -a
输出如下:
[root@localhost ~]# su - admin
Last failed login: Mon Sep  8 14:48:09 CST 2025 from 192.168.40.110 on ssh:notty
There were 10 failed login attempts since the last successful login.
[admin@localhost ~]$ ulimit -a
core file size          (blocks, -c) unlimited
data seg size           (kbytes, -d) unlimited
scheduling priority             (-e) 0
file size               (blocks, -f) unlimited
pending signals                 (-i) 23696
max locked memory       (kbytes, -l) 64
max memory size         (kbytes, -m) unlimited
open files                      (-n) 655350
pipe size            (512 bytes, -p) 8
POSIX message queues     (bytes, -q) 819200
real-time priority              (-r) 0
stack size              (kbytes, -s) unlimited
cpu time               (seconds, -t) unlimited
max user processes              (-u) 655360
virtual memory          (kbytes, -v) unlimited
file locks                      (-x) unlimited
需关注如下字段值:
-
core file size表示核心文件的最大阈值(以块为单位),对应limits.conf配置文件中的 core 参数,需查看值是否为unlimited。 -
open files表示最大打开文件描述符数,对应limits.conf配置文件中的 nofile 参数,需查看值是否为655350。 -
stack size表示堆栈大小(以千字节为单位),对应limits.conf配置文件中的 stack 参数,需查看值是否为unlimited。 -
max user processes表示最大用户进程数,对应limits.conf配置文件中的 nproc 参数,需查看值是否为655360。
检查主机是否满足要求
obd host precheck admin 192.168.40.110 -p admin
输出如下:
[admin@localhost ~]$ obd host precheck admin 192.168.40.110 -p admin
get system config ok
No need to change system parameters
Trace ID: e6d6b978-8d27-11f0-8263-000c29e13c26
If you want to view detailed obd logs, please run: obd display-trace e6d6b978-8d27-11f0-8263-000c29e13c26
若存在不符合要求的检查项,输出中将会展示对应信息,您可执行
obd host user init
或
obd host init
命令进行初始化。存在不符合要求的检查项的示例如下:
[admin@localhost ~]$ obd host precheck admin 192.168.40.110 -p admin
get system config ok
[WARN] SELinux is not in a disabled state.  --需要重启生效
[WARN] The net-tools package is not installed.  --需要配置yum仓库安装
No need to change system parameters
please run: `yum install net-tools` or `sudo apt install net-tools`
Please run `obd host init admin 192.168.40.110 -p '******'` to init host.
Trace ID: 81342fae-8c98-11f0-9f97-000c29e13c26
If you want to view detailed obd logs, please run: obd display-trace 81342fae-8c98-11f0-9f97-000c29e13c26
启动交互式部署安装
执行如下命令启动交互式安装流程。
obd cluster deploy -i
按照参数逐步安装即可,安装后数据库信息
#Saved configurations:
cluster name: myoceanbase
mysql port: 2881
rpc port: 2882
obshell port: 2886
cpu count: 8
memory limit: 6G
home path: /data/base/myoceanbase/oceanbase_name
data dir: /data/1/myoceanbase
log dir: /data/log1/myoceanbase
datafile maxsize: 12G
log disk size: 12G
tenant name: dxj
tenant cpu: 1
tenant memory: 2G
tenant log disk size: 4G
租户dxj和root密码需要手动保存,避免时间长忘记。
以下是详细的安装过程:
[admin@localhost ~]$ obd cluster deploy -i
----填写部署相关信息 进入交互式安装流程后,需在打印内容的对应位置输入待安装 OceanBase 数据库的相关信息,或直接单击键盘 Enter 键使用默认值。
Enter the IP (Default: 127.0.0.1): 192.168.40.110
Enter the current user password:
get system config ok
No need to change system parameters
Do you want to modify the parameters above? [y/n] [Default: y]:
get system config ok
No need to change system parameters
Enter the cluster name (Default: myoceanbase; allowed characters: letters, numbers, and underscores):
+-----------------------------------------------------------------------------------------------------+
|                                         Available Oceanbase                                         |
+--------------+---------+------------------------+--------+------------------------------------------+
| name         | version | release                | arch   | md5                                      |
+--------------+---------+------------------------+--------+------------------------------------------+
| oceanbase-ce | 4.3.5.3 | 103000092025080818.el7 | x86_64 | 8120a146d35cd47a9289d91990c8b44a8c21675d |
+--------------+---------+------------------------+--------+------------------------------------------+
Enter the OB SQL port (Default: 2881):
Enter the OB RPC port (Default: 2882):
Enter the obshell port (Default: 2886):
Enter the OB root password (Default: WgnHVW73cV7OGY4QDABT):
Enter the OB cpu count (Default: 2):
The cpu_count cannot be less than 8. It will be set to 8 automatically.
Enter the OB memory limit (Configurable Range[6, 6], Default: 6, Unit: G):
Enter the OB installation directory (Default: /home/admin/myoceanbase): /data/base/myoceanbase
Enter the OB data directory (Default: /data/1/myoceanbase):
Enter the OB log directory (Default: /data/log1/myoceanbase):
Cluster optimization scenario not specified, please specify the scenario you want to optimize.
1. express_oltp
2. complex_oltp
3. olap
4. htap (default)
5. kv
Please input the scenario you want to optimize [default: 4]:
The data_dir and redo_dir are using the same disk.
Enter the log disk size (Configurable Range[12, 16], Default: 16 , unit: G): 12
Enter the datafile maxsize (Configurable Range[12, 48], Default: 48 , unit: G): 12
Do you want to create tenant for your business workload? [y/n] [Default: y]:
Tenant: sys conifguration: 2C/2G/3G(CPU/Memory/Log disk)
system_memory configuration(Unit: G): 1G
Enter the tenant name (Default: test; allowed characters: letters, numbers, and underscores): dxj
Enter the tenant password:
Confirm the tenant password:
Enter the tenant cpu (Configurable Range[1, 6], Default: 6 ): 1
Enter the tenant memory (Configurable Range[2, 3], Default: 3 , unit: G): 2
Enter the tenant log disk size (Configurable Range[4, 9], Default: 4 , unit: G):
    Please select the character (enter the corresponding number):
    1) utf8mb4
    2) utf16
    3) gbk
    4) gb18030
    5) binary
Enter the tenant charset (Default: 1):
    Please select the tenant collation (enter the corresponding number):
    1) utf8mb4_general_ci
    2) utf8mb4_bin
    3) utf8mb4_unicode_ci
    4) utf8mb4_unicode_520_ci
    5) utf8mb4_croatian_ci
    6) utf8mb4_czech_ci
    7) utf8mb4_0900_ai_ci
Enter the tenant collation (Default: 1):
    Please select the tenant time zone (enter the corresponding number):
    1) -12:00(International Date Line West)
    2) -11:00(Samoa Standard Time)
    3) -10:00(Hawaii-Aleutian Standard Time)
    4) -09:00(Alaska Standard Time)
    5) -08:00(Pacific Standard Time)
    6) -07:00(Mountain Standard Time)
    7) -06:00(Central Standard Time)
    8) -05:00(Eastern Standard Time)
    9) -04:00(Atlantic Standard Time)
    10) -03:00(Brasilia Standard Time)
    11) -02:00(Mid-Atlantic Standard Time)
    12) -01:00(Azores Standard Time)
    13) +00:00(Greenwich Mean Time)
    14) +01:00(Central European Time)
    15) +02:00(Eastern European Time)
    16) +03:00(Moscow Standard Time)
    17) +04:00(Gulf Standard Time)
    18) +05:00(Pakistan Standard Time)
    19) +06:00(Bangladesh Standard Time)
    20) +07:00(Indochina Time)
    21) +08:00(China Standard Time)
    22) +09:00(Japan Standard Time)
    23) +10:00(Australian Eastern Standard Time)
    24) +11:00(Solomon Islands Time)
    25) +12:00(New Zealand Standard Time)
    26) +13:00(Tonga Standard Time)
    27) +14:00(Line Islands Time)
Enter the tenant time zone (Default: 21):
    Please select case sensitivity for table names:
    0) Table names are stored as specified and compared case-sensitively
    1) Table names are stored in lowercase and compared case-insensitively
    2) Table names are stored as specified but compared case-insensitively
Please enter your choice [0/1/2] [default 1]:
Do you need to install the monitoring components (OBAgent, Prometheus, Grafana)? [y/n] [Default: n]:
#Saved configurations:
cluster name: myoceanbase
mysql port: 2881
rpc port: 2882
obshell port: 2886
cpu count: 8
memory limit: 6G
home path: /data/base/myoceanbase/oceanbase_name
data dir: /data/1/myoceanbase
log dir: /data/log1/myoceanbase
datafile maxsize: 12G
log disk size: 12G
tenant name: dxj
tenant cpu: 1
tenant memory: 2G
tenant log disk size: 4G
Are you sure these configurations are correct? [y/n] [Default: y]:
Configuration confirmed.
Do you want to enable encryption for password security (default_encryption_passkey: 123456)? [y/n] [Default: n]:
--配置完上述信息之后,会自动安装数据库等,具体返回内容如下:
Package oceanbase-ce-4.3.5.3-103000092025080818.el7 is available.
install oceanbase-ce-4.3.5.3 for local ok
Cluster param config check ok
Open ssh connection ok
+--------------------------------------------------------------------------------------------+
|                                          Packages                                          |
+--------------+---------+------------------------+------------------------------------------+
| Repository   | Version | Release                | Md5                                      |
+--------------+---------+------------------------+------------------------------------------+
| oceanbase-ce | 4.3.5.3 | 103000092025080818.el7 | 8120a146d35cd47a9289d91990c8b44a8c21675d |
+--------------+---------+------------------------+------------------------------------------+
Repository integrity check ok
Load param plugin ok
Open ssh connection ok
Initializes observer work home ok
Parameter check ok
Remote oceanbase-ce-4.3.5.3-103000092025080818.el7-8120a146d35cd47a9289d91990c8b44a8c21675d repository install ok
Remote oceanbase-ce-4.3.5.3-103000092025080818.el7-8120a146d35cd47a9289d91990c8b44a8c21675d repository lib check ok
myoceanbase deployed
Get local repositories ok
Load cluster param plugin ok
Open ssh connection ok
[WARN] OBD-1012: (192.168.40.110) clog and data use the same disk (/)
cluster scenario: htap
Start observer ok
observer program health check ok
Connect to observer 192.168.40.110:2881 ok
oceanbase bootstrap ok
obshell start ok
obshell program health check ok
obshell bootstrap ok
Connect to observer 192.168.40.110:2881 ok
Wait for observer init ok
+--------------------------------------------------+
|                   oceanbase-ce                   |
+----------------+---------+------+-------+--------+
| ip             | version | port | zone  | status |
+----------------+---------+------+-------+--------+
| 192.168.40.110 | 4.3.5.3 | 2881 | zone1 | ACTIVE |
+----------------+---------+------+-------+--------+
obclient -h192.168.40.110 -P2881 -uroot@sys -p'WgnHVW73cV7OGY4QDABT' -Doceanbase -A
cluster unique id: e4832a95-1ae5-5f61-8784-203312e169bb-1992d0904d6-03050304
obshell program health check ok
display ob-dashboard ok
+---------------------------------------------------------------------+
|                             ob-dashboard                            |
+----------------------------+------+------------------------+--------+
| url                        | user | password               | status |
+----------------------------+------+------------------------+--------+
| http://192.168.40.110:2886 | root | 'WgnHVW73cV7OGY4QDABT' | active |
+----------------------------+------+------------------------+--------+
myoceanbase running
Get local repositories ok
Open ssh connection ok
Connect to observer 192.168.40.110:2881 ok
Create tenant dxj ok
obclient -h192.168.40.110 -P'2881' -p'dxj' -uroot@dxj -Doceanbase -A
optimize tenant with scenario: htap ok
See https://www.oceanbase.com/product/ob-deployer/error-codes .
Trace ID: d2927614-8d40-11f0-89d4-000c29e13c26
If you want to view detailed obd logs, please run: obd display-trace d2927614-8d40-11f0-89d4-000c29e13c26
问题处理
[admin@localhost ~]$ obd cluster deploy -i
Enter the IP (Default: 127.0.0.1): 192.168.40.110
Enter the current user password:
get system config ok
No need to change system parameters
Do you want to modify the parameters above? [y/n] [Default: y]:
get system config ok
No need to change system parameters
Enter the cluster name (Default: myoceanbase; allowed characters: letters, numbers, and underscores):
+-----------------------------------------------------------------------------------------------------+
|                                         Available Oceanbase                                         |
+--------------+---------+------------------------+--------+------------------------------------------+
| name         | version | release                | arch   | md5                                      |
+--------------+---------+------------------------+--------+------------------------------------------+
| oceanbase-ce | 4.3.5.3 | 103000092025080818.el7 | x86_64 | 8120a146d35cd47a9289d91990c8b44a8c21675d |
+--------------+---------+------------------------+--------+------------------------------------------+
Enter the OB SQL port (Default: 2881):
Enter the OB RPC port (Default: 2882):
Enter the obshell port (Default: 2886):
Enter the OB root password (Default: 7VgTKmtayeLXZonzJ3MY):
Enter the OB cpu count (Default: 2):
The cpu_count cannot be less than 8. It will be set to 8 automatically.
[ERROR] The machine's minimum memory cannot be less than min_value (6G). Please try again.
See https://www.oceanbase.com/product/ob-deployer/error-codes .
Trace ID: ea45a458-8d30-11f0-8df1-000c29e13c26
If you want to view detailed obd logs, please run: obd display-trace ea45a458-8d30-11f0-8df1-000c29e13c26
[admin@localhost ~]$ free -g
              total        used        free      shared  buff/cache   available
Mem:              7           0           4           0           2           3
Swap:             1           0           1
查看结果显示的内存不满足部署 OceanBase 数据库的内存要求,执行如下命令清空 Linux 缓存:PageCache、dentries 和 inodes。
sudo sysctl -w vm.drop_caches=3
#或
sudo echo 3 > /proc/sys/vm/drop_caches
再次安装依然报错: [ERROR] The machine's minimum memory cannot be less than min_value (6G). Please try again.
[admin@localhost ~]$ free -g
              total        used        free      shared  buff/cache   available
Mem:              7           0           7           0           0           4
Swap:             1           0           1
临时解决办法将内存从8G扩到10G,注意官方文档上写的低配6G是指可用内存而不是服务器内存或free值,而是指available值。
[root@localhost ~]# free -g
              total        used        free      shared  buff/cache   available
Mem:              9           0           9           0           0           6
Swap:             1           0           1
查看安装日志:obd display-trace 9219b20a-8c69-11f0-9b67-000c29e13c26
安装命令行客户端
官方下载地址: https://www.oceanbase.com/softwarecenter
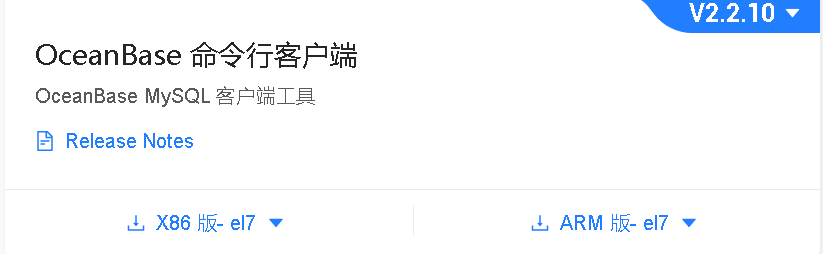
官网下载命令行客户端工具并上传到/opt目录下,进行安装
--安装命令行客户端
yum install -y obclient-2.2.10-4.el7.x86_64.rpm
--将下载好的安装包上传到本地仓库
obd mirror clone obclient-2.2.10-4.el7.x86_64.rpm
--查看本地仓库的安装包列表
obd mirror list local
输出如下:
+-----------------------------------------------------------------------------------------------------+
|                                          local Package List                                         |
+--------------+---------+------------------------+--------+------------------------------------------+
| name         | version | release                | arch   | md5                                      |
+--------------+---------+------------------------+--------+------------------------------------------+
| ob-deploy    | 3.5.0   | 5.el7                  | x86_64 | 9f0daac3c324e745d860048bbca55f0bc77bb055 |
| oceanbase-ce | 4.3.5.3 | 103000092025080818.el7 | x86_64 | 8120a146d35cd47a9289d91990c8b44a8c21675d |
| obclient     | 2.2.10  | 4.el7                  | x86_64 | 9fbbf7ddf0562b8c5f2b1680e97d49863eac8a0c |
+--------------+---------+------------------------+--------+------------------------------------------+
注意:若不安装连接 OceanBase 数据库会提示obclient命令不存在。
验证部署结果
登录 sys 租户
使用上述部署结果中,输出的连接串连接 OceanBase 数据库的 sys 租户
obclient -h192.168.40.110 -P2881 -uroot@sys -p'WgnHVW73cV7OGY4QDABT' -Doceanbase -A
输出如下:
[admin@localhost ~]$ obclient -h192.168.40.110 -P2881 -uroot@sys -p'WgnHVW73cV7OGY4QDABT' -Doceanbase -A
Welcome to the OceanBase.  Commands end with ; or \g.
Your OceanBase connection id is 3221580463
Server version: OceanBase_CE 4.3.5.3 (r103000092025080818-e8da5f0afb288ed0add0613740c6ccf2a3c6830b) (Built Aug  8 2025 18:44:31)
Copyright (c) 2000, 2018, OceanBase and/or its affiliates. All rights reserved.
Type 'help;' or '\h' for help. Type '\c' to clear the current input statement.
obclient(root@sys)[oceanbase]>
登录创建的普通租户
输出的连接串连接 OceanBase 数据库的创建的普通租户
obclient -h192.168.40.110 -P'2881' -p'dxj' -uroot@dxj -Doceanbase -A
输出如下:
[admin@localhost ~]$ obclient -h192.168.40.110 -P'2881' -p'dxj' -uroot@dxj -Doceanbase -A
Welcome to the OceanBase.  Commands end with ; or \g.
Your OceanBase connection id is 3221628179
Server version: OceanBase_CE 4.3.5.3 (r103000092025080818-e8da5f0afb288ed0add0613740c6ccf2a3c6830b) (Built Aug  8 2025 18:44:31)
Copyright (c) 2000, 2018, OceanBase and/or its affiliates. All rights reserved.
Type 'help;' or '\h' for help. Type '\c' to clear the current input statement.
obclient(root@dxj)[oceanbase]>
至此,通过OBD离线部署OceanBase部署完成。
总结
OBD离线部署很便捷,仅通过一个轻便的rpm包即可完成部署。而通过OBD离线部署OceanBase数据库前期需要注意硬件配置尤其是内存方面需要注意最低内存是指available值,非total和free值。
附录: OceanBase 服务端进程 & 生态产品默认端口号
介绍 OceanBase 服务端进程和 OceanBase 生态各产品进程的默认端口号。
OceanBase 服务端进程默认端口号
OceanBase 产品族中,目前运行在服务端的进程包括
observer
、
obproxy
等。目前他们使用的默认端口号如下。
|
产品 |
默认端口号 |
配置项 |
是否支持自定义 |
含义 |
|
observer |
2881 |
|
1.使用 OBD 部署和手动部署支持自定义; 2.使用 OCP 4.0.3 及以上版本部署支持自定义 |
SQL 服务端口 |
|
observer |
2882 |
|
1.使用 OBD 部署和手动部署支持自定义; 2.使用 OCP 4.0.3 及以上版本部署支持自定义 |
RPC 服务端口 |
|
obproxy |
2883 |
|
是 |
SQL 服务端口 |
|
obproxy |
2884 |
|
是 |
OBProxy prometheus 监听端口 |
|
obagent |
8088 |
|
是 |
OBAgent 的监控采集端口 |
|
obagent |
8089 |
|
是 |
OBAgent 的运维监听端口 |
生态产品默认端口号
OceanBase 生态产品,包括 OCP、ODC、OMS 等,有诸多组件。目前他们使用的默认端口号如下。
|
产品 |
默认端口号 |
是否支持自定义 |
含义 |
|
ODC |
8989 |
是 |
WEB 服务监听端口 |
|
OMS |
8089/8090 |
否 |
OMS 管理控制台对应端口 |
|
OMS |
8088 |
否 |
OMS 集群管理 http 端口 |
|
OMS |
9000/9001 |
否 |
OMS Worker agent http 端口 |
|
OMS |
16000~16499
|
否 |
OMS 内部组件通信使用 |
|
OCP |
8080 |
是 |
OCP-Server web 服务监听端口,通常其它组件通过 SLB/DNS 地址访问 OCP-Server |
|
OCP |
62888 |
否 |
OCP-Agent 的运维监听端口 |
|
OCP |
62889 |
否 |
OCP-Agent 的监控采集端口 |
|
OCP |
2911 |
否 |
备份 Agent 监听端口(当使用逻辑备份功能,并安装Backup-Agent 时,才监听该端口。逻辑备份最高支持到内核2.2.52版本) |
|
OCP |
2912 |
否 |
恢复 Agent 监听端口(当使用逻辑备份功能,并安装Backup-Agent 时,才监听该端口。逻辑备份最高支持到内核2.2.52 版本) |
|
OCP-Express |
8180 |
是 |
Server 的 Web 服务监听端口 |
|
OBD Web |
8680 |
是 |
OBD 白屏 web 工具端口 |
|
Prometheus |
9090 |
是 |
prometheus 的 Web 服务监听端口 |
|
Grafana |
3000 |
是 |
grafana-server 的 Web 服务监听端口 |
来自 “ ITPUB博客 ” ,链接:https://blog.itpub.net/69963491/viewspace-3095265/ ,如需转载,请注明出处,否则将追究法律责任。

