本文收录在个人博客: www.chengxy-nds.top,技术资源共享。
上一篇
《OAuth2.0 的四种授权方式》文末说过,后续要来一波
OAuth2.0实战,耽误了几天今儿终于补上了。
最近在做自己的开源项目(
fire),
Springboot +
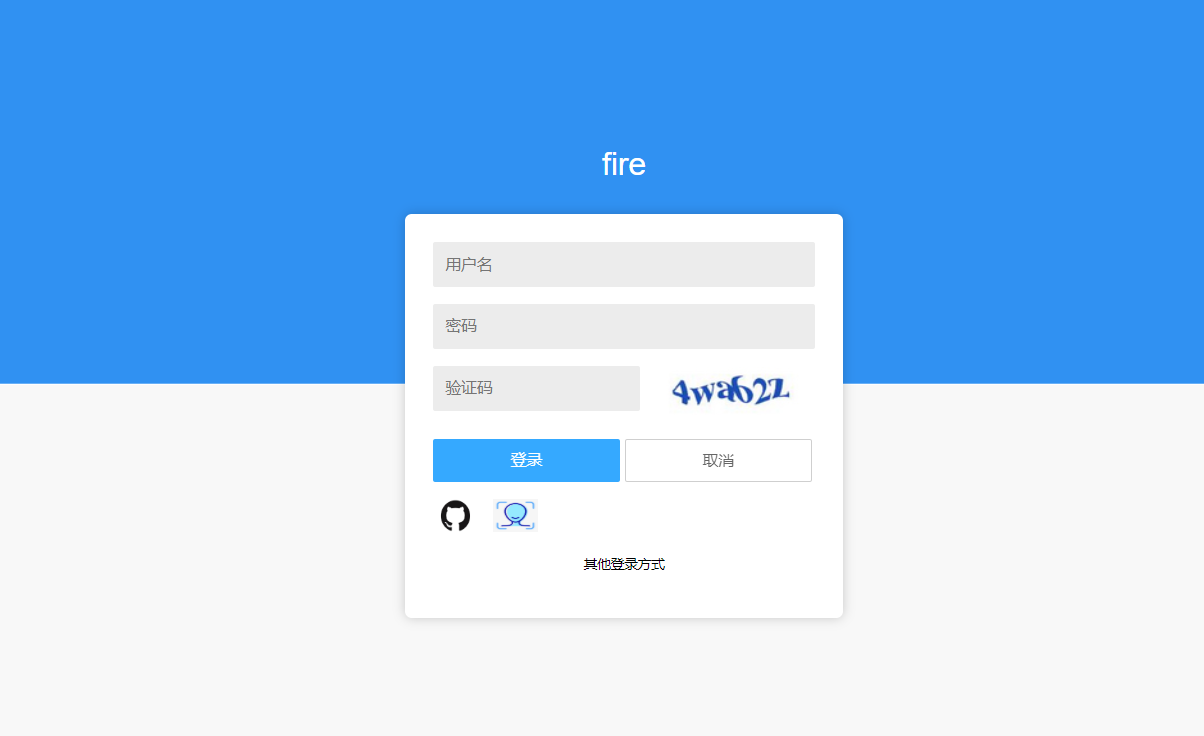
vue 的前后端分离框架才搭建完,刚开始做登录功能,做着做着觉得普通账户密码登录太简单了没啥意思,思来想去为显得逼格高一点,决定再加上
GitHub授权 和
人脸识别等多种登录方式。
 在这里插入图片描述
而
GitHub授权登录正好用到了
OAuth2.0中最复杂的授权码模式,正好拿我这个案例给大家分享一下
OAuth2.0的授权过程,后续项目功能会持续更新。
一、授权流程
在具体做
GitHub授权登录之前,咱们再简单回顾一下
OAuth2.0授权码模式的授权流程,如果
fire 网站允许 用
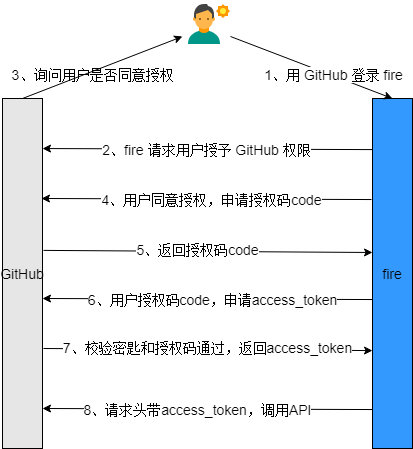
GitHub 账号登录,流程大致如下图。
 在这里插入图片描述
用户想用
GitHub 账号去登录
fire 网站:
-
fire网站先让用户跳转到GitHub进行授权,会弹出一个授权框。 -
用户同意后, GitHub会根据redirect_uri重定向回fire网站,同时返回一个授权码code。 -
fire网站使用授权码和客户端密匙client_secret,向 GitHub 请求令牌token,检验通过返回令牌。 -
最后 fire网站向GitHub请求数据,每次调用 GitHub 的API都要带上令牌。
二、身份注册
梳理完授权逻辑,接下来我们还有一些准备工作。
要想得到一个网站的
OAuth授权,必须要到它的网站进行身份注册,拿到应用的身份识别码
ClientID 和
ClientSecret。
注册
传送门
https://github.com/settings/applications/1334665,有几个必填项。
-
Application name:我们的应用名; -
Homepage URL:应用主页链接; -
Authorization callback URL:这个是github回调我们项目的地址,用来获取授权码和令牌。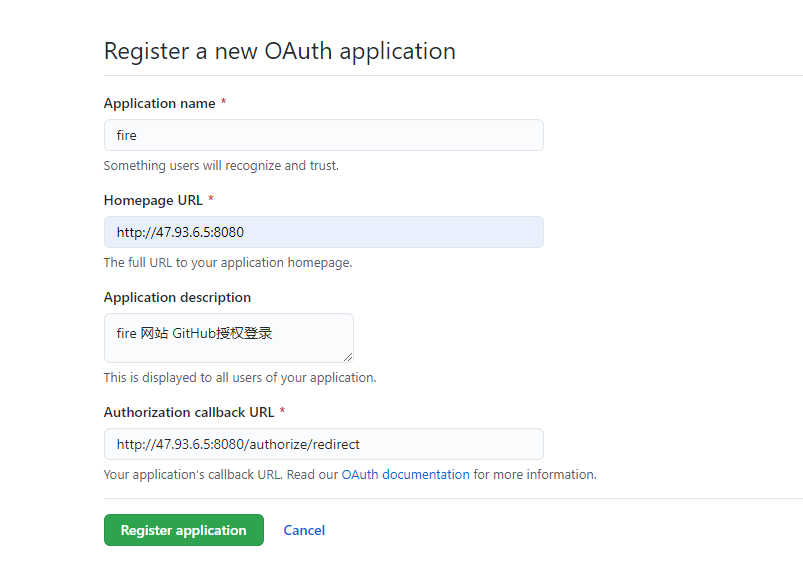
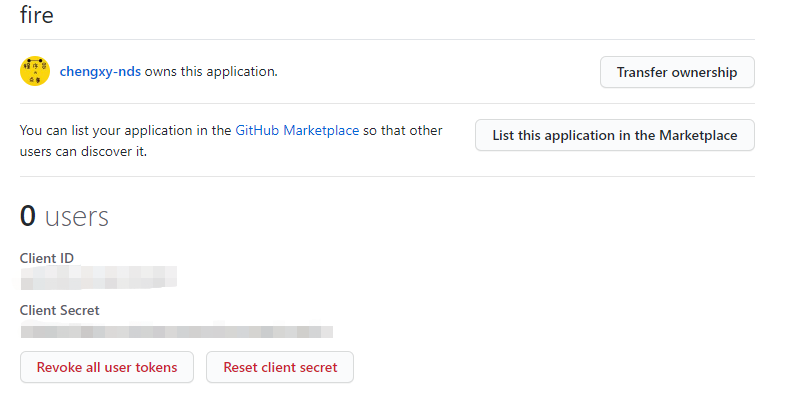
提交后会看到就可以看到客户端
ClientID 和客户端密匙
ClientSecret,到这我们的准备工作就完事了。
 在这里插入图片描述
三、授权开发
1、获取授权码
为了更好的看效果,获取授权码我处理的比较粗暴,直接在
JS里拼装好了授权链接,但实际工作开发中一定要考虑到安全问题。
https:
//github.com/login/oauth/authorize?

client_id=ad41c05c211421c659db&

redirect_uri=http:
//47.93.6.5:8080/authorize/redirect
前端
vue 的逻辑也非常简单,只需要
window.location.href 重定向一下。
<script>


export
default {


methods: {


loginByGithub:

function (
) {


window.location.href =
'https://github.com/login/oauth/authorize?client_id=ad41c05c211421c659db&redirect_uri=http://47.93.6.5:8080/authorize/redirect'

    }

  }

}

<
/script>
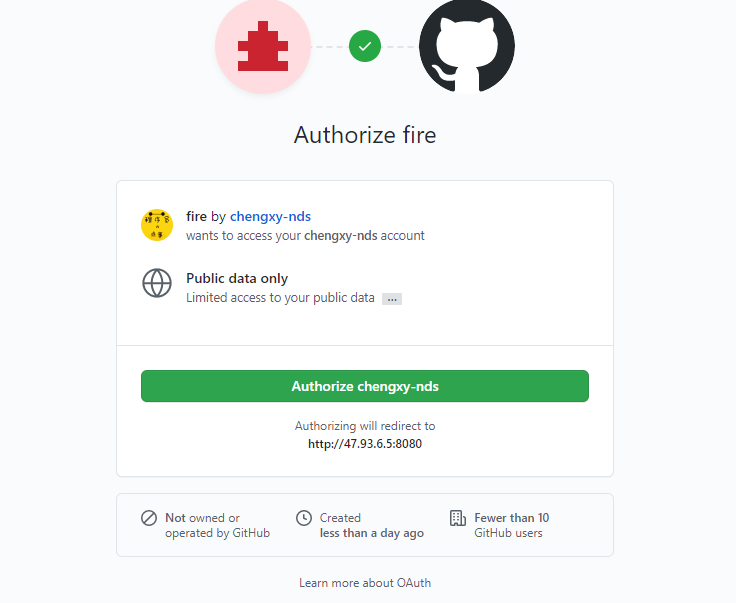
请求后会提示让我们授权,同意授权后会重定向到
authorize/redirect,并携带授权码
code;如果之前已经同意过,会跳过这一步直接回调。
 在这里插入图片描述
2、获取令牌
授权后紧接着就要回调
fire 网站接口,拿到授权码以后拼装获取令牌
access_token的请求链接,这时会用到客户端密匙
client_secret。
https:
//github.com/login/oauth/access_token?

    client_id=${clientID}&

    client_secret=${clientSecret}&

    code=${requestToken}
access_token 会作为请求响应返回,结果是个串字符,需要我们截取一下。
access_token=
4dc43c2f43b773c327f97acf5dd66b147db9259c&scope=&token_type=bearer
有了令牌以后开始获取用户信息,在
API 中要带上
access_token。
https:
//api.github.com/user?access_token=4dc43c2f43b773c327f97acf5dd66b147db9259c
返回的用户信息是
JSON 数据格式,如果想把数据传递给前端,可以通过
url 重定向到前端页面,将数据以参数的方式传递。
{


"login":
"chengxy-nds",


"id":
12745094,


"node_id":
"",


"avatar_url":
"https://avatars3.githubusercontent.com/u/12745094?v=4",


"gravatar_id":
"",


"url":
"https://api.github.com/users/chengxy-nds",


"html_url":
"https://github.com/chengxy-nds",


"followers_url":
"https://api.github.com/users/chengxy-nds/followers",


"following_url":
"https://api.github.com/users/chengxy-nds/following{/other_user}",


"gists_url":
"https://api.github.com/users/chengxy-nds/gists{/gist_id}",


"starred_url":
"https://api.github.com/users/chengxy-nds/starred{/owner}{/repo}",


"subscriptions_url":
"https://api.github.com/users/chengxy-nds/subscriptions",


"organizations_url":
"https://api.github.com/users/chengxy-nds/orgs",


"repos_url":
"https://api.github.com/users/chengxy-nds/repos",


"events_url":
"https://api.github.com/users/chengxy-nds/events{/privacy}",


"received_events_url":
"https://api.github.com/users/chengxy-nds/received_events",


"type":
"",


"site_admin":
false,


"name":
"程序员内点事",


"company":
null,


"blog":
"",


"location":
null,


"email":
"",


"hireable":
null,


"bio":
null,


"twitter_username":
null,


"public_repos":
7,


"public_gists":
0,


"followers":
14,


"following":
0,


"created_at":
"2015-06-04T09:22:44Z",


"updated_at":
"2020-07-13T06:08:57Z"

}
下边是
GitHub 回调我们
fire网站后端处理流程的部分代码,写的比较糙,后续继续优化吧!
/**

     * @param code

     * @author xiaofu

     * @description 授权回调

     * @date 2020/7/10 15:42

     */

   @RequestMapping(
"/authorize/redirect")

    public ModelAndView authorize(@NotEmpty
String code) {


        log.info(
"授权码code: {}", code);


/**

         * 重新到前端主页

         */


String redirectHome =
"http://47.93.6.5/home";


try {


/**

             * 1、拼装获取accessToken url

             */


String accessTokenUrl = gitHubProperties.getAccesstokenUrl()

                    .replace(
"clientId", gitHubProperties.getClientId())

                    .replace(
"clientSecret", gitHubProperties.getClientSecret())

                    .replace(
"authorize_code", code);


/**

             * 返回结果中直接返回token

             */


String result = OkHttpClientUtil.sendByGetUrl(accessTokenUrl);

            log.info(
" 请求 token 结果:{}", result);


String accessToken =
null;

            Pattern p = Pattern.compile(
"=(\\w+)&");

            Matcher m = p.matcher(result);


while (m.find()) {

                accessToken = m.group(
1);

                log.info(
"令牌token:{}", m.group(
1));


break;

            }


/**

             * 成功获取token后,开始请求用户信息

             */


String userInfoUrl = gitHubProperties.getUserUrl().replace(
"accessToken", accessToken);


String userResult = OkHttpClientUtil.sendByGetUrl(userInfoUrl);


            log.info(
"用户信息:{}", userResult);


            UserInfo userInfo =
JSON.parseObject(userResult, UserInfo.class);


            redirectHome +=
"?name=" + userInfo.getName();


        }
catch (Exception e) {

            log.error(
"授权回调异常={}", e);

        }


return
new ModelAndView(
new RedirectView(redirectHome));

    }
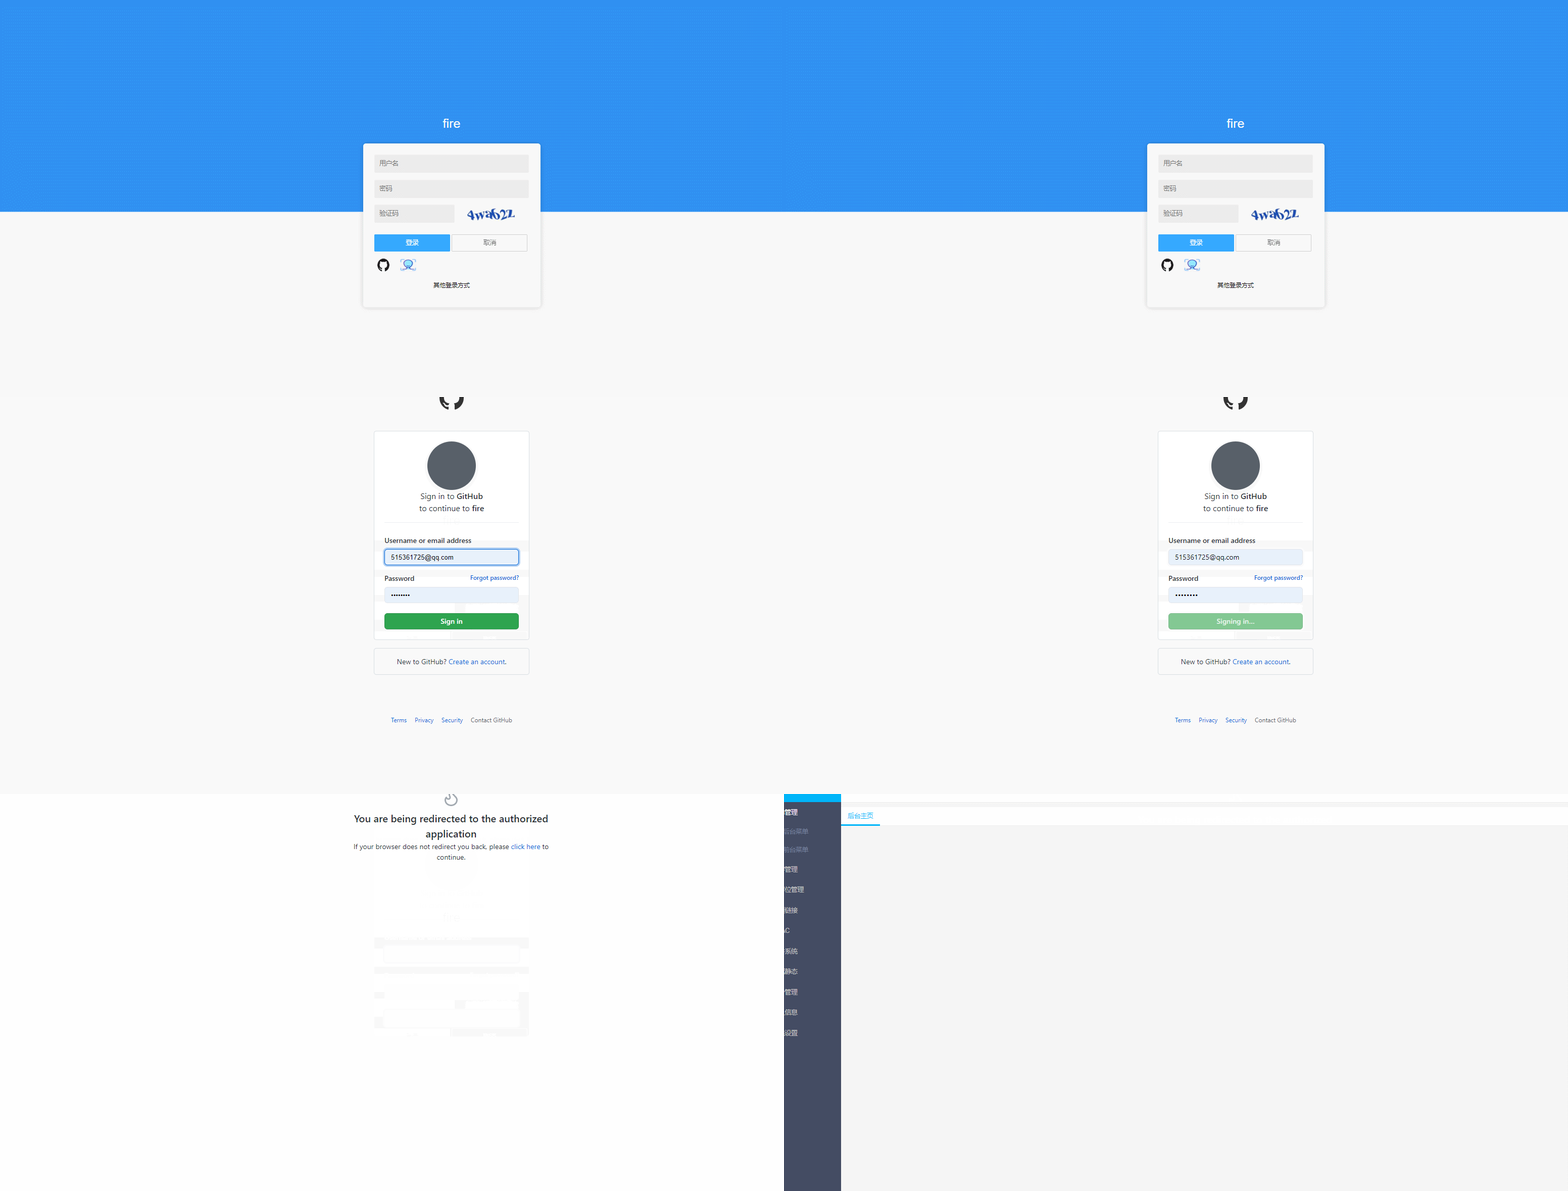
最后我们动图看一下整体的授权流程,由于
GitHub的访问速度比较慢,偶尔会有请求超时的现象。
 在这里插入图片描述
线上预览地址:
http://47.93.6.5/login ,欢迎体验~
项目 GitHub 地址:
https://github.com/chengxy-nds/fire.git
总结
从整个
GitHub授权登录的过程来看,
OAuth2.0的授权码模式还是比较简单的,搞懂了一个
GitHub的登录,像微信、围脖其他三方登录也就都会了,完全是大同小异的东西,感兴趣的同学可以试一试。
原创不易,燃烧秀发输出内容,如果有一丢丢收获,点个赞鼓励一下吧!
整理了几百本各类技术电子书,送给小伙伴们。关注公号回复【666】自行领取。和一些小伙伴们建了一个技术交流群,一起探讨技术、分享技术资料,旨在共同学习进步,如果感兴趣就扫码加入我们吧!

来自 “ ITPUB博客 ” ,链接:https://blog.itpub.net/69961615/viewspace-2704536/ ,如需转载,请注明出处,否则将追究法律责任。

