一、配置中心的演进
有些小伙伴在工作中可能还停留在传统的配置管理方式,让我们先来看看配置管理的演进历程。
配置管理的三个时代
1.0 时代:硬编码配置
配置硬编码在代码中:
// 远古时代的配置管理方式public class DatabaseConfig {    // 配置硬编码在代码中
    private static final String URL = "jdbc:mysql://localhost:3306/app";    private static final String USERNAME = "root";    private static final String PASSWORD = "123456";
    public Connection getConnection() {        // 每次修改配置都需要重新编译部署
        return DriverManager.getConnection(URL, USERNAME, PASSWORD);
    }
}
每次修改配置都需要重新编译部署,显然非常不方便。
2.0 时代:配置文件外部化
通过配置文件管理:
# application.propertiesdb.url=jdbc:mysql://localhost:3306/appdb.username=rootdb.password=123456
// 通过配置文件管理@Configurationpublic class DatabaseConfig {
    @Value("${db.url}")
    private String url;
    @Value("${db.username}")
    private String username;
    @Value("${db.password}")
    private String password;
    // 配置变更仍需重启应用}
但配置变更仍需重启应用。
3.0 时代:配置中心时代
现代配置中心的使用方式:
// 现代配置中心的使用方式@Configurationpublic class DynamicDatabaseConfig {
    @Autowired
    private ConfigService configService;
    // 配置动态更新,无需重启
    @RefreshScope
    @Bean
    public DataSource dataSource() {        // 从配置中心实时获取配置
        String url = configService.getProperty("db.url");        String username = configService.getProperty("db.username");        String password = configService.getProperty("db.password");
        return DataSourceBuilder.create()
            .url(url)
            .username(username)
            .password(password)
            .build();
    }
}
配置动态更新,无需重启,程序能够从配置中心实时获取配置。
为什么需要配置中心?
让我们通过一个简单的对比来理解配置中心的价值:

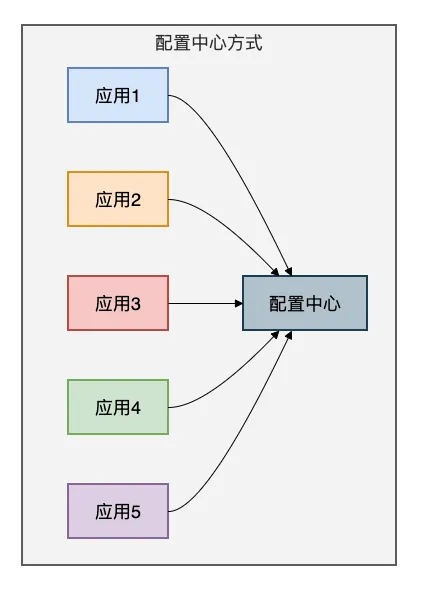
传统方式的配置文件分散到每个应用当中,非常不方便管理和唯一。
配置中心的核心价值:
- 统一管理:所有配置集中存储和管理
- 动态更新:配置变更实时推送到应用
- 版本控制:配置变更历史追踪和回滚
- 权限管控:敏感配置的访问控制
- 环境隔离:不同环境配置隔离管理
二、Spring Cloud Config:Spring生态的原生选择
有些小伙伴在工作中使用Spring Cloud体系时,首先接触到的可能就是Spring Cloud Config。
作为Spring Cloud家族的一员,它与Spring生态无缝集成。
架构深度解析
Spring Cloud Config采用经典的客户端-服务器架构:
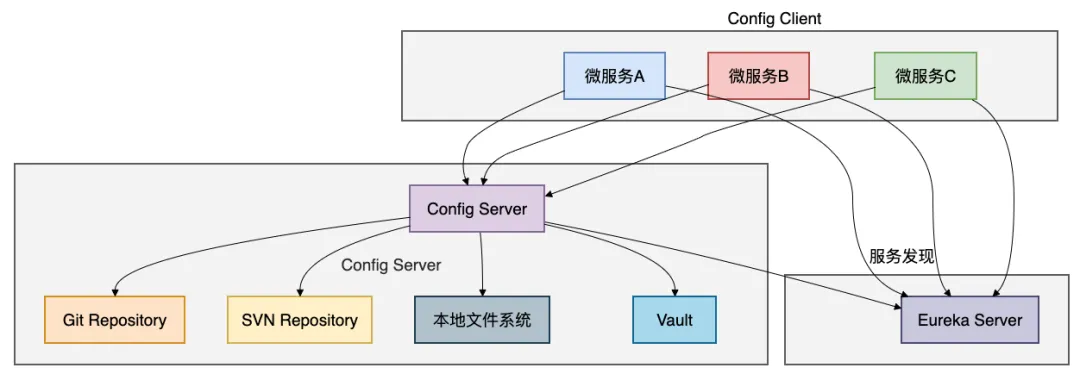
核心实现原理
配置服务器端实现:
@SpringBootApplication@EnableConfigServerpublic class ConfigServerApplication {    public static void main(String[] args) {
        SpringApplication.run(ConfigServerApplication.class, args);
    }
}// 配置服务器核心配置@Configurationpublic class ConfigServerConfig {
    // 支持多种存储后端
    @Bean
    public MultipleJGitEnvironmentRepository multipleJGitEnvironmentRepository() {        MultipleJGitEnvironmentRepository repository = new MultipleJGitEnvironmentRepository();
        // Git仓库配置
        Map<String, PatternMatchingJGitEnvironmentRepository> repos = new HashMap<>();
        repos.put("service-.*", createGitRepo("https://github.com/config/service-config"));
        repos.put("user-.*", createGitRepo("https://github.com/config/user-config"));

        repository.setRepos(repos);        return repository;
    }
    private PatternMatchingJGitEnvironmentRepository createGitRepo(String uri) {        PatternMatchingJGitEnvironmentRepository repo = new PatternMatchingJGitEnvironmentRepository();
        repo.setUri(uri);
        repo.setBasedir("/tmp/config-repo");        return repo;
    }
}
配置客户端实现:
// 客户端启动配置@SpringBootApplication@EnableEurekaClientpublic class UserServiceApplication {    public static void main(String[] args) {
        SpringApplication.run(UserServiceApplication.class, args);
    }
}// 配置客户端核心逻辑@Configuration@RefreshScopepublic class ApplicationConfig {
    // 动态配置注入
    @Value("${app.database.url:jdbc:mysql://localhost:3306/default}")
    private String databaseUrl;
    @Value("${app.redis.host:localhost}")
    private String redisHost;
    // 配置变更监听
    @EventListener
    public void handleRefresh(EnvironmentChangeEvent event) {
        System.out.println("配置发生变更: " + event.getKeys());        // 重新初始化相关组件
        refreshDataSource();
    }
    private void refreshDataSource() {        // 动态重建数据源
        // 实际项目中需要更精细的控制
    }
    // 手动触发配置刷新
    @RestController
    class RefreshController {        @PostMapping("/refresh")
        public String refresh() {            // 通过Actuator端点刷新配置
            return "Configuration refreshed";
        }
    }
}
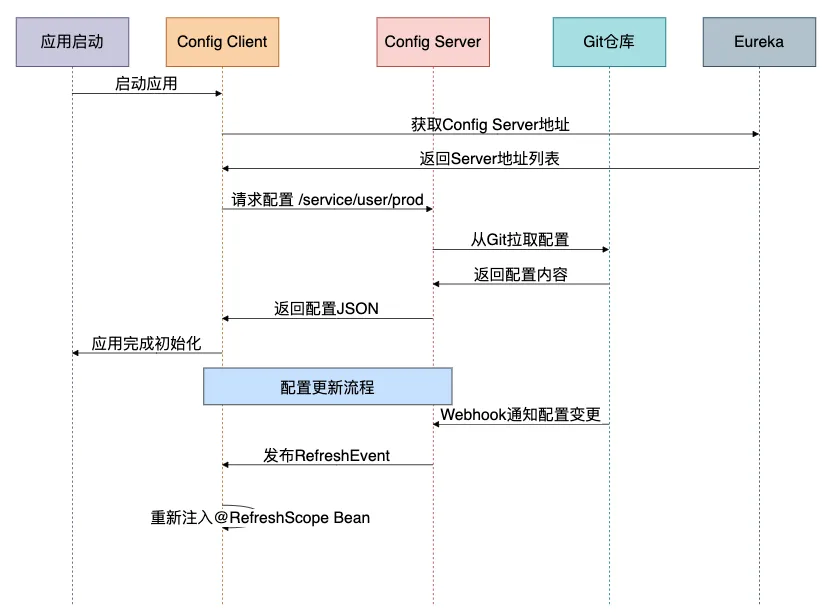
配置获取的详细流程
高级特性:配置加密
// 配置加密支持@Configurationpublic class EncryptionConfig {
    // 使用JCE加密敏感配置
    @Bean
    public TextEncryptor textEncryptor() {        return new EncryptorFactory().create("my-secret-key");
    }
}// 加密配置的使用public class SensitiveConfig {
    // 数据库密码加密存储
    // 在配置文件中存储为: {cipher}FKSAJDFGYOS8F7GLHAKERHG13K4H1KO

    @Value("${encrypted.db.password}")
    private String encryptedPassword;
    public String getDecryptedPassword() {        // Config Server会自动解密
        return encryptedPassword;
    }
}
Spring Cloud Config的优缺点
优点:
- 与Spring生态完美集成
- 支持多种存储后端(Git、SVN、本地文件等)
- 配置版本化管理
- 配置加密支持
缺点:
- 配置变更需要手动刷新或依赖Git Webhook
- 客户端长轮询,实时性相对较差
- 缺乏友好的管理界面
- 高可用配置相对复杂
三、Apollo:携程开源的企业级配置中心
有些小伙伴在大型互联网公司工作,可能已经接触过Apollo。
作为携程开源的配置中心,它在功能和稳定性上都有很好的表现。
架构深度解析
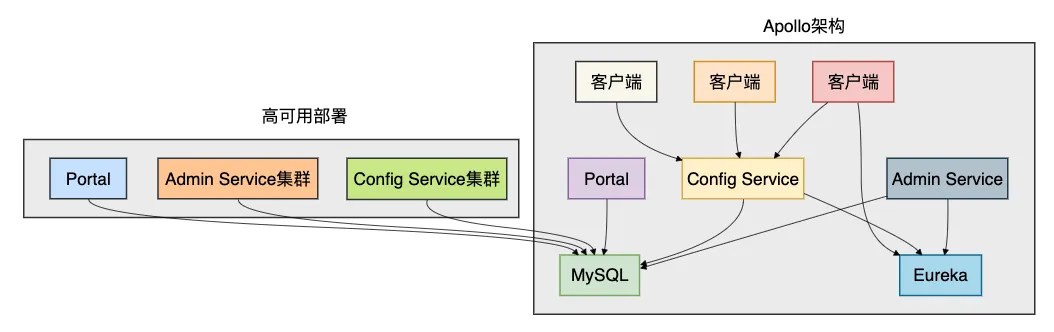
Apollo采用分布式架构,支持高可用和水平扩展:
核心组件详细实现
客户端实现:
// Apollo客户端核心配置@Configurationpublic class ApolloClientConfig {
    @Bean
    public Config config() {        // 系统属性配置Apollo Meta Server地址
        System.setProperty("apollo.meta", "http://apollo-config:8080");
        // 初始化配置
        Config appConfig = ConfigService.getAppConfig();
        // 添加配置变更监听器
        appConfig.addChangeListener(new ConfigChangeListener() {            @Override
            public void onChange(ConfigChangeEvent changeEvent) {                for (String key : changeEvent.changedKeys()) {                    ConfigChange change = changeEvent.getChange(key);
                    System.out.println(String.format(                        "配置发生变更 - key: %s, oldValue: %s, newValue: %s, changeType: %s",
                        change.getPropertyName(), change.getOldValue(),
                        change.getNewValue(), change.getChangeType()));
                    // 根据变更类型处理
                    handleConfigChange(change);
                }
            }
        });
        return appConfig;
    }
    private void handleConfigChange(ConfigChange change) {        switch (change.getPropertyName()) {            case "app.database.url":
                refreshDataSource();                break;            case "app.redis.host":
                refreshRedisConnection();                break;            case "app.feature.toggle":
                updateFeatureToggle();                break;
        }
    }
}// 配置使用示例@Servicepublic class UserService {
    @Autowired
    private Config config;
    // 获取配置值,支持默认值
    private String getDatabaseUrl() {        return config.getProperty("app.database.url",
            "jdbc:mysql://localhost:3306/default");
    }
    // 获取整数配置
    private int getMaxConnections() {        return config.getIntProperty("app.database.max-connections", 10);
    }
    // 获取布尔配置
    private boolean isFeatureEnabled() {        return config.getBooleanProperty("app.feature.new-payment", false);
    }
    // 定时任务配置动态更新
    @Scheduled(fixedDelayString = "${app.job.delay:5000}")
    public void scheduledTask() {        // 配置变更会自动生效
        int delay = config.getIntProperty("app.job.delay", 5000);
        System.out.println("当前任务间隔: " + delay);
    }
}
配置监听和动态更新:
// 高级配置监听模式@Componentpublic class AdvancedConfigListener {
    private final Map<String, List<Consumer<String>>> configListeners = new ConcurrentHashMap<>();
    @PostConstruct
    public void init() {        Config config = ConfigService.getAppConfig();
        // 注册特定配置的监听器
        registerConfigListener(config, "app.database.url", this::onDatabaseUrlChange);
        registerConfigListener(config, "app.redis.cluster", this::onRedisClusterChange);
        registerConfigListener(config, "app.rate.limit", this::onRateLimitChange);
    }
    private void registerConfigListener(Config config, String key, Consumer<String> listener) {
        config.addChangeListener(changeEvent -> {            if (changeEvent.isChanged(key)) {                String newValue = changeEvent.getChange(key).getNewValue();
                listener.accept(newValue);
            }
        });
        // 保存监听器用于后续管理
        configListeners.computeIfAbsent(key, k -> new ArrayList<>()).add(listener);
    }
    private void onDatabaseUrlChange(String newUrl) {
        System.out.println("数据库URL变更为: " + newUrl);        // 重新初始化数据源
        DataSourceManager.refresh(newUrl);
    }
    private void onRedisClusterChange(String newCluster) {
        System.out.println("Redis集群配置变更为: " + newCluster);        // 重新连接Redis集群
        RedisClient.reconnect(newCluster);
    }
    private void onRateLimitChange(String newLimit) {
        System.out.println("限流配置变更为: " + newLimit);        // 更新限流器配置
        RateLimiter.updateConfig(Integer.parseInt(newLimit));
    }
}
命名空间和多环境支持
// 多命名空间配置public class MultiNamespaceConfig {
    // 获取默认命名空间配置
    private Config defaultConfig = ConfigService.getAppConfig();
    // 获取特定命名空间配置
    private Config databaseConfig = ConfigService.getConfig("DATABASE-NS");    private Config featureConfig = ConfigService.getConfig("FEATURE-NS");    private Config secretConfig = ConfigService.getConfig("SECRET-NS");
    public void useMultipleNamespaces() {        // 从不同命名空间获取配置
        String dbUrl = databaseConfig.getProperty("url", "default-url");        boolean newFeature = featureConfig.getBooleanProperty("new-ui", false);        String apiKey = secretConfig.getProperty("api.key", "");
        // 根据配置初始化组件
        initializeServices(dbUrl, newFeature, apiKey);
    }
    // 公共配置和私有配置分离
    public void setupConfigHierarchy() {        // 公共配置(应用级别)
        String appName = defaultConfig.getProperty("app.name", "unknown");
        // 数据库配置(数据库命名空间)
        String dbConfig = databaseConfig.getProperty("connection.pool", "default");
        // 特性开关(特性命名空间)
        boolean darkMode = featureConfig.getBooleanProperty("dark.mode", false);

        System.out.println(String.format(            "应用: %s, 数据库配置: %s, 暗黑模式: %s",
            appName, dbConfig, darkMode));
    }
}
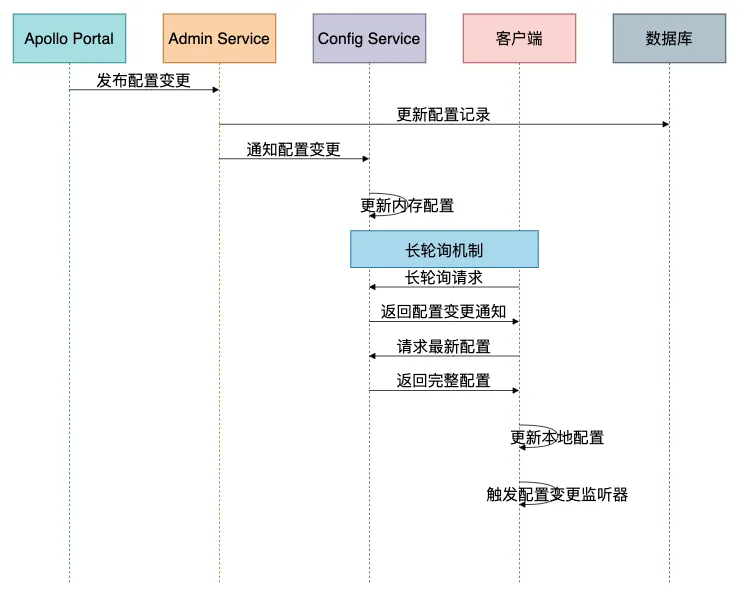
Apollo配置更新流程
Apollo的优缺点
优点:
- 配置变更实时推送(1秒内)
- 完善的权限管理和审计
- 多环境、多集群、多命名空间支持
- 友好的管理界面
- 客户端配置缓存,高可用
缺点:
- 部署相对复杂
- 依赖MySQL等外部存储
- 客户端内存占用相对较高
四、Nacos:阿里巴巴开源的动态服务发现和配置管理
有些小伙伴在微服务架构中既需要服务发现又需要配置管理,Nacos提供了一个统一的解决方案。
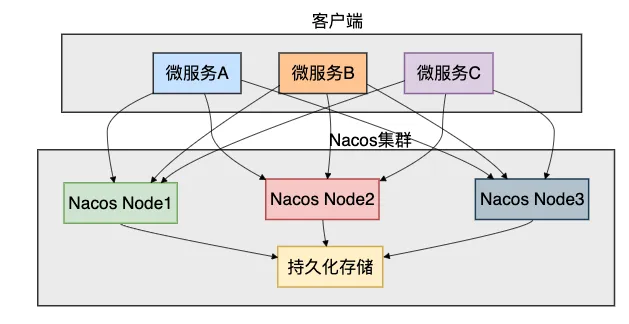
架构深度解析
Nacos集服务发现和配置管理于一体:
核心实现原理
Spring Cloud Alibaba集成:
// Nacos配置管理@SpringBootApplication@EnableDiscoveryClientpublic class NacosApplication {    public static void main(String[] args) {
        SpringApplication.run(NacosApplication.class, args);
    }
}// Nacos配置类@Configuration@NacosPropertySource(dataId = "user-service", autoRefreshed = true)public class NacosConfig {
    // 通过注解获取配置
    @NacosValue(value = "${app.database.url:jdbc:mysql://localhost:3306/default}", autoRefreshed = true)
    private String databaseUrl;
    @NacosValue(value = "${app.thread.pool.size:10}", autoRefreshed = true)
    private int threadPoolSize;
    // 配置变更监听
    @NacosConfigListener(dataId = "user-service")
    public void onConfigChange(String newConfig) {
        System.out.println("配置发生变更: " + newConfig);        // 解析新配置并应用
        applyNewConfig(parseConfig(newConfig));
    }
    // 手动获取配置
    @Autowired
    private NacosConfigManager configManager;
    public String getConfig(String dataId) throws Exception {        ConfigService configService = configManager.getConfigService();        return configService.getConfig(dataId, "DEFAULT_GROUP", 5000);
    }
}// 服务发现集成@Servicepublic class UserService {
    @Autowired
    private NacosDiscoveryProperties discoveryProperties;
    @Autowired
    private NacosServiceManager nacosServiceManager;
    public void registerService() {        // 获取当前服务实例
        Instance instance = new Instance();
        instance.setIp("192.168.1.100");
        instance.setPort(8080);
        instance.setWeight(1.0);
        instance.setClusterName("DEFAULT");
        // 注册服务实例
        try {            NamingService namingService = nacosServiceManager.getNamingService();
            namingService.registerInstance("user-service", instance);
        } catch (NacosException e) {            throw new RuntimeException("服务注册失败", e);
        }
    }
    // 服务发现
    public List<Instance> discoverServices(String serviceName) {        try {            NamingService namingService = nacosServiceManager.getNamingService();            return namingService.getAllInstances(serviceName);
        } catch (NacosException e) {            throw new RuntimeException("服务发现失败", e);
        }
    }
}
配置管理和服务发现的协同:
// 配置驱动的服务发现@Componentpublic class ConfigDrivenDiscovery {
    @Autowired
    private NacosConfigProperties configProperties;
    @Autowired
    private NacosDiscoveryProperties discoveryProperties;
    // 根据配置动态调整服务发现策略
    @NacosConfigListener(dataId = "discovery-strategy")
    public void onDiscoveryStrategyChange(String strategyConfig) {        DiscoveryConfig config = parseDiscoveryConfig(strategyConfig);
        // 动态更新服务发现配置
        updateDiscoveryConfig(config);
    }
    private void updateDiscoveryConfig(DiscoveryConfig config) {        // 更新集群配置
        discoveryProperties.setClusterName(config.getClusterName());
        // 更新负载均衡策略
        if ("weighted".equals(config.getLoadBalanceStrategy())) {
            enableWeightedLoadBalancing();
        } else {
            enableRoundRobinLoadBalancing();
        }
        // 更新健康检查配置
        updateHealthCheckConfig(config.getHealthCheck());
    }
}// 配置版本管理和回滚@Servicepublic class NacosConfigVersioning {
    @Autowired
    private ConfigService configService;
    // 获取配置历史版本
    public List<ConfigHistory> getConfigHistory(String dataId, String group) throws NacosException {        // 查询配置变更历史
        List<ConfigHistory> history = new ArrayList<>();
        // 实际实现中会调用Nacos的历史版本API
        // 这里简化实现
        return history;
    }
    // 回滚到指定版本
    public boolean rollbackConfig(String dataId, String group, long version) throws NacosException {        // 获取历史配置内容
        String historyConfig = getConfigByVersion(dataId, group, version);
        // 发布回滚后的配置
        return configService.publishConfig(dataId, group, historyConfig);
    }
    // 配置监听器管理
    public void manageConfigListeners(String dataId) {        try {            // 添加配置监听器
            configService.addListener(dataId, "DEFAULT_GROUP", new Listener() {                @Override
                public void receiveConfigInfo(String configInfo) {
                    System.out.println("接收到配置变更: " + configInfo);
                    handleConfigUpdate(configInfo);
                }
                @Override
                public Executor getExecutor() {                    return Executors.newSingleThreadExecutor();
                }
            });
        } catch (NacosException e) {            throw new RuntimeException("添加配置监听器失败", e);
        }
    }
}
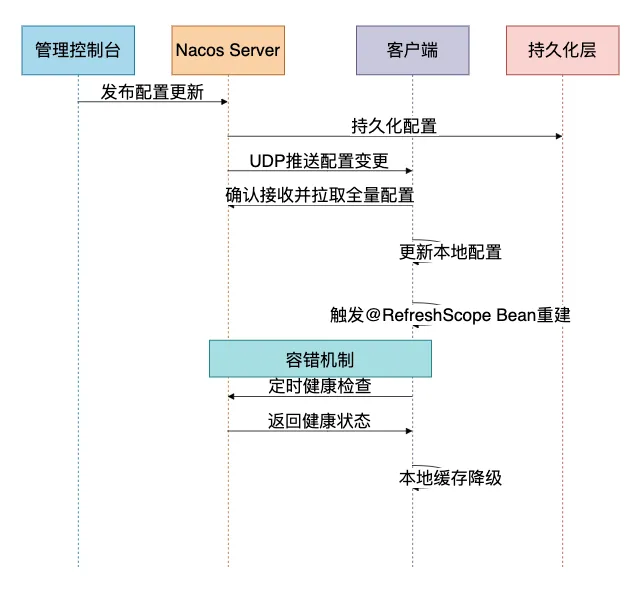
Nacos配置更新机制
Nacos的优缺点
优点:
- 服务发现和配置管理一体化
- 支持AP和CP模式切换
- 配置变更实时推送
- 与Spring Cloud生态良好集成
- 相对轻量,部署简单
缺点:
- 管理界面相对简单
- 权限管理功能较弱
- 大规模集群性能需要验证
五、Consul:基于HashiCorp生态的服务网格配置中心
有些小伙伴在云原生环境中工作,可能接触过Consul。
它不仅是配置中心,更是完整的服务网格解决方案。
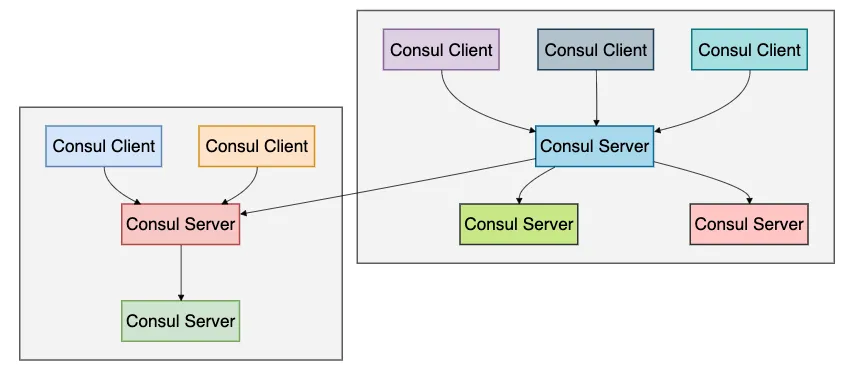
架构深度解析
Consul采用多数据中心架构:
核心实现原理
Java客户端集成:
// Consul配置管理@Configurationpublic class ConsulConfig {
    @Bean
    public ConsulClient consulClient() {        // 创建Consul客户端
        return new ConsulClient("localhost", 8500);
    }
    @Bean
    public ConfigPropertySourceLocator configPropertySourceLocator() {        return new ConsulConfigPropertySourceLocator(consulClient());
    }
}// Consul配置监听@Componentpublic class ConsulConfigWatcher {
    @Autowired
    private ConsulClient consulClient;
    private final Map<String, List<Consumer<String>>> watchers = new ConcurrentHashMap<>();
    @PostConstruct
    public void init() {        // 启动配置监听
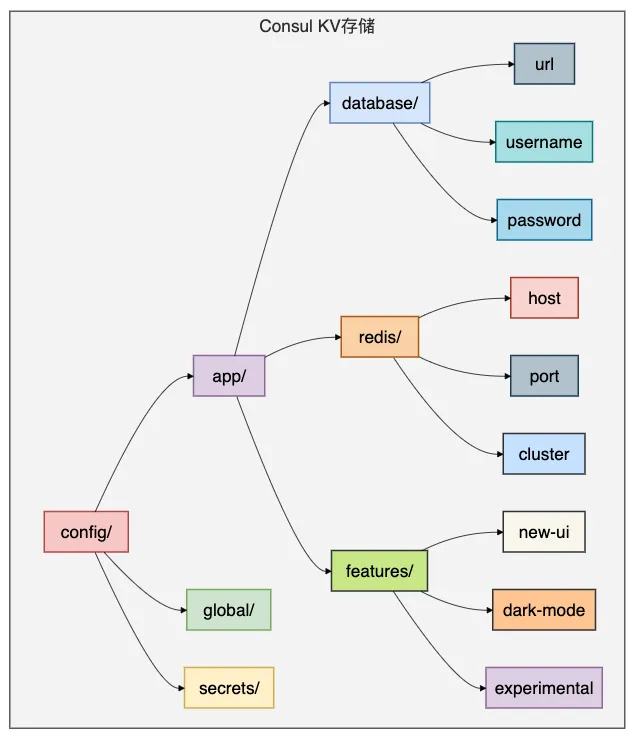
        watchConfig("config/app/database");
        watchConfig("config/app/redis");
        watchConfig("config/app/features");
    }
    private void watchConfig(String key) {        new Thread(() -> {            while (true) {                try {                    // 获取配置并设置监听
                    Response<GetValue> response = consulClient.getKVValue(key);                    if (response.getValue() != null) {                        String config = response.getValue().getDecodedValue();
                        notifyWatchers(key, config);
                    }
                    // 阻塞等待配置变更
                    long lastIndex = response.getConsulIndex();
                    response = consulClient.getKVValue(key,
                        new QueryParams(BlockingMode.SOURCE, 60000, lastIndex));

                } catch (Exception e) {
                    System.err.println("监听配置失败: " + e.getMessage());                    try {
                        Thread.sleep(5000);
                    } catch (InterruptedException ie) {
                        Thread.currentThread().interrupt();                        break;
                    }
                }
            }
        }).start();
    }
    public void registerWatcher(String key, Consumer<String> watcher) {
        watchers.computeIfAbsent(key, k -> new ArrayList<>()).add(watcher);
    }
    private void notifyWatchers(String key, String config) {
        List<Consumer<String>> keyWatchers = watchers.get(key);        if (keyWatchers != null) {
            keyWatchers.forEach(watcher -> watcher.accept(config));
        }
    }
}// Spring Cloud Consul集成@SpringBootApplication@EnableDiscoveryClientpublic class ConsulApplication {
    public static void main(String[] args) {
        SpringApplication.run(ConsulApplication.class, args);
    }
}// 配置使用示例@Service@RefreshScopepublic class ConfigurableService {
    @Value("${app.database.url}")
    private String databaseUrl;
    @Value("${app.feature.new-payment:false}")
    private boolean newPaymentFeature;
    // 服务注册
    @EventListener
    public void onApplicationReady(ApplicationReadyEvent event) {
        registerServiceWithConsul();
    }
    private void registerServiceWithConsul() {        try {            ConsulClient consulClient = new ConsulClient();
            NewService newService = new NewService();
            newService.setId("user-service-1");
            newService.setName("user-service");
            newService.setAddress("192.168.1.100");
            newService.setPort(8080);
            // 健康检查配置
            NewService.Check check = new NewService.Check();
            check.setHttp("http://192.168.1.100:8080/health");
            check.setInterval("10s");
            check.setTimeout("5s");
            newService.setCheck(check);

            consulClient.agentServiceRegister(newService);

        } catch (Exception e) {            throw new RuntimeException("服务注册失败", e);
        }
    }
}
服务网格集成:
// Consul服务网格配置@Componentpublic class ConsulServiceMesh {
    @Autowired
    private ConsulClient consulClient;
    // 配置服务网格策略
    public void configureServiceMesh() {        // 配置服务路由规则
        configureServiceRouter();
        // 配置负载均衡
        configureLoadBalancing();
        // 配置故障恢复策略
        configureResilience();
    }
    private void configureServiceRouter() {        // 创建服务路由配置
        String routingConfig = """
            {
                "routes": [
                    {
                        "match": {
                            "http": {
                                "path_prefix": "/api/v1/"
                            }
                        },
                        "destination": {
                            "service": "user-service"
                        }
                    }
                ]
            }
            """;
        // 将配置写入Consul KV存储
        consulClient.setKVValue("config/service-router", routingConfig);
    }
    // 多数据中心配置同步
    public void syncMultiDatacenterConfig() {        // 配置跨数据中心服务发现
        String multiDcConfig = """
            {
                "datacenters": ["dc1", "dc2"],
                "failover": {
                    "dc2": {
                        "service": "user-service",
                        "policy": "failover"
                    }
                }
            }
            """;

        consulClient.setKVValue("config/multi-dc", multiDcConfig);
    }
}
Consul配置存储结构
Consul的优缺点
优点:
- 完整的服务网格解决方案
- 多数据中心支持
- 强一致性和高可用性
- 健康检查和故障恢复
- 丰富的ACL和安全特性
缺点:
- 资源消耗相对较大
- 部署和运维复杂
- 学习曲线较陡
- 客户端集成相对复杂
六、Etcd:Kubernetes原生的键值存储配置中心
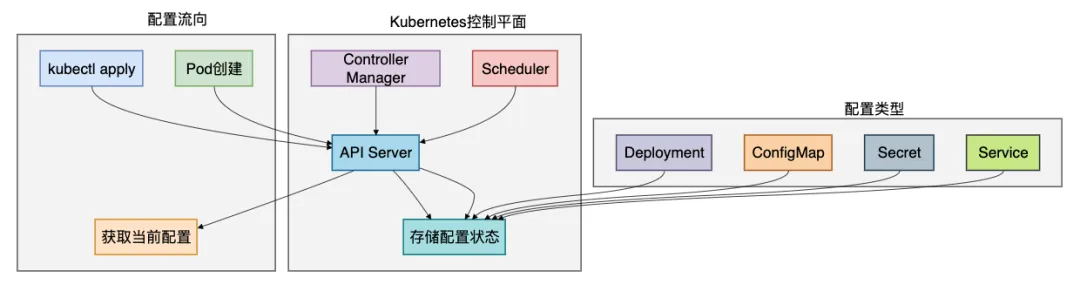
有些小伙伴在Kubernetes环境中工作,Etcd是必须了解的配置中心,因为它是Kubernetes的大脑。
架构深度解析
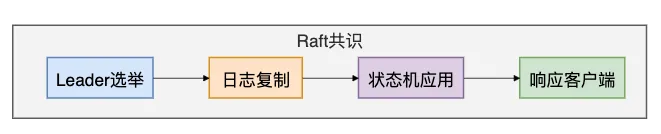
Etcd采用Raft一致性算法:

核心实现原理
Java客户端集成:
// Etcd客户端配置@Configurationpublic class EtcdConfig {
    @Bean
    public Client etcdClient() {        // 连接Etcd集群
        return Client.builder()
            .endpoints("http://etcd1:2379", "http://etcd2:2379", "http://etcd3:2379")
            .build();
    }
    @Bean
    public KV etcdKV() {        return etcdClient().getKVClient();
    }
    @Bean
    public Watch etcdWatch() {        return etcdClient().getWatchClient();
    }
}// Etcd配置管理@Servicepublic class EtcdConfigManager {
    @Autowired
    private KV etcdKV;
    @Autowired
    private Watch etcdWatch;
    private final Map<String, List<Consumer<String>>> configWatchers = new ConcurrentHashMap<>();
    // 保存配置
    public void saveConfig(String key, String value) {        ByteSequence etcdKey = ByteSequence.from(key.getBytes());        ByteSequence etcdValue = ByteSequence.from(value.getBytes());

        etcdKV.put(etcdKey, etcdValue).join();
    }
    // 获取配置
    public String getConfig(String key) {        ByteSequence etcdKey = ByteSequence.from(key.getBytes());
        GetResponse response = etcdKV.get(etcdKey).join();        if (response.getKvs().isEmpty()) {            return null;
        }
        return response.getKvs().get(0).getValue().toString();
    }
    // 监听配置变更
    public void watchConfig(String key) {        ByteSequence etcdKey = ByteSequence.from(key.getBytes());

        etcdWatch.watch(etcdKey, new Watch.Listener() {            @Override
            public void onNext(WatchResponse response) {                for (WatchEvent event : response.getEvents()) {                    if (event.getEventType() == WatchEvent.EventType.PUT) {                        String newValue = event.getKeyValue().getValue().toString();
                        notifyWatchers(key, newValue);
                    }
                }
            }
            @Override
            public void onError(Throwable throwable) {
                System.err.println("配置监听错误: " + throwable.getMessage());
            }
            @Override
            public void onCompleted() {
                System.out.println("配置监听完成");
            }
        });
    }
    // 租约和TTL支持
    public void saveConfigWithTTL(String key, String value, long ttlSeconds) {        ByteSequence etcdKey = ByteSequence.from(key.getBytes());        ByteSequence etcdValue = ByteSequence.from(value.getBytes());
        // 创建租约
        Lease leaseClient = etcdClient().getLeaseClient();        long leaseId = leaseClient.grant(ttlSeconds).join().getID();
        // 使用租约保存配置
        etcdKV.put(etcdKey, etcdValue, PutOption.newBuilder().withLeaseId(leaseId).build()).join();
    }
}// Kubernetes配置集成@Componentpublic class KubernetesConfigSync {
    @Autowired
    private EtcdConfigManager etcdConfigManager;
    // 同步Kubernetes ConfigMap到Etcd
    public void syncConfigMapToEtcd(String configMapName) {        // 在实际实现中,这里会调用Kubernetes API获取ConfigMap
        // 然后同步到Etcd中

        Map<String, String> configData = getConfigMapData(configMapName);
        for (Map.Entry<String, String> entry : configData.entrySet()) {            String etcdKey = "configmaps/" + configMapName + "/" + entry.getKey();
            etcdConfigManager.saveConfig(etcdKey, entry.getValue());
        }
    }
    // 从Etcd生成Kubernetes配置
    public Map<String, String> generateConfigFromEtcd(String prefix) {
        Map<String, String> config = new HashMap<>();
        // 获取指定前缀的所有配置
        // 实际实现中会使用范围查询
        return config;
    }
}
分布式锁实现:
// 基于Etcd的分布式锁@Componentpublic class EtcdDistributedLock {
    @Autowired
    private Client etcdClient;
    private final Map<String, Lock> locks = new ConcurrentHashMap<>();
    public boolean tryLock(String lockKey, long timeoutSeconds) {        try {            Lock lockClient = etcdClient.getLockClient();            Lock lock = lockClient.lock(ByteSequence.from(lockKey.getBytes()), timeoutSeconds);
            if (lock != null) {
                locks.put(lockKey, lock);                return true;
            }            return false;
        } catch (Exception e) {            throw new RuntimeException("获取锁失败: " + e.getMessage(), e);
        }
    }
    public void unlock(String lockKey) {        Lock lock = locks.get(lockKey);        if (lock != null) {            try {
                lock.unlock();
                locks.remove(lockKey);
            } catch (Exception e) {                throw new RuntimeException("释放锁失败: " + e.getMessage(), e);
            }
        }
    }
    // 配置更新的分布式锁保护
    public void updateConfigWithLock(String configKey, String newValue) {        String lockKey = "lock:" + configKey;
        if (tryLock(lockKey, 30)) {            try {                // 在锁保护下更新配置
                etcdConfigManager.saveConfig(configKey, newValue);
                // 模拟复杂的配置更新逻辑
                Thread.sleep(1000);

            } catch (Exception e) {                throw new RuntimeException("配置更新失败", e);
            } finally {
                unlock(lockKey);
            }
        } else {            throw new RuntimeException("获取配置更新锁超时");
        }
    }
}
Etcd在Kubernetes中的角色
Etcd的优缺点
优点:
- 高性能,低延迟
- 强一致性保证
- Kubernetes原生支持
- 简单的API设计
- 可靠的分布式锁
缺点:
- 功能相对简单
- 缺乏友好的管理界面
- 客户端生态相对较小
- 运维复杂度高
七、5大配置中心对比
通过前面的详细分析,我们现在对这五种配置中心有了深入的了解。
让我们通过一个全面的对比来帮助大家做出正确的技术选型。
详细对比表格
| 特性维度 | Spring Cloud Config | Apollo | Nacos | Consul | Etcd |
|---|---|---|---|---|---|
| 配置实时推送 | 需要手动刷新 | 1秒内实时推送 | 实时推送 | 实时推送 | 实时推送 |
| 配置格式支持 | 多种格式 | 多种格式 | 多种格式 | Key-Value | Key-Value |
| 权限管理 | 基础 | 完善 | 基础 | 完善 | 基础 |
| 版本管理 | Git版本管理 | 完善 | 基础 | 基础 | 基础 |
| 服务发现 | 需集成Eureka | 不支持 | 支持 | 支持 | 支持 |
| 管理界面 | 无 | 完善 | 完善 | 基础 | 无 |
| 部署复杂度 | 简单 | 复杂 | 中等 | 复杂 | 中等 |
| 生态集成 | Spring Cloud原生 | 需客户端集成 | Spring Cloud Alibaba | HashiCorp生态 | Kubernetes原生 |
选型指南
选择Spring Cloud Config当:
- 已经在使用Spring Cloud全家桶
- 团队熟悉Git工作流
- 配置实时性要求不高
- 希望最小化外部依赖
选择Apollo当:
- 企业级应用,需要完善的权限管理
- 配置频繁变更,需要实时生效
- 多环境、多集群管理需求
- 需要友好的管理界面
选择Nacos当:
- 需要统一的配置管理和服务发现
- Spring Cloud Alibaba技术栈
- 希望部署和维护相对简单
- 对权限管理要求不高
选择Consul当:
- 需要完整的服务网格解决方案
- 多数据中心部署
- 强一致性和高可用性要求
- 丰富的安全特性需求
选择Etcd当:
- Kubernetes环境
- 高性能和低延迟要求
- 强一致性保证
- 相对简单的配置管理需求
实战场景建议
场景1:传统企业微服务改造
推荐:Spring Cloud Config + Eureka
理由:技术栈统一,学习成本低,与现有Spring体系完美集成
场景2:大型互联网电商平台
推荐:Apollo
理由:配置频繁变更,需要完善的权限审计,多环境管理
场景3:云原生技术栈
推荐:Nacos 或 Consul
理由:服务发现和配置管理一体化,云原生生态友好
场景4:Kubernetes环境
推荐:Etcd(Kubernetes内置) + 可选Nacos用于应用配置
理由:基础设施和应用配置分离,各司其职
https://zq.zhaopin.com/moment/67728353
https://zq.zhaopin.com/moment/67728345
https://zq.zhaopin.com/moment/67728340
https://zq.zhaopin.com/moment/67728333
https://zq.zhaopin.com/moment/67728304
https://zq.zhaopin.com/moment/67728282
https://zq.zhaopin.com/moment/67728270
https://zq.zhaopin.com/moment/67728263
https://zq.zhaopin.com/moment/67728153
https://zq.zhaopin.com/moment/67728145
https://zq.zhaopin.com/moment/67728139
https://zq.zhaopin.com/moment/67728133
https://zq.zhaopin.com/moment/67728131
https://zq.zhaopin.com/moment/67728125
https://zq.zhaopin.com/moment/67728116
https://zq.zhaopin.com/moment/67728114
https://zq.zhaopin.com/moment/67728105
https://zq.zhaopin.com/moment/67728096
https://zq.zhaopin.com/moment/67728085
https://zq.zhaopin.com/moment/67728081
总结
在选择配置中心时需要考虑以下关键因素:
- 技术栈匹配:选择与团队技术栈最匹配的方案
- 功能需求:根据实际的配置管理需求选择合适的功能集
- 运维成本:考虑部署、监控、维护的复杂度
- 社区生态:选择有活跃社区和良好生态支持的项目
- 长期演进:考虑技术的长期发展和演进路径
记住,没有最好的配置中心,只有最适合的配置中心。
来自 “ ITPUB博客 ” ,链接:https://blog.itpub.net/69961373/viewspace-3100561/ ,如需转载,请注明出处,否则将追究法律责任。

