mysql+keepalived+haproxy配置(负载均衡)
实验系统:CentOS 6.5_x86_64
实验前提:防火墙和selinux都关闭
实验软件:keepalived-1.2.13 haproxy-1.8.13 mysql—5.7.21
主1 ip:192.168.226.134
主2 ip:192.168.226.135
vip 192.168.226.150
一、安装mysql
获取mysql安装包:wget https://dev.mysql.com/get/Downloads/MySQL-5.7/mysql-5.7.21-linux-glibc2.12-x86_64.tar.gz
安装mysql过程省略
二、配置mysql复制
命令 service iptables stop
检查:service iptables status
关闭vi /etc/selinux/config
SELINUX=disabled
两台服务器上都要执行:
创建复制用户
grant replication slave on *.* to 'repl'@'%' identified by '123';
进入从服务器mysql
命令: # mysql -uroot -p
关闭slave
命令:stop slave;
开始配置:
输入下面代码即可:
CHANGE MASTER TO MASTER_HOST='192.168.226.135', MASTER_USER='repl', MASTER_PASSWORD='123', MASTER_LOG_FILE='mysql-bin.000002', MASTER_LOG_POS=681;
先在从服务器配置完成,启动从服务器:
命令: start slave;
反向再配置一次
三、安装haproxy(两台节点都要安装)
tar -zxvxf haproxy-1.8.13.tar.gz
cd haproxy-1.8.13
make TARGET=linux2628 //根据自己主机设定
make install
提供启动脚本
vi /etc/init.d/haproxy
#!/bin/sh
#
# haproxy
#
# chkconfig: - 85 15
# description: HAProxy is a free, very fast and reliable solution \
# offering high availability, load balancing, and \
# proxying for TCP and HTTP-based applications
# processname: haproxy
# config: /etc/haproxy/haproxy.cfg
# pidfile: /var/run/haproxy.pid
# Source function library.
. /etc/rc.d/init.d/functions
# Source networking configuration.
. /etc/sysconfig/network
# Check that networking is up.
[ "$NETWORKING" = "no" ] && exit 0
exec="/usr/local/sbin/haproxy"
prog=$(basename $exec)
[ -e /etc/sysconfig/$prog ] && . /etc/sysconfig/$prog
cfgfile=/etc/haproxy/haproxy.cfg
pidfile=/var/run/haproxy.pid
lockfile=/var/lock/subsys/haproxy
check() {
$exec -c -V -f $cfgfile $OPTIONS
}
start() {
$exec -c -q -f $cfgfile $OPTIONS
if [ $? -ne 0 ]; then
echo "Errors in configuration file, check with $prog check."
return 1
fi
echo -n $"Starting $prog: "
# start it up here, usually something like "daemon $exec"
daemon $exec -D -f $cfgfile -p $pidfile $OPTIONS
retval=$?
echo
[ $retval -eq 0 ] && touch $lockfile
return $retval
}
stop() {
echo -n $"Stopping $prog: "
# stop it here, often "killproc $prog"
killproc $prog
retval=$?
echo
[ $retval -eq 0 ] && rm -f $lockfile
return $retval
}
restart() {
$exec -c -q -f $cfgfile $OPTIONS
if [ $? -ne 0 ]; then
echo "Errors in configuration file, check with $prog check."
return 1
fi
stop
start
}
reload() {
$exec -c -q -f $cfgfile $OPTIONS
if [ $? -ne 0 ]; then
echo "Errors in configuration file, check with $prog check."
return 1
fi
echo -n $"Reloading $prog: "
$exec -D -f $cfgfile -p $pidfile $OPTIONS -sf $(cat $pidfile)
retval=$?
echo
return $retval
}
force_reload() {
restart
}
fdr_status() {
status $prog
}
case "$1" in
start|stop|restart|reload)
$1
;;
force-reload)
force_reload
;;
check)
check
;;
status)
fdr_status
;;
condrestart|try-restart)
[ ! -f $lockfile ] || restart
;;
*)
echo $"Usage: $0 {start|stop|status|restart|try-restart|reload|force-reload}"
exit 2
esac
chkconfig --add haproxy
chkconfig haproxy on
chmod +x /etc/init.d/haproxy
提供配置文件
mkdir /etc/haproxy
mkdir /var/lib/haproxy
useradd -r haproxy
vi /etc/haproxy/haproxy.cfg
global
log 127.0.0.1 local2
chroot /var/lib/haproxy
pidfile /var/run/haproxy.pid
maxconn 4000
user haproxy
group haproxy
daemon
stats socket /var/lib/haproxy/stats
defaults
mode tcp
log global
option dontlognull
option redispatch
retries 3
timeout http-request 10s
timeout queue 1m
timeout connect 10s
timeout client 1m
timeout server 1m
timeout http-keep-alive 10s
timeout check 10s
maxconn 600
listen stats
mode http
bind :6677
stats enable
stats hide-version
stats uri /haproxyadmin?stats
stats realm Haproxy\ Statistics
stats auth admin:admin
stats admin if TRUE
frontend main
bind *:80
default_backend mysql
backend mysql
balance leastconn
server m1 192.168.226.134:80 check port 80 maxconn 300
server m2 192.168.226.135:80 check port 80 maxconn 300
启动日志:
vi /etc/rsyslog.conf
# Provides UDP syslog reception
$ModLoad imudp
$UDPServerRun 514
local2.* /var/log/haproxy.log
service rsyslog restart
启动测试haproxy:
service haproxy start
netstat -tnlp
四、安装keepalived (两台服务器都要执行)
yum install -y keepalived
chkconfig --add keepalived
chkconfig keepalived on
mv /etc/keepalived/keepalived.conf /etc/keepalived/keepalived.conf.bak
vi /etc/keepalived/keepalived.conf
! Configuration File for keepalived
global_defs {
router_id Mysql_ha
}
vrrp_script chk_mysql {
script "/etc/keepalived/check_mysql.sh"
interval 2
weight 5
}
vrrp_script chk_haproxy {
script "/etc/keepalived/chk.sh"
interval 2
weight 5
}
vrrp_instance mysql-instance {
state MASTER #另一台为BACKUP
interface enp4s0 #与网卡名称对应
virtual_router_id 11 #每一个IP唯一,另一台绑定相同IP要与整个ID一致
priority 10 #另一台为9
advert_int 1
authentication {
auth_type PASS
auth_pass password321
}
track_script {
chk_mysql
}
virtual_ipaddress {
192.168.226.150/24
}
}
vrrp_instance mysql-ha {
state MASTER
interface enp4s0
virtual_router_id 13
priority 10
advert_int 1
# nopreempt
authentication {
auth_type PASS
auth_pass password321
}
track_script {
chk_haproxy
}
virtual_ipaddress {
192.168.226.14/24
}
notify_backup "/etc/init.d/haproxy restart"
notify_fault "/etc/init.d/haproxy stop"
}
五、在两台机器上测试
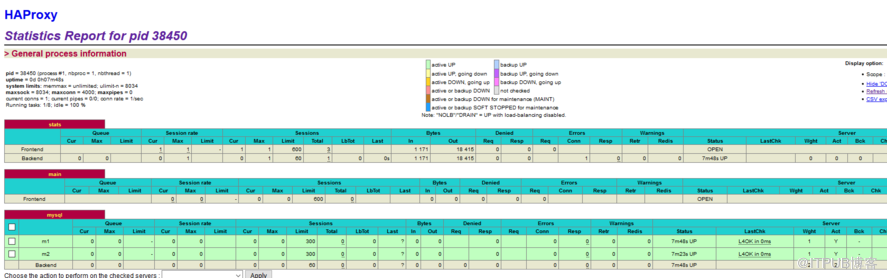
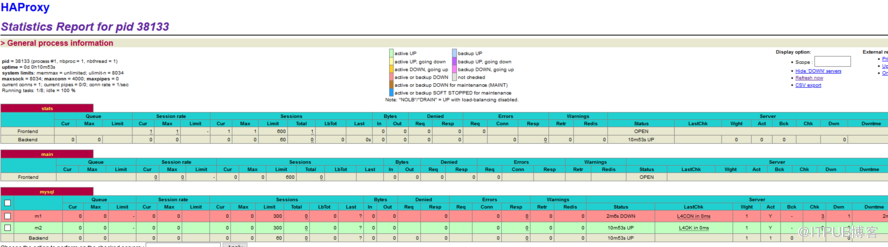
在浏览器打开http://192.168.226.150:6677/haproxyadmin?stats,打开haproxy状态页:
来自 “ ITPUB博客 ” ,链接:https://blog.itpub.net/69950231/viewspace-2662325/ ,如需转载,请注明出处,否则将追究法律责任。

