1.前言
之前也分享过分离与分层方式部署,本文只不过将之前的那两种方式放到了容器中来部署运行,里面多多少少还是有点坑在里面的,要对简单一点直接使用如下命令部署:
nohup java -jar xxxx.jar --spring.profiles.active=xx ,,,,, > xxxx.log &使用容器部署方式就比这种更高级优雅一点,根据个人喜好去选择适合自己的部署方式。
之前的文章链接如下:
https://blog.csdn.net/qq_34905631/article/details/126616809?spm=1001.2014.3001.5501https://mp.weixin.qq.com/s/OTZ-VVn_VimHNcSdEaLYJwhttps://blog.csdn.net/qq_34905631/article/details/126574085?spm=1001.2014.3001.5501https://mp.weixin.qq.com/s/5mhF1ge_yYUA6tMCYi77Og
2.deom项目工程结构

3.分离容器部署
3.1父工程pom
这里只展示build的配置
<build><!--特别注意:项目仅仅是为了演示配置方便,直接在parent的build部分做了插件配置和运行定义。但是实际项目中需要把这些定义只放到spring boot模块项目(可优化使用pluginManagement形式),避免干扰其他util、common等模块项目--><plugins><!-- 跳过测试代码 maven版本需要3.6.3及以上版本 jeksion构建时候,maven版本需要3。6.3及以上版本--><!--<plugin><groupId>org.apache.maven.plugins</groupId><artifactId>maven-surefire-plugin</artifactId><version>3.5.2</version><configuration><skipTests>true</skipTests></configuration></plugin>--><!--Spring Boot模块jar构建--><plugin><groupId>org.springframework.boot</groupId><artifactId>spring-boot-maven-plugin</artifactId><version>2.3.12.RELEASE</version><configuration><!-- 指定该Main Class为全局的唯一入口 --><mainClass>xxxx.xxxx.xxxx.xxxApplication</mainClass><!--解决windows命令行窗口中文乱码,该参数配置无效,需要容器启动命令中动态传入该参数才有效--><jvmArguments>-Dfile.encoding=UTF-8</jvmArguments><!--设置为true,以便把本地的system的jar也包括进来--><includeSystemScope>true</includeSystemScope><layout>ZIP</layout><classifier>exec</classifier><addResources>true</addResources><fork>true</fork><!--开启分层编译支持--><!-- <layers><enabled>true</enabled></layers>--><outputDirectory>${project.build.directory}</outputDirectory><skip>true</skip><includes><!-- 不存在的include引用,相当于排除所有maven依赖jar,没有任何三方jar文件打入输出jar--><!-- <include><groupId>null</groupId><artifactId>null</artifactId></include>--><!--这里是填写需要包含进去的jar,必须项目中的某些模块,会经常变动,那么就应该将其坐标写进来如果没有则non-exists ,表示不打包依赖--><include><groupId>non-exists</groupId><artifactId>non-exists</artifactId></include><!--<include><groupId>*</groupId><artifactId>*-dto</artifactId></include>--><!--<include><groupId>xxxxx.xxxxx</groupId><artifactId>xxxx</artifactId></include>--></includes></configuration><executions><execution><goals><goal>repackage</goal><!--可以把依赖的包都打包到生成的Jar包中--></goals></execution></executions></plugin><!--拷贝资源文件--><plugin><groupId>org.apache.maven.plugins</groupId><artifactId>maven-resources-plugin</artifactId><version>3.2.0</version><executions><execution><id>copy-resources</id><phase>package</phase><goals><goal>copy-resources</goal></goals><configuration><resources><resource><directory>src/main/resources</directory><excludes><exclude>static/**</exclude><exclude>*.xml</exclude><!-- 这里把yml文件排除 dockerfile文件中就不用拷贝yml文件,这种验证是ok的--><exclude>*.yml</exclude></excludes></resource></resources><outputDirectory>${project.build.directory}/resources</outputDirectory></configuration></execution></executions><configuration><nonFilteredFileExtensions><nonFilteredFileExtension>pem</nonFilteredFileExtension></nonFilteredFileExtensions></configuration></plugin><!--生成doc jar包--><plugin><groupId>org.apache.maven.plugins</groupId><artifactId>maven-javadoc-plugin</artifactId><version>2.9</version><configuration><attach>true</attach><!-- utf-8读取文件 --><charset>UTF-8</charset><!-- utf-8进行编码代码 --><encoding>UTF-8</encoding><!-- utf-8进行编码文档 --><docencoding>UTF-8</docencoding></configuration><executions><execution><id>attach-javadocs</id><goals><goal>jar</goal></goals><configuration><additionalparam>-Xdoclint:none</additionalparam></configuration></execution></executions></plugin><!--生成源码jar包--><plugin><groupId>org.apache.maven.plugins</groupId><artifactId>maven-source-plugin</artifactId><version>3.2.1</version><executions><execution><id>attach-sources</id><goals><goal>jar</goal></goals></execution></executions></plugin><plugin><groupId>org.apache.maven.plugins</groupId><artifactId>maven-jar-plugin</artifactId><version>3.3.0</version><configuration><!-- 不打包资源文件--><excludes><!-- <exclude>static/**</exclude>--><exclude>*.properties</exclude><!--<exclude>*.xml</exclude>--><exclude>*.json</exclude><!-- yaml和yml这两个也可以注释了,dockerfile文件中不拷贝yaml文件[这个验证是ok的]--><!-- <exclude>*.yaml</exclude><exclude>*.yml</exclude>--><exclude>*.png</exclude><exclude>*.txt</exclude></excludes><archive><!-- <!– 生成的jar中,不要包含pom.xml和pom.properties这两个文件 –>--><addMavenDescriptor>false</addMavenDescriptor><manifest><!-- 指定程序入口 --><mainClass>xxx.xxxxx.xxxiApplication</mainClass><!-- 打包时 MANIFEST.MF文件不记录的时间戳版本,jar不包含唯一版本 --><useUniqueVersions>false</useUniqueVersions><!--MANIFEST.MF中的Class-Path加前缀--><addClasspath>true</addClasspath><!-- 服务依赖的jar包放在lib目录下 --><classpathPrefix>lib/</classpathPrefix><!--<addDefaultImplementationEntries>true</addDefaultImplementationEntries>--></manifest><manifestEntries><!-- <!–有些非官方三方的诸如sdk jar在pom中是以systemPath方式引入的,maven-jar-plugin组件没有直接参数声明包含指定scope的组件通过使用额外定义 Class-Path 值来追加指定依赖组件列表,在子模块按实际情况指定 jar-manifestEntries-classpath 值即可例如(注意前面个点字符及各空格分隔符):. lib/xxx-1.0.0.jar lib/yyy-2.0.0.jar详见各子模块中 boot-jar-output 属性定义示例–>--><Class-Path>./resources/</Class-Path><!--这里是一个坑,外部jar依赖分离打包需要在这里配置一下,有多个就配置多个--><Class-Path>lib/xxxxxx.xxxxx.jar lib/xxxxxx.xxxx.jar </Class-Path></manifestEntries></archive><outputDirectory>${project.build.directory}</outputDirectory></configuration></plugin><!-- 拷贝项目所有依赖jar文件到构建lib目录下 --><plugin><groupId>org.apache.maven.plugins</groupId><artifactId>maven-dependency-plugin</artifactId><version>3.6.0</version><executions><execution><id>copy-dependencies</id><phase>package</phase><goals><goal>copy-dependencies</goal></goals><configuration><!--各子模块按照实际层级定义各模块对应的属性值,检查所有微服务模块依赖jar文件合并复制到同一个目录详见各子模块中 boot-jar-output 属性定义--><type>jar</type><includeTypes>jar</includeTypes><!-- 存放服务依赖的jar包,存放在服务相同目录的lib文件夹下 --><outputDirectory>${project.build.directory}/lib</outputDirectory></configuration></execution></executions></plugin><!-- 跳过deploy --><plugin><groupId>org.apache.maven.plugins</groupId><artifactId>maven-deploy-plugin</artifactId><version>2.8.2</version><configuration><skip>true</skip></configuration></plugin><!--<plugin><groupId>org.apache.maven.plugins</groupId><artifactId>maven-war-plugin</artifactId><version>3.1.0</version><configuration><failOnMissingWebXml>false</failOnMissingWebXml><warName>${project.artifactId}</warName></configuration></plugin>--></plugins><finalName>${project.artifactId}</finalName></build>
3.2子模块3的Dockerfile
FROM xxx基础镜像VOLUME /resourcesWORKDIR /appADD target/xxx.jar /app/app.jarADD target/lib /app/lib/ADD target/resources/* /app/resources/# COPY target/resources/*.yml /app/config/ 这种方式是将boostrap.yml文件拷贝到config,提升了加载优先级别,否则找不到这个ymlRUN echo "Asia/Shanghai" > /etc/timezoneEXPOSE xxx对外暴露监听端口ENTRYPOINT java ${JAVA_OPTS} ${JAVA_PARAMETERS} ${SERVER_NAME} -Xss1m -jar /app/app.jar
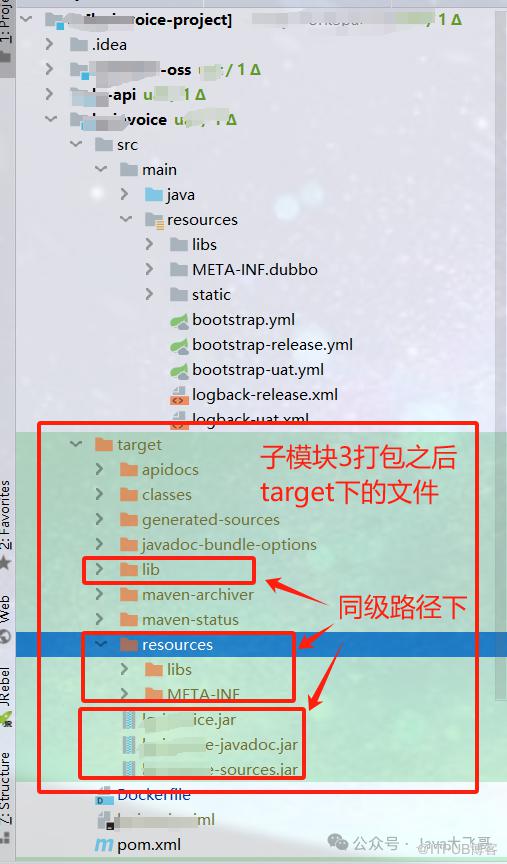
3.3子模块3的target
子模块3打包之后target下文件如图所示:
3.4构建启动docker命令
#进入到子模块三路劲中docker build -t xx:v2.0.0 .docker run -itd -p xxx:xxx --ip=本机ip(连接wifi的ip) -e JAVA_OPTS="-Xms200m -Xmx200m -Xss256K -Xdebug -Xrunjdwp:transport=dt_socket,suspend=n,server=y,address=jvm远程调试监听端口 -Dfile.encoding=UTF-8" --name xxx-xxxx-server xx:v2.0.0
4.分层容器部署
4.1父工程pom
这里只展示build的配置
<build><!--特别注意:项目仅仅是为了演示配置方便,直接在parent的build部分做了插件配置和运行定义。但是实际项目中需要把这些定义只放到spring boot模块项目(可优化使用pluginManagement形式),避免干扰其他util、common等模块项目--><plugins><!-- 跳过测试代码 maven版本需要3.6.3及以上版本--><!--<plugin><groupId>org.apache.maven.plugins</groupId><artifactId>maven-surefire-plugin</artifactId><version>3.5.2</version><configuration><skipTests>true</skipTests></configuration></plugin>--><!--Spring Boot模块jar构建--><plugin><groupId>org.springframework.boot</groupId><artifactId>spring-boot-maven-plugin</artifactId><version>2.3.12.RELEASE</version><configuration><mainClass>xxxlx.xxxx.xxxApplication</mainClass><includeSystemScope>true</includeSystemScope><!--<!– 指定该Main Class为全局的唯一入口 –><mainClass>xxxx.xxxxx.xxApplication</mainClass><!–解决windows命令行窗口中文乱码,该参数配置无效,需要容器启动命令中动态传入该参数才有效–><jvmArguments>-Dfile.encoding=UTF-8</jvmArguments><!–设置为true,以便把本地的system的jar也包括进来–><includeSystemScope>true</includeSystemScope><layout>ZIP</layout><classifier>exec</classifier><addResources>true</addResources><fork>true</fork>--><!--开启分层编译支持--><layers><enabled>true</enabled></layers><!--<outputDirectory>${project.build.directory}</outputDirectory><skip>true</skip><includes><!– 不存在的include引用,相当于排除所有maven依赖jar,没有任何三方jar文件打入输出jar–><!– <include><groupId>null</groupId><artifactId>null</artifactId></include>–><!–这里是填写需要包含进去的jar,必须项目中的某些模块,会经常变动,那么就应该将其坐标写进来如果没有则non-exists ,表示不打包依赖–><include><groupId>non-exists</groupId><artifactId>non-exists</artifactId></include><!–<include><groupId>*</groupId><artifactId>*-dto</artifactId></include>–><!–<include><groupId>xxxxx.xxxxx</groupId><artifactId>xxxx</artifactId></include>–></includes>--></configuration><executions><execution><goals><goal>repackage</goal><!--可以把依赖的包都打包到生成的Jar包中--></goals></execution></executions></plugin><!--拷贝资源文件--><!--<plugin><groupId>org.apache.maven.plugins</groupId><artifactId>maven-resources-plugin</artifactId><version>3.2.0</version><executions><execution><id>copy-resources</id><phase>package</phase><goals><goal>copy-resources</goal></goals><configuration><resources><resource><directory>src/main/resources</directory><excludes><exclude>static/**</exclude><exclude>*.xml</exclude><!– 这里把yml文件排除 dockerfile文件中就不用拷贝yml文件,这种验证是ok的–><exclude>*.yml</exclude></excludes></resource></resources><outputDirectory>${project.build.directory}/resources</outputDirectory></configuration></execution></executions><configuration><nonFilteredFileExtensions><nonFilteredFileExtension>pem</nonFilteredFileExtension></nonFilteredFileExtensions></configuration></plugin>--><!--生成doc jar包--><plugin><groupId>org.apache.maven.plugins</groupId><artifactId>maven-javadoc-plugin</artifactId><version>2.9</version><configuration><attach>true</attach><!-- utf-8读取文件 --><charset>UTF-8</charset><!-- utf-8进行编码代码 --><encoding>UTF-8</encoding><!-- utf-8进行编码文档 --><docencoding>UTF-8</docencoding></configuration><executions><execution><id>attach-javadocs</id><goals><goal>jar</goal></goals><configuration><additionalparam>-Xdoclint:none</additionalparam></configuration></execution></executions></plugin><!--生成源码jar包--><plugin><groupId>org.apache.maven.plugins</groupId><artifactId>maven-source-plugin</artifactId><version>3.2.1</version><executions><execution><id>attach-sources</id><goals><goal>jar</goal></goals></execution></executions></plugin><!--<plugin><groupId>org.apache.maven.plugins</groupId><artifactId>maven-jar-plugin</artifactId><version>3.3.0</version><configuration><!– 不打包资源文件–><excludes><!– <exclude>static/**</exclude>–><exclude>*.properties</exclude><!–<exclude>*.xml</exclude>–><exclude>*.json</exclude><!– yaml和yml这两个也可以注释了,dockerfile文件中不拷贝yaml文件[这个验证是ok的]–><!– <exclude>*.yaml</exclude><exclude>*.yml</exclude>–><exclude>*.png</exclude><exclude>*.txt</exclude></excludes><archive><!– <!– 生成的jar中,不要包含pom.xml和pom.properties这两个文件 –>–><!– <addMavenDescriptor>false</addMavenDescriptor>–><manifest><!– 指定程序入口 –><mainClass>com.lq.invoice.LeQiApplication</mainClass><!– 打包时 MANIFEST.MF文件不记录的时间戳版本,jar不包含唯一版本 –><useUniqueVersions>false</useUniqueVersions><!–MANIFEST.MF中的Class-Path加前缀–><addClasspath>true</addClasspath><!– 服务依赖的jar包放在lib目录下 –><classpathPrefix>lib/</classpathPrefix><!–<addDefaultImplementationEntries>true</addDefaultImplementationEntries>–></manifest><manifestEntries><!– <!–有些非官方三方的诸如sdk jar在pom中是以systemPath方式引入的,maven-jar-plugin组件没有直接参数声明包含指定scope的组件通过使用额外定义 Class-Path 值来追加指定依赖组件列表,在子模块按实际情况指定 jar-manifestEntries-classpath 值即可例如(注意前面个点字符及各空格分隔符):. lib/xxx-1.0.0.jar lib/yyy-2.0.0.jar详见各子模块中 boot-jar-output 属性定义示例–>–><Class-Path>./resources/</Class-Path><Class-Path>lib/spire.pdf.free-9.13.0.jar</Class-Path></manifestEntries></archive><outputDirectory>${project.build.directory}</outputDirectory></configuration></plugin><!– 拷贝项目所有依赖jar文件到构建lib目录下 –><plugin><groupId>org.apache.maven.plugins</groupId><artifactId>maven-dependency-plugin</artifactId><version>3.6.0</version><executions><execution><id>copy-dependencies</id><phase>package</phase><goals><goal>copy-dependencies</goal></goals><configuration><!–各子模块按照实际层级定义各模块对应的属性值,检查所有微服务模块依赖jar文件合并复制到同一个目录详见各子模块中 boot-jar-output 属性定义–><type>jar</type><includeTypes>jar</includeTypes><!– 存放服务依赖的jar包,存放在服务相同目录的lib文件夹下 –><outputDirectory>${project.build.directory}/lib</outputDirectory></configuration></execution></executions></plugin>--><!-- 跳过deploy --><plugin><groupId>org.apache.maven.plugins</groupId><artifactId>maven-deploy-plugin</artifactId><version>2.8.2</version><configuration><skip>true</skip></configuration></plugin><!--<plugin><groupId>org.apache.maven.plugins</groupId><artifactId>maven-war-plugin</artifactId><version>3.1.0</version><configuration><failOnMissingWebXml>false</failOnMissingWebXml><warName>${project.artifactId}</warName></configuration></plugin>--></plugins><finalName>${project.artifactId}</finalName></build>
这个是用之前的分离打包的build改的,测试是ok的
4.2子模块3的Dockerfile
FROM xxxx基础镜像 AS builderVOLUME /resourcesWORKDIR /app# 配置参数ARG JAR_FILE=target/xxxx.jar# 将编译构建得到的jar文件复制到镜像空间中COPY ${JAR_FILE} /app/app.jar#ADD target/lib /app/lib/#ADD target/resources/* /app/resources/# COPY target/resources/*.yml /app/config/# 通过工具spring-boot-jarmode-layertools从application.jar中提取拆分后的构建结果RUN java -Djarmode=layertools -jar app.jar extractRUN echo "Asia/Shanghai" > /etc/timezone# 正式构建镜像FROM xxxx基础镜像WORKDIR /app# 前一阶段从jar中提取除了多个文件,这里分别执行COPY命令复制到镜像空间中,每次COPY都是一个layerCOPY --from=builder /app/dependencies/ ./COPY --from=builder /app/spring-boot-loader/ ./COPY --from=builder /app/snapshot-dependencies/ ./COPY --from=builder /app/application/ ./EXPOSE xxx对外暴露监听端口ENTRYPOINT ["java","-Xms200m","-Xmx200m","-Xss256K","-Xdebug", "-Xrunjdwp:transport=dt_socket,suspend=n,server=y,address=xxxxjvm远程调试监听端口", "-Dfile.encoding=UTF-8", "org.springframework.boot.loader.JarLauncher"]
这种方式是用一个胖jar包来提取分层镜像构建的,缺点是不能动态传递启动参数,必须在ENTRYPOINT中写死。
4.3子模块3的target
这种方式是一个正常的java胖jar包,所有的都打入到这个胖jar中,这里就不展示了。
4.4构建启动docker命令
#进入到子模块三路劲中docker build -t xx:v2.0.0 .docker run -itd -p xxx:xxxx --ip=本机ip(wifi连接的ip) --name lq-invoice-server xx:v2.0.0
5.jekines脚本
pipeline {agent anyenvironment {image_tag="xxxxx/xxxxx/xxxxxx:v1.0.${BUILD_NUMBER}"git_address="http://xxxx/xxxx/xx.git"git_branch="xxx"port=xxxxxgit_auth="xxxxxx"registry_name="xxxxx"registry_pwd="xxxx"container_name="xxxxxxxx"JAVA_OPTS="-javaagent:/agent/skywalking-agent.jar -Dskywalking.agent.service_name=[xxxx-xxxx-xxx] -Dskywalking.trace.ignore_path=/actuator/** -Xms512m -Xmx512m -Xss256K -Xdebug -Xrunjdwp:transport=dt_socket,suspend=n,server=y,address=xxxxxx"}stages {stage("拉取代码") {steps {git branch: "${git_branch}", credentialsId: "${git_auth}",url: "${git_address}"}}stage('质量扫描') {steps {echo '跳过扫描'}}stage('maven编译') {steps {sh 'mvn -B -f ./pom.xml clean install -DskipTests'}}stage('编译镜像') {steps {sh '''cd 子模块三路劲/cp target/*.jar ./docker build -t ${image_tag} .'''sh 'docker login --username=${registry_name} --password=${registry_pwd} xxxx.xxxx.xxxx私服域名'sh 'docker push ${image_tag}'sh 'docker rmi ${image_tag}'}}stage('部署服务') {steps {echo '自动部署'sh '''ssh root@服务器ip << remotesshdocker stop ${container_name}docker rm ${container_name}docker pull ${image_tag}docker run -d -p ${port}:${port} --net=host -e SERVER_PORT=${port} -e JAVA_OPTS="${JAVA_OPTS}" --name ${container_name} ${image_tag}exitremotessh'''}}}}
这个构建分离的是没有啥问题的,构建分层的这个docker run 需要修改一下,参数不能动态传了,直接修改为4.4构建启动docker命令的docker run命令部署即可。
6.总结
这两种方式是之前分享之后的酝酿灵感思路融合实践总结,上面两种方式是互斥的,任选一种即可,希望我的分享对你有所启发和帮助,请一键三连,么么么哒!
原文作者:Java大飞哥;如有侵权,请联系管理员删除。

请登录后发表评论
登录
全部评论
最新文章
- CentOs7.9安装Docker,SpringBoot项目分层构建镜像
- windows10下安装docker且使用wsl2安装双系统并构建最小jre镜像和应用镜像
- 乐企数电发票分布式发票号码生成重复的问题修复思路分享
- disruptor-spring-boot-start版本优化升级
- spring-rabbit的CachingConnectionFactory默认参数导致消费者Channel数量暴增问题解决
- disruptor-spring-boot-start生产实践导致pod节点CPU爆表100%的问题解决说明
- rabbitmq-spring-boot-start版本优化升级
- 使用shell脚本批量curl调用POST接口
- windwos上jps既不是内部命令也不是外部命令解决方法
- 接口对外安全交互新姿势
