Overview
Since there are several issues in the installation file, we alter the configuration of the default settings of the ProFrame. b163 installer.
Database Recreation
If you find the some error messages in the Web Admin, the installer probably insert all required data into database inappropriately. To resolve the problem, we need to delete the some lines from the database script. because they prevent the installer from working properly. The database script. files are located in the following folder.
%ProFrame. root path%/lib/sql
In the above path, you can find the following files.
Proframe Installtion
Post Installation - Configuration
- dev_oracle_tables.sql
- pfm_oracle_tables.sql
- pfm_sequence.sql
- conv_node_name.sql
- dev_oracle_data.sql
- pfm_oracle_data.sql
- sample_tables_n_data.sql
- all_oracle_alter
- pfm_oracle_node_n_container_info.sql
- sample_data.sql
- conv_node_name.sql
Metadata configuration
Once you successfully update the database through the above step, it is time to change metadata configuration. You can accomplish this configuration step using Web Admin. However, direct changes using database tools are strongly recommended. Just change switch the contents in the PHYSICAL_NAME and LOGICAL_NAME of the following rows in the DEV_PROPERTY and DEV_RESOURCES tables.
- dbio_total_count_, Dbio Total Count
- dbio_fetch_seq_, Dbio Fetch Seq
- dbio_fetch_size_, Dbio Fetch Size
- dbio_affected_count_, Dbio Affected Count
ProBuilderConfig.xml configuration
In this section, we will configure the ProBuilderConfig.xml file contaning configuration settings for ProBuilder IDE. The file is located in the following folder.
%ProFrame. root path%/config
Once you open the file, you will see some broken characters. Just find the following tags and change it as shown.
In
Out
Map
Msg - <pairDtoField array="" comments="" decimal="" fieldType="integer" length="10" logicalName="Dbio Affected Count" physicalName="dbio_affected_count_"/>
- <pairDtoField array="" comments="" decimal="" fieldType="integer" length="5" logicalName="Dbio Fetch Size" physicalName="dbio_fetch_size_"/>
- <pairDtoField array="" comments="" decimal="" fieldType="integer" length="5" logicalName="Dbio Fetch Seq" physicalName="dbio_fetch_seq_"/>
- <pairDtoField array="" comments="" decimal="" fieldType="integer" length="10" logicalName="Dbio Total Count" physicalName="dbio_total_count_"/>
Upload the confiuration and restart JEUS server
Now, it is time to finish this configuration step by uploading onto the ProFrame. server. The uploading will be done by run the insert_config.sh file in the %ProFrame. root path%/bin folder. Just input the following command at the folder.
If you see the uploading success message, the uploading is done successfully.
Then, restart your JEUS server.
This document is for the people who has difficulty in setting Linux, database, WAS server and so forth. To test the features of ProFrame. 4 Java, there are a lot of obstacles. In this document, you will see the one of successful installation of ProFrame. 4 Java. Please note the version of the installation file in this document and make sure that is is same as yours. In addition to this, I am not sure that the settings in this document is fit for your development environment. Since I allow you to post comment, you can ask me about more question or leave your comments or help.
To begin with, let me explain about the my intention for the setting of development environments. Basically, I will use virtual machine since I have no additional PC or server to test it. You can download the VMware Workstation from VMware website. Then, let's summarize the software environment for this document.
Hardware: VMWare
Software
OS: Ubuntu 8.04 LTS Server Edition
DB: Oracle 10g Express
WAS: JEUS
As you can see, all software is free except TMaxSoft JEUS. If you want to use JEUS, please email to SungJu.CHO@tmaxsoft.com. I will let you test the program. For more information, please visit the website. In this blog, I will have a lot of chance to mention about it.
Basically, ProFrame. will be a kind of software development framework. That's because we need a web application server, JEUS. As I know, we can use other WAS such as Web Logic. However in this document, I will use JEUS. Since ProFrame. is also TmaxSoft product, it would be a good match.
The installation steps are shown below.
1. Ubuntu installation
2. JDK installation
3. Oracle installation
4. JEUS installation
5. ProFrame. installation
Ok. just down load all required software, and follow next step.
To begin with, let me explain about the my intention for the setting of development environments. Basically, I will use virtual machine since I have no additional PC or server to test it. You can download the VMware Workstation from VMware website. Then, let's summarize the software environment for this document.
Hardware: VMWare
Software
OS: Ubuntu 8.04 LTS Server Edition
DB: Oracle 10g Express
WAS: JEUS
As you can see, all software is free except TMaxSoft JEUS. If you want to use JEUS, please email to SungJu.CHO@tmaxsoft.com. I will let you test the program. For more information, please visit the website. In this blog, I will have a lot of chance to mention about it.
Basically, ProFrame. will be a kind of software development framework. That's because we need a web application server, JEUS. As I know, we can use other WAS such as Web Logic. However in this document, I will use JEUS. Since ProFrame. is also TmaxSoft product, it would be a good match.
The installation steps are shown below.
1. Ubuntu installation
2. JDK installation
3. Oracle installation
4. JEUS installation
5. ProFrame. installation
Ok. just down load all required software, and follow next step.
Ubuntu Installation
Let's install Ubuntu server edition as OS. Please make new Linux virtual machine using VMware workstation. After making it, you can install the Ubuntu server edtion just by starting the virtual machine.
Change to root account
Basically, Ubuntu doesn't allow to create root account. In stead of that, you can change to root accout after you logged in. In this document, we will install all software using root account since Oracle 10g Express would work properly only if it was installed using root account. Just type the below command.
sudo su -
It will ask your log-in password. After input correct password, the system account will be changed to root account. The meaning of sudo is that running the command as if the current user is root.
Package Update
Very first installation of Ubuntu server just set up the only required packages, which requires addtional installation of other packages required for specific work. You can install this packages through internet. Basically, Ubuntu server has basic information of the possible packages and you can update the information through internet. Rather than downloading seperate files, installing through package information is much more convenient and best way of finding correct version. To update the package information just input the below command.
apt-get update
If you don't change to the root account, the above command will show error related with the priviledge.
Vim Installation
The default vim editor in Ubuntu is not advanced version but basic. Therefore, you need to install the advanced version first. Once you update the package information, just input the below command.
apt-get install vim vim-essenctial vim-common
build-essential and libaio-dev package installation
To install the debian type installer file, you need to install the glib and libaio packages. Each package can be installed with the below commands.
apt-get install build-essential
apt-get install libaio-dev
If you finish the above steps, you can install Oracle 10g Express of which installation step is described in the next section.
Let's install Ubuntu server edition as OS. Please make new Linux virtual machine using VMware workstation. After making it, you can install the Ubuntu server edtion just by starting the virtual machine.
Change to root account
Basically, Ubuntu doesn't allow to create root account. In stead of that, you can change to root accout after you logged in. In this document, we will install all software using root account since Oracle 10g Express would work properly only if it was installed using root account. Just type the below command.
sudo su -
It will ask your log-in password. After input correct password, the system account will be changed to root account. The meaning of sudo is that running the command as if the current user is root.
Package Update
Very first installation of Ubuntu server just set up the only required packages, which requires addtional installation of other packages required for specific work. You can install this packages through internet. Basically, Ubuntu server has basic information of the possible packages and you can update the information through internet. Rather than downloading seperate files, installing through package information is much more convenient and best way of finding correct version. To update the package information just input the below command.
apt-get update
If you don't change to the root account, the above command will show error related with the priviledge.
Vim Installation
The default vim editor in Ubuntu is not advanced version but basic. Therefore, you need to install the advanced version first. Once you update the package information, just input the below command.
apt-get install vim vim-essenctial vim-common
build-essential and libaio-dev package installation
To install the debian type installer file, you need to install the glib and libaio packages. Each package can be installed with the below commands.
apt-get install build-essential
apt-get install libaio-dev
If you finish the above steps, you can install Oracle 10g Express of which installation step is described in the next section.
Oracle debian installer download
To begin with, please download Oracle 10g Express edition from Oracle website. Since Ubuntu is built based on debian, debian installer is required.
Install Oracle Server
Using dpkg command, we can install the Oracle debian installer. Let's assume that the name of the installer is "oracle-xe-universal_10.2.0.1-1.0_i386.deb". Please input the below command.
dpkg -i oracle-xe-universal_10.2.0.1-1.0_i386.deb
Needless to say, you should input the command at the path contains the installer. Otherwise, correct path should be followed by the file name.
During the installation process, the installer prompted for configuration. When prompted, just ruen the following command.
$ /etc/init.d/oracle-xe configure
Then you can set the folliwng configuration information
Install Oracle Client
At this time, we will install the Oracle client. As same as the Oracle server, we need to download the debian Oracle client installer. After downloading it, please input the below command.
dpkg -i oracle-xe-client_10.2.0.1-1.0_i386.deb
Disk Swapping
During the installation process, some system may cause error due to insufficient swap space. If you don't see any error related with swap space, you can skip this section. If you encounter the problem, please refer the oracle installation memory in which you can calculate how much swap space is required. Then, you can input the below command.
dd if=/dev/zero f=/swapfile bs=1M count=800
mkswap /swpfile
swapon /swpfile
You can control the swap size using bs and count. As you can see, the swap page size will be the mutiple of the bs with the count.
Setting the Environment Variables
After installation, we need to set up the environment variables for Oracle server. Oracle provides a script. that sets the environment variables. Just find the oracle_env.csh or oracle_env.sh file. You can use the below command to find them.
find -name "oracle_env.*"
Once you find the path, just move to there and run the one of the scripts. For C or tcsh shell, you can run oracle_env.csh. For Bourne, Bash, or Korn shell, just run oracle_env.sh.
Start and Stop Service
The following commands are for start and stop respectively.
$ /etc/init.d/oracle-xe start
$ /etc/init.d/oracle-xe stop
Enabling Remote Client Access
Basically, Oracle server dosen't allow the remote client access. To allow it, you need to start the Oracle service first. Then, run SQL*Plus with system account.
$ sqlplus system
Then, input password. You will see the SQL*Plus screen. Input the following command allowing remote clinet access.
SQL> EXEC DBMS_XDB.SETLISTENERLOCALACCESS(FALSE);
Verifying the Oracle Installation
Just access the Oracle Database though the below URL through web browser.
http://{IP address}:port/apex/
If you can see the following screen, you can think the basic installation is done well. In addtion, please verify the database with other functions of the web site such as table creation and deleting.

To begin with, please download Oracle 10g Express edition from Oracle website. Since Ubuntu is built based on debian, debian installer is required.
Install Oracle Server
Using dpkg command, we can install the Oracle debian installer. Let's assume that the name of the installer is "oracle-xe-universal_10.2.0.1-1.0_i386.deb". Please input the below command.
dpkg -i oracle-xe-universal_10.2.0.1-1.0_i386.deb
Needless to say, you should input the command at the path contains the installer. Otherwise, correct path should be followed by the file name.
During the installation process, the installer prompted for configuration. When prompted, just ruen the following command.
$ /etc/init.d/oracle-xe configure
Then you can set the folliwng configuration information
- A HTTP port for the Oracle Database GUI management (the default is 8080)
- A port for the Oracle database listener (the defualt is 1521)
- A password for sys and system admin user accounts
- Whether you want to start automatically when the computer starts
Install Oracle Client
At this time, we will install the Oracle client. As same as the Oracle server, we need to download the debian Oracle client installer. After downloading it, please input the below command.
dpkg -i oracle-xe-client_10.2.0.1-1.0_i386.deb
Disk Swapping
During the installation process, some system may cause error due to insufficient swap space. If you don't see any error related with swap space, you can skip this section. If you encounter the problem, please refer the oracle installation memory in which you can calculate how much swap space is required. Then, you can input the below command.
dd if=/dev/zero f=/swapfile bs=1M count=800
mkswap /swpfile
swapon /swpfile
You can control the swap size using bs and count. As you can see, the swap page size will be the mutiple of the bs with the count.
Setting the Environment Variables
After installation, we need to set up the environment variables for Oracle server. Oracle provides a script. that sets the environment variables. Just find the oracle_env.csh or oracle_env.sh file. You can use the below command to find them.
find -name "oracle_env.*"
Once you find the path, just move to there and run the one of the scripts. For C or tcsh shell, you can run oracle_env.csh. For Bourne, Bash, or Korn shell, just run oracle_env.sh.
Start and Stop Service
The following commands are for start and stop respectively.
$ /etc/init.d/oracle-xe start
$ /etc/init.d/oracle-xe stop
Enabling Remote Client Access
Basically, Oracle server dosen't allow the remote client access. To allow it, you need to start the Oracle service first. Then, run SQL*Plus with system account.
$ sqlplus system
Then, input password. You will see the SQL*Plus screen. Input the following command allowing remote clinet access.
SQL> EXEC DBMS_XDB.SETLISTENERLOCALACCESS(FALSE);
Verifying the Oracle Installation
Just access the Oracle Database though the below URL through web browser.
http://{IP address}:port/apex/
If you can see the following screen, you can think the basic installation is done well. In addtion, please verify the database with other functions of the web site such as table creation and deleting.

Installation 4/6 - JDK installation
JDK package installation
Similar to other application, Ubuntu also provides the package information of the JDK. In this document, JDK 1.5 edition is recommended for the development environment since currently there are several issues in the ProFrame. 4 Java installer.
To install the JDK 1.5 run the follwoing commands
apt-get install sun-java5-jdk
It will install the following packages in your computer:
JDK path
JDK path is required when you install ProFrame. Therefore, let's figure out how can we get the path of JDK.
$ find -name "jvm"
It will show you two items. One is for the real path of the JDK and the other one is for the soft link of the path. Therefore, you can use the both as JDK. However, I strongly recommend using soft link since it is much easier to remember and desigened for indicating the real path.
Similar to other application, Ubuntu also provides the package information of the JDK. In this document, JDK 1.5 edition is recommended for the development environment since currently there are several issues in the ProFrame. 4 Java installer.
To install the JDK 1.5 run the follwoing commands
apt-get install sun-java5-jdk
It will install the following packages in your computer:
- sun-java5-bin
- sun-java5-jre
- sun-java5-jdk
- sun-java5-demo
JDK path
JDK path is required when you install ProFrame. Therefore, let's figure out how can we get the path of JDK.
$ find -name "jvm"
It will show you two items. One is for the real path of the JDK and the other one is for the soft link of the path. Therefore, you can use the both as JDK. However, I strongly recommend using soft link since it is much easier to remember and desigened for indicating the real path.
Introduction to JEUS
JEUS is an abbreviation of Java Enterprise User Solution. It is the platform. for J2EE applications. It acquired J2EE certificate. That means it fully implemented all required J2EE specs. Similar to WebLogic and WebSphere, you can think it of Java WAS server. For more detail information, please visit TmaxSoft's JEUS homepage.
Basically, ProFrame. is a development framework which will be run on WAS server. That's why we need to install JEUS first. Besides JEUS, you can use WebLogic to run ProFrame. In this document, we will use JEUS for Java WAS.
Moreover, JEUS 5 will be used since ProFrame. 4 Java which will be used in this document is optimized with JEUS 5. To download JEUS 5, please visit TmaxSoft's technet site.
JEUS installation
Since our Ubuntu doesn't have GUI, let's install in console mode. In the same folder of the JEUS installer, please input the following command.
$ ./jeus50_unix_generic_en.bin
As you can see the jeus50_unix_generic_en.bin is the JEUS installer.
The installer will ask for license agreement. Then, it will ask for the installation path. In this document, we will install on /root/jeus5. Then, input the JDK path which we install the previous section. Then, input the JEUS administrator password.
$PATH variable configuration
Once the installation process is done successfully, we need to add the following paths to $PATH variable.
PATH = /root/jeus5/bin:/root/jeus5/lib/system:/root/jeus5/webserver/bin:$PATH
export PATH
Then restart the system. Since we add the PATH in the .bashrc file in root folder. To enable the configuration, log in as root account is required.
Verifying JEUS installation
Once you restart the system, let's start JEUS server. In the linux screen please run the following command which will start the JEUS service.
$ jeus
Then, open the another screen by pressing Ctrl+F2 or F3 key. You can log in the system and Input the following command to start the jeus administrator.
$ jeusadmin ubuntu8041
Then, it will ask you log in information. When it comes to the "ubuntu8041", it is the host name of your system. You can check this name in your command prompt screen. The id is "administrator", and the password is what you entered as password when you install the JEUS. To start the JEUS server, please input "boot". To stop, input "down". To get out of the JEUS admin, input "exit".
JEUS webadmin
JEUS provides webadmin allowing remote access to manage the resources and settings of the JEUS server. Once you successfully start the JEUS service, please acess the below URL using your browser.
http://{IP address of your system}:9744/webadmin
It will ask you the log in information. You can log in by inputting same information as jeusadmin. Then, we can think all installation process is done well.

JEUS is an abbreviation of Java Enterprise User Solution. It is the platform. for J2EE applications. It acquired J2EE certificate. That means it fully implemented all required J2EE specs. Similar to WebLogic and WebSphere, you can think it of Java WAS server. For more detail information, please visit TmaxSoft's JEUS homepage.
Basically, ProFrame. is a development framework which will be run on WAS server. That's why we need to install JEUS first. Besides JEUS, you can use WebLogic to run ProFrame. In this document, we will use JEUS for Java WAS.
Moreover, JEUS 5 will be used since ProFrame. 4 Java which will be used in this document is optimized with JEUS 5. To download JEUS 5, please visit TmaxSoft's technet site.
JEUS installation
Since our Ubuntu doesn't have GUI, let's install in console mode. In the same folder of the JEUS installer, please input the following command.
$ ./jeus50_unix_generic_en.bin
As you can see the jeus50_unix_generic_en.bin is the JEUS installer.
The installer will ask for license agreement. Then, it will ask for the installation path. In this document, we will install on /root/jeus5. Then, input the JDK path which we install the previous section. Then, input the JEUS administrator password.
$PATH variable configuration
Once the installation process is done successfully, we need to add the following paths to $PATH variable.
- /root/jeus5/bin
- /root/jeus5/lib/system
- /root/jeus5/webserver/bin
PATH = /root/jeus5/bin:/root/jeus5/lib/system:/root/jeus5/webserver/bin:$PATH
export PATH
Then restart the system. Since we add the PATH in the .bashrc file in root folder. To enable the configuration, log in as root account is required.
Verifying JEUS installation
Once you restart the system, let's start JEUS server. In the linux screen please run the following command which will start the JEUS service.
$ jeus
Then, open the another screen by pressing Ctrl+F2 or F3 key. You can log in the system and Input the following command to start the jeus administrator.
$ jeusadmin ubuntu8041
Then, it will ask you log in information. When it comes to the "ubuntu8041", it is the host name of your system. You can check this name in your command prompt screen. The id is "administrator", and the password is what you entered as password when you install the JEUS. To start the JEUS server, please input "boot". To stop, input "down". To get out of the JEUS admin, input "exit".
JEUS webadmin
JEUS provides webadmin allowing remote access to manage the resources and settings of the JEUS server. Once you successfully start the JEUS service, please acess the below URL using your browser.
http://{IP address of your system}:9744/webadmin
It will ask you the log in information. You can log in by inputting same information as jeusadmin. Then, we can think all installation process is done well.

Database account creation
While ProFrame. 4 Java installation, installer will create tables and insert data into them. Therefore, ProFrame. 4 Java installer will ask Oracle database information. For this purpose, we need to create separte database account.
Let's do this first. Open the Oracle web admin, and log in using the proper account information.
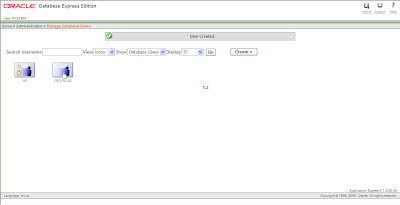 Oracle Web Admin Page
Once you logged in the page, you can see the following figure. To add new account select down arrow located on the left side of the Administration button.
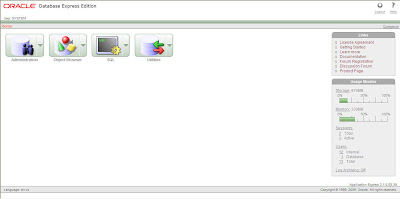 Oracle Web Admin Home page
Then, select "Creating User" menu by selecting Database Users as shown in following figure.
 Oracle Web Admin "Create User" menu
Then, input the account information. Please assign all privileges as long as it is not problem. Basically, the account should be able to manage tables and data contents.
 Creating New account in the Oracle Web Admin
Once you successfully create an account, you can jump to next section.
ProFrame. 4 Java installation
After you get the ProFrame. 4 Java installer, please run it using the following command
$ ./ProFrame4_0Server_unix_generic.bin
To begin with, you will see the license information screen. Then, the installer will ask path for ProFrame. In my case, I just use default path (/root/proframe/). Next, it will ask you WAS type and path of the installed WAS. Then, select default settings if there is no restriction except IP address. For the IP address, please input your IP address instead of 127.0.01. Actually, it is not strict options but recommended.
Sonner or later, the installer will ask about database information. Please input the account information accoridng to previous section. When it comes to the Oracle SID, just input XE if you also install Oracle 10g Express Edition.
After selecting several default settings options, you can see the installing process screen.
Configuration
After the installation process, the installer will notify you to configure using run_first.sh script. in the {proframe. path}/bin/. Before run the script, you need to reboot JEUS server. Then, run the script. using the following command.
$ ./run_first.sh
If there is no error, the script. will show you "upload success !!" messages. During this process, the script. insert some data into the database. If you log in the database system using the accout created for ProFrame, you can see the newly created tables.
 Newly created tables
Then, installation process is done! Please restart your JEUS server and you can play with the ProFrame
Meta-data Correction
After the installation, there is another minor issue which should be fixed before we use ProBuilder and ProFrame. To do this, we need to correct some database contents in manual way.
Once you open the list of tables created by the ProFrame. installer, find out the "DEV_RESOURCE" and "DEV_PROPERTY" tables. Then switch the physical name and logical name of the following items.
While ProFrame. 4 Java installation, installer will create tables and insert data into them. Therefore, ProFrame. 4 Java installer will ask Oracle database information. For this purpose, we need to create separte database account.
Let's do this first. Open the Oracle web admin, and log in using the proper account information.
 Oracle Web Admin Page
Once you logged in the page, you can see the following figure. To add new account select down arrow located on the left side of the Administration button.
 Oracle Web Admin Home page
Then, select "Creating User" menu by selecting Database Users as shown in following figure.
 Oracle Web Admin "Create User" menu
Then, input the account information. Please assign all privileges as long as it is not problem. Basically, the account should be able to manage tables and data contents.
 Creating New account in the Oracle Web Admin
Once you successfully create an account, you can jump to next section.
ProFrame. 4 Java installation
After you get the ProFrame. 4 Java installer, please run it using the following command
$ ./ProFrame4_0Server_unix_generic.bin
To begin with, you will see the license information screen. Then, the installer will ask path for ProFrame. In my case, I just use default path (/root/proframe/). Next, it will ask you WAS type and path of the installed WAS. Then, select default settings if there is no restriction except IP address. For the IP address, please input your IP address instead of 127.0.01. Actually, it is not strict options but recommended.
Sonner or later, the installer will ask about database information. Please input the account information accoridng to previous section. When it comes to the Oracle SID, just input XE if you also install Oracle 10g Express Edition.
After selecting several default settings options, you can see the installing process screen.
Configuration
After the installation process, the installer will notify you to configure using run_first.sh script. in the {proframe. path}/bin/. Before run the script, you need to reboot JEUS server. Then, run the script. using the following command.
$ ./run_first.sh
If there is no error, the script. will show you "upload success !!" messages. During this process, the script. insert some data into the database. If you log in the database system using the accout created for ProFrame, you can see the newly created tables.
 Newly created tables
Meta-data Correction
After the installation, there is another minor issue which should be fixed before we use ProBuilder and ProFrame. To do this, we need to correct some database contents in manual way.
Once you open the list of tables created by the ProFrame. installer, find out the "DEV_RESOURCE" and "DEV_PROPERTY" tables. Then switch the physical name and logical name of the following items.
- Dbio Total Count
- Dbio Fetch Seq
- Dbio Fetch Size
- Dbio Affected Count

来自 “ ITPUB博客 ” ,链接:https://blog.itpub.net/672726/viewspace-555301/ ,如需转载,请注明出处,否则将追究法律责任。
上一篇:
软件测试文档
下一篇:
Proframe Operation

请登录后发表评论
登录
全部评论
